Table of Contents
Advertisement
Advertisement
Table of Contents

Related Manuals for Silvercrest SDABC 1 A2


Summary of Contents for Silvercrest SDABC 1 A2
- Page 1 DAB+ RADIO SDABC 1 A2 DAB+ RADIO Operation and safety notes IAN 374053_2104...
- Page 2 GB/IE/NI Page...
- Page 3 1a ] 1b ] 1c ] 1g ] 1f ] 1e ] 1d ]...
- Page 4 10 ] 11 ] 12 ] 13 ] 14 ] 15 ]...
-
Page 5: Table Of Contents
Warnings and symbols used . . . . . . . . . . . . . . Page Introduction . . . . . . . . . . . . . . . . . . . . . . . . . . . . . . . . . Page 10 Intended use . - Page 6 Operation . . . . . . . . . . . . . . . . . . . . . . . . . . . . . . . . . . . . Page 40 Adjusting the volume .
-
Page 7: Warnings And Symbols Used
Warnings and symbols used The following warnings and symbols are used in these operating instructions, the device, the quick start guide and on the packaging: DANGER! This symbol in combination with the signal word “Danger” marks a high‑risk hazard that if not prevented could result in death or serious injury . - Page 8 WARNING! EXPLOSION HAZARD! A warning with this symbol and word “WARNING! EXPLOSION HAZARD” indicates the potential threat of explosion . Failure to observe this warning may result in serious or fatal injuries and potential property damage . Follow the instructions in this warning to prevent serious injuries, a danger to life or property damage! NOTE: This symbol in combination with “Note”...
- Page 9 Use the product in dry indoor spaces only . This symbol refers to the special rules of conduct associated with children . Risk of hearing damage Symbol for a Protection Class II product . Polarity of barrel connector UKCA mark indicates conformity with relevant Great Britain regulations applicable for this product (The UKCA mark logo is valid in Great Britain only) .
-
Page 10: Introduction
DAB+ RADIO ˜ Introduction We congratulate you on the purchase of your new product . You have chosen a high quality product . The instructions for use are part of the product . They contain important information concerning safety, use and disposal . -
Page 11: Scope Of Delivery
4 Battery (type 1,5 V, LR6, AA) 1 Instructions for use 1 Quick start guide ˜ Trademark notice The SilverCrest trademark and trade name is the property of their respective owners . Any other names and products are trademarks or registered ... -
Page 12: Description Of Parts
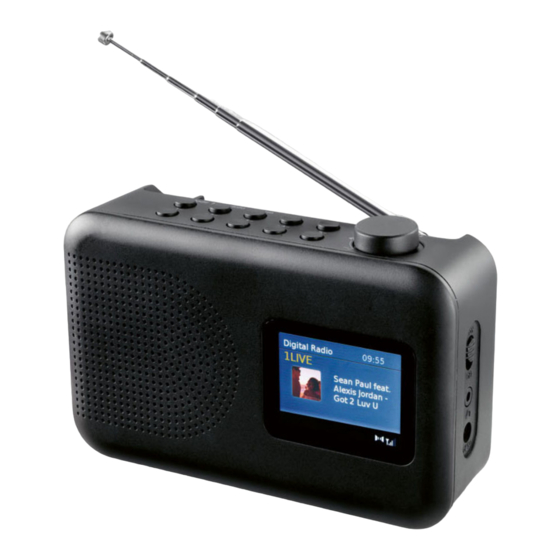
˜ Description of parts Please refer to the fold out page . LCD display Power adaptor port Radio mode Battery compartment 1a ] (Digital Radio or FM) Time Antenna 1b ] /Mode button (Signal strength) 1c ] (power/mode) Menu/Info button (Preset) 1d ] Alarm button... -
Page 13: Technical Data
˜ Technical data DAB+ radio Frequency range DAB+: 174 .928 to 239 .2 MHz Frequency range FM: 87 .5 to 108 MHz Output: 10 W (1 W RMS) Dimensions (W x H x D): approx . 16 .1 x 10 .9 x 5 .6 cm (with antenna) Weight: approx . - Page 14 Power adaptor Description Value OWIM GmbH & Co . KG District court Stuttgart: HRA 721742 Distributor: Stiftsbergstraße 1 74167 Neckarsulm Germany Manufacturer’s name: Xiamen Xdroid Technology Co ., Ltd . EU version: XZ0500‑1000VG Model identifier: UK version: XZ0500‑1000V Input voltage: 100–240 V ~ Input AC frequency: 50/60 Hz...
-
Page 15: Safety Notes
Safety notes BEFORE USING THIS PRODUCT, PLEASE FAMILIARISE YOURSELF WITH ALL OF THE SAFETY NOTES AND INSTRUCTIONS FOR USE! PLEASE ALSO INCLUDE ALL DOCUMENTATION WHEN PASSING THIS PRODUCT ON TO OTHERS! DANGER! RISK OF DEATH AND ACCIDENTS FOR TODDLERS AND CHILDREN! Packaging materials are not a toy . - Page 16 If you notice anything unusual during use (e .g . unusual noise, strange odour or smoke), switch the product off immediately and unplug the power adaptor from the mains socket and, 15 ] if applicable, remove the batteries . Afterwards, do not use the product until it has been examined by a qualified person .
- Page 17 CAUTION! High sound pressure! Be careful when using the headphones . Using headphones for a long period of time and at high volume can lead to hearing damage to the user . Always set the volume to a low level first and adjust it to a comfortable level .
- Page 18 Never immerse the product and the power adaptor in water or 15 ] other liquids . Do not use the product in very humid rooms, e .g . kitchen, bathroom or sauna . This product is only intended for use in dry locations and ...
-
Page 19: Safety Instructions For Batteries
ATTENTION! RISK OF PROPERTY DAMAGE! Always set the product on a sturdy, level surface . It could be damaged if it falls . Do not place heavy objects on the product . Do not place heavy objects, e .g . furniture, on the cable . ... - Page 20 DANGER OF EXPLOSION! Never recharge non‑ rechargeable batteries . Do not short‑circuit batteries and open them . Overheating, fire or bursting can be the result . Never throw batteries into fire or water . Do not exert mechanical loads to batteries . ...
-
Page 21: Before Use
Risk of product damage Only use the specified battery type! Insert the batteries according to the polarity marking (+) and (–) on the battery and the product . Clean the contacts on the battery and inside the battery ... -
Page 22: Inserting/Replacing Batteries
˜ Inserting/replacing batteries Remove the battery compartment lid to open the battery compartment . If applicable, remove the used batteries . Insert 4 batteries (type 1 .5 V, LR6, AA) . Ensure correct polarity . Note the markings inside the battery compartment Reattach the battery compartment lid until it locks into place . - Page 23 Switching the product on/off (power adaptor) Fully extend the antenna for good reception . to the ON position . The product is now in Set the main switch standby mode . The LCD display shows: – Current time 1b ] –...
- Page 24 Switching the product off completely: Set the main switch the OFF position . NOTE: When the power adaptor is plugged into a mains 15 ] socket, it uses a small amount of electricity even if the product is not connected to the power adaptor or is switched off . Switching the product on/off (battery‑powered) Fully extend the antenna for good reception .
-
Page 25: Menu Navigation Using The Jog Dial
NOTES: The station list is automatically saved so the product does not need to scan for DAB+ stations the next time it is switched on . After being switched on, the product automatically starts playing the last DAB+ station selected . You can manually scan for DAB+ stations anytime or start an ... -
Page 26: Changing Radio Modes
˜ Changing radio modes You can toggle between DAB+ and FM mode . /Mode With the product in DAB+ mode, press to switch to shows FM . FM mode . The LCD display /Mode Press again to return to DAB+ mode . The LCD ... -
Page 27: Menu Options Via The Menu/Info Button
˜ Menu options via the Menu/Info button You can use Menu/Info to configure various basic settings on the product . Open the menu options: Press and hold Menu/Info for approx . 2 seconds . Navigate through the menu options: Turn the jog dial left or 13 ] ... - Page 28 DAB+ mode: Menu options Menu option Available Function settings Station List Shows the Scroll through the station list: station list in the Turn the jog dial left or 13 ] LCD display right . Select a station . Confirm selection: ...
- Page 29 Menu option Available Function settings Preset Save Displays the Scroll through the list of saved used/free stations: memory slots Turn the jog dial left or 13 ] right . Save a station or overwrite a memory slot: Press the jog dial 13 ] Manual Manual...
- Page 30 Menu option Available Function settings Prune Customise You can erase DAB+ stations Invalid radio stations from the station list if they (Yes/No) cannot be received in your current region (e .g . when on holiday) . Select whether you would like ...
- Page 31 Menu option Available Function settings System Sleep Time setting for the sleep Settings timer (see “Setting the sleep timer (switch‑off time)“) Time/Date Sets the time and date (see “Setting the clock“) Backlight Sets the lighting of the LCD ...
- Page 32 FM mode: Menu options Menu option Available Function settings Start station In FM mode you can scan? automatically search for (Yes/No) stations . Turn the jog dial left . 13 ] Select Yes . Confirm selection: Press the jog dial 13 ] Preset Recall Displays...
- Page 33 Menu option Available Function settings Preset Save Displays Scroll through the list of saved the used/ stations: free memory Turn the jog dial left or 13 ] slots right . Confirm selection: Press the jog dial 13 ] The station is saved or a ...
- Page 34 Menu option Available Function settings Audio Stereo In FM mode you can select Setting Mono whether radio stations are Stereo received in or in Mono . Select one of the available setting options: Turn the jog dial left or 13 ] right .
- Page 35 Menu option Available Function settings System Sleep Time setting for the sleep Settings timer (see “Setting the sleep timer (switch‑off time)“) Time/Date Sets the time and date (see “Setting the clock“) Backlight Sets the lighting of the LCD ...
-
Page 36: Setting The Language
˜ Setting the language In this menu option you can choose from the following 12 languages: Danish French Polish Dutch German Portuguese English Italian Spanish Finnish Norwegian Swedish Open the menu options: Press and hold Menu/Info for approx . 2 seconds . System Settings Select in the menu: Turn the jog dial... -
Page 37: Setting The Clock
NOTE: If no entry is made or button pressed, the product automatically returns to playback mode after approx . 30 seconds . ˜ Setting the clock Open the menu options: Press and hold Menu/Info for approx . 2 seconds . System Settings Select in the menu: Turn the jog dial... -
Page 38: Setting The Display Light
Navigate through the menu options: Turn the jog dial left or 13 ] right . Confirm selection: Press the jog dial 13 ] Select your preferred settings: Turn the jog dial left or right . 13 ] Confirm selection: Press the jog dial 13 ] ... - Page 39 Menu option Available Function settings On Level High Brightness of LCD Medium display Dim Level High Brightness of LCD Medium display in dimmed state Open the menu options: Press and hold Menu/Info for approx . 2 seconds . System Settings Select in the menu: Turn the jog dial...
-
Page 40: Operation
Return to the menu options for other settings: Press Menu/ Info again . Return to playback mode: Repeatedly press Menu/Info until the product is in playback mode again . NOTE: If no entry is made or button pressed, the product automatically returns to playback mode after approx . -
Page 41: Dab+ Station Scan
˜ DAB+ station scan We recommend regularly repeating the DAB+ station scan to be able to save current DAB+ stations to the station list of the product . This particularly applies when changing locations, e .g . after moving or on holiday . -
Page 42: Seek/Change Fm Station
Selecting a DAB+ station Verify the product is in DAB+ mode . In DAB+ mode, the LCD Digital Radio . display shows Open the station list using . The DAB+ stations 11 ] 12 ] found are shown in the station list in numerical and alphabetical order . -
Page 43: Saving A Dab+ Station/Fm Station
Scan the frequency band for stations: Press and hold 11 ] 12 ] The product stops scanning when a station has been found . You can also manually scan the frequency band in 0 .05 MHz increments: Press several times in quick succession . -
Page 44: Function)
Display Memory slot Name of the saved station Already in use Empty Free memory slot Confirm selection: Press the jog dial 13 ] The current station selection is saved to the memory . NOTE: After saving, the one‑touch buttons are automatically 14 ] to 5 . -
Page 45: Selecting A Saved Dab+/Fm Station
˜ Selecting a saved DAB+/FM station To be able to access the respective memory of DAB+ or FM stations, the product must be in the respective radio mode (see “Changing radio modes”) . Open the menu options: Press and hold Menu/Info ... -
Page 46: Overwrite Saved Stations
˜ Overwrite saved stations You can reassign a memory slot that is already in use both in DAB+ and FM mode . Play the radio station you wish to save . Open the menu options: Press and hold Menu/Info ... -
Page 47: Setting The Sleep Timer (Switch-Off Time)
˜ Setting the sleep timer (switch‑off time) You can set the product to automatically switch off after a specified number of minutes . Open the menu options: Press and hold Menu/Info for approx . 2 seconds . System Settings Select in the menu: Turn the jog dial left... -
Page 48: Setting The Alarm/Snooze
Confirm selection: Press the jog dial 13 ] Sleep Select in the menu: Turn the jog dial left or right . 13 ] Scroll through the available sleep timer options: Turn the jog dial left or right . 13 ] Select Off . - Page 49 Menu option Available Function settings Alarm Turn the alarm on or off: Press the jog dial 13 ] Frequency Set the alarm Workday frequency: Weekend Turn the jog dial 13 ] Week left or right . ...
- Page 50 Menu option Available Function settings Wake Up time Day–Month‑ Set the date and time Year (only of your chosen alarm: available in Turn the jog dial 13 ] day mode) left or right . Hours: Select the desired ...
- Page 51 Menu option Available Function settings Source Buzzer Select a source for the Digital alarm: Radio Turn the jog dial 13 ] left or right . Select the desired settings . Confirm selection: Press the jog dial 13 ] GB/IE/NI...
- Page 52 Menu option Available Function settings Station Last Select which radio Listened (This menu option station should play only appears if Memory slots: when the alarm goes Digital Radio 1–30 off: were Turn the jog dial 13 ] previously selected left or right .
- Page 53 Menu option Available Function settings Duration 15, 30, 45, Set the duration of the 60, 90, alarm: Turn the jog dial 13 ] left or right . Select the desired settings (duration in minutes) . Confirm selection: ...
-
Page 54: Connecting Headphones
Navigate through the settings: Turn the jog dial left or right . 13 ] Confirm each selection: Press the jog dial 13 ] Return to the menu options and select other settings: Press Menu/ Info Repeat these steps for the second alarm to customise settings, e .g . ... -
Page 55: Displaying Information In The Lcd Display
CAUTION! Using headphones at high volume for a long time can damage your hearing . Plug the headphones connector into the headphones jack (3 .5 mm jack) . The speaker automatically switches off . ˜ Displaying information in the LCD display You can have different types of information displayed in the LCD . - Page 56 Display DAB+ Battery level (only on battery Signal strength / stability 1c ] power): Battery capacity in percent . Kbps display (Kilobit per Main switch (only in operation second): Transmission speed with power adaptor): Display shows the product is powered via the power adaptor .
-
Page 57: Factory Reset
˜ Factory reset You can reset the product in network operation at any time and restore the original factory settings . NOTE: The factory reset will erase all settings, including the station presets and the station list . Open the menu options: Press and hold Menu/Info ... -
Page 58: Cleaning And Care
NOTE: A factory reset is only possible in network operation . If you operate the product using batteries and select in order to carry out a factory reset, the LCD display displays the All settings will be restored to factory warning message defaults! Are you sure? Connect the product to the mains... -
Page 59: Troubleshooting
˜ Troubleshooting Problem Possible cause Solution The product The power Plug the power does not switch adaptor is not adaptor into the 15 ] 15 ] on . connected . mains socket . The batteries are Insert new batteries . ... -
Page 60: Glossary
Problem Possible cause Solution There is The station is not set Press 11 ] 12 ] interference correctly . to search for FM in FM radio stations manually . reception . Reception is weak . Fully extend the ... -
Page 61: Simplified Eu Declaration Of Conformity
˜ Simplified EU declaration of conformity Hereby, OWIM GmbH & Co . KG, Stiftsbergstraße 1, 74167 Neckarsulm, GERMANY, declares that the product DAB+ RADIO HG08657A‑BS / HG08657B‑BS is in compliance with Directives 2014/53/EU, 2011/65/EU and 2009/125/EC . The full text of the EU declaration of conformity is available at the following internet address: www .owim .com ˜... -
Page 62: Disposal
˜ Disposal Packaging: The packaging is made of environmentally friendly materials, which may be disposed of through your local recycling facilities . Observe the marking of the packaging materials for waste separation, which are marked with abbreviations (a) and numbers (b) with following meaning: 1–7: plastics / 20–22: paper and fibreboard / 80–98: composite materials . - Page 63 This disposal is free of charge to you. Protect the environment and dispose of properly . The product is recyclable, subject to extended manufacturer responsibility, and collected separately . Batteries: Think about the environment and your personal health . Dispose empty batteries in separate collecting boxes .
-
Page 64: Warranty
˜ Warranty The product has been manufactured to strict quality guidelines and meticulously examined before delivery . In the event of product defects you have legal rights against the retailer of this product . Your legal rights are not limited in any way by our warranty detailed below . The warranty for this product is 3 years from the date of purchase . -
Page 65: Warranty Claim Procedure
˜ Warranty claim procedure To ensure quick processing of your case, please observe the following instructions: Please have the till receipt and the item number (IAN 374053_2104) available as proof of purchase . You will find the item number on the rating plate, an engraving, on the front page of the instructions for use (bottom left), or as a sticker on the rear or bottom of the product . - Page 66 OWIM GmbH & Co. KG Stiftsbergstraße 1 74167 Neckarsulm GERMANY Model No.: HG08657A-BS / HG08657B-BS Version: 12/2021 IAN 374053_2104...