Table of Contents
Advertisement
Quick Links
Advertisement
Table of Contents

Related Manuals for Guilin Woodpecker Medical Instrument Fi-E


Summary of Contents for Guilin Woodpecker Medical Instrument Fi-E
-
Page 2: Table Of Contents
Contents Introduction ------------------------------------------------------------------- 1 1 Product introduction ------------------------------------------------------ 1 2 European authorized representative ----------------------------------- 6 3 Standard icons -------------------------------------------------------------- 7 4 Contraindications ---------------------------------------------------------- 7 5 Installation and disassembly method of accessories ----------------- 7 6 Operation method ---------------------------------------------------------- 8 7 Charging instruction------------------------------------------------------- 11 8 Safety precautions ---------------------------------------------------------- 11 9 Cleaning,Disinfection,Sterilization and Maintenance -------------- 12 10 Troubleshooting ----------------------------------------------------------- 17... -
Page 3: Introduction
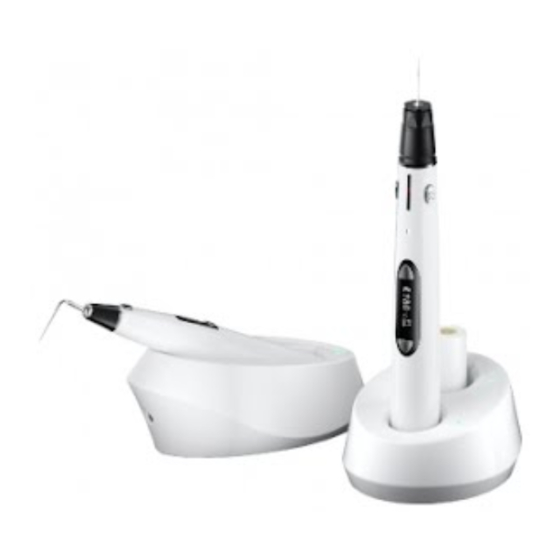
Introduction Thank you for purchase Fi-E Hot Melting and Filling Instrument developed by Guilin Woodpecker Medical Instrument Co., Ltd, a Hi-tech enterprise developing, manufacturing, and selling dental instruments. Woodpecker has excellent Quality Control System. To guarantee correct and safe operation, please read this Instruction Manual carefully before use. - Page 4 1. Gutta Percha Injecting Needle 2. Gutta Percha Injecting Needle Protector 3. Thermal Protector Cap 4. Injecting button 5. Gutta-percha amount level 6. Heating indicator 7. Mode button 8. Injecting speed 9. Preset temperature Level 10.Battery level 11. “ON/OFF” button 12.
- Page 5 Firstly, connect the power adapter plug to the power adapter as shown in Figure 2. Then connect the power adapter to the charging base as shown in Figure 3 and connect the power adapter to a standard socket. Place the Hot Melting and Filling Instrument correctly on the charging base as shown in Figure 4, so that the charging connector under the Hot Melting and Filling Instrument can be reliably connected to the output connector of the...
- Page 6 5) Thermal Protector Cap The design of Thermal Protector Cap is to protect the oral soft tissue and lip from scalding. Note: Before use, please clean, disinfect and sterilize the Thermal Protector 6) Gutta Percha Injecting Needle Note: 1. Store unused Gutta Percha Injecting Needles in a sealed environment, as the Gutta Percha Injecting Needle are made of silver and may discolor due to oxidation caused by long-term exposure to air.
- Page 7 The battery can be replaced quickly and easily. 1.4.2 Scope of applications Only used in endodontic filling with gutta-percha or root canal sealant. Fi-E is equipped with Gutta-Percha Injecting Needle and Thermal Protector Cap to heat up and soften gutta-percha to backfill root canal. 1.5 Product specifications Hot Melting and Filling 25mm×28mm×200mm...
-
Page 8: European Authorized Representative
Hot Melting and Filling 148g Instrument Weight Charging base 179g Power adapter 167g 1.6 Technical parameters Classification Class (AC/DC power adapter) Optional preset 100°C→120°C→150°C→180°C→200°C temperatures Time consumption for About 2.5h (First charging needs 3 h) charging Input AC100V-240V 50/60Hz 800mA Power supply Output DC15V/1.6A... -
Page 9: Standard Icons
3 Standard icons Product serial number Follow instructions for use Manufacturer Date of manufacture Type B applied part Class II device Power switch Ordinary equipment Used indoor only Caution ,hot surface Can be autoclaved DC 15V Rectilinear motion CE marked product Device complies with WEEE directive Attention! Please refer to the accompanying documents. -
Page 10: Operation Method
Note: In order to prevent from scalding, when replace the Gutta Percha Injecting Needle, please first power off and wait for 5 minutes. Only after the heating chamber cools down, the replacement can start. 1.Power off the device and wait for 5 minutes until the Hot Melting and Filling Instrument cools down. - Page 11 1. During use, please do not contact the heating part of the Hot Melting and Filling Instrument. Before use, remember to install the Thermal Protector Cap to prevent users or patients from scalding. 6.1 Choose Gutta Percha Injecting Needle Choose suitable Gutta Percha Injecting Needle (20ga, 23ga or 25ga) according to the situation of patient.
- Page 12 The contents of the mode that can be adjust includes: ① Set preset temperature 100-200°C adjustable, 100°C, 120°C, 150°C, 180°C, 200°C); ② The speed of injecting (fast, medium and slow three gears adjustable); ③ Change the gutta-percha (YES/NO) option, after selecting “YES” ,short press the injecting button to start the gutta-changing procedure, short press the “ON/OFF”...
-
Page 13: Charging Instruction
or avoid the generation of bubbles. Place the needle at the bottom of the root canal, press the injecting button to squeeze out the gutta precha, then slowly withdraw the needle tip until the coronal hole. Warning The maximum temperature of the applied part surface is 97°C . After heating, the glue injection needle should not stay in the oral cavity for more than 5 seconds to prevent scalding the patient. -
Page 14: Cleaning,Disinfection,Sterilization And Maintenance
8.1 Do not use instruments other than the provided wrench to install, disassemble or pre-bent Gutta Percha Injecting Needle. 8.2 Do not knock or scratch the Hot Melting and Filling Instrument. 8.3 Keep heat carrier accessories such as Hot Melting and Filling Instrument, Gutta Percha Injecting Needle, Thermal Protector Cap etc. - Page 15 Needle exceed 30mm. 3.Remove the Gutta Percha Injecting Needle from the handle with the wrench provided by guilin woodpecker medical instrument co., LTD. Then Put them into a clean tray. 4.Wipe and Clean the surface of Gutta Percha Injecting Needle with a clean cloth dipped in cleaning agent until no dirt can be seen on the surface.
- Page 16 1.Pre-wash with pure water at 25°C for 3 minutes. 2.Clean with the condition recommended by the cleaning agent manufacturer for 5 minutes. For example the detergent use RUHOF ENDOZIME AW PLUS WITH APA,Dilution Ratio1: 270, temperature 25°C.Clean for 5 minutes. 3.Rinse twice with pure water at 25°C for 1 minute each.
- Page 17 (For example, pure water that is in accordance with the European Pharmacopoeia or the United States Pharmacopoeia). d) The air used for drying must be filtered by HEPA. e) Regularly repair and inspect the disinfector. 9.5 Drying If your cleaning and disinfection process does not have an automatic drying function, dry it after cleaning and disinfection.
- Page 18 9.8 Sterilization Use only the following steam sterilization procedures (fractional pre- vacuum procedure*) for sterilization, and other sterilization procedures are not recommended: 1.The steam sterilizer complies with EN13060 or is certified according to EN 285 to comply with EN ISO 17665; 2.The sterilization time is 5 minutes at a temperature of 134°C and a pressure of 2.0 bar ~ 2.3 bars.
-
Page 19: Troubleshooting
2.It should not be mixed with dangerous goods during transportation. 3.Avoid exposure to sun or rain or snow during transportation. 9.11 The cleaning and disinfection of Hot Melting and Filling Instrument and charging base . 1.Before each use, wipe the surface of the Hot Melting and Filling and charging base with a soft cloth or paper towel soaked in 75% medical alcohol. -
Page 20: After-Sales Service
1. The push ram has been pushed to the end, 1. Pull back the pushing indicating that the gutta- ram and load a new gutta- Gutta-percha cannot flow percha has run out. percha stick. out from the needle 2. The pushing ram seal 2. -
Page 21: Emc-Declaration Of Comformity
Guidance and manufacturer’s declaration - electromagnetic emissions The model Fi-E is intended for use in the electromagnetic environment specified below. The customer or the user of the model Fi-E should assure that it is used in such an environment. Emissions test... - Page 22 Conducted RF & Radiated RF Guidance & Declaration - Electromagnetic immunity The model Fi-E is intended for use in.the electromagnetic environment specified below. The customer or the user of the models Fi-E should assure that it is used in such an environment. Immunity...
- Page 23 To assess the electromagnetic environment due to fixed RF transmitters, an electromagnetic site survey should be considered. If the measured field strength in the location in which the model Fi-E is used exceeds the applicable RF compliance level above, the model Fi-E should be observed to verify normal operation. If...
-
Page 24: Statement
RF communications equipment and the model Fi-E The model Fi-E is intended for use in electromagnetic environment in which radiated RF disturbances is controlled. The customer or the user of the model Fi-E can help prevent electromagnetic interference by maintaining a minimum distance... - Page 25 ZMN-SM-453 V1.0-20220224...
Need help?
Do you have a question about the Fi-E and is the answer not in the manual?
Questions and answers