
Related Manuals for Guilin Woodpecker Medical Instrument Ai-Pex


Summary of Contents for Guilin Woodpecker Medical Instrument Ai-Pex
- Page 1 Apex locator Instruction Manual Please read this manual before operating. Industrial design patent No.: ZL 201930704918.8...
-
Page 2: Table Of Contents
Contents 1 Introduction ....................1 2 Notice of installing and using the device ............ 5 3 Installation of the device ................7 4 Product function and operation ..............17 5 Trouble shooting ..................22 6 Cleaning, Disinfection and Sterilization ............ 25 7 Storage, maintenance and transportation .......... -
Page 3: Introduction
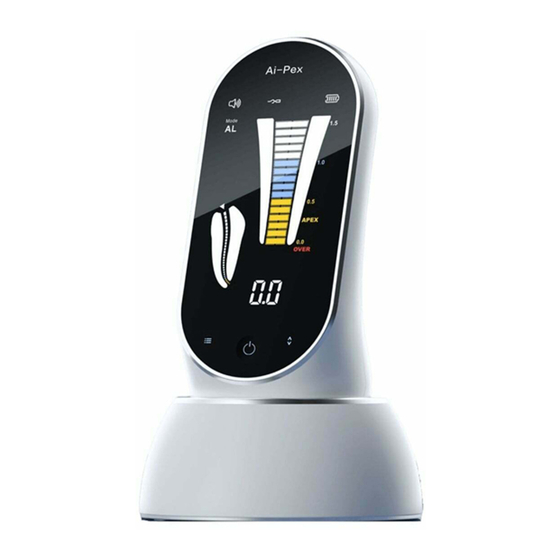
1 Introduction 1.1 Foreword Guilin Woodpecker Medical Instrument Co., Ltd. is a professional manufacturer in researching, developing and producing dental equipment which has a wholesome quality assurance system. Products include ultrasonic scaler, curing light, apex locator and ultrasurgery, etc. 1.2 Description of the device... - Page 4 1.4 Components 1.4.1 Picture of the main unit. ( Picture 1 ) APEX OVER Picture 1...
- Page 5 1.4.2 Pictures of the main accessories ( Picture 2 ) Picture 2 1.5 Structure Is composed of main unit, measuring wire, lip hooks, file clip, touch probe, adapter, Pulp tester probe, etc.. 1.6 Intended use This equipment applies to the measurements below: 1.6.1 Used to help determine the working length of various types of dental root canals during root canal treatment.
- Page 6 1.7 Contraindication We do not advise the use of the model on patients fitted with pacemakers (or other electrical equipment) or on those patients who are advised not to use the electric equipment (like electric shaver, electric blower) for safety reasons. 1.8 The classification of the device 1.8.1 Type of protection against electric shock: Class Ⅱ...
-
Page 7: Notice Of Installing And Using The Device
c) Atmosphere pressure: 70kPa ~ 106kPa 2 Notice of installing and using the device 2.1 Please read the instruction manual carefully before the operation. 2.2 When the indicating bar reaches the position of the dial 0.0, and there is "APEX" on screen, the endo file has reached the anatomical apical foramen. To guarantee the safety, the work length is clinically obtained by subtracting 0.5-1mm from the length measured by the Apex locator. - Page 8 long time. 2.10 Please recharge the battery when low battery indicator flashes. 2.11 Please use original components, the components made by other companies may cause inaccurate measurement or un-measurable. 2.12 Avoid the connection between the outside and inside liquid of endodontic during measuring in order to avoid the measuring difference.
-
Page 9: Installation Of The Device
2.21 Error in replacing lithium batteries can lead to unacceptable risks, so use the original lithium battery and replace the lithium battery according to the correct steps in the instructions. 2.22 Please to remove the battery if the me equipment is not likely to be used for some time. - Page 10 wire. When the Apex Locator is used alone, there is no difference between the gray end and the white end of measuring wire [Picture 3]. But if the Apex Locator is connected to the Endo Motor, please connect the white end with the lip hook and the gray end is suspended.
- Page 11 Mode OVER c) Make sure if the file clip and lip hook are connected well to the measuring wire. d) Make the lip hook touch the bent wire of the file clip [as showed in Picture 5] make sure the connection icon on the LCD screen shows steadily [as showed in Picture 6], otherwise, it means that the file clip or the measuring wire is damaged, should be replaced.
- Page 12 Mode OVER Picture 7 * The working length will differ somewhat depending on each individual tooth. This discrepancy must be judged by the dentist as he/she works on the tooth. * Make sure to take an X-ray to check the results. 3.1.4 Apical Stop Setting Set the Apical Stop between 0.0 and 0.5 by pressing the middle button, and the set parameter will be automatically saved.
- Page 13 Picture 8 3.1.5 Testing the device by tester(Test every two weeks) Users can use the tester to check if the device work properly, specific operation is as follows: a) Pulling out the the measuring wire and turn off the device.
- Page 14 Mode APEX Picture 9 b) Insert the tester. c) After powered on, If the indicating bar indicates within ±1 bars away from the dial 0.0 the device functions normally [Picture 9]. If the indicating bar is outside the range, the device cannot measure accurately. On this occasion, please contact authorized distributor or manufacturer for help.
- Page 15 Picture 10 【 Cautions 】 : ① Please use the Apex locator carefully and do not drop it or hit it. Careless use may bring risk of damage to the machine or malfunction. ② If the USB wire was not completely plugged into the USB socket, the Apex locator cannot communicate with the Endo Motor.
- Page 16 3.2.1 How to use the pulp test function: 1. The purpose of the test should be explained to the patient to eliminate unnecessary nervousness and to win the patient's cooperation. The patient should also be instructed to raise his or her hand immediately when there is a feeling of tingling.
- Page 17 4. Select the volume and pulse level by pressing the mode button, and then adjust the volume and pulse speed by pressing the adjustment button. 5. Isolate the tooth under test from moisture and blow to dry the tooth surface. If there is calculus at the tooth neck, it must be cleaned.
- Page 18 3.2.2 Possible causes of false positive results of pulp test 1.The probe touches a large area of the metal restoration or the gums, causing the current to flow to the periodontal tissue. 2. Insufficient moisture isolation or drying of the tested tooth causes current leakage to periodontal tissue.
-
Page 19: Product Function And Operation
relevant contraindications in section 1.7 for details. 4 Product function and operation 4.1 Usage requirements Apex locator should be precise, repeatable, and easy to operate. The following requirements are necessary besides the proper operation method. 4.1.1 The operation should be according to the manual. 4.1.2 The dentists should have the knowledge of teeth position and average length and the skill to operate the device. - Page 20 b) Bleeding or the blood overflow from the apical foramen. In this case, the blood will overflow from the root canal and reaches gingival that the blood and the gingival will be on a conducting state which will cause an inaccurate result while measuring.
- Page 21 Picture 15 Picture 16 Picture 17 Sometimes, the results of the Apex Locator and X-rays do not meet each other,which is neither bdcause the machine is not normal, nor the photo is incorrect taken.The actual position of the apical foramen is different from the anatomical one, it is very common that the apical foramen slightly to the side of the root canal crowns.In this case, according to the shooting angle as the belowing picture show,...
- Page 22 reference electrode [Picture 19]. 4.2.5 Clip the file with file clip, approach to the apex, then there will be continuous alarm when the distance is less than 2mm [Picture 20]. Picture 19 Picture 20 Attention: a) When gripping the root canal with a canal file, please grip the upper of the metal part (near the root canal at the needle handle).
- Page 23 Picture 21 Picture 22 4.2.6 When the file reaches the apex, adjust the rubber piece set on the endo file to the reference point (incisal edge or fossa edge), then pull out the endo file, measure the length between the top of the file and the rubber piece, and this is the working length of the tooth.
-
Page 24: Trouble Shooting
5 Trouble shooting Problems Possible cause Solutions 1. If the battery is placed No power and no signal on correctly? 1. Re-install the battery. the screen after the power on. 2. If the battery with no 2. Recharge the battery. power? 1. - Page 25 Problems Possible cause Solutions If the connection between the Make sure the lip hook has contacted the lip hook and the oral mucosa oral mucosa at a good position. is ok? Blood, liquid overflow from the root canal, Is there a blood/saliva glued to the crown or the tooth neck, overflowing, glued to the will cause short-circuit then cause the in-...
- Page 26 Problems Possible cause Solutions If there is still pulp in the root If there is much pulp left in the root canal, canal? the root canal length can’t be measured correctly. Once the needle touched the metal If the needle touched the repaired material, current measurement metal repaired material? from the gums to the periodontal tissue...
-
Page 27: Cleaning, Disinfection And Sterilization
Problems Possible cause Solutions Display not steady while Are there cysts apical? If there has cysts, the length of root canal measuring: the measurement can’t be measured accurately. result is rather longer or Whether the file clip is not Clean the file clip by alcohol, or replace it. shorter;... - Page 28 renewed preparation for use, thermal and chemical stresses will result in ageing of the products. The specified maximum times of sterilization for File clip is 200 times. The specified maximum times of sterilization for Touch probe and Lip hook is 1000 times.
- Page 29 Automated Cleaning: Use a washer-disinfector meeting the requirements of the ISO 15883 series. Put the instrument into the machine on a tray. Connect the instrument with the WD by using suitable adapter and start the program: • 4 min pre-washing with cold water (<40°C); •...
-
Page 30: Storage, Maintenance And Transportation
cavities of instruments by using sterile compressed air. 6.8 Functional Testing, Maintenance: Visual inspection for cleanliness of the instruments and reassembling. Functional testing according to instructions of use. If necessary, perform reprocessing process again until instruments is visibly clean. Before packaging and autoclaving, make sure that the file clip, touch probe and lip hook has been maintained acc. - Page 31 life of electronic components, damage battery, reshape or melt some plastic. 7.1.3 Avoid the storage in a too cold condition. Otherwise, when the temperature of the equipment increases to a normal level, there will be dew that will possibly damage PCB board. 7.2 Maintenance 7.2.1 This device do not include accessories for repair usage, the repair should be carried out by authorized person or authorized after service center.
-
Page 32: Environmental Protection
8 Environmental protection Please dispose according to the local laws. 9 European authorized representative 10 After service From the date this equipment has been sold, based on the warranty card, we will repair this equipment free of charge if there are quality problems. Please refer to the warranty card for the warranty period. -
Page 33: Statement
All rights of modifying the product are reserved to the manufacturer without further notice. The pictures are only for reference. The final interpretation rights belong to GUILIN WOODPECKER MEDICAL INSTRUMENT CO., LTD. The industrial design, inner structure, etc, have claimed for several patents by WOODPECKER, any copy or fake product must undertake legal responsibilities. - Page 34 2 for EMC. This does not guarantee in any way that this device will not be effected by electromagnetic interference Avoid using the device in high electromagnetic environment. Guidance and manufacturer’s declaration - electromagnetic emissions The model is intended for use in the electromagnetic environment specified below. The customer or the user of the model should assure that it is used in such an environment.
- Page 35 Guidance & Declaration - electromagnetic immunity The model is intended for use in the electromagnetic environment specified below. The customer or the user of the model should assure that It is used in such an environment . IEC 60601 test Electromagnetic environment Immunity test Compliance level...
- Page 36 Surge ±1 kV line to line ±2kV for power Mains power quality should be IEC 61000-4-5 ±2 kV line to earth supply lines that of a typical commercial or ±1kV for hospital interconnecting environment. cable Voltage dips, short <5 % UT <5 % Ur Mains power quality should be interruptions and...
- Page 37 Immunity IEC 60601 test Compliance Electromagnetic environment - guidance test level level C o n d u c t e d 3 Vrms Portable and mobile RF communications l E C 150 kHz to 80 3 V/m equipment should be used no closer to any 61000-4-6 part of the model, including cables, than the Radiated RF...
- Page 38 Field strengths from fixed transmitters, such as base stations for radio (cellular/cordless) telephones and land mobile radios, amateur radio, AM and FM radio broadcast and TV broadcast cannot be predicted theoretically with accuracy. To assess the electromagnetic environment due to fixed RF transmitters, an electromagnetic site survey should be considered. If the measured field strength in the location in which the model is used exceeds the applicable RF compliance level above, the model should be observed to verify normal operation.
- Page 39 For transmitters rated at a maximum output power not listed above, the recommended separation distanced in meters (m) can be estimated using the equation applicable to the frequency of the transmitter, where Pis the maximum output power rating of the transmitter in watts (W) accordable to the transmitter manufacturer.
- Page 40 Serial Number Accessories name Cable length Whether shielding adapter measuring wire file clip 4. Cautions:The use of accessories, transducers and cables other than those specified, with the exception of transducers and cables sold by Guilin Woodpecker Medical Instrument Co., Ltd. as replacement parts for internal components, may result in increased Emissions or decreased Immunity of the model.
- Page 41 ZMN-SM-272 V1.1-20210702...
Need help?
Do you have a question about the Ai-Pex and is the answer not in the manual?
Questions and answers