Table of Contents
Advertisement
Volt 1 Hardware Manual
This article contains complete instructions for Volt 1 USB audio
interface hardware controls and connections.
Note: To learn how to set up Volt with audio software and how to
redeem your bundled software, please see the
Manual.
Article Contents
Getting Started
•
Introduction & Overview
•
Hardware Descriptions
•
Troubleshooting
•
Getting Started
Volt Software
Advertisement
Table of Contents

Related Manuals for Universal Audio Volt 1


Summary of Contents for Universal Audio Volt 1
- Page 1 Volt 1 Hardware Manual This article contains complete instructions for Volt 1 USB audio interface hardware controls and connections. Note: To learn how to set up Volt with audio software and how to redeem your bundled software, please see the Volt Software Manual.
-
Page 2: Introduction And Overview
— and our goal is to make your investment pay off. Universal Audio’s family of audio interfaces represent the best examples of what UA has stood for over its long history; from its original founding in the 1950s by my father, to our current vision of delivering the best of both analog and digital audio technologies. - Page 3 Few sounds can compare to a vintage Universal Audio 610 tube preamp, as used to record everyone from Ray Charles to Van Halen to Arcade Fire. Volt 1 gives you the rich, full sound of this classic UA mic/line/instrument preamp, thanks to its built-in tube emulation circuitry, a UA exclusive.
-
Page 4: Key Features
Easy In, Easy Out Volt 1 gives you simple 1-in/2-out audio connections. Just plug in a mic or instrument to the front panel. Then connect your speakers or headphones to monitor your audio with no latency. With Volt, you’ll be creating like a pro, fast. -
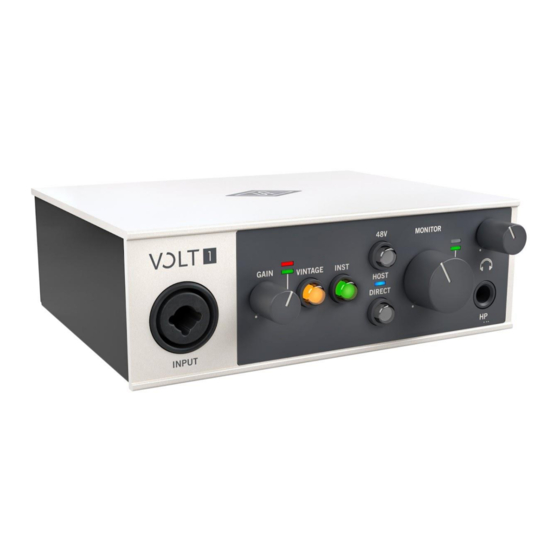
Page 5: Front Panel
Internet connection for software downloads • iPad & iPhone iPadOS / iOS 14 or later • Volt 1 Hardware Descriptions All hardware controls, connections, and indicators are explained in this section. Front Panel (1) XLR/TRS combo input Connect your microphone, instrument, or line level source here. - Page 6 A microphone is typically connected with an XLR connector, and an instrument or line level signal is connected with a ¼” (6.35 mm) TS or TRS plug. Preamp gain and impedance automatically adjusts for line or mic signals, based on whether the plug is XLR or ¼”, along with the state of the INST button.
-
Page 7: Phantom Power Button
Preamp can be used on mic, line, and instrument inputs. The Vintage Preamp adds a carefully crafted analog tube preamp emulation, inspired by Universal Audio’s all-tube 610 console preamplifier, to the sound. When the button is lit orange, the circuit is active. -
Page 8: Headphone Output
Rotate this knob to adjust the volume of speakers connected to the Monitor outputs. The output signal level meters indicate the output levels. (7) Headphone Output Connect stereo headphones to this output. Headphones are connected with a ¼” (6.35 mm) TRS plug. If your headphones have a ⅛”... -
Page 9: Host Indicator
Use direct monitoring on Volt to hear your input signals with no delay in your headphones and monitor speakers. With direct monitoring, you hear the input signals directly from the Volt hardware with no delay or latency, bypassing your audio software’s buffers When you monitor input signals through your audio software, those signals pass through the software before you hear them... -
Page 10: Monitor Outputs
The rear panel is used to make audio output connections, the USB connection to the computer, and MIDI connections. (11) Monitor Outputs Connect your stereo speaker system to the monitor outputs. Connect the left speaker to Monitor 1/L and the right speaker to Monitor 2/R. -
Page 11: Power Switch
For example, you can connect with a USB-C to USB-C cable if your computer has a USB-C port. For iOS or iPad devices, connect the interface with a USB-C cable (iPads with USB-C) or with the Apple Lightning to USB Camera Adapter (other iPadOS and iOS devices). - Page 12 When recording, you can use dropouts, direct monitoring to record without latency at glitches higher buffer sizes. (PC) ASIO driver not Install the Volt hardware driver with the UA available in Connect app. Volt 1 Specifications For Volt 1 specifications, please...
Need help?
Do you have a question about the Volt 1 and is the answer not in the manual?
Questions and answers