Advertisement
Volt 476 Hardware Manual
This article contains complete instructions for Volt 476 hardware controls
and connections.
Note: To learn how to set up Volt with audio software and how to redeem
your bundled software, please see the
Article Contents
Getting Started
•
Introduction & Overview
•
Hardware Descriptions
•
Troubleshooting
•
Volt Software
Manual.
Advertisement
Table of Contents

Related Manuals for Universal Audio Volt 476


Summary of Contents for Universal Audio Volt 476
- Page 1 Volt 476 Hardware Manual This article contains complete instructions for Volt 476 hardware controls and connections. Note: To learn how to set up Volt with audio software and how to redeem your bundled software, please see the Volt Software Manual.
-
Page 2: Getting Started
— and our goal is to make your investment pay off. Universal Audio’s family of audio interfaces represent the best examples of what UA has stood for over its long history; from its original founding in the 1950s by my father, to our current vision of delivering the best of both analog and digital audio technologies. - Page 3 USB interface in its class. Get Classic Sounds with Vintage Mic Preamp Mode Few sounds can compare to a vintage Universal Audio 610 tube preamp, as used to record everyone from Ray Charles to Van Halen to Arcade Fire.
-
Page 4: Key Features
Volt 476 gives you simple 4-in/4-out audio connections. Just plug your mics, guitars, or synths into the front panel. Then connect your speakers or headphones to monitor your audio with no latency. With Volt, you’ll be producing like a pro, fast. -
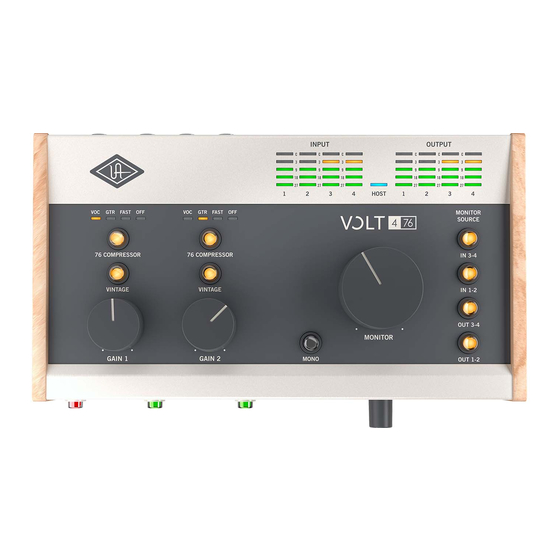
Page 5: Front Panel
Internet connection for software downloads • iPad & iPhone iPadOS / iOS 14 or later • Volt 476 Hardware Descriptions All hardware controls, connections, and indicators are explained in this section. Front Panel (1) XLR/TRS Combo Inputs Connect your microphones, instruments, or line level sources here. The... -
Page 6: Headphone Volume Knob
A microphone is typically connected with an XLR connector, and an instrument or line level signal is connected with a ¼” (6.35 mm) TS or TRS plug. Preamp gain and impedance automatically adjusts for line or mic signals, based on whether the plug is XLR or ¼”, along with the state of the INST button. -
Page 7: Top Panel
(4) 48V Phantom Power Button Press this button to toggle 48V phantom power at the XLR microphone inputs. The LED blinks red while phantom power is activating or powering off. The LED is lit solid red when phantom power is active. Both XLR inputs receive phantom power when enabled. - Page 8 (6) Monitor Knob Rotate this knob to adjust the volume of speakers connected to the Monitor outputs. The output signal level meters (14) indicate the output levels. (7) Gain Knobs These knobs adjust the preamp gain for the microphones, instruments or line level devices attached to the inputs.
- Page 9 The Vintage Preamp adds a carefully crafted analog tube preamp emulation, inspired by Universal Audio’s all-tube 610 console preamplifier, to the sound. When the button is lit orange, the circuit is active.
- Page 10 FAST Very fast attack and medium release for aggressive compression Tip: Although these presets are designed to work well with these particular sources, you can use any setting with any source. Feel free to use the 76 Compressor creatively. SHAPING YOUR SOUND WITH THE VINTAGE PREAMP AND 76 COMPRESSOR Here’s some guidance to help you add just the right amount of analog saturation or compression to your track with the Vintage Preamp and 76 Compressor:...
- Page 11 OUT – The OUT 1-2 and OUT 3-4 buttons route audio from the computer to the monitor outputs. Enable these buttons to hear sound from the audio software. MONITOR SOURCE NOTES You can monitor multiple sources at the same time. Enable all •...
- Page 12 outputs, and also to the the monitor and headphone audio software. outputs. Audio software outputs 3-4 Audio software outputs 3-4 OUT 3-4 are routed to the monitor are not routed to monitor and headphone outputs. and headphone outputs. Audio software outputs 1-2 Audio software outputs 1-2 OUT 1-2 are routed to the monitor...
- Page 13 (12) Mono Button Press the mono button to route the monitor source direct inputs in mono instead of stereo. The button lights blue when enabled. Important: The mono button applies to Volt’s hardware inputs only. (13) Input Meters The input meters show the level of signal on the inputs. The red LED lights when the level is near 0 dB.
-
Page 14: Rear Panel
Rear Panel (16) Line 3-4 Inputs Connect input sources for line inputs 3-4 here. These are ¼” balanced inputs designed for line-level sources, such as synths, external sound modules, or other line-level sources. Note: There are no gain controls on the line 3-4 inputs. Any level controls must be configured in your software. - Page 15 the headphone outputs, even if no outputs are selected with the Monitor Source buttons. BALANCED AND UNBALANCED CONNECTIONS The outputs on Volt are balanced when connected with TRS • connectors to balanced equipment. Use TRS (balanced) audio cables for the best results with a •...
-
Page 16: Power Switch
USB-C cable (iPads with USB-C) or with the Apple Lightning to USB Camera Adapter (other iPadOS and iOS devices). (21) 5VDC Power Use the 5VDC power supply when using Volt 476. Volt 476 may work from USB bus power, but only in limited configurations. (22) Power Switch Apply power to Volt with this switch. - Page 17 Power Volt off and back on. • Host indicator Try a different USB port or USB hub. • doesn’t light Try a different USB cable. • Increase the buffer size setting in the software on Crackling audio, your computer. When recording, you can use direct dropouts, monitoring to record without latency at higher buffer glitches...
Need help?
Do you have a question about the Volt 476 and is the answer not in the manual?
Questions and answers