Table of Contents
Advertisement
Advertisement
Table of Contents

Related Manuals for Centrodyne S700


Summary of Contents for Centrodyne S700
- Page 1 S700 TAXIMETER ® Installation, Operation & Programming Manual...
- Page 2 No part of this manual may be reproduced in any form without written permission This manual represents the CENTRODYNE S700 Taximeter as manufactured at the time of publication. Every effort has been made to ensure that the information included here is complete and accurate. Centrodyne cannot be held responsible for errors or omissions.
-
Page 3: Table Of Contents
S700 Taximeter Operating & Programming Guide Table of Contents Contents S700 Operation ..............................4 SWITCH DEFINITION - TAXIMETER MODE......................5 Statistics Mode ..............................5 Programming via Switches ..........................6 ESI – Electronic Sealing of the Installation......................6 Edit Data ................................6 Menu Mode................................. -
Page 4: S700 Operation
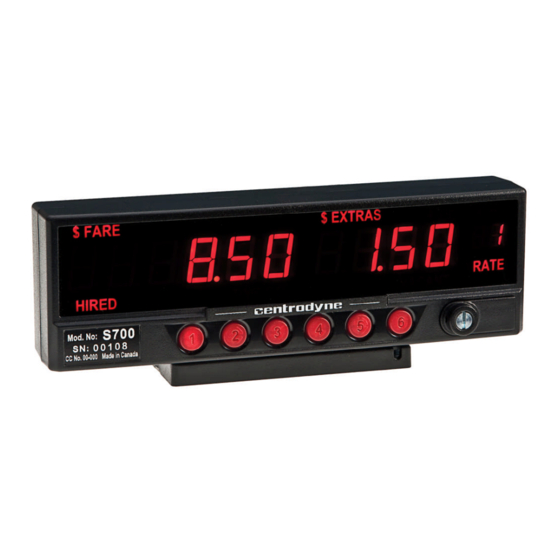
S700 Taximeter Operating & Programming Guide S700 Operation Operation of the taximeter is controlled by the 6 switches (SW1 to SW6) on the face of the taximeter. HIRED SUMMING FARE AND EXTRAS STATISTICS RECEIPT When the taximeter is off or “VACANT”, you... -
Page 5: Switch Definition - Taximeter Mode
S700 Taximeter Operating & Programming Guide SWITCH DEFINITION - TAXIMETER MODE SWITCH VACANT STATE HIRED STATE TIME-OFF STATE STATISTICS STATE Hired ---- Vacant Exit Statistics State Toggle Display Brightness Time Off Time On Reset Stats Stats Decrement Extras Sum Fare & Extras... -
Page 6: Programming Via Switches
From the Vacant state, press switch 4 to enter menu mode. Upon entering menu mode, all the legends become off, and the first menu number flashes in the rate display. If the S700 is configured for audit trail, the first menu number displayed will be 0, otherwise it will be 1. While in menu mode with menu number flashing, press switch 4 to increment through the menu list, or press switch 3 to decrement through the menu list. -
Page 7: Menu - 0 (Audit Trail Menu)
S700 Taximeter Operating & Programming Guide Except for Menu #3 (Rates Menu), when the desired menu number is displayed flashing, press switch 6 to select it. The rate display will then display the menu number on steady. The first item in the selected menu will be shown in the fare display, and the item number in the extras display. If the selected menu has more than 1 item, pressing switch 4 will increment through the list of items and pressing switch 3 will decrement through the list of items. -
Page 8: Menu - 3 (Tariff Menu)
Menu – 4 (Configuration Menu) Menu #4 allows the user to view and/or print hardware and software related information as displayed in the following table. The S700 Taximeter prints this information as well as factory configurations when the user presses switch 5 while the meter displays item 1 to 6. When meter displays item 8, pressing switch 5 will print the error code list. -
Page 9: Menu - 7 (Disable Date Menu & Lease Period)
S700 Taximeter Operating & Programming Guide Menu – 7 (Disable Date Menu & Lease Period) This menu will be skipped over if the disable meter at date option and lease period are not enabled. Menu #7 allows the operator to display the current date and time that are stored for the Disable Meter At Time And Date and the Lease Period number of days. -
Page 10: Switch Definition - Programming Mode
S700 Taximeter Operating & Programming Guide Switch Definition - Programming Mode TOP LEVEL - GROUP VIEW DATA EDIT DATA SWITCH SELECTION -------------- Exit To Top Level Abort Edit Data And Return To Top Level -------------- -------------- Move One Digit To The Left... -
Page 11: Group 3 Programmable Variables
S700 Taximeter Operating & Programming Guide B = 1 When this bit is set, the user is allowed to clear total statistics while in total statistics display state. C – Miles / Kilometres C = 0 Use miles when printing receipt or statistics data. -
Page 12: Group 4 Clock/Calendar
S700 Taximeter Operating & Programming Guide Group 4 Clock/Calendar Enabled By Item Description Default Range Factory Option Current: Hours: minutes 12:00 00:00 - 23:59 12:00a(p) - 11:59p(a) N.A. Current: Day/month 01/01 1 - 31/1 – 12 N.A. Current: Year/day of week 03/01 Current - XX/1 –... - Page 13 S700 Taximeter Operating & Programming Guide RECEIPT: LINE CHARACTER POSITION TOTALS: CAB ID: NOTES: 1. For use with Silent 160 Printer. 2. Length of printed lines depends on the Characters per Line Factory option. 3. The length of CAB ID is 10 characters.
-
Page 14: Group 6 Password Entry/Edit
S700 Taximeter Operating & Programming Guide Char Char Char Char Char SPACE " & < > Group 6 Password Entry/Edit If the PASSWORD option is enabled, then no editing of the data in groups 0 thru’ 5 will be allowed until the correct User password is entered. -
Page 15: S700 Taximeter Installation Drawing
S700 Taximeter Operating & Programming Guide S700 Taximeter Installation Drawing Speed Signal Jumper Selection A) To set speed sensor input to digital (on/off, square wave), place jumper so that Pin 1 and 2 are connected. B) To set speed sensor input to analog (magnetic, varying amplitude levels), place jumper so that Pin 2 and 3 are connected. -
Page 16: Silent 700 Series Error Codes
S700 Taximeter Operating & Programming Guide Silent 700 Series Error Codes Errors are displayed in the Fare window as follows: Meter Fault 000001 Meter Fault 000002 Meter Fault 000003 Paper out Error 000004 Meter Fault 000005 Meter Fault 000006 Meter Fault...
Need help?
Do you have a question about the S700 and is the answer not in the manual?
Questions and answers