Table of Contents
Advertisement
Quick Links
Advertisement
Table of Contents

Related Manuals for Miele HS20


Summary of Contents for Miele HS20
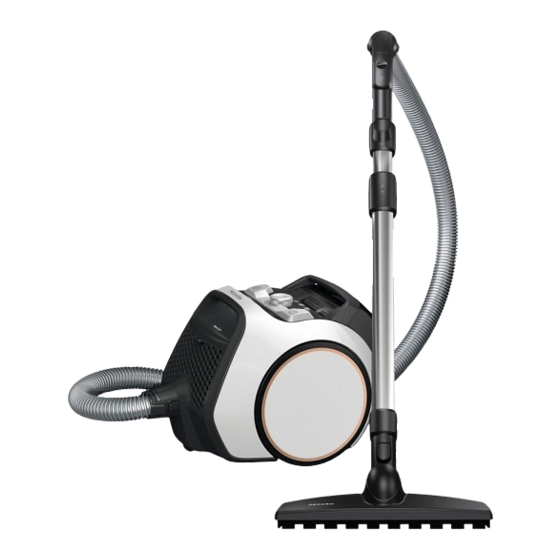
- Page 1 Vacuum cleaner Operating instructions AUS, NZ HS20 M.-Nr. 11 646 821...
-
Page 2: Table Of Contents
Contents Warning and Safety instructions ..............Guide to the appliance ..................Caring for the environment ................10 Connection......................11 Using the supplied accessories ............... 14 Use........................14 Setting down and storing the vacuum cleaner..........18 Maintenance ...................... 18 Emptying and cleaning the dust container............18 Cleaning the fine dust filter.................. -
Page 3: Warning And Safety Instructions
“Connection” chapter as well as the safety instructions and warn- ings. Miele cannot be held liable for injury or damage caused by non- compliance with these instructions. Keep these operating instructions in a safe place and pass them on to any future owner. - Page 4 Warning and Safety instructions This vacuum cleaner is intended for use at altitudes of up to 4000 m above sea level. The vacuum cleaner must only be used to vacuum dry floor sur- faces. Do not vacuum people or animals. Any other types of use, modifications or alterations are not permitted.
- Page 5 The protective measures provided in the domestic installation and in this Miele product must also be assured in their function and opera- tion in isolated operation or in non-mains synchronous operation, or replaced with equivalent measures in the installation.
- Page 6 Warning and Safety instructions Miele can only guarantee the safety of the appliance when genu- ine Miele replacement parts are used. Faulty components must only be replaced with genuine Miele replacement parts. The packaging material protects the vacuum cleaner from trans- port damage.
- Page 7 Only use genuine accessories with the “ORIGINAL Miele” logo on the packaging. The manufacturer cannot otherwise guarantee the safety of the product.
-
Page 8: Guide To The Appliance
Guide to the appliance... - Page 9 Guide to the appliance a Handle b Air inlet valve c Release catches d Comfort telescopic tube e Release catch for Comfort telescopic tube f Floorhead* g Side flap release catch (to gain access to the filter frame and the pre-filter) h Cleaning tool i Fine dust filter with filter mat j Dust container release catch...
-
Page 10: Caring For The Environment
Please dispose of it at your local com- munity waste collection / recycling centre for electrical and electronic ap- pliances, or contact your dealer or Miele for advice. Please ensure that your old appliance poses no risk to chil- dren while being stored prior to dis- posal. -
Page 11: Connection
Connecting the suction hose to the Connection handle Attaching the suction hose Insert the suction hose into the Insert the hose connector into the handle until it clicks into position. suction opening on the vacuum Connecting the handle to the suction cleaner until it clicks into position. - Page 12 Connecting the telescopic tube to the floorhead You will recognise that the HEPA AirClean exhaust filter is fitted to the appliance by an indicator strip Push the telescopic tube into the hanging out of the exhaust filter com- floorhead and turn it clockwise or partment.
- Page 13 Remove the indicator strip from the Fit the exhaust filter compartment HEPA AirClean exhaust filter. flap carefully in the bottom of the ex- haust filter compartment and close the flap, making sure it clicks into po- sition. How the exhaust filter timestrip® change indicator works The exhaust filter timestrip®...
-
Page 14: Using The Supplied Accessories
Using the supplied accessories Attach the accessories holder to the connector on the handle if required. Dusting brush Make sure it clicks into position. For cleaning skirting boards, as well as ornate, carved or particu- larly delicate objects. Adjusting the telescopic suction tube The head can be swivelled to ad- just the angle. - Page 15 This vacuum cleaner can be used for daily cleaning of carpets, rugs and ro- bust hard flooring. Miele offers a range of other floorheads, brushes and accessories for other types of flooring and special applications (see “Optional accessories”).
- Page 16 Insert the plug into the socket. Adjustable floorhead Risk of damage due to overheat- ing. The mains cable may overheat after a long period of use. If vacuuming for longer than 30 minutes, the cable must be pulled out all the way. Rewinding the cable ...
- Page 17 Switching on and off When using the adjustable floorhead, if the suction seems too high, reduce the suction power until the floorhead is easier to manoeuvre. Press the On/Off footswitch . During vacuuming During vacuuming, pull the vacuum Turn the suction power selector to the cleaner behind you like a sledge.
-
Page 18: Setting Down And Storing The Vacuum Cleaner
We recommend using only genuine voltage. Miele accessories bearing the “ORI- The mains voltage is applied to the GINAL Miele” logo on the packaging. appliance even if it is switched off. Only these will guarantee the optimum After use, switch the appliance off at performance of your vacuum cleaner the wall socket and unplug it. -
Page 19: Cleaning The Fine Dust Filter
Clean the dust container using a slightly damp cloth and mild wash- ing-up liquid if necessary. Dry the dust container thoroughly. Close the flap making sure it clicks into place. Unlatch the dust container by lifting the handle upwards. - Page 20 Remove the dust container. Remove the filter mat from the fine dust filter. The fine dust filter is located at the rear of the dust container. Carefully knock the dust out of both filters over a bin. ...
- Page 21 Rinse the pleated side of the fine dust filter under cold running water. Clean the pleated side of the fine dust filter with the long brushes on the cleaning tool. Rinse the filter mat under cold run- ning water.
-
Page 22: Putting The Fine Dust Filter And The Filter Mat Together
Putting the fine dust filter and the fil- ter mat together Refit the dust container to the va- cuum cleaner. Attach the dry filter mat to the dry fine Cleaning the filter frame and pre-fil- dust filter so that the soft side of the filter mat is pointing up and the loop There is a removable filter frame on the used to remove it is visible. - Page 23 Risk of damage caused by incor- rect cleaning. The pre-filter can become damaged and be less effective as a result. Do not use pointed or sharp-edged objects to clean the pre-filter. Clean the interior side walls using a slightly damp cloth and mild wash- ing-up liquid if necessary.
-
Page 24: When To Replace The Exhaust Filter
c Press the side flap firmly into posi- Clean the filter frame and the side flap using a slightly damp cloth and tion. mild washing-up liquid if necessary. Clean the filter frame and the side flap carefully. Refit the dust container to the va- cuum cleaner. -
Page 25: Replacing The Exhaust Filter
Replacing the exhaust filter a Place the insertion aids that are loc- ated on both sides of the new ex- Press the release catch on the ex- haust filter into the guides on the ex- haust filter compartment flap and re- haust filter compartment. -
Page 26: Replacing The Thread Lifters
To do so use a suitable tool, e.g. a flat haust filter compartment and close blade screwdriver. the flap, making sure it clicks into po- sition. Fit new thread lifters. Replacement parts are available from your Miele dealer or from the Miele Spare Parts Dept. -
Page 27: Cleaning And Care
Cleaning and care Risk of electric shock from mains voltage. The mains voltage is applied to the appliance even if it is switched off. Before cleaning, switch the appli- ance off at the wall socket and un- plug it. Vacuum cleaner and accessories ... -
Page 28: Problem Solving Guide
With the help of the following guide, minor faults in the performance of the appli- ance, some of which may result from incorrect operation, can be remedied without contacting Miele. This will save you time and money because you won't need a service call. -
Page 29: Service
Purchasing accessories Service Original Miele accessories are available Contact in case of malfunction from the Miele webshop, the Miele Cus- In the event of any faults which you tomer Service Department and from cannot remedy yourself, please contact your Miele dealer. -
Page 30: Electrical Connection
Parquet Twister floorbrush with Electrical connection swivel action (SBB 300-3) All work should be carried out by a suit- With natural bristles for vacuuming ably qualified and competent person in smooth hard floors and small gaps. strict accordance with national and local safety regulations. - Page 32 183 Featherston Street Miele Experience Centre South Melbourne: Wellington 6011 206-210 Coventry Street South Melbourne, VIC 3205 0800 464 353 (0800 4 MIELE) Miele Experience Centre and Office Sydney: www.miele.co.nz 3 Skyline Place Frenchs Forest, NSW 2086 Miele Experience Centre and Office Brisbane:...