Table of Contents
Advertisement
Quick Links
Advertisement
Table of Contents

Related Manuals for Evolveo StrongPhone Z5


Summary of Contents for Evolveo StrongPhone Z5
- Page 1 MANUAL MODEL VERSION / DATE StrongPhone Z5 l. / 30. 4. 21...
-
Page 2: Table Of Contents
Contents Welcome ............... 3 Phone description ..........4 Putting the phone in operation ....... 7 Basic functions ............8 Settings ............... 10 Phone settings ............. 11 Multimedia............13 FM radio .............. 13 File management ..........14 Camera ............... 14 Organizer ............14 Maintenance instructions ........ -
Page 3: Welcome
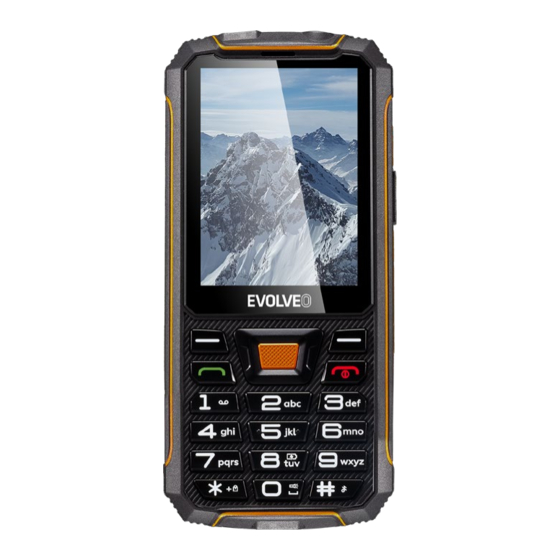
Welcome Thank you for purchasing our rugged mobile phone EVOLVEO StrongPhone Z5! The phone main advantages are: • large 2.8“ display • shock resistant • water resistant according to IP68 • SOS key • two SIM cards • powerbank functionality •... -
Page 4: Phone Description
Phone description Function Function Earphone # key Display Hang-up button Left function button Right function button Navigation button Battery cover Call button Camera Alphanumeric buttons Flashlight * key Loudspeaker 0 key: Flashlight Headphone connector 8 key: Powerbank SOS button... - Page 5 FUNCTION BUTTONS Push this button to open the menu in the standby Left function mode. A function will be launched and immediately button (LFB, 3) displayed in the display bottom left corner. Right function Push this button to open the contact list. Return to button (RFB, previous menu.
- Page 6 You can navigate through the menu up and down, left and right. The quick access functions on the Navigation home screen can be set as desired. The middle button (4) button is used to confirm an action or to enter the menu.
-
Page 7: Putting The Phone In Operation
Putting the phone in operation Inserting the battery Follow these instructions to properly and safely insert the battery into your phone. Remove the four screws on the battery cover and insert the battery. Make sure that the battery is aligned properly. Replace the battery cover on the phone. -
Page 8: Basic Functions
Calls Use the keyboard to enter the desired number and then push the green button (5) to make the call. To accept an incoming call, push the green button (5). To reject a call, push the red button (11). During the call, the volume can be adjusted with the Up/Down navigation button (4). - Page 9 Go to Phonebook/Options/Directory settings/Speed dial/Status/Enabled. Select Set numbers/Edit to assign the speed dial keys to contacts already saved in the phonebook. Call history To open the respective menu use LFB (3)/Menu/Call history. Call history Contains the history of your Missed calls, Outgoing calls, Incoming calls and All calls.
-
Page 10: Settings
Select Activate/To new number to which your calls shall be redirected. You can also Activate/To voicemail Confirm with Options/Done and the settings will be saved. Blocked numbers - Blacklist You can blacklist up to 20 phone numbers. When you use this function, the numbers in the blacklist will not be able to reach you. -
Page 11: Phone Settings
Turn phone off: Silent, Tone 1, Tone 2,...Tone 5 Phone settings SOS function settings This mobile phone is equipped with a SOS function - if you push and hold the side button for 1.5 s, the phone automatically calls and/or sends a text message to all your specified emergency numbers. - Page 12 by the telephone supplier, operator or map data provider. The service may be terminated at any time without notice. Date and time settings To enter the menu, use LFB (3)/Menu/Settings/Phone settings/Time and date/Set time/date. Enter the current time and date. Click to Save to save the settings.
-
Page 13: Multimedia
Phone security This function allows to lock/unlock the phone. If it is enabled, you have to enter the password every time you turn the phone on (the default setting is 1234). Restore factory settings The default password is 1234. Remember that once you restore the factory settings, everything you have stored on the device will be deleted! Multimedia... -
Page 14: File Management
Use the right and left navigation keys to switch to the previous or next available channel. Use the up and down buttons to increase/decrease the frequency. File management The File manager lets you manage your files as needed. View, copy, move and perform other maintenance operations on files such as pictures, videos, music and applications stored on your phone or microSD card. - Page 15 Alarm The default setup has five deactivated alarms. You can activate one, more or all of them as needed. You can customize the settings for each of the alarms. Go to Organizer/Alarm/Alarm settings/Edit Select Status/Activated to activate it. Enter the desired time. Select number of repetitions: Oce/Daily/Custom Select the alarm tone out of the five available Save the settings.
- Page 16 Push LFB (3) to erase all numbers. Bluetooth Use the Bluetooth function for free exchange of data with the Bluetooth- capable devices. Turning the Bluetooth on/off: Go to Organizer/Bluetooth/Connection. Select Activated/Deactivated to turn Bluetooth on/off. Visibility: You can choose the visibility of your mobile phone to other Bluetooth devices in the vicinity.
-
Page 17: Maintenance Instructions
• Intentional damage. Warranty and post-warranty service Repairs and service may be performed only at an authorized service point for EVOLVEO products (more at www.evolveo.com); otherwise the phone may be damaged and the warranty voided. Disposal: The crossed-out container symbol or on packaging... - Page 18 DECLARATION OF COMPLIANCE Abacus Electric, s.r.o. hereby declares that the EVOLVEO StrongPhone Z5 complies with the requirements of standards and regulations relevant for this type of device. For the full wording of the Declaration of Conformity see http://ftp.evolveo.com/ce/ Dovozce / Dovozca / Importer / Importőr Abacus Electric, s.r.o.
Need help?
Do you have a question about the StrongPhone Z5 and is the answer not in the manual?
Questions and answers