Insulet Omnipod 5 User Manual
Automated insulin delivery system
Hide thumbs
Also See for Omnipod 5:
- Quick start manual (92 pages) ,
- User manual (76 pages) ,
- Resource manual (31 pages)
Advertisement
Quick Links
User Guide
Omnipod
5 Automated Insulin Delivery System
®
Insulet Corporation
100 Nagog Park
Acton, MA 01720
1-800-591-3455 | 1-978-600-7850
omnipod.com
Pod shown without the necessary adhesive.
FCC ID: 2ADINN5004L
Controller
FCC ID: RBV-029
Pod
Reference #: PDM-USA-H001-MG PT-000369-AW Rev. 007 01/22
Advertisement
Chapters

Related Manuals for Insulet Omnipod 5


Summary of Contents for Insulet Omnipod 5
- Page 1 User Guide Omnipod 5 Automated Insulin Delivery System ® Insulet Corporation 100 Nagog Park Acton, MA 01720 1-800-591-3455 | 1-978-600-7850 omnipod.com Pod shown without the necessary adhesive. FCC ID: 2ADINN5004L Controller FCC ID: RBV-029 Reference #: PDM-USA-H001-MG PT-000369-AW Rev. 007 01/22...
- Page 2 Customer Care 1-800-591-3455 (24 hours/7 days) From Outside the US: 1-978-600-7850 Customer Care Fax: 877-467-8538 Address: Insulet Corporation 100 Nagog Park, Acton MA 01720 Emergency Services: Dial 911 (USA only; not available in all communities) Website: omnipod.com Controller Model: PDM-USA-H001-MG...
- Page 3 SmartAdjust are trademarks or registered trademarks of Insulet Corporation. All rights reserved. The Bluetooth® word mark and logos are registered trademarks owned by Bluetooth SIG, Inc. and any use of such marks by Insulet Corporation is under license. Dexcom and Dexcom G6 are registered trademarks of Dexcom, Inc.
-
Page 4: Table Of Contents
Chapter 4: Setting Up Your Omnipod 5 Application . . . . . . . . . . . . . . . . - Page 5 Contents 5.3. Fill the Syringe with Insulin ......... . . 83 5.4.
- Page 6 12.2. Omnipod 5 App on Smartphone ........150...
- Page 7 19.2. CGM Placement ........... .275 19.3. Using the Dexcom G6 with Omnipod 5 ......276 19.4.
- Page 8 26.7. Deleting the Omnipod 5 App ........
- Page 9 This page intentionally left blank. viii...
-
Page 10: Section 1: Before You Begin
BEFORE YOU BEGIN 1 Introduction... - Page 11 This page intentionally left blank.
- Page 12 Omnipod 5 SmartAdjust™ Technology Features . . . . . . . . . . . . . . . . . .
-
Page 13: Welcome To Your Omnipod® 5 System
The Pod is waterproof for depths up to 25 feet (7.6 meters) for up to 60 minutes (IP28). Omnipod® 5 App: The Omnipod 5 App allows you to select a basal profile, •... - Page 14 Dexcom G6 Continuous Glucose Monitoring (CGM) System: The • Omnipod 5 System is designed to work with the Dexcom G6 which must be obtained separately. CGM values and trends from the Dexcom G6 are used for automated insulin delivery in Automated Mode, as well as for bolus calculations in both Automated and Manual Mode.
-
Page 15: About This User Guide
Note: This User Guide is intended for use only with the Insulet-provided Controller with the Omnipod 5 App, model PDM-USA-H001-MG, or the Omnipod 5 App on a compatible smartphone. To learn which version of the Insulet-provided Controller you have, turn it over. If you see "PDM-USA-H001- MG"... -
Page 16: Compatible Insulins
(or blood glucose reading if using fingerstick), rate of change of the sensor glucose (if applicable), insulin on board (IOB), and programmable correction factor, insulin to carbohydrate ratio, and target glucose value. The Omnipod 5 SmartBolus Calculator is intended for single patient, home use and requires a prescription. -
Page 17: General Warnings
Warning: DO NOT use the Omnipod 5 System if you are unable or unwilling to use it as instructed by this User Guide and your healthcare provider. Failure to use this system as intended could result in over-delivery or under-delivery of insulin which can lead to hypoglycemia or hyperglycemia. - Page 18 Introduction 1 Humalog, and Admelog are compatible with the Omnipod 5 System for use up to 72 hours (3 days). Follow your healthcare provider’ s directions for how often to replace the Pod. Warning: AVOID administering insulin, such as by injection or inhalation, while wearing an active Pod as this could result in hypoglycemia.
- Page 19 ALWAYS make sure you are using the CGM per manufacturer's instructions. Do not extend the sensor wear beyond the recommended duration and do not wear a sensor that is past the labeled expiration date. The Omnipod 5 System relies on accurate, current CGM values to determine your insulin needs.
-
Page 20: General Precautions
Exposure to oxygen rich environments could result in combustion of the Pod or Omnipod 5 Controller, which can cause severe burns to the body. Warning: DO NOT use the Omnipod 5 System in high atmospheric pressure environments (above 1060 hPA), which can be found in a hyperbaric chamber. - Page 21 Caution: DO NOT navigate away from the Omnipod 5 App while you are in the process of making changes to your insulin delivery settings. If you leave the App before you are able to save the setting change and before the App is able to put the setting change into effect, the system will continue to use your last saved settings.
- Page 22 Pay special attention to Warnings and Precautions in this User Guide. The words “Warning” and “Caution” are displayed in red, bolded text. The Omnipod 5 System is designed to work with the Dexcom G6 CGM. To use the Dexcom G6 CGM with the Omnipod 5 System, you will need to obtain the Dexcom G6 sensor, transmitter, and User Guide, and download the Dexcom G6 app on your personal smartphone.
- Page 23 Warning: ALWAYS keep an emergency kit with you to quickly respond to any diabetes emergency or in the case that your Omnipod 5 System stops working. Always carry supplies to perform a Pod change should you need to replace your Pod at any time.
-
Page 24: Section 2: Omnipod 5 Pump Features
Omnipod 5 Pump Important Safety Information 2 System Terminology and Navigation 3 Omnipod 5 System Overview 4 Setting Up Your Omnipod 5 Application 5 Activating and Changing Your Pod 6 Basal Programs 7 Temporary Basal Rates and Presets 8 Blood Glucose Readings 9 Pausing and Starting Insulin Delivery... - Page 25 This page intentionally left blank.
-
Page 26: Omnipod 5 Pump Important Safety Information
Pod, CGM transmitter, and Admelog are compatible with the and CGM sensor may be affected by Omnipod 5 System for use up to 72 strong radiation or magnetic fields. hours (3 days). Follow your healthcare Device components must be removed provider’... - Page 27 DO NOT apply a Pod if you this results in them not functioning see the cannula is extended beyond properly. Store all Omnipod 5 System the adhesive backing after the tab products and supplies, including on the Pod is removed. This cannula unopened Pods, in a cool, dry place.
- Page 28 Important Safety Information Omnipod 5 App fails to beep during sometimes used to promote healing a diagnostic test, call Customer Care of diabetic ulcers, or to treat carbon immediately. Continuing to use the monoxide poisoning, certain bone and Omnipod 5 System in these situations tissue infections, and decompression may put your health and safety at risk.
- Page 29 Pod Shut-Off advisory alarm. If you treat glucose below 70 mg/ do not respond to this alarm within dL (hypoglycemia) according this time, the Omnipod 5 App and Pod to your healthcare provider's sound a hazard alarm and your Pod recommendations. Symptoms of...
- Page 30 Caution: DO NOT use any attention. If left untreated, these component of the Omnipod 5 System situations can quickly lead to diabetic (smartphone, Controller, Pod) if you ketoacidosis (DKA), shock, coma, or suspect damage after an unexpected death.
- Page 31 Caution: DO NOT reset the where sudden changes or extremes of Omnipod 5 App or clear the app data air pressure, altitude, or gravity may before checking with your healthcare be occurring. Though the Omnipod provider.
- Page 32 Important Safety Information Caution: single use only and should only be used ALWAYS check for signs with the Omnipod 5 System. Failure of infection often. If an infusion site to follow the instructions above may shows signs of infection: result in damage to your Pod.
- Page 33 Controller. AVOID using The Omnipod 5 App must be open or alternative charging cables or other be running in the background in order accessories, as they may damage the...
- Page 34 (RF) communications active Pod, and DO NOT clear the equipment (including peripherals Omnipod 5 App data. If you do, your such as antenna cables and external Pod will remain active, but you will antennas) closer than 12 inches (30...
- Page 35 Your Pod will still sound, and you will be able see the Alarm or Notification displayed on the Omnipod 5 App. See "13.3. Sounds and Vibrations" on page 157 to learn how to manage sounds...
- Page 36 CHAPTER 2 System Terminology and Navigation Contents 2.1. Terminology ............28 2.2.
-
Page 37: Terminology
Advisory Alarm An alarm that alerts you to some aspect of the Omnipod 5 System that will need your attention in the near future, such as a low amount of insulin remaining in your Pod. Automated Mode... - Page 38 Insulet-provided device. Deactivate Preferred method for shutting down the Pod. Deactivation turns off insulin delivery in the Pod and allows the Omnipod 5 App to activate a new Pod. Device In Omnipod 5, “device” refers to the smartphone or Omnipod 5 Controller used to control the Omnipod 5 App.
- Page 39 Mode. Omnipod 5 Application Software on the Controller or smartphone that (App) is the primary user interface of the Omnipod 5 System. SmartAdjust™ technology Pod software used to calculate automated insulin delivery, as often as every 5 minutes to bring your glucose to your customized glucose target, or Target Glucose.
-
Page 40: Using The Touchscreen And Entering Information
Omnipod 5 App, and how this User Guide describes moving between Omnipod 5 App screens. Note: If you are using your smartphone with the Omnipod 5 App, images in this section may differ from your smartphone. Touchscreen Basics The Omnipod 5 App displays messages and options for you on its touchscreen. -
Page 41: Entering Numbers And Text
System Terminology and Navigation Entering Numbers and Text Tapping in an editable field can bring up a keypad or number pad. Using a keypad Change between upper Delete most and lower case recent entry Open a different keypad Close keypad Minimize after entering text No function... -
Page 42: Using A Scroll Wheel
System Terminology and Navigation Using a scroll wheel Tapping an editable field can bring up a scroll wheel. Place your finger on the scroll wheel. Swipe up or down to select your desired value. The faster you move your finger, the faster the wheel will scroll. -
Page 43: Navigation Buttons And Navigation Shorthand
System Terminology and Navigation Navigation Buttons and Navigation Shorthand Options button The Options button ( ) appears on the right side of certain lists. Tapping the Options button brings up a list of options relevant to the item on that row. User Guide navigation shorthand The User Guide uses the ">"... - Page 44 Contents 3.1. Omnipod 5 App and Dexcom Communication .....36 3.2. Omnipod 5 App ........... .37 The Omnipod 5 Controller .
- Page 45 • The Pod delivers insulin to your body, receives commands from the Omnipod 5 App, receives CGM values from Dexcom CGM transmitter, sends CGM values to the Omnipod 5 App and automatically adjusts insulin delivery in Automated Mode. • Your Dexcom G6 transmitter sends CGM values to the Pod and to the Dexcom G6 app.
-
Page 46: Omnipod 5 App
Omnipod 5 System Overview 3.2. Omnipod 5 App You use the Omnipod 5 App to control and monitor the Pod's operations using Bluetooth® wireless technology. You can use the provided Controller or a compatible smartphone with the Omnipod 5 App. -
Page 47: Lock Screen And Security
3.3. Lock Screen and Security Warning: ALWAYS identify the Omnipod 5 App as yours before using it. Using someone else's Omnipod 5 App can result in incorrect insulin delivery for both of you. Warning: ALWAYS keep your smartphone or Controller safe and within your control to ensure others cannot make changes to your insulin therapy. -
Page 48: Forgot Your Pin
"Power Off", tap outside the message to cancel the message. If you accidentally power off your Controller, you can miss important notifications and alarms from the Omnipod 5 App. If you do not hear alarms and notifications from your Controller, you might not make the changes you need to make to your insulin therapy in a timely manner. -
Page 49: Status Bar
Omnipod 5 System Overview 3.4. Status Bar At the top of the screen is a status bar that shows icons for both the Omnipod 5 App and your Controller or smartphone. The following icons will display when applicable: • Omnipod 5 Status icon •... -
Page 50: Home Screen
Omnipod 5 System Overview 3.5. Home Screen This section introduces you to what you may see on the Omnipod 5 App Home screen. Different information will display depending on which system mode is activated. Alarms and Notifications Status bar Menu button... -
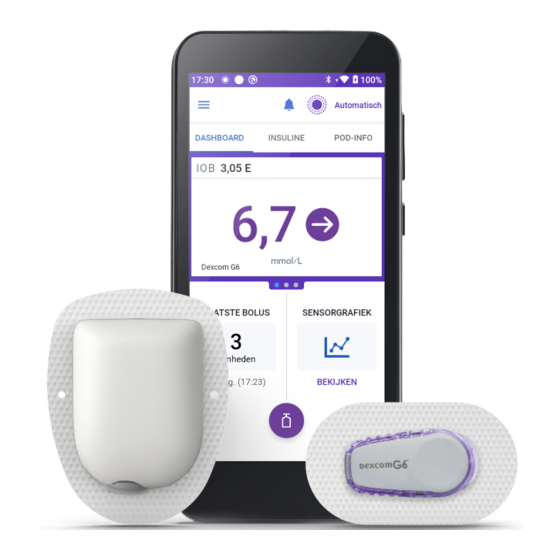
Page 51: Dashboard Tab
The DASHBOARD tab displays the following information. Note: The DASHBOARD tab shows different content if a CGM transmitter is paired to the Omnipod 5 App. Without paired CGM transmitter • INSULIN ON BOARD (IOB): value displays when IOB is available. -
Page 52: With Paired Cgm Transmitter
Omnipod 5 System Overview With paired CGM transmitter • INSULIN ON BOARD (IOB) • CGM value (with trend arrow): when a CGM value is available. See "19.5. CGM Trend Arrows" on page 278. • CGM value (without arrow): when transmitter supplies a CGM value but is unable to report CGM trend. -
Page 53: Insulin Tab
Omnipod 5 System Overview INSULIN Tab The INSULIN tab label changes to ACTIVITY when the Activity feature is enabled in Automated Mode or to TEMP ON when a temp basal is running in Manual Mode. Manual Mode By default, in Manual Mode, the INSULIN tab shows the name and graph of the user- defined Basal Program. -
Page 54: Temp Basal
Omnipod 5 System Overview Temp basal When a temp basal is running, the INSULIN tab label changes to TEMP ON and is highlighted in light blue. It displays the temp basal graph and allows you to cancel the temp basal. See"7.1. About Temporary Basal Rates"... -
Page 55: Pod Info Tab
Pod. The VIEW POD DETAILS screen shows: • Amount of insulin in the Pod. • Time of the last communication between the Omnipod 5 App and Pod. • Date and time of the Pod's expiration. • Reminders. •... -
Page 56: Pod Info Banners
Omnipod 5 System Overview POD INFO banners When your Pod will expire soon, a yellow CHANGE POD SOON banner appears on the POD INFO tab. The yellow banner appears 12 hours before Pod expiration or at the time of your Pod expiration reminder, whichever is earlier. -
Page 57: Bolus Information And Button
Once the Pod is in range again and the bolus delivery is confirmed, the confirmed bolus amount is shown. Estimated and unconfirmed bolus amounts The Omnipod 5 App estimates bolus amounts during an ongoing bolus and when the Pod is out of range. A gray icon ( ) marks estimated bolus amounts. A yellow icon ( ) marks unconfirmed bolus amounts (see "When the Pod has not... -
Page 58: Home Screen Main Menu
Omnipod 5 System Overview 3.6. Home Screen Main Menu The Main Menu on the Home screen lets you access most of the Omnipod 5 App's functions. To access the Main Menu: • Tap the Menu button ( ) in the upper left corner of the Home screen. -
Page 59: About Screen
(called force stopping) on your smartphone. The Omnipod 5 App must be open or be running in the background in order to display and sound alarms on the smartphone. If the App is not running, you could miss important alarms and notifications on the smartphone. -
Page 60: Alarms
Alarms require your immediate attention (see page 160). If you ignore an alarm, you could develop hypoglycemia or hyperglycemia. When an alarm occurs, the Pod will beep and the Omnipod 5 App will beep or vibrate if sound/vibrate is on. Hazard alarms ( ) alert you to a problem with your insulin delivery, Pod, or Omnipod 5 App that requires immediate attention to resolve. -
Page 61: Manual And Automated Mode Overview
Omnipod 5 System Overview 3.8. Manual and Automated Mode Overview Available tasks in each mode The following table defines the tasks that can be performed in Manual Mode and Automated Mode. Manual Mode Automated Mode How it works Basal Insulin... - Page 62 Omnipod 5 System Overview Manual Mode Automated Mode What you can do Pod Changes Activate and Deactivate Pods Deactivate Pods Once deactivated, the system switches to Manual Mode. Pod activation occurs in Manual Mode (after activation, prompt to switch to Automated Mode is...
-
Page 63: Identifying System Modes
Omnipod 5 System Overview Identifying System modes The mode indicator shows Omnipod 5 System's current operating mode. Graphic Description Displays when there is no Pod communication or no active Pod. Displays when the Omnipod 5 System is in Automated Mode and the Pod is providing automated insulin delivery. - Page 64 Signing in to the Omnipod 5 App on Your Smartphone . . . . . . . . . . . . . . .
-
Page 65: Setting Up Your Account
2. Follow the on-screen instructions to set up your account. 4.2. Preparing for Your Training If you are a first-time Omnipod user, you may need to meet with your Omnipod 5 Trainer to set up your Omnipod 5 App, first Pod, and your Dexcom G6 sensor. -
Page 66: Items Needed For Your Training
Pod cannot communicate with two devices at one time. If possible, wait to switch between devices until a scheduled Pod change. Before setting up your Omnipod 5 System, decide whether you want to use the Insulet-provided Controller or a compatible personal smartphone for the... -
Page 67: General Settings On Insulet-Provided Controller
Omnipod 5 App. You can find a list of compatible smartphones at omnipod.com/ compatibility. If you choose to use the Omnipod 5 App on your smartphone, you will need to sign into the Insulet-provided Controller first to confirm that your healthcare provider has prescribed the use of the Omnipod 5 System. - Page 68 (EULA), warranty and Legal Notices as follows: a. Tap the HIPAA Privacy Notice, EULA, ToU, and Warranty link to read the Omnipod 5 System's legal notices and privacy policy. Then tap AGREE. A checkmark is added to the checkbox to indicate agreement.
-
Page 69: Setting Up Training
System on your Controller, or sign into the Omnipod 5 App on your smartphone. If you intend to use your smartphone for the Omnipod 5 App, continue to "4.5. General Settings on Your Smartphone" on page 62. You do not need to continue with any further Controller setup at this time. -
Page 70: Personalize Your Controller
If the second PIN entry does not match the first, you must repeat the above steps. Enabling Notifications and Sound on Your Controller 1. Read the message explaining the importance of enabling Omnipod 5 App notifications. You cannot enter or use the App if you turn notifications off. -
Page 71: General Settings On Your Smartphone
A pop-up screen warns you that you could lose these entries. If you choose to use the Omnipod 5 App on your smartphone, you will need to sign into the Insulet-provided Controller first to confirm that your healthcare provider has prescribed the use of the Omnipod 5 System. -
Page 72: Using The Omnipod 5 App On Your Smartphone
Omnipod 5 App to work and save important information regarding your insulin therapy. If your smartphone does not have enough free space, you will not be able to use the Omnipod 5 App and you will be prompted to free up smartphone storage. -
Page 73: Recommended Smartphone Settings
Recommended smartphone settings Follow the recommended settings below to improve your experience using the Omnipod 5 System. If these settings are not set as recommended, the App will periodically alert you and give you the option to navigate to your smartphone’ s settings menu to enable the setting. -
Page 74: Signing In To The Omnipod 5 App On Your Smartphone
(EULA), warranty and Legal Notices as follows: a. Tap the HIPAA Privacy Notice, EULA, ToU, and Warranty link to read the Omnipod 5 System's legal notices and privacy policy. Then tap AGREE. A checkmark is added to the checkbox to indicate agreement. -
Page 75: Setting Your Omnipod 5 App Security (On Your Smartphone)
Setting Your Omnipod 5 App Security (on Your Smartphone) Use of the Omnipod 5 App on your phone requires that you select a screen lock type and set security options on your phone to protect against unintended use and accidental therapy changes. This feature can be enabled from your phone’ s Settings. -
Page 76: Enabling Notifications And Sound On Your Smartphone
¾ Tap I UNDERSTAND . 2. Read the message explaining the importance of enabling sound on your Omnipod 5 App. If you do not have sound enabled, you may miss important messages. ¾ Tap I UNDERSTAND . If you do silence your device, the... -
Page 77: Basal Settings
Setting Up Your Omnipod 5 Application 4.6. Basal Settings Warning: DO NOT start to use your system or change your settings without adequate training and guidance from your healthcare provider. Initiating and adjusting settings incorrectly can result in over-delivery or under-delivery of insulin, which could lead to hypoglycemia or hyperglycemia. -
Page 78: Create A Basal Program
Setting Up Your Omnipod 5 Application Create a Basal Program The next step is to create a Basal Program. For a description of basal rates, basal segments, and Basal Programs, see "Basal Programs" on page 97. ¾ Tap NEXT on the Create Basal Program description screen to continue. Name and tag the Basal Program The default name for the Basal Program is Basal 1. -
Page 79: Review The Basal Program
Setting Up Your Omnipod 5 Application additional segments. Repeat steps 1-3 as needed until your final segment ends at midnight. Review the Basal Program The next screen summarizes the start and end times, and basal rate for each segment of the Basal Program. 1. -
Page 80: Temporary Basal Configuration
7. When the Basal Program is correct, tap SAVE. Note: If the basal rate for a segment is 0 U/hr, the Omnipod 5 App displays a message calling this to your attention. Tap OK if the 0 U/hr rate is correct. -
Page 81: Bolus Settings
Setting Up Your Omnipod 5 Application 4.7. Bolus Settings Next, you will set Bolus Settings that will be used to calculate a bolus in the SmartBolus Calculator. You can adjust your bolus settings later, if your needs change (see "17.8. Bolus Settings" on page 248 for more information). 1. -
Page 82: Insulin To Carb (Ic) Ratio
Setting Up Your Omnipod 5 Application a. Tap the row containing the entry to be changed and enter the corrected value. b. Review and correct as needed any remaining segments. 8. When the segments and values are correct, tap SAVE. Insulin to Carb (IC) Ratio Your Insulin to Carbohydrate Ratio, or "IC Ratio,"... -
Page 83: Correction Factor
Setting Up Your Omnipod 5 Application 6. Review your 24-hour IC Ratio segments. 7. To change any of the entries: a. Tap the row containing the entry to be changed and enter the corrected value. b. Review and correct as needed any remaining segments. -
Page 84: Duration Of Insulin Action
Setting Up Your Omnipod 5 Application 5. Review the segments for the full 24- hour profile. 6. To change any of the entries: a. Tap the row containing the entry to be changed and enter the corrected value. b. Review and correct as needed any remaining segments. -
Page 85: Maximum Bolus
Setting Up Your Omnipod 5 Application Maximum Bolus The Omnipod 5 App will not let you request a bolus above the Maximum Bolus setting. You will see a message if the SmartBolus Calculator calculates a bolus that is above this amount. -
Page 86: Saving Your Settings For Reference
DO NOT delete the Omnipod 5 App while you have an active Pod, and DO NOT clear the Omnipod 5 App data. If you do, your Pod will remain active, but you will not be able to control your Pod even if you re-install or re- open the App. - Page 87 This page intentionally left blank.
- Page 88 CHAPTER 5 Activating and Changing Your Pod Contents 5.1. Beginning the Pod Activation Process ......80 5.2.
-
Page 89: Beginning The Pod Activation Process
Pod may not work properly and increase your risk of infection. Caution: DO NOT use any component of the Omnipod 5 System (smartphone, Controller, Pod) if you suspect damage after an unexpected event such as dropping or hitting on a hard surface. Using damaged components may put your health at risk as the system may not be working properly. - Page 90 5. If the insulin or Pod is below 50°F (10°C), allow it to warm up to room temperature before proceeding. Confirm that you are using an Omnipod 5 Pod prior to beginning Pod activation. Look for the Omnipod 5 logo on the Pod tray lid and the words “Omnipod 5®” on your Pod. Bottom...
-
Page 91: Setting Up A New Pod
2. Tap SET UP NEW POD. Turn on location access If you are using the Omnipod 5 App on your smartphone, location permission must be allowed and location setting must be turned on to activate a Pod. If you deny the permission or turn off the setting, you will be prompted to turn it on to activate a Pod. -
Page 92: Fill The Syringe With Insulin
Activating and Changing Your Pod 5.3. Fill the Syringe with Insulin Warning: NEVER inject large bubbles or pockets of air when filling the Pod with insulin. Air in the system takes up space where insulin should be and can affect insulin delivery. Doing so could result in over-delivery or under- delivery of insulin, which can lead to hypoglycemia or hyperglycemia. -
Page 93: Filling, Activating, Applying, And Starting The Pod
Use only the fill syringe and needle that came with your Pod. The fill syringe is intended for single use only and should only be used with the Omnipod 5 System. Failure to follow the instructions above may result in damage to your Pod. -
Page 94: Fill The Pod With Insulin
Activate the Pod To activate the Pod: 1. Place the Controller or smartphone running the Omnipod 5 App next to the Pod so they are touching. The Pod should be in its plastic tray during this process. Note: ALWAYS ensure that no other... - Page 95 Note: After activating a Pod, the Omnipod 5 App should always be able to communicate with a Pod that is up to 5 feet (1.5 meters) away. Depending on the location, the Omnipod 5 App may be able to communicate with a Pod that is as much as 50 feet (15 meters) away.
-
Page 96: Prepare The Pod Site
Activating and Changing Your Pod Prepare the Pod Site Caution: ALWAYS rotate insulin infusion sites to help prevent infusion site complications like scar tissue and infection. Rotating insulin infusion sites reduces the risk of scarring. Using a site with scar tissue can lead to problems with insulin absorption. -
Page 97: Pod Site Examples
Activating and Changing Your Pod Pod site examples Pod site map (optional) The Pod site map is an optional feature that helps you track your current and recent Pod site locations. This option only appears if the Pod Sites setting is turned on (see "10.2. -
Page 98: Prepare The Infusion Site
Activating and Changing Your Pod 4. Tap the DETAILS tab to add a detail about the placement of this Pod. For example, you could add a detail that says "Facing up" or "Facing down" to describe the Pod's orientation. a. To add a new detail, tap ADD NEW and type in the new detail. Tap ADD when done. -
Page 99: Remove The Pod's Tab
Activating and Changing Your Pod Remove the Pod's Tab Warning: DO NOT apply a Pod if you see the cannula is extended beyond the adhesive backing after the tab on the Pod is removed. This cannula cannot be inserted resulting in under-delivery of insulin which could lead to hyperglycemia. -
Page 100: Begin Insulin Delivery
Activating and Changing Your Pod 2. Orient the Pod so it is: • Horizontal or diagonal Up, down, or slight angle on your abdomen, hip, lower back, or buttocks. Horizontal or diagonal • Up and down or at a slight angle on your upper arm or thigh. -
Page 101: Checking Your Infusion Site
Confirm Pod is securely attached 1. Confirm that the Pod is securely attached to your body, then tap YES. 2. If you are squeezing your skin, stop squeezing when the Omnipod 5 App asks if the cannula is properly inserted. -
Page 102: Switching To Automated Mode
Automated Mode, if a valid CGM value is received, this reminder will not display. See " Check BG After Pod Change" on page 201. If the Omnipod 5 App has a CGM value displayed you will not receive this reminder. -
Page 103: Deactivating An Active Pod
Manual Mode; however, you will be prompted to enter Automated Mode if you have a CGM transmitter serial number entered in to the Omnipod 5 App. 3. Remove the deactivated Pod from your body: a. Gently lift the edges of the adhesive tape from your skin and remove the entire Pod. -
Page 104: More Information About Pod Use
Activating and Changing Your Pod c. Check the infusion site for signs of infection (see "Avoiding Infusion Site Infections" on page 95). d. Dispose of the used Pod according to local waste disposal regulations. 4. To activate a new Pod, tap SET UP NEW POD . 5.8. -
Page 105: Additional Information
Again"" on page 337. • If the Home: POD INFO tab says "No Pod Communication:" • To find the last time the Omnipod 5 App successfully communicated with the Pod, navigate to: Menu button ( ) > Pod. • If you are unable to restore communication with the Pod and want to change to a new Pod, navigate to: Menu button ( ) >... - Page 106 CHAPTER 6 Basal Programs Contents 6.1. About Basal Programs ..........98 6.2.
-
Page 107: Chapter 6: Basal Programs
While in Manual Mode, Basal Programs are used to deliver a steady amount of insulin throughout the day. This is known as your basal insulin. Different days can have different routines. The Omnipod 5 System lets you create different Basal Programs for your different routines. For example, you may use one Basal Program on weekdays and a different one on weekends. -
Page 108: Creating New Basal Programs
Basal Programs 6.3. Creating New Basal Programs To create a new Basal Program: 1. Navigate to the Create Basal Program screen: Menu button ( ) > Basal Programs 2. Tap CREATE NEW. Note: If you already have 12 Basal Programs, CREATE NEW does not appear. If necessary, you can delete an existing Basal Program. -
Page 109: Deleting A Basal Program
Basal Programs 5. Tap DONE. 6. Tap NEXT. 7. See steps 2 - 7 of "6.2. Reviewing All Basal Programs" on page 98 to continue editing your Basal Program. 8. To activate the newly edited Basal Program: • If you edited the Basal Program in progress, tap START INSULIN. •... -
Page 110: Basal Insulin Delivery
"basal" insulin. In people without diabetes, the pancreas continuously delivers this basal insulin. For people using the Omnipod 5 System, the Pod can mimic a pancreas of a person without diabetes by delivering basal insulin continuously as your wear the Pod. - Page 111 In order to create the Basal Program shown in the example above, the following basal segments are programmed into the Omnipod 5 App: Segment Basal rate 1: Midnight–10:00 am 0.20 U/hr...
- Page 112 CHAPTER 7 Temporary Basal Rates and Presets Contents 7.1. About Temporary Basal Rates ........104 7.2.
-
Page 113: Chapter 7: Temporary Basal Rates And Presets
U/hr, see page 132. Tip: By default, the Omnipod 5 App or Pod sounds a tone at the beginning and end of a temp basal and every 60 minutes while a temp basal is running. To turn these ON or OFF, see "13.3. -
Page 114: Starting A Temp Basal
Temporary Basal Rates and Presets 7.2. Starting a Temp Basal Note: You cannot start or cancel a temp basal during an immediate bolus, but you can start or cancel a temp basal while an extended bolus is in progress. To start a temp basal: 1. - Page 115 Temporary Basal Rates and Presets 4. Examine the temp basal graph at the top of the screen. The proposed temp basal is displayed over the Basal Program in progress. • The lighter blue shaded area shows the proposed temp basal rate for each segment.
-
Page 116: Canceling A Temp Basal Or Temp Basal Preset
1. Navigate to the Home screen's TEMP ON tab. 2. Tap CANCEL. 3. Tap YE S to confirm cancellation. The Omnipod 5 App cancels the temp basal and starts the last scheduled Basal Program. 7.4. Creating a New Temp Basal Preset To create a new temp basal preset: 1. -
Page 117: Editing A Temp Basal Preset
Temporary Basal Rates and Presets • If using a flat rate (U/hr), scroll the wheel to select the basal rate for the entire temp basal period. 8. Tap the Duration field and scroll to a duration for the preset. The temporary change to the Basal Program is shown on the graph. -
Page 118: Deleting A Temp Basal Preset
Temporary Basal Rates and Presets 7.6. Deleting a Temp Basal Preset Note: You cannot delete a temp basal preset that is in progress. To delete a temp basal preset: 1. Navigate to the Temp Basal Presets screen: Menu button ( ) >... -
Page 119: Temp Basal Settings: Units Per Hour (U/Hr) Or Percent (%)
Temporary Basal Rates and Presets Temp basal settings: Units per hour (U/hr) or percent (%) Temp basals can be set using percent (%) or units per hour (U/hr). Setting temp basals to units per hour (U/hr) means that the Pod delivers insulin at a flat rate for the duration of the temp basal. -
Page 120: Temp Basal Limitations
Temp basals that turn off basal insulin delivery: When using percent (%), if you set a decrease that results in a flow of less than 0.05 U/hr for a segment, the Omnipod 5 App informs you that you will receive 0 U/hr of insulin for one or more segments. -
Page 121: Temp Basal Presets
Temporary Basal Rates and Presets Tip: Using a temp basal to turn off basal insulin delivery is useful if you want your Basal Program to automatically start when the temp basal ends. Temp basal presets Some temporary changes in your daily routine are easy to predict, and you may know from experience how they affect your insulin needs. -
Page 122: Chapter 8: Blood Glucose Readings
Chapter 8: Blood Glucose Readings CHAPTER 8 Blood Glucose Readings Contents 8.1. About Blood Glucose Readings ........114 8.2. -
Page 123: About Blood Glucose Readings
CGM to an active Pod. Once connected, CGM values are displayed and can be used in the Omnipod 5 App in both Manual and Automated Modes. There may be times when you need to check your blood glucose using a separate BG meter. -
Page 124: Entering Your Blood Glucose Reading
If you accessed this screen from the SmartBolus Calculator, SAVE does not appear. • Tap CANCEL, then YES, to exit the screen without saving the blood glucose reading or tags. The Omnipod 5 App records the current time as the time of the blood glucose reading. -
Page 125: High And Low Blood Glucose Readings
If left untreated, these situations can quickly lead to diabetic ketoacidosis (DKA), shock, coma, or death. If the blood glucose reading is HI or above 600 mg/dL, the Omnipod 5 App records "HI" in the history. This indicates severe hyperglycemia (high glucose). If the blood glucose reading is LO or below 20 mg/dL, the Omnipod 5 App records "LO"... -
Page 126: How Blood Glucose Readings Are Displayed
<blood glucose reading> 0-19 mg/dL or LO How Blood Glucose Readings are Displayed The Omnipod 5 App displays the blood glucose reading inside a colored circle. The circle is: • Yellow if your blood glucose is above your Glucose Goal Range. -
Page 127: Tagging Your Blood Glucose Readings
Blood Glucose Readings 8.4. Tagging Your Blood Glucose Readings You can add informational tags to your blood glucose reading for future reference. For example, you may tag the blood glucose reading as pre-meal. To add a tag to the current blood glucose reading: 1. - Page 128 CHAPTER 9 Pausing and Starting Insulin Delivery Contents 9.1. Pausing Insulin Delivery ......... 120 Pause insulin delivery .
-
Page 129: Chapter 9: Pausing And Starting Insulin Delivery
Sometimes you may need to pause insulin delivery briefly. For example, you must pause insulin delivery prior to editing a Basal Program in progress or changing the time zone. The Omnipod 5 System lets you pause all insulin delivery for up to two hours. -
Page 130: Methods To Temporarily Pause Insulin Delivery In Manual Mode
Pausing and Starting Insulin Delivery 9.2. Methods to Temporarily Pause Insulin Delivery in Manual Mode There may be times when you want to pause all insulin delivery, or at least all basal insulin delivery, for a period of time. If you do not want to deactivate your current Pod, you can request a temporary halt of insulin delivery as follows: •... -
Page 131: Starting Insulin Delivery
) > Start Insulin 2. Tap START INSULIN to confirm restarting the Basal Program scheduled for the current time. The Omnipod 5 App beeps to confirm that insulin delivery has started. Start insulin delivery after the pause period ends ¾ Tap START INSULIN to start insulin delivery. -
Page 132: Chapter 10: Changing Settings
CHAPTER 10 Changing Settings Contents 10.1. General Settings ..........124 Network Connectivity . -
Page 133: General Settings
Insulin Action. Some settings differ between the Insulet-provided Controller with the Omnipod 5 App and the Omnipod 5 App on your smartphone. If you are using the Controller, settings allow you to change your network connectivity, screen display settings, lock screen settings, and time zones. You can also check alarms and reset the Controller. -
Page 134: Screen Display
Changing Settings 10 Screen Display Use the screen display settings to control the screen time-out and brightness. Screen time-out The Controller screen turns black if you have not used it for the specified amount of time in order to preserve battery power. To change the amount of time: 1. -
Page 135: Pin
A time change occurs when you are traveling to a different time zone or for daylight savings time. To help you manage time changes your device’ s time zone is separate from your insulin delivery time zone as described in the table below. Omnipod 5 App Device Time Insulin Delivery... -
Page 136: Device Time Zone
For example, when you travel outside of the country, your Omnipod 5 App will ask you if you would like to update your insulin delivery time zone to your new local time. -
Page 137: Reminder Settings
Your Pod will still sound, and you will be able see the Alarm or Notification displayed on the Omnipod 5 App. See "13.3. Sounds and Vibrations" on page 157 to learn how to manage sounds and vibrations. -
Page 138: Pod Shut-Off
You must use the Omnipod 5 App within 15 minutes of the onset of the Pod Shut-Off advisory alarm. If you do not respond to this alarm within this time, the Omnipod 5 App and Pod sound a hazard alarm and your Pod stops delivering insulin which can lead to hyperglycemia. -
Page 139: Program Reminders
2. Scroll down and tap the Custom Reminders toggle to enable or disable all custom reminders. If you disable these reminders, the Omnipod 5 System saves any previously set reminders for later use. Note: The custom reminders toggle must be set to ON in order to add, edit, or delete custom reminders. -
Page 140: Add A New Custom Reminder
Changing Settings 10 Add a new custom reminder To add a new custom reminder: 1. Navigate to: Menu button ( ) > Settings > Reminders > Custom Reminders. 2. Tap Add Reminder. 3. Tap the toggle to select Single Reminder or Recurring Reminder. •... -
Page 141: Basal And Temp Basal Settings
10 Changing Settings 10.3. Basal and Temp Basal Settings The following sections describe how to change settings that control basal insulin delivery. Note: These settings only apply when using Manual Mode. Maximum Basal Rate The Maximum Basal Rate defines an upper limit for any basal rate used in your Basal Programs and temp basals during Manual Mode only. -
Page 142: Chapter 11: Browsing Your History And Records
CHAPTER 11 Browsing Your History and Records Contents 11.1. About Your Recent History and Past Records ....134 11.2. Viewing the CGM Graph ........134 11.3. -
Page 143: About Your Recent History And Past Records
11 Browsing Your History and Records 11.1. About Your Recent History and Past Records The Omnipod 5 App can store 90 days of history records. Once the memory is full, new records begin to replace the oldest records. You can browse but not edit the information in your records. -
Page 144: Cgm Graph States
The top section of the CGM Graph changes color based on your current system mode. When the Omnipod 5 System is in Manual Mode, the graph heading is light gray. The graph shows your most recent CGM values over the last 3 hours. - Page 145 • Bolus button at the time you started a bolus 6. Vertical axis: Displays CGM values in mg/dL 7. Time scale: Displays hour and half-hour markings. When the Omnipod 5 System is in Automated Mode, the graph heading is purple.
-
Page 146: History Information Overview
Browsing Your History and Records 11 When the Omnipod 5 System is in Automated Mode: Limited state, the graph heading is dark gray. History Information Overview You can access the history summary and detail information, and a list of automated events from the History Detail screen. -
Page 147: History Summary Section
11 Browsing Your History and Records 11.4. History Summary Section The upper section of the History screens summarizes the records for the day. Summary item Description Row 1 - CGM Average CGM Average of CGM values for the day. Percentage of CGM values within your Glucose Goal CGM in Range Range. - Page 148 When insulin delivery is unconfirmed After delivering a bolus or basal dose of insulin, the Pod sends a confirmation to the Omnipod 5 App once completed. If a bolus, basal, or total insulin delivery has not been confirmed, the following icons will display:...
-
Page 149: Calculations For History Summaries
11 Browsing Your History and Records 11.5. Calculations for History Summaries This section lists the calculations for the summary data shown on the History screens. Glucose Summaries The calculations used for the glucose summaries include CGM values (including HIGH and LOW values) and exclude manually-entered readings. Item Calculation Row 1... -
Page 150: History Details Section
Browsing Your History and Records 11 When your Omnipod 5 System has not received updates from the Pod about confirmed insulin delivery, the insulin delivery calculations are estimates based on the scheduled insulin delivery. Summary item Calculation Row 2 Total Insulin... -
Page 151: Glucose Goal Range
11 Browsing Your History and Records Glucose Goal Range The goal of using the Omnipod 5 System is to keep your glucose within your Glucose Goal Range. You define this range by setting the upper and lower limits. The CGM Graph and the Enter BG screen use the Glucose Goal Range to determine which glucose readings are within your goal and which are above or below your goal. -
Page 152: Extended Bolus Events
Omnipod 5 App that the bolus was delivered. Before the Omnipod 5 App receives confirmation from the Pod that the bolus has been delivered, the Omnipod 5 App estimates the amount delivered. During this time, the History screens use a gray exclamation icon to indicate that the bolus is estimated. -
Page 153: Pod Details
11 Browsing Your History and Records Note: If you have an unconfirmed bolus, the SmartBolus Calculator is disabled for the duration of insulin action. Pod Details A Pod icon and banner mark the activation and deactivation (or discarding) of each Pod. Tapping a Pod banner displays the Pod's lot number and sequence number. -
Page 154: Basal Rate At Midnight
Browsing Your History and Records 11 Basal rate at midnight The first entry for each day is a banner displaying the status of the basal insulin delivery at midnight. If a Basal Program, temp basal, or use of the Activity feature was carried over from the day before, the banner indicates that this is a continued program. -
Page 155: Automated Events (Auto Events)
11 Browsing Your History and Records Automated Events (Auto Events) Tap AUTO EVENTS on the history screen to display the amount of insulin delivered at each 5-minute period while in Automated Mode. A system mode icon and banner show the time the system switched to Automated Mode or to Manual Mode. -
Page 156: Chapter 12: Managing Software Updates
12.1. Insulet-provided Controller ........148... -
Page 157: Insulet-Provided Controller
When an update is available, you will receive a notification prompting you to update. Note: You will not be able to navigate in the Omnipod 5 App during an Omnipod 5 update; however, your insulin therapy will not be impacted. The Pod continues delivering insulin and will re-establish connection with the Omnipod 5 App once the update is complete. -
Page 158: Omnipod 5 App Update On The Controller
5 App as soon as the update is available. If you choose to postpone an optional update to a later time, you can manually update the Omnipod 5 App at any time. After 72 hours have passed, you will receive a notification every 24 hours reminding you to update your Omnipod 5 App. -
Page 159: Omnipod 5 App On Smartphone
If you have Automatic Updates enabled on your phone, the Omnipod 5 App updates will be downloaded and installed automatically through Google Play. If an automatic update occurs, the Omnipod 5 App informs you that an update was successfully completed when you open the App. - Page 160 5 App as soon as the update is available. If you choose to postpone an optional update to a later time, you can manually update the Omnipod 5 App at any time. After 72 hours have passed, you will receive a notification every 24 hours reminding you to update your Omnipod 5 App.
- Page 161 This page intentionally left blank.
-
Page 162: Chapter 13: Alarms, Action And Reminder Notifications
Timing of Pod Alarms on the Omnipod 5 App . . . . . . . . . . . . . . . . - Page 163 Turn Notifications ON . . . . . . . . . . . . . . . . . . . . . . . . . . . . . . . . . . . . . . . . . . . 1 92 Update Omnipod 5 - App No Longer Supported . . . . . . . . . . . . . . 1 93 Update Omnipod 5 - Software Update .
-
Page 164: Types Of Alarms And Notifications
(called force stopping) on your smartphone. The Omnipod 5 App must be open or be running in the background in order to display and sound alarms on the smartphone. If the App is not running, you could miss important alarms and notifications on the smartphone. -
Page 165: Alarms And Notifications Screen
13 Alarms, Action and Reminder Notifications hazard alarm that most recently occurred will be displayed first on the Omnipod 5 App. Any Pod hazard alarms will be sounded on the Pod. Advisory alarms are low-priority alarms that indicate that a situation •... -
Page 166: Sounds And Vibrations
), the icon for those notifications will be gray the next time you view this screen. 13.3. Sounds and Vibrations The Omnipod 5 System uses sounds and vibrations to attract your attention to an alarm or notification. Caution: AVOID setting your Controller or smartphone to Silent, Vibrate... -
Page 167: Informational Sounds And Vibrations
ALWAYS make sure you can hear alarms and notifications when paired to alternative audio devices (e.g. Bluetooth speaker, headphones). Navigate to your smartphone’ s sound settings to ensure that all Omnipod 5 App notifications are enabled to produce a vibration and audible sound. See "4.5. -
Page 168: Confidence Reminders
Note: Confidence reminders and program reminders are turned on by default. These reminders cause the Omnipod 5 App or Pod to beep at the beginning and end of boluses and temp basals, and also once an hour during an extended bolus or temp basal. -
Page 169: Responding To Alarms
Your Pod will still sound, and you will be able see the Alarm or Notification displayed on the Omnipod 5 App. See "13.3. Sounds and Vibrations" on page 157 to learn how to manage sounds and vibrations. -
Page 170: Timing Of Pod Alarms On The Omnipod 5 App
2. After unlocking your Omnipod 5 App, follow the on-screen instructions or see the individual alarm details starting on page 162. Note: You can use your Omnipod 5 System even if you do not address an advisory alarm immediately. However, you must acknowledge a hazard alarm before you can use your Omnipod 5 System. -
Page 171: Check Alarms
5. If the Pod did not beep, tap NO. Then either tap CHECK AGAIN to retry testing the alarms, or tap DONE and change your Pod. 6. If the Omnipod 5 System alarms did not sound, tap NO. Then either tap CHECK AGAIN to retry testing the alarms or contact Customer Care. -
Page 172: Hazard Alarm List
(occlusion). Not taking action promptly could result in under-delivery of insulin which can lead to hyperglycemia or diabetic ketoacidosis (DKA). Screen Alert Description Omnipod 5 App: Why it occurs: A blockage (occlusion) was detected from the blocked cannula, a Pod malfunction, or from using old or inactive insulin, which has stopped insulin delivery. -
Page 173: Omnipod 5 App Error
Screen Alert Description Omnipod 5 App: Why it occurs: An unexpected error is detected in the Omnipod 5 App. Note: If your Omnipod App stops and restarts on its own, you may notice the app flashing white before this screen appears. -
Page 174: Omnipod 5 Memory Corruption
Alarms, Action and Reminder Notifications 13 Omnipod 5 Memory Corruption Screen Alert Description Omnipod 5 App: Why it occurs: An unexpected error is detected in the Omnipod 5 App. Pod sound: None Controller/Smartphone sound and vibration: • 30 second tone •... -
Page 175: Pod Error
Pod changes could result in under-delivery of insulin which can lead to hyperglycemia. If another Pod is not available, use a different insulin delivery method. Screen Alert Description Omnipod 5 App: Why it occurs: The Pod detects an unexpected error and insulin delivery has stopped. Pod sound: Continuous tone... -
Page 176: Pod Expired
If another Pod is not available, use a different insulin delivery method. Screen Alert Description Omnipod 5 App: Why it occurs: The Pod has reached the end of its operating life, and insulin delivery has stopped. Pod sound: Continuous tone... -
Page 177: Pod Out Of Insulin
If another Pod is not available, use a different insulin delivery method. Screen Alert Description Omnipod 5 App: Why it occurs: The Pod’ s insulin reservoir is empty, and insulin delivery has stopped. Pod sound: Continuous tone Controller/Smartphone sound and vibration: •... -
Page 178: Pod Shut-Off
If another Pod is not available, use a different insulin delivery method. Screen Alert Description Omnipod 5 App: Why it occurs: The Pod has stopped delivering insulin because you have set a Pod Shut-Off time and you did not respond to the Pod Shut-Off advisory alarm. -
Page 179: System Error
13 Alarms, Action and Reminder Notifications System Error Screen Alert Description Omnipod 5 App: Why it occurs: An unexpected error is detected in the Pod or the Omnipod 5 App. Pod sound: None Controller/Smartphone sound and vibration: • 30 second tone •... -
Page 180: Advisory Alarm List
Advisory alarms inform you of a situation that needs your attention in the near future. Low Pod Insulin Screen Alert Description Omnipod 5 App: Why it occurs: The amount of insulin in the Pod is below the value specified in your settings. Pod sound: •... -
Page 181: Pod Expired
13 Alarms, Action and Reminder Notifications Pod Expired Screen Alert Description Omnipod 5 App: Why it occurs: Your Pod will stop delivering insulin soon. Pod sound: • 8 beep tone • Tone issued once every 60 minutes starting after 72 hours of Pod life •... -
Page 182: Pod Shut-Off
Alarms, Action and Reminder Notifications 13 Pod Shut-Off Screen Alert Description Omnipod 5 App: Why it occurs: You have reached the Pod Shut-Off time you set. The Pod will stop delivering soon if you do not respond to this alarm. -
Page 183: Start Insulin
If you do not start insulin delivery, you could develop hyperglycemia. Screen Alert Description Omnipod 5 App: Why it occurs: The time period that you specified to pause insulin has passed. If you do not start insulin delivery, you could develop hyperglycemia. -
Page 184: Urgent Low Glucose
Screen Alert Description Omnipod 5 App: Why it occurs: Your glucose is at or below 55 mg/dL, according to what your CGM sent to the Omnipod 5 App. Pod sound: • 4 beep tone • Repeats every 5 minutes that CGM value... -
Page 185: Action Item Notification List
You have not installed a required update to the Omnipod 5 App • An update for the Omnipod 5 App is not yet available to fix a known issue • Your smartphone device is no longer compatible with use of the Omnipod 5 App •... - Page 186 Description Omnipod 5 App: Why it occurs: The installed version of the Omnipod 5 App is no longer supported for use. You will not be able to use the App until an update becomes available. This message may appear whether you have an active Pod or not.
-
Page 187: Attention
If you notice any unexpected effects on your screen or otherwise have concerns about the way your Omnipod 5 System is working, call Customer Care. For a list of compatible operating systems, go... -
Page 188: Connect To A Wireless Network
Tip: If Wi-Fi is not available, move to an area with a better cellular signal. Note: The SIM Card on your Omnipod 5 Controller enables data to be sent and received via the AT&T wireless network when your Controller is not connected to a Wi-Fi network. -
Page 189: Daylight Saving Time Change
Screen Alert Description Omnipod 5 App: Why it occurs: The Omnipod 5 App has detected that Daylight Saving Time has started or ended. Pod sound: None Controller/Smartphone sound and vibration: •... -
Page 190: Device Has Been Modified
App is, do not install it, regardless of the source. It is not advised to install any app from a source other than Google Play on your smartphone that is running the Omnipod 5 App. Doing so may put you at risk of unintentionally installing malware on your device. - Page 191 13 Alarms, Action and Reminder Notifications Screen Alert Description Omnipod 5 App: Why it occurs: You have modified your device and it is not safe to use with the Omnipod 5 App. Pod sound: None Controller/Smartphone sound and vibration: •...
-
Page 192: Device Not Compatible
You have not installed a required update to the Omnipod 5 App • An update for the Omnipod 5 App is not yet available to fix a known issue • Your smartphone device is no longer compatible with use of the Omnipod 5 App •... -
Page 193: Not Enough Storage
Why it occurs: You do not have enough available storage for the Omnipod 5 App to run on your smartphone. Your smartphone must have enough storage space for the Omnipod 5 App to work and save important information about your insulin therapy. -
Page 194: Omnipod 5 Error
You have not installed a required update to the Omnipod 5 App • An update for the Omnipod 5 App is not yet available to fix a known issue • Your smartphone device is no longer compatible with use of the Omnipod 5 App •... - Page 195 13 Alarms, Action and Reminder Notifications Screen Alert Description Omnipod 5 App: Why it occurs: The Omnipod 5 App cannot be used on your device’ s current operating system (OS). You will not be able to use the app until an update becomes available. This message may appear whether you have an active Pod or not.
-
Page 196: Stop Optimizing Battery Usage
2. Tap ALLOW when prompted to stop battery optimization. Note: You cannot navigate within the Omnipod 5 App until you tap ALLOW. Note: You will not be able to use the Omnipod 5 App until you stop battery optimization for the Omnipod 5 App. -
Page 197: Turn Bluetooth
Turn Bluetooth ON Screen Alert Description Omnipod 5 App: Why it occurs: Bluetooth is turned OFF on your smartphone. Your Omnipod 5 App and Pod communicate via Bluetooth so Bluetooth must be turned ON. Pod sound: None Smartphone sound and vibration: •... -
Page 198: Turn Do Not Disturb Access
Omnipod 5 App 4. Press the back button to return Note: The Omnipod 5 App on your smartphone requires Do Not Disturb permission and Notifications to be turned ON to ensure you always receive important safety alarms. You cannot use the App until Do Not Disturb... -
Page 199: Turn Lock Screen Security
2. Enable your passcode or another security method. Use of the Omnipod 5 App on your phone requires that you select a screen lock type and set security options on your phone to protect against unintended use and accidental therapy changes. This feature can be enabled from your phone’ s Settings. -
Page 200: Turn On Automatic Date And Time
App has many therapy-related actions that depend on time. Automatic Date and Time is a setting on your smartphone that ensures the accuracy of your time. The Omnipod 5 App uses the setting to detect if you have traveled to a different time zone. -
Page 201: Turn Notifications
2. Tap Show notifications to turn Omnipod 5 App notifications ON. Note: The Omnipod 5 App on your smartphone requires Do Not Disturb permission and Notifications to be turned ON to ensure you always receive important safety alarms. You cannot use the App until Do Not Disturb... -
Page 202: Update Omnipod 5 - App No Longer Supported
Alarms, Action and Reminder Notifications 13 Update Omnipod 5 - App No Longer Supported Screen Alert Description Omnipod 5 App: Why it occurs: The Omnipod 5 App version you are currently using is obsolete and no longer supported. Pod sound: None... -
Page 203: Update Omnipod 5 - Software Update
13 Alarms, Action and Reminder Notifications Update Omnipod 5 - Software Update Screen Alert Description Omnipod 5 App: Why it occurs: An Omnipod 5 App software update is available. Pod sound: None Controller/Smartphone sound and vibration: • 3 second tone •... - Page 204 Alarms, Action and Reminder Notifications 13 Update OS Screen Alert Description Why it occurs: An operating system update is Omnipod 5 App: available for your Controller. Pod sound: None Controller sound and vibration: • 3 second tone • 3 second vibration •...
-
Page 205: Update
Screen Alert Description Omnipod 5 App: Why it occurs: Your Controller or smartphone time zone does not match the Omnipod 5 App insulin delivery time zone. Pod sound: None Controller/Smartphone sound and vibration: • 3 second tone •... -
Page 206: Silencing Unresolved Alarms
Alarms, Action and Reminder Notifications 13 13.9. Silencing Unresolved Alarms You can silence Pod or Omnipod 5 App alarms by acknowledging the alarm screen displayed on your Omnipod 5 App. If the alarm continues, follow the directions in this section. -
Page 207: Responding To Reminder Notifications
Reminder Notifications remind you about actions you may want to perform. Finding out about reminder notifications To alert you to a notification, the Pod sounds a 3-beep tone, and the Omnipod 5 App either sounds a tone or vibrates (see "13.3. Sounds and Vibrations" on page 157). -
Page 208: Reminder Notifications List
) in the upper left of the screen to mark the notifications as acknowledged. Note: Putting the Omnipod 5 Controller to sleep by pressing the Power button does not mark the notifications as acknowledged. You must tap the back arrow ( ) to acknowledge the notification. -
Page 209: No Active Pod
What to do Acknowledge the message (see "Acknowledging reminder notifications" on page 198). Change your Pod. Note: To change the timing of this notification, see "Pod Expiration" on page 128. Both the Pod and the Omnipod 5 App sound the notification. -
Page 210: Missed Bolus
Check the infusion site to see if the cannula is properly inserted. Note: If there is a valid CGM value present at the time, in either Manual or Automated Mode, this alert will automatically be cleared by the Omnipod 5 App. -
Page 211: Check Bg After Bolus
Note: To edit these reminders, see " Check BG After Bolus" on page 202. Note: If there is a valid CGM value present at the time, in either Manual or Automated Mode, this alert will automatically be cleared by the Omnipod 5 App. -
Page 212: Chapter 14: Taking Care Of Your Controller And Pod
CHAPTER 14 Taking Care of Your Controller and Pod Contents 14.1. Pod and Insulin Storage and Care ....... 204 Pod and Insulin Storage . -
Page 213: Pod And Insulin Storage And Care
DO NOT expose any Omnipod 5 System products or supplies to extreme temperatures as this results in them not functioning properly. Store all Omnipod 5 System products and supplies, including unopened Pods, in a cool, dry place. The Omnipod 5 Automated Insulin Delivery System has no user-serviceable parts. -
Page 214: Controller Storage And Care
Controller screen lock security with anyone. Caution: DO NOT use any component of the Omnipod 5 System (smartphone, Controller, Pod) if you suspect damage after an unexpected event such as dropping or hitting on a hard surface. Using damaged components may put your health at risk as the system may not be working properly. -
Page 215: Long Term Storage Of Your Controller
Your Controller and the Environment Avoid extreme temperatures Extreme operating temperatures can affect the Controller battery and interfere with Omnipod 5 System operation. Avoid using the Controller in temperatures below 41°F (5°C) or above 104°F (40°C). Caution: DO NOT expose your Controller to extreme temperatures while in storage or during use. -
Page 216: Usb Cable
Taking Care of Your Controller and Pod 14 USB cable Caution: Use ONLY the USB charging cable that you received in the box with your Controller. AVOID using alternative charging cables or other accessories, as they may damage the Controller or affect the way it charges in the future. -
Page 217: Controller Battery Care
The battery may explode if overheated. • Do not drop the Controller. • Only use an Insulet approved charger to charge your Controller. Using unapproved chargers can cause the battery to explode or damage the Controller and may void the warranty. -
Page 218: Charging The Controller Battery
Under normal use, the battery should hold its charge for more than one day. An Omnipod 5 App message alerts you when the battery charge is low. The battery icon in the status bar tracks the remaining charge in the battery (see "3.4. - Page 219 14 Taking Care of Your Controller and Pod Note: If the Controller battery is critically low and the Controller has turned OFF, your Pod continues to deliver Automated Mode insulin or Manual Mode basal insulin according to the Basal Program in progress or temp basal. If you do not charge your Controller battery, this insulin delivery continues until the Pod expires.
-
Page 220: Chapter 15: Living With Diabetes
CHAPTER 15 Living with Diabetes Contents 15.1. Infusion Site Checks ..........212 15.2. -
Page 221: Infusion Site Checks
15 Living with Diabetes 15.1. Infusion Site Checks Caution: ALWAYS check for signs of infection often. If an infusion site shows signs of infection: • Immediately remove the Pod and apply a new Pod at a different infusion site. • Contact your healthcare provider. -
Page 222: Being Aware Of Your Glucose
Living with Diabetes 15 15.2. Being Aware of Your Glucose Warning: ALWAYS be aware of your current CGM value, trust how your body feels, and do not ignore symptoms of high and low glucose. Even though insulin delivery adjusts automatically in Automated Mode with the goal of bringing your glucose level to your defined Target Glucose, severe hypoglycemia or hyperglycemia may still occur. -
Page 223: Traveling And Vacations
Keep Supplies Accessible On airplanes, trains, and buses, keep these items with you, rather than checking them: • Your Controller or your smartphone with the Omnipod 5 App • Extra Pods • An emergency kit •... -
Page 224: Plan For Changing Time Zones
Living with Diabetes 15 Plan for Changing Time Zones If you’re planning a vacation or business trip to a different time zone, you may need to adjust Basal Programs that you would typically follow while in Manual Mode. For changes of just a few hours, basal rate adjustments are minor and easy to calculate. -
Page 225: Avoiding Lows, Highs, And Diabetic Ketoacidosis
If the use of a Personal Medical Electronic Device using Bluetooth technology is allowed, set your Omnipod 5 App to airplane mode while on the airplane (see "Airplane mode" on page 124). The Bluetooth setting remains enabled in the Controller's Airplane Mode so you can communicate with your Pod. -
Page 226: Hypoglycemia (Low Glucose)
Tip: Hypoglycemia unawareness is a condition in which you do not realize when your glucose is low. If you are prone to hypoglycemia unawareness, you may want to use the Omnipod 5 System's blood glucose reminder and check your glucose more frequently (see "Check BG After Bolus" on page 236). -
Page 227: To Avoid Hypoglycemia (Low Glucose)
15 Living with Diabetes To avoid hypoglycemia (low glucose) • Work with your healthcare provider to establish individualized Target Glucose settings and guidelines. • Keep a fast-acting carbohydrate with you at all times to respond quickly to low glucose. Examples of fast-acting carbs are glucose tablets, hard candies, or juice. -
Page 228: To Treat Hypoglycemia (Low Glucose)
Living with Diabetes 15 Possible causes of Suggested action hypoglycemia Prone to severe Consult your healthcare provider about hypoglycemia hypoglycemia unawareness and about raising or hypoglycemia Target Glucose. unawareness Consult with your healthcare provider about using Unplanned physical Temp Basal (Manual Mode) or the Activity feature activity (Automated Mode). -
Page 229: Hyperglycemia (High Glucose)
Pods use rapid-acting insulin, which has a shorter duration than long-acting insulin, so you have no long-acting insulin in your body when using the Omnipod 5 System. If a blockage (interruption of insulin delivery from the Pod, or occlusion) occurs, your glucose can rise rapidly. - Page 230 Living with Diabetes 15 Possible causes of Suggested action hyperglycemia Expired insulin or Deactivate and remove the used Pod. Apply a new Pod insulin exposed to filled from a new vial of insulin. extreme temperatures Infusion site in or Deactivate and remove the used Pod. Apply a new Pod near a scar or mole in a different location.
-
Page 231: To Treat Hyperglycemia (High Glucose)
• Replace the Pod. Use a new vial of insulin to fill the new Pod. Then contact your healthcare provider for guidance. Note: The Omnipod 5 System cannot track insulin that is administered outside of the system. Consult your healthcare provider about how long to wait after manually administering insulin before you start Automated Mode. -
Page 232: Diabetic Ketoacidosis (Dka)
Pods use rapid-acting insulin, which has a shorter duration than long-acting insulin, so you have no long-acting insulin in your body when using the Omnipod 5 System. If insulin delivery from the Pod is interrupted (a blockage or occlusion), your glucose can rise rapidly and lead to diabetic ketoacidosis (DKA). -
Page 233: Handling Special Situations
15 Living with Diabetes • Check your glucose again after 2 hours. If your glucose has not declined or if your ketone levels have risen or remain elevated, immediately contact your healthcare provider for guidance. 15.5. Handling Special Situations Sick Days Any physical or emotional stress can cause your glucose to rise, and illness is physical stress. -
Page 234: X-Rays, Mris, And Ct Scans
Living with Diabetes 15 The Pod’ s adhesive keeps it securely in place for up to 3 days. However, if necessary, several products are available to enhance adhesion. Ask your healthcare provider about these products. Avoid getting body lotion, creams, or oils near the infusion site; these products may loosen the adhesive. - Page 235 This page intentionally left blank.
-
Page 236: Section 3: Smartbolus Calculator
SMARTBOLUS CALCULATOR SmartBolus Calculator Important Safety Information 16 Delivering a Bolus 17 Delivering a Bolus with the SmartBolus Calculator 18 SmartBolus Calculator Calculations... - Page 237 This page intentionally left blank.
-
Page 238: Smartbolus Calculator Important Safety Information
Warning: over-delivery or under-delivery of Do NOT use Omnipod 5 insulin. This can lead to hypoglycemia System if you are taking hydroxyurea, or hyperglycemia. a medication used in the treatment of... - Page 239 Caution: DO NOT navigate away from the Omnipod 5 App while you are in the process of making changes to your insulin delivery settings. If you leave the App before you are able to...
-
Page 240: Chapter 16: Delivering A Bolus
CHAPTER 16 Delivering a Bolus Contents 16.1. Delivering a Manual Bolus ........232 16.2. -
Page 241: Delivering A Manual Bolus
You can extend some or all of a manual bolus in Manual Mode. When delivering a manual bolus, the Omnipod 5 System does not adjust the bolus amount based on your glucose value, carbohydrates being consumed, or IOB as it does when the SmartBolus Calculator is used. -
Page 242: Delivering Immediate And Extended Boluses
Delivering a Bolus 16 16.2. Delivering Immediate and Extended Boluses A bolus is an extra dose of insulin that is delivered in addition to the continuous basal rate of insulin delivery. Use boluses to cover the carbohydrates in a meal and/ or bring down a high glucose. -
Page 243: Tracking The Progress Of A Bolus
Note: You cannot navigate within the Omnipod 5 App during an immediate bolus. Note: Look for the progress bar to confirm the bolus delivery has started before navigating away from the Omnipod 5 App. -
Page 244: Canceling A Bolus In Progress
When an immediate bolus is in progress, you must cancel it or allow it to finish before performing any other action. During an extended bolus, you can use your Omnipod 5 System normally, except that the Bolus button will be disabled (grayed out), preventing you from delivering an additional bolus. -
Page 245: Reminder Settings
If a meal bolus or a manual bolus is not delivered during the Missed Bolus time period, the Omnipod 5 System will generate the Missed Bolus reminder. You can set time intervals from 30 minutes to 4 hours. You can set up to 6 Missed Bolus reminders per day. -
Page 246: Add A New Missed Bolus Reminder
Delivering a Bolus 16 Add a new Missed Bolus reminder To add a new Missed Bolus reminder: 1. Navigate to: Menu button ( ) > Settings >Reminders > Missed Bolus. 2. Tap Add Reminder. The Add Reminder button does not appear if Missed Bolus reminders are disabled. - Page 247 This page intentionally left blank.
- Page 248 CHAPTER 17 Delivering a Bolus with the SmartBolus Calculator Contents 17.1. About the SmartBolus Calculator ....... 240 Compatible Devices for Use with the SmartBolus Calculator .
-
Page 249: About The Smartbolus Calculator
Brand Name Blood Glucose Meter All FDA-cleared blood glucose meters iCGM Dexcom Dexcom G6 Continuous Glucose Monitor Alternate Controller Insulet Corporation Omnipod 5 ACE Pump Enabled Insulin Pump (Pod) (Insulin Pump) Interoperable Insulet Corporation SmartAdjust technology Automated Glycemic Controller software... -
Page 250: About Using A Cgm Value With Trend
To change your personal settings used by the SmartBolus Calculator, see "SmartBolus Calculator Settings" on page 250. Note: To use the SmartBolus Calculator, the Omnipod 5 App and the Pod must be communicating. If there is no Omnipod 5 App to Pod communication, you will be prompted to re-establish a Pod connection. -
Page 251: Entering Meal Information
17 Delivering a Bolus with the SmartBolus Calculator 17.2. Entering Meal Information To enter carbohydrates, or "carbs," for your meal: 1. On the Home screen, tap the Bolus button Note: The Bolus screen is only valid for 5 minutes. After 5 minutes, if bolus delivery has not started, you must refresh and re- enter new values. -
Page 252: Import And Use Cgm Value
Delivering a Bolus with the SmartBolus Calculator 17 To enter a blood glucose reading: 1. Tap the Glucose field . If you have manually entered a blood glucose reading from a meter within the past 10 minutes, that value automatically appears in the Glucose field. If you want the SmartBolus Calculator to use that value, skip the next step. -
Page 253: Insulin On Board (Iob)
SmartBolus Calculator is disabled. If the CGM value displays "HIGH", the SmartBolus Calculator is temporarily disabled. Note: If your Omnipod 5 System does not have a valid CGM value or trend at the time you open the SmartBolus Calculator, the USE CGM option is disabled. -
Page 254: Adjustments To Your Calculation
Delivering a Bolus with the SmartBolus Calculator 17 17.5. Adjustments to Your Calculation A suggested meal bolus that is calculated using your Insulin to Carb (IC) Ratio may be further adjusted for other values entered into and used by the SmartBolus Calculator, including: blood glucose readings, CGM value and trend, and/or IOB. -
Page 255: Delivering An Extended Bolus
17 Delivering a Bolus with the SmartBolus Calculator 6. Review the bolus details on the Confirm Bolus screen. Grams of carbs Blood glucose or CGM value The total bolus includes any IOB Adjusted for adjustments and IOB of x U means any adjustments the SmartBolus you made to the... - Page 256 Delivering a Bolus with the SmartBolus Calculator 17 CLOSE when done. See "SmartBolus Calculator Equations" on page 263 for details. 3. Tap EXTEND BOLUS. 4. Tap the Now field and enter the percentage of the bolus to be delivered immediately. Alternatively, tap the Extended field and enter the percentage to be extended.
-
Page 257: Bolus Settings
Impacts to Suggested Bolus Calculations The following table describes what each SmartBolus Calculator setting does, how you can adjust them and how they are used to calculate a suggested bolus. Omnipod 5 Setting and How to Enter the Impacts to Suggested... -
Page 258: Maximum Bolus
Delivering a Bolus with the SmartBolus Calculator 17 Omnipod 5 Setting and How to Enter the Impacts to Suggested Range Setting Bolus Calculations Maximum Bolus Enter in Omnipod 5 Limits amount of single App Settings or during bolus dose. 0.05 – 30 U First Time Setup (0.05 U increments) -
Page 259: Target Glucose And Correct Above
17 Delivering a Bolus with the SmartBolus Calculator Omnipod 5 Setting and How to Enter the Impacts to Suggested Range Setting Bolus Calculations Duration of Insulin Enter in Omnipod 5 Increase in setting value Action App Settings or during may decrease amount of... -
Page 260: Insulin To Carb Ratio (Ic Ratio)
Delivering a Bolus with the SmartBolus Calculator 17 calculates a correction bolus if your glucose is above your Correct Above setting. In Automated Mode, the Omnipod 5 System will adjust your automated insulin delivery with the goal of bringing you to your Target Glucose. -
Page 261: Correction Factor
17 Delivering a Bolus with the SmartBolus Calculator 4. Repeat the previous step as needed for the remaining segments. 5. After confirming that all segments are correct, tap SAVE. Note: You can add and delete segments by editing the existing segments. Correction Factor The SmartBolus Calculator uses your Correction Factor to calculate a correction bolus when your glucose is above your Correct Above setting. - Page 262 CHAPTER 18 Understanding SmartBolus Calculator Calculations Contents 18.1. The SmartBolus Calculator ........254 SmartBolus Calculator Boluses .
-
Page 263: The Smartbolus Calculator
= 3 units (3 units meal bolus) Maximum Bolus The Omnipod 5 System does not allow you to enter a bolus that is above your Maximum Bolus setting. If the SmartBolus Calculator calculates a bolus amount greater than your Maximum Bolus, you will only be able to deliver up to the Maximum Bolus amount. -
Page 264: When The Smartbolus Calculator Does Not Work
The SmartBolus Calculator does not work when it is disabled or when there is no Pod communication. Being "disabled" means that the SmartBolus Calculator is temporarily unable to calculate a suggested bolus. Your Omnipod 5 System may disable the SmartBolus Calculator in a few situations. -
Page 265: Cgm Trend
IOB from previous correction boluses is referred to as correction IOB. IOB from previous meal boluses is referred to as meal IOB. Additionally, in Manual or Automated Modes, the Omnipod 5 algorithm constantly calculates IOB from your basal delivery. -
Page 266: Reverse Correction
The below table shows how each value is used in the SmartBolus Calculator to calculate the total bolus volume: Accepted How does the SmartBolus Calculator use Value this value? Using Omnipod 5 System with an FDA-Cleared Blood Glucose Meter Blood Glucose To calculate total bolus volume. 20-600 Reading from a mg/dL... - Page 267 Meal IOB Por- To calculate total bolus volume. tion Units The value is known by the Omnipod 5 Sys- tem and used by the Calculator to indicate any previously delivered Meal Boluses that may still be in effect. Target Glucose To calculate total bolus volume.
-
Page 268: Boundaries Of The Smartbolus Calculator Suggestions
Understanding SmartBolus Calculator Calculations 18 Boundaries of the SmartBolus Calculator suggestions The following figure shows the boundaries between the types of calculations performed by the SmartBolus Calculator depending on your glucose. Some examples of how to read the figure are provided below: •... -
Page 269: Considerations About Smartbolus Calculator Recommendations
The SmartBolus Calculator refreshes values every 5 minutes. If you do not start your bolus within 5 minutes of entering the SmartBolus Calculator, the Omnipod 5 System will need to clear the screen so that it has the latest IOB and CGM information. -
Page 270: Insulin On Board (Iob)
IOB, decrease your suggested bolus amount to help prevent giving too much insulin. Note: You must bring your Controller or smartphone running the Omnipod 5 App near the Pod to get the most recent IOB value on your Omnipod 5 App Home screen. Bolus IOB depletion The graph below shows the IOB from an 8 unit bolus depleting over the set Duration of Insulin Action of 4 hours. - Page 271 18 Understanding SmartBolus Calculator Calculations In the Omnipod 5 System, the correction IOB can also change depending on the SmartAdjust technology calculations. It can increase or decrease automatically. Insulin on board (IOB) calculations Duration of Insulin Action – time since previous bolus x previous bolus Duration of Insulin Action IOB from a previous correction bolus is called a “correction IOB.
-
Page 272: Smartbolus Calculator Equations
Understanding SmartBolus Calculator Calculations 18 SmartBolus Calculator Equations The SmartBolus Calculator first calculates a preliminary correction and meal bolus. It adjusts these values for IOB, if necessary. It then suggests a final total bolus that includes the adjusted correction bolus and meal bolus. Note: Your adjustments from the CGM trend can add or subtract insulin from the correction and/or the meal portion. -
Page 273: Smartbolus Calculator Rules
18 Understanding SmartBolus Calculator Calculations SmartBolus Calculator Rules The SmartBolus Calculator applies the following rules to the suggested bolus doses: Rule Detail Rounding Boluses will always be rounded down to the nearest 0.05 U and will never be below 0 U. IOB will always be rounded up to the nearest 0.05 U and will never be below 0 U. -
Page 274: Overview Of The Bolus Calculations Screen
Understanding SmartBolus Calculator Calculations 18 Overview of the Bolus Calculations Screen You can tap VIEW BOLUS CALCULATIONS from the Insulin & BG history screen or tap CALCULATIONS from the SmartBolus Calculator screen if you want to view bolus calculation details. When a CGM value and trend are used for a bolus, the SmartBolus Calculator will not only consider the value but may also adjust the bolus amount for the trend. -
Page 275: Smartbolus Calculator Examples
18 Understanding SmartBolus Calculator Calculations 18.2. SmartBolus Calculator Examples Example 1 Eating 50 g carbs, and 0.6 U meal IOB and 0.5 U correction IOB from previous meal and correction boluses. CGM is not available and a blood glucose reading is not entered. - Page 276 Understanding SmartBolus Calculator Calculations 18 Example 2 Eating 30 g carbs, no meal or correction IOB. Used CGM value of 180 mg/dL, with a rising trend. Correction Bolus Your glucose is 1.2 U 180 mg/dL which is 50 mg/ CGM = 180, Target Glucose = 130 dL over your target .
- Page 277 18 Understanding SmartBolus Calculator Calculations Example 3 No carbs entered, used CGM of 180 mg/dL with decreasing trend. There is 0.8 U meal IOB and 0.5 U correction IOB from the previous meal and correction boluses. Correction Bolus CGM = 180, Your glucose is 180 mg/dL, which is 50 mg/dL over target .
- Page 278 USING A CGM WITH OMNIPOD 5 CGM Important Safety Information 19 About the Dexcom G6 20 Connecting Dexcom G6 CGM to the Pod...
- Page 279 This page intentionally left blank.
- Page 280 ALWAYS confirm the symptoms, ALWAYS check your blood Dexcom G6 Transmitter serial number glucose using a BG meter, consider you save in the Omnipod 5 App treatment and/or CGM sensor matches the one you are wearing. In calibration if necessary. ALWAYS...
- Page 281 CGM Precautions Caution: You cannot use the Dexcom G6 receiver with the Omnipod 5 System because the Omnipod 5 System is compatible only with the G6 app on a smartphone.
- Page 282 Pediatric placement examples . . . . . . . . . . . . . . . . . . . . . . . . . . . . . . . . . . . . . . . 2 76 19.3. Using the Dexcom G6 with Omnipod 5 ......276 19.4.
- Page 283 User Guide, contact your healthcare provider. The Omnipod 5 System is designed to connect with the Dexcom G6 CGM System. When connected to the Dexcom G6, the Pod receives glucose values and trends from the Dexcom G6.
-
Page 284: Cgm Placement
About the Dexcom G6 19 Note: The Omnipod 5 System also alerts you when your CGM values are at or below 55 mg/dL. • Always ensure the transmitter serial number entered in the Dexcom G6 and Omnipod 5 Apps match the transmitter on your body. -
Page 285: Pediatric Placement Examples
Note: Consult the Dexcom G6 CGM System User Guide for more information on approved CGM placement locations. 19.3. Using the Dexcom G6 with Omnipod 5 When using Omnipod 5 System with the Dexcom G6 CGM System, you need to use the Dexcom G6 app to control your CGM. Caution:... -
Page 286: Cgm Values
Screen display Above 400 mg/dL HIGH Below 40 mg/dL Note: CGM values are automatically recorded on the Omnipod 5 System and do not need to be entered on the Enter BG screen. Urgent Low Glucose Warning: ALWAYS promptly treat low glucose. Glucose at or below 55 mg/ dL indicates significant hypoglycemia (very low glucose). -
Page 287: Cgm Trend Arrows
Note: Use a BG meter to confirm your glucose. Treat low glucose as needed. Note: The Urgent Low Glucose Advisory Alarm has to do directly with your body’ s current glucose, while other alarms have to do with the Pod or Omnipod 5 App state. -
Page 288: Communication Messages
SEARCHING FOR CGM: When the CGM is active and connected to the Omnipod 5 Pod but the most recent CGM value was not acquired within the 5-minute window. There may be no valid CGM value available due to a Pod/ CGM communication issue or a temporary CGM sensor issue (recoverable without any user action). - Page 289 This page intentionally left blank.
- Page 290 CHAPTER 20 Connecting Dexcom G6 CGM to the Pod Contents 20.1. About Connecting Dexcom G6 to the Pod ..... . 282 20.2. Connecting the Dexcom G6 during Initial Pod Setup ... 282 20.3.
-
Page 291: About Connecting Dexcom G6 To The Pod
Dexcom G6 sensor and transmitter, Dexcom G6 User Guide, and download the Dexcom G6 app on your personal smartphone. Before you can view and use CGM values in the in the Omnipod 5 System, you must first set up the Omnipod 5 System to allow the Pod to communicate with the CGM. -
Page 292: Connecting The Dexcom G6 Transmitter
Warning: ALWAYS confirm the Dexcom G6 Transmitter serial number you save in the Omnipod 5 App matches the one you are wearing. In cases where more than one person in the household uses the Dexcom G6 CGM, mis- matching transmitter serial numbers could result in over-delivery or under- delivery of insulin, which can lead to hypoglycemia and hyperglycemia. -
Page 293: Disconnecting The Cgm From The Pod
20 Connecting Dexcom G6 CGM to the Pod If you do not have an active Pod or you are changing your Pod, the transmitter serial number will be saved and sent to the next Pod that is activated. 20.4. Disconnecting the CGM from the Pod To stop the Pod from communicating with the CGM, delete the serial number. - Page 294 AUTOMATED MODE 21 About Automated Mode 22 Switching Between Manual Mode and Automated Mode 23 Activity Feature 24 Automated Mode Alarms 25 Omnipod 5 System Clinical Studies...
- Page 295 This page intentionally left blank.
- Page 296 ALWAYS be aware of as this could result in hypoglycemia. your current CGM value, trust how The Omnipod 5 System cannot track your body feels, and do not ignore insulin that is administered outside of symptoms of high and low glucose.
- Page 297 Important Safety Information can lead to seizure, loss of consciousness or death. Warning: Do NOT use Omnipod 5 System if you are taking hydroxyurea, a medication used in the treatment of diseases including cancer and sickle cell anemia. Your Dexcom G6 CGM...
- Page 298 CHAPTER 21 About Automated Mode Contents 21.1. About Automated Mode ........290 How insulin is calculated and delivered during Automated Mode 290 Automated insulin delivery 21.2.
-
Page 299: About Automated Mode
Automated Mode is the defining feature of the Omnipod 5 System. In Automated Mode, the system automatically adjusts your insulin delivery every 5 minutes, based on the current CGM value and trend, with the goal of bringing your glucose to your defined Target Glucose. - Page 300 You will stay in Automated Mode when the Controller or smartphone running your Omnipod 5 App is out of range of the Pod. When the Pod and Controller or smartphone are in range, the Pod sends its information back to the Omnipod 5 App, updating its Home screen to show your current IOB along with recent CGM value and trend.
-
Page 301: Automated Insulin Delivery
21 About Automated Mode Automated insulin delivery Automated insulin delivery changes as your CGM value and trend change. The table below describes how CGM trend affects your automated insulin delivery in Automated Mode: Automated insulin delivery depends on your baseline adaptive basal rate. -
Page 302: About The Dexcom G6 In Automated Mode
About Automated Mode 21 Consult with your healthcare provider before making any changes in your Target Glucose. See "Omnipod 5 Clinical Studies" on page 309 for clinical study information at each Target Glucose. SmartBolus Calculator settings can also be adjusted including Insulin-to- Carbohydrate ratio, Correction Factor, Correct Above, Reverse Correction and Duration of Insulin Action. -
Page 303: Bolus Settings And Importance Of A Bolus
Adaptive Basal Rate for your automated insulin delivery with your next Pod change. With each Pod change, insulin delivery information is sent and saved in the Omnipod 5 App so that the next Pod that is started is updated with the new Adaptive Basal Rate. -
Page 304: About Automated Mode: Limited
Pod is not receiving updated glucose information from the CGM. After 20 minutes of the Pod not receiving CGM values, the Omnipod 5 App displays ‘Limited’ on the Home screen. The System also enters Limited state after receiving the Automated Delivery Restriction Advisory alarm. - Page 305 21 About Automated Mode Note: Automated Mode: Limited state can occur due to a loss of communication between the CGM and Pod. It is possible that your Dexcom G6 app is still receiving CGM values. Open your Dexcom G6 app to check.
- Page 306 CHAPTER 22 Switching Between Manual Mode and Automated Mode Contents 22.1. Switching from Manual Mode to Automated Mode ... . . 298 Before you begin . . . . . . . . . . . . . . . . . . . . . . . . . . . . . . . . . . . . . . . . . . . . . . . . . . . . . 2 98 To switch to Automated Mode .
-
Page 307: Switching From Manual Mode To Automated Mode
22 Switching Between Manual Mode and Automated Mode 22.1. Switching from Manual Mode to Automated Mode Warning: ALWAYS be aware of your current CGM value, trust how your body feels, and do not ignore symptoms of high and low glucose. Even though insulin delivery adjusts automatically in Automated Mode with the goal of bringing your glucose level to your defined Target Glucose, severe hypoglycemia or hyperglycemia may still occur. -
Page 308: To Switch To Automated Mode
Switching Between Manual Mode and Automated Mode 22 To switch to Automated Mode To switch from Manual Mode to Automated Mode: 1. From the Home screen, tap Menu button ( ) > Switch Mode. Note: If the screen displays a red circle with an exclamation point and SWITCH TO AUTOMATED is disabled (grayed out), take the corrective action... -
Page 309: Switching From Automated Mode To Manual Mode
22 Switching Between Manual Mode and Automated Mode 22.2. Switching from Automated Mode to Manual Mode When you switch from using Automated Mode to using Manual Mode, basal insulin will be delivered based on the Basal Program scheduled for the current time. -
Page 310: Chapter 23: Activity Feature
CHAPTER 23 Activity Feature Contents 23.1. About the Activity Feature ........302 23.2. -
Page 311: About The Activity Feature
While in Automated Mode, you cannot start a temp basal or manually pause insulin delivery. The Omnipod 5 System provides an option for modified automated insulin delivery through the Activity feature. The Activity feature can be useful in times when you need less insulin, for example, when you are exercising. -
Page 312: Starting The Activity Feature
1. Navigate to the Home screen ACTIVITY tab. 2. Tap CANCEL. 3. Tap YES to confirm cancellation. The Omnipod 5 App cancels Activity and full automated insulin delivery starts. Note: You may see a decrease in insulin on board (IOB) when canceling the... - Page 313 This page intentionally left blank.
-
Page 314: Chapter 24: Automated Mode Alarms
CHAPTER 24 Automated Mode Alarms Contents 24.1. Advisory Alarm List ..........306 Automated Delivery Restriction . -
Page 315: Advisory Alarm List
Omnipod 5 App Screens: Lock Screen: Cause Insulin was either paused for too long or at maximum delivery for too long while the Omnipod 5 System was in Automated Mode. Tone (Pod) • 6 beep tone, repeats once every minute for 3 minutes •... - Page 316 Automated Mode Alarms 24 What to do 1. Tap NEXT to see the next screen. 2. Use a BG meter to confirm your blood glucose. • If low confirmed, consider treatment. • If high confirmed, check infusion (Pod) site and ketones.
- Page 317 Missing CGM Values Only occurs in Automated Mode. Screen Alert Description Omnipod 5 App: Why it occurs: The Pod has not received CGM values for more than one hour. The system will continue to operate in Automated Mode: Limited state until CGM values are received or until you switch to Manual Mode.
-
Page 318: Chapter 25: Omnipod 5 Clinical Studies
CHAPTER 25 Omnipod 5 Clinical Studies The goal of the pivotal study of the Omnipod 5 System was to assess the safety and efficacy of the system. This single-arm, multicenter, prospective study enrolled 112 children (6 to 13.9 years) and 128 adolescents and adults (14 to 70 years). - Page 319 25 Overview of Omnipod 5 System Pivotal Clinical Study Demographics Baseline characteristics including demographics of the subjects at the start of the 3-month Omnipod 5 treatment phase are provided in the table below. Baseline Characteristics at Omnipod 5 Treatment Phase Start (N=240) Children Adolescents &...
- Page 320 A1C and time in range after 3 months of Omnipod 5 System use. This was achieved with a reduction of time >180 mg/dL in adolescents, adults, and children as well as a reduction in median time <70 mg/dL in adolescents and adults.
- Page 321 (std dev) values in brackets. Time in range < 70mg/dL and < 54mg/dL is reported as medians with interquartile ranges in brackets(Q1,Q3). The median is the middle number in an ascending list of numbers and the interquartile range represents the middle 50% of values. *Change between standard therapy phase and Omnipod 5 System phase was statistically significant...
- Page 322 Avg % ≥250mg/ 16.3% 5.4% -10.9%* 10.6% 4.8% -5.7%* (15.0%) (5.1%) (12.7%) (7.0%) (std dev) Avg % ≥300mg/ 6.7% -4.8%* 4.2% 1.5% -2.7%* (9.1%) (2.5%) (8.0%) (3.1%) (std dev) *Change between standard therapy phase and Omnipod 5 System phase was statistically significant...
- Page 323 A1C% in children (6 to 13.9 years) and adolescents and adults (14 to 70 years). Adolescents, adults, and children experienced a reduction in A1C after 3 months of Omnipod 5 System use regardless of baseline A1C < 8% or ≥ 8% category.
- Page 324 6.7%* 7.7% 7.0%* *Change between standard therapy phase and Omnipod 5 System phase was statistically significant Values presented for % Time <70mg/dL are medians, the remaining values in the table are averages . ‡ Subgroup Analysis of Average Glycemic Results by BaselineTreatment in...
- Page 325 (0.12) U/kg (std dev) *Change between standard therapy phase and Omnipod 5 System phase was statistically significant Body Mass Index Results The table below provides information on the average body mass index (BMI), which is a measure of weight adjusted for height, and BMI z-score, which is a measure of weight adjusted for height, sex, and age, during the standard therapy phase and the 3-month Omnipod 5 System phase in children.
- Page 326 Adverse Events The table below provides a full list of the adverse events that occurred during the 3-month Omnipod 5 System treatment phase. There were 3 severe hypoglycemia events not attributable to the Omnipod 5 System automated insulin delivery or system malfunction and 1 DKA event from a suspected infusion site failure.
- Page 327 Glycemic Results at Target Glucose Settings in Pivotal Study The tables below provide information on the glycemic results at various self- selected Target Glucose settings during the 3-month Omnipod 5 System phase of the pivotal study. Of the customizable Glucose targets, the most selected was 110 mg/dL.
- Page 328 Overview of Omnipod 5 System Pivotal Clinical Study 25 Overall (24 hours) Glycemic Results at Target Glucose Settings in Adolescents and Adults (14 to 70 years) from Pivotal Study Characteristic 110 mg/dL 120 mg/dL 130 mg/dL Target Glucose Target Glucose...
- Page 329 Glucose Settings Glycemic Results at Target Glucose Settings in Pre-Pivotal Study The goal of the pre-pivotal study of the Omnipod 5 System was to assess the safety and efficacy of the system. This single-arm, multicenter, prospective study enrolled 18 children (6 to 13.9 years) and 18 adults (14 to 70 years) with type 1 diabetes.
- Page 330 Overview of Omnipod 5 System Pivotal Clinical Study 25 Overall (24 hours) Glycemic Results at Target Glucose Settings in Adolescents and Adults (14 to 70 years) from Pre-Pivotal Study Characteristic 110mg/dL 120mg/dL 130mg/dL 140mg/dL 150mg/dL Target Target Target Target Target...
- Page 331 A study was conducted on 25 participants with type 1 diabetes aged 6-70 years to assess the Omnipod 5 CGM-informed SmartBolus Calculator. During Phase 1, participants used the Omnipod 5 system in Manual Mode for the first 7 days without a connected CGM (standard SmartBolus Calculator). In Phase 2, participants used the Omnipod 5 system in Manual Mode with a connected CGM (CGM-informed SmartBolus Calculator) for 7 days.
-
Page 332: Section 6: Additional Information
ADDITIONAL INFORMATION 26 Frequently Asked Questions and Troubleshooting Appendix... - Page 333 This page intentionally left blank.
-
Page 334: Chapter 26: Troubleshooting
26.7. Deleting the Omnipod 5 App ........ -
Page 335: Omnipod 5 Pump Faqs
26 Frequently Asked Questions and Troubleshooting 26.1. Omnipod 5 Pump FAQs The following topics have been frequently asked during the use of Omnipod 5, and the main causes and recommended actions are listed below. Pod Issues Issue Possible Cause What you can do... - Page 336 This will show you the time, CGM value, and corresponding amount of insulin delivered at each 5-minute interval. Where to find The Omnipod 5 App maintains the history for previous history of insulin insulin deliveries. You can check here: Menu button ( deliveries ) >...
- Page 337 If while charging or typical use the issue does not resolve, call Insulet (draining capacity Customer Care at 1-800-591-3455. to ~0%) without charging for an extended period.
- Page 338 DO NOT delete the Omnipod 5 App while you have an active Pod, and DO NOT clear the Omnipod 5 App data. If you do, your Pod will remain active, but you will not be able to control your Pod even if you re-install or re- open the App.
- Page 339 26 Frequently Asked Questions and Troubleshooting Issue Possible Cause What you can do Received an Your Omnipod 5 1. Close the Omnipod 5 App and “Omnipod 5 App encountered reopen the App failed to start” into a problem 2. If the problem continues contact message starting up.
- Page 340 Frequently Asked Questions and Troubleshooting 26 Issue Possible Cause What you can do Opening the You cleared If you clear data for the Omnipod 5 App, Omnipod 5 App data for the your current Pod will still be delivering App restarts Omnipod 5 App.
-
Page 341: Smartbolus Calculator Faqs
26 Frequently Asked Questions and Troubleshooting 26.2. SmartBolus Calculator FAQs Issue Possible Cause What you can do With carbs You have already You can remove the CGM value so entered and CGM received a lot of that the calculator only suggests a value available, insulin (your IOB bolus amount for the carbs entered. -
Page 342: Cgm Faqs
If Omnipod 5 App. you have just connected, it can take up to 20 minutes for values to appear in the Omnipod 5 App. You are using 1. Use the Dexcom G6 app on your the Dexcom G6 smartphone. - Page 343 Controller or smartphone close to from those on the from the sensor. the Pod. Omnipod 5 App. The Omnipod 5 App receives CGM values from the Pod. Occasionally, there is a slight delay before the value is updated on the Omnipod 5 App.
- Page 344 Frequently Asked Questions and Troubleshooting 26 High Glucose Issues Issue Possible Cause What you can do After using the One of the benefits It is common to need changes system for a couple of of automated insulin to your Insulin-to-Carb ratio, weeks, CGM values delivery is the greater generally a lowering of the ratio...
- Page 345 26 Frequently Asked Questions and Troubleshooting Issue Possible Cause What you can do After using the Your Target Check your Target Glucose system in Automated Glucose may need here: Mode for a few to be adjusted. In Menu button ( ) >...
- Page 346 Frequently Asked Questions and Troubleshooting 26 Issue Possible Cause What you can do CGM values have Although the system Think about diet, exercise, Pod been running high is able to automate insertion site, and change in over several days. insulin delivery, your body’...
-
Page 347: Automated Mode Faqs
Settings > CGM Transmitter . to switch to number is not Tip: Always check that the serial Automated Mode entered into the number entered into the App is Omnipod 5 App. the same as the number on the transmitter you are wearing. -
Page 348: Pod Communication Issues - "Try Again
Pod. Tip: When there is a communication issue, the Omnipod 5 App offers you options to help you resolve it. It is in your best interest to leave any options to... - Page 349 If the Omnipod 5 App has not sent the Pod the instruction, the Omnipod 5 App tells you to move to a new location, and tap TRY AGAIN to reattempt communication. After you tap TRY AGAIN if the next communication attempt fails, the Omnipod 5 App offers these options: •...
-
Page 350: About Keeping Your Omnipod 5 Controller And/Or Smartphone
DISCARD POD: Select this option if the TRY AGAIN option has not resolved the problem. This will tell your Omnipod 5 System to unpair from that Pod. The Omnipod 5 App instructs you to remove your Pod and tap CONTINUE. -
Page 351: Deleting The Omnipod 5 App
DO NOT delete the Omnipod 5 App while you have an active Pod, and DO NOT clear the Omnipod 5 App data. If you do, your Pod will remain active, but you will not be able to control your Pod even if you re-install or re- open the App. -
Page 352: Device Complaints
Frequently Asked Questions and Troubleshooting 26 To delete the Omnipod 5 App: 1. Open Google Play. 2. Tap Menu. 3. Tap My apps & game. 4. Tap on the app or game. 5. Tap Uninstall. 26.8. Device Complaints If you have a problem with your System, contact Customer Care at 1-800-591- 3455. - Page 353 This page intentionally left blank.
-
Page 354: Appendix
Appendix Summary of Settings and Options The options for the various Omnipod 5 Automated Insulin Delivery System settings are: Time format 12-hour Time zone GMT-11:00 to GMT+13.00. Daylight Savings Time ON or OFF. Default based on date and time zone. - Page 355 Appendix Correct Above threshold Maximum of 8 segments; Target Glucose to 200 mg/ dL in 1 mg/dL increments. Minimum Glucose for 50 to 70 mg/dL in 1 mg/dL increments Calculations Default is 70 mg/dL. Insulin-to-carb (IC) Maximum of 8 segments; 1 to 150 g carb/U in ratio 0.1 g carb/U increments.
- Page 356 Appendix IP (Ingress Protection) rating for moisture and dust: : IP28 (protected from touch by fingers and objects 12.5 millimeters or larger; protected from water to a depth of up to 25 feet (7.6 meters) for up to 60 minutes) Insulin concentration: U-100 Alarm type: Audible.
- Page 357 Controller Service Life: 2 Years Shelf Life (Starter Kit): 18 months Battery charger operating line voltage: 100 to 240 VAC, 50/60 Hz Only use the Noetic approved power adapter (Insulet PN PT-000428) with the Controller. Dexcom Specifications For information about Dexcom operating specifications, see the Dexcom G6...
- Page 358 (occlusion). Blockages can result in hyperglycemia. A blockage (occlusion) is an interruption in insulin delivery from the Pod. If the Omnipod 5 System detects a blockage, it sounds a hazard alarm and prompts you to deactivate and change your Pod.
- Page 359 Appendix Performance Characteristics The Omnipod 5 insulin pump delivers insulin in two ways: basal insulin delivery (continuous) and bolus insulin delivery. The following accuracy data was collected on both types of delivery in laboratory studies performed by Insulet. Delivery performance characterization Basal Delivery: In order to assess basal delivery accuracy, 12 Pods were tested by delivering at low, medium, and high basal rates (0.05, 1.00, and 30.0 U/hr).
- Page 360 Appendix Bolus Delivery: In order to assess bolus delivery accuracy, 12 Pods were tested by delivering a minimum, intermediate, and maximum bolus amount (0.05, 5.00, and 30.0 Units). Water was used as a substitute for insulin. The water was pumped into a container on a scale and the weight of the liquid delivered was used to assess pumping accuracy.
- Page 361 Appendix The tables below show for each requested bolus size, the range of amount of insulin that was observed delivered compared to the requested amount. Each table provides the number and percent of delivered bolus sizes observed within the specified range. Amount of Insulin Delivery for a Minimum (0.05 U) Bolus Request Amount <0.0125...
- Page 362 Appendix Amount of Insulin Delivery for an Intermediate (5.00 U) Bolus Request Amount <1.25 1.25-3.75 3.75-4.50 4.50-4.75 4.75-5.25 (Units) (% of settings) (<25%) (25-75%) (75-90%) (90-95%) (95-105%) Number and percent 0/300 0/300 1/300 4/300 287/300 of boluses (0%) (0%) (0.3%) (1.3%) (95.7%) within...
- Page 363 Appendix Omnipod 5 System Label Symbols The following symbols appear on the Omnipod 5 System or its packaging: Symbol Meaning Symbol Meaning Single-use only MR unsafe Consult Do not use if package is accompanying damaged documents Sterilized using Type BF applied part...
- Page 364 Caution: DO NOT make changes or modifications to any component of the Omnipod 5 System that has not been authorized by Insulet Corporation. Unauthorized tampering with the System can revoke your right to operate it. This equipment has been tested and found to comply with the limits for a Class B digital device, pursuant to Part 15 of the FCC Rules.
- Page 365 Appendix Quality of Service The Omnipod 5 System includes two wireless transmission pathways. Insulet defines the quality of service of the Omnipod 5 System for each of the two pathways: Omnipod 5 App to Pod wireless communication definition Successful transfer of commands, data, and alarms between the Controller or smartphone running the Omnipod 5 App and Pod when in communication range (within 5 ft during normal operation).
- Page 366 If you must use a different cable, use only cables less than or equal to 4 feet (1.2 meters) in length. Care should be taken if the Omnipod 5 System is used adjacent to other electrical equipment; if adjacent use is inevitable, such as in work environments, the Omnipod 5 System should be observed to verify normal operation in this setting.
- Page 367 Appendix Electromagnetic Emissions This equipment is intended for use in the electromagnetic environment specified below. The user of this equipment should ensure that is used in such an environment. Emissions Compliance Electromagnetic environment according to RF Emissions Group 1 The Pod, Controller, and CGM emit low- (CISPR11) level electromagnetic energy (RF) in order to communicate.
- Page 368 Disturbances 80 MHz KHz-80 portable RF communications equipment induced by at least 12 inches (30 cm) away from the 6V in ISM RF fields (IEC Omnipod 5 System. and amateur 6V in 61000-4-6) radio bands ISM and between 150 amateur...
- Page 369 RF communications equipment 2.7 GHz at least 12 inches (30 cm) away from the Omnipod 5 System. The table below lists the immunity levels at specific test frequencies for testing the effects of some wireless communication equipment. The frequencies and services listed in the trable are representative examples in various locations where the System may be used.
- Page 370 Appendix 430– GMRS FM c) ±5 460, FRS 460 deviation 1 kHz sine 704– Pulse Band 13, modulatio n b) 217 Hz 800- Pulse 800/900, modulation TETRA b) 18 Hz 800. ODEM 820, CDMA 850, LTE Band 5 1720 1700– G GSM Pulse 1800,...
- Page 371 Insulet Corporation’ s scope of services is limited to providing the Omnipod 5 Automated Insulin Delivery System. The Omnipod 5 System consists of the Pod and the handheld, wireless Controller or compatible smartphone running the Omnipod 5 App, which programs the Pod with insulin delivery instructions.
- Page 372 14 days to resolve. CHAP Accredited Insulet Corporation has been accredited by the Community Health Accreditation Program (CHAP) since 2007. To learn more about CHAP or to communicate concerns that you have been unable to resolve directly with the company, please visit www.chapinc.org or call CHAP at 1-800-656-9656.
- Page 373 Insulin Delivery System (“Omnipod 5 System”), that, if Insulet determines, during the period of four (4) years from the date of purchase, that the Omnipod 5 System handheld hardware Controller (“Controller”) included in your shipment manifests a defect in material or workmanship while utilized under normal use and conditions, Insulet will either repair or replace, at its sole option, the Controller.
- Page 374 Express Warranty. Unless Insulet elects to repair the Controller (which may include, but is not limited to, a repair kit or replacement part(s) Insulet provides) or refers you to a third party, you must obtain a prior authorization and return the Controller or the Pod to Insulet.
- Page 375 Insulet Corporation’ s liability in such jurisdictions shall be limited to the maximum extent permitted by law. Such limitations shall include but are not limited to...
- Page 376 Appendix 5 Automated Insulin Delivery System products shall constitute acknowledgement of and consent to the Disclaimer of Implied Warranties and the Limitation of Remedies. Rev: January 2021 HIPAA Privacy Notice This notice describes how medical information about you may be used and disclosed and how you can get access to this information.
- Page 377 Appendix Appointment Reminder and Other Communications: We may use or disclose your Medical Information without your prior written authorization to provide you or others with, among other things, (i) appointment reminders; (ii) product/supply reorder notifications; and/or (iii) information about treatment alternatives or other health-related products and services that we provide.
- Page 378 Appendix occurred as a result of criminal conduct, (v) in the event that a crime occurs on the premises of the practice, and (vi) medical emergency in which it is likely that a crime has occurred. Research: We may disclose your Medical Information to researchers when their research has been approved by an institutional review board that has reviewed the research proposal and established protocols to ensure the privacy of your Medical Information.
- Page 379 Appendix https://omnipod.com/images/upload/HIPAA_Privacy_Notice_Request_Form.pdf and follow the directions included on that form. We will respond to your request in a reasonable amount of time. Please contact our Privacy Officer if you have questions about requesting an amendment to your Medical Information. You Have the Right to Request a Restriction of Your Medical Information: You may ask us not to use or disclose any part of your Medical Information for the purposes of treatment, payment or healthcare operations.
- Page 380 Acton, MA 01720 866-941-0155 Furthermore, if you believe that Insulet has violated your privacy rights with respect to your Medical Information, you have the right to file a complaint in writing with our Privacy Officer or with the Secretary of Health and Human Services at 200 Independence Avenue, S.W.
- Page 381 This page intentionally left blank.
-
Page 382: Index
Turn Lock Screen Security ON 190 switching to manual mode 300 Turn Notifications ON 192 Turn On Automatic Date and Time basal history records 138–146 Update Omnipod 5 - App No Lon- Basal Program ger Supported 193 about 101 Update Omnipod 5 - Software Up-... - Page 383 Index blood glucose controller 37 HIGH and LOW results 116, 277 App security 65 Target Glucose 250, 256–268 controller PIN 61 Bluetooth diagram 37 controller 124 screen time-out 125 turn on 188 setting up 56, 58 Bolus Calculator Controller disabled 255 dropped or damaged 207 sample calculations 263 electrical interference 206...
- Page 384 Index enter Automated Mode 298 indications for use 6 entering text 32 infusion site estimated bolus 143 guidelines for selection 87 exercise 224 preparation 89 expiration, Pod 128, 200 insulin Advisory Alarm 172 history records 138–146 extended bolus rapid-acting vs. long-acting 223 cancel 235 storage 204 deliver 246...
- Page 385 Index available tasks within 52 orientation 91 MRIs 225 Shut-off setting 129 site selection 87, 91 specifications 344 storage 204 navigation shorthand 34 Pod expired alarm 172 negative IOB Pod shut-off advisory alarm. See Ad- advisory alert 163, 164, 165, 166, visory Alarms: Pod Shut-Off 167, 168, 169, 170, 171, 172, Pod shut-off hazard alarm.
- Page 386 Index activating 105 controller setup 57 settings obtaining 57 airplane mode 124 travel 214 Bolus Calculator 250–252 surgery 225 check BG after bolus 236 suspend (pause) insulin delivery 121 Correct Above 250 swimming 205 Correction Factor 252 Switching modes custom reminders 130 from automated to manual 299 Duration of Insulin Action 252 symbols on labels 352...
- Page 387 Index unlock controller 38 Urgent Low Glucose advisory alert 175 USB cable 207 vacation 215 vibration or sound notifications 157 wake up controller 38 warranty 362 water and the Controller 206 and the Pod 205 X-rays 215...
- Page 388 Index...
-
Page 389: My Settings
Notes My Settings Use these pages to keep track of your important settings. Remember to update your information if you change or add settings. Basal Program 1 Basal Program 2 Basal rate Basal rate Name_______________ Name_______________ U/hr U/hr midnight midnight U/hr U/hr U/hr... - Page 390 My Settings Insulin-to-Carbohydrate Correction Factor Ratio (IC Ratio) 1 unit of insulin 1 unit of IC Ratio for each time Correction Factor for decreases insulin covers segment each time segment glucose by midnight to g carb midnight to mg/dL g carb mg/dL g carb mg/dL...
- Page 391 My Notes...
Need help?
Do you have a question about the Omnipod 5 and is the answer not in the manual?
Questions and answers
Can you manually turn off Omnipod to connect to sensor and turn it back on
The Insulet Omnipod 5 does not have a manual "turn off" function. However, switching between a Controller and a smartphone will reset the algorithm, causing it to lose learned data. If you need to deactivate a Pod, you can use the deactivation function, but this is primarily for shutting down insulin delivery and activating a new Pod.
This answer is automatically generated