
Related Manuals for Excelitas Technologies OmniCure S2000 Elite


Summary of Contents for Excelitas Technologies OmniCure S2000 Elite
- Page 1 035-00707R Revision 1 S2000 Elite - User's Guide 2260 Argentia Road, Mississauga, ON L5N 6H7 Canada 905.821.2600 omnicure@excelitas.com Toll Free (USA and CAN): +1 800 668-8752 www.excelitas.com...
-
Page 2: Table Of Contents
S2000 Elite - User's Guide 035-00707 Revision 1 Table of Contents 1. S2000 Elite - User Guide ............................4 1.1. Introduction ......................................5 2. Safety Precautions..............................7 2.1. Glossary of Symbols ....................................8 2.2. Safety Precautions ....................................9 3. Getting Started ..............................11 3.1. - Page 3 14.6. I/O Ports (including RS-232) ................................117 14.7. Environmental Conditions ................................118 14.8. Radio specifications ..................................119 14.9. Noise and the OmniCure S2000 Elite ............................... 120 14.10. Miscellaneous ....................................122 15. Regulatory Compliance ........................... 123 15.1. FCC Part 15 Subpart B, Class A - Unintentional Radiators ......................124 15.2.
-
Page 4: S2000 Elite - User Guide
S2000 Elite - User's Guide 035-00707 Revision 1 1. S2000 Elite - User Guide Excelitas Canada Inc. 2260 Argentia Road Mississauga (ON) L5N 6H7 Canada +1 905.821.2600 www.excelitas.com Trademarks and Intelli-Tap™ are trademarks of Excelitas Canada ® ® ® OmniCure , Intelli-Lamp , StepCure Inc. -
Page 5: Introduction
• Field swappable lamps, between Standard and Surface Cure • Cleanroom ready & compatible with exhaust duct attachment points This guide describes how to assemble, use, and maintain the OmniCure S2000 Elite light- curing spot lamp system safely and efficiently. Excelitas Canada prepared this user guide for engineers, technicians, and manufacturing personnel. - Page 6 S2000 Elite - User's Guide 035-00707 Revision 1 We suggest that you read this manual to discover all features of the OmniCure S2000 Elite, and how to use them.
-
Page 7: Safety Precautions
S2000 Elite - User's Guide 035-00707 Revision 1 2. Safety Precautions The S2000 Elite has been designed with safety in mind. Multiple failsafe mechanisms exist to minimize risks on danger to the user. Some risks cannot be mitigated by the systems' design and requires user precaution and understanding of all potential dangers. -
Page 8: Glossary Of Symbols
S2000 Elite - User's Guide 035-00707 Revision 1 2.1. Glossary of Symbols CAUTION - Risk of danger: consult accompanying documents. CAUTION – Hot surface WARNING - UV radiation hazard WARNING – Eye damage may result from directly viewing ultraviolet radiation. Protective eye shielding and clothing must be used at all times. -
Page 9: Safety Precautions
S2000 Elite - User's Guide 035-00707 Revision 1 2.2. Safety Precautions The S2000 Elite is equipped with two safety sensors to protect the user from accidental UV exposure. In addition, please observe the following precautions during use. This Series of cautions, warnings and dangers relate to the operation and maintenance of the S2000 Elite. - Page 10 S2000 Elite - User's Guide 035-00707 Revision 1 • Should this S2000 Elite unit be used in a manner not specified by Excelitas Canada, the protection provided by the equipment may be impaired. • The lamp module’s operational life can be significantly shortened if it is handled incorrectly.
-
Page 11: Getting Started
S2000 Elite - User's Guide 035-00707 Revision 1 3. Getting Started To get started, please reference the Quick-Start guide included with your S2000 Elite and review the topics in this section. • Box Contents • System front and rear details •... -
Page 12: Box Contents
S2000 Elite - User's Guide 035-00707 Revision 1 3.1. Box Contents Every S2000 Elite UV Lamp Spot Curing Unit will come with the following items included in the shipping box: • UV Safety Glasses • Foot Pedal Switch • Lamp Housing Access Tool (fastened beneath the system housing) •... -
Page 13: System Front And Rear Details
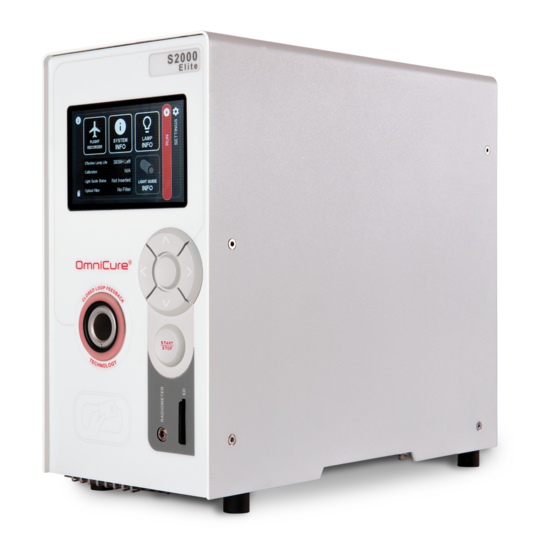
S2000 Elite - User's Guide 035-00707 Revision 1 3.2. System front and rear details Front Panel 1. 4.3” LCD Touch Screen Display 2. System, Light Guide and CLF Status Indicator 3. Light Guide Port 4. NFC Contact Area 5. 5 Button Navigation 6. - Page 14 S2000 Elite - User's Guide 035-00707 Revision 1 Rear Panel 1. AC Receptacle and Dual Fuse Holder 2. PLC Connector 3. Analog Jack (foot pedal) 4. USB Type-B 5. RJ45 Ethernet 6. Exhaust Fan Duct Attachment 7. Exhaust Fan 8. Product Label 9.
-
Page 15: Installing And Replacing The Lamp Module
S2000 Elite - User's Guide 035-00707 Revision 1 3.3. Installing and Replacing the Lamp Module The S2000 Elite comes with a choice of a standard or surface curing lamp. Please ensure that the appropriate lamp type has been selected for your curing application. The part number of the lamp module is available on the lamp box. - Page 16 S2000 Elite - User's Guide 035-00707 Revision 1 Figure 1: Lamp Housing Panel 1. Lamp Housing Side Panel (door) 2. Hex Socket Screws 1. Loosen the two hex socket screws from the lamp housing side panel using the tool provided (3mm Allen key) and remove the panel from the unit cover. 2.
- Page 17 S2000 Elite - User's Guide 035-00707 Revision 1 Figure 2: Lamp Direction 1. Spring Clamp 2. Ceramic Component 3. Lamp Holder 4. Lamp Rim 5. Power Leads 1. Ensure that the middle body of the lamp is in position to fit into the spring clamp shown in Figure 2.
- Page 18 S2000 Elite - User's Guide 035-00707 Revision 1 Figure 3: Lamp Orientation 1. Spring Clamp 2. Center Position 3. Right Power Lead 1. Locate the 6-pin Intelli-Lamp sensor connector at the rear of the lamp module and connect it to its mate located on the top of the lamp-housing wall. 2.
- Page 19 S2000 Elite - User's Guide 035-00707 Revision 1 Figure 4: Lamp Connections 1. Intelli-lamp Connector 2. Grommet The power connector will only attach in the correct orientation. If there are difficulties attaching the connector, try rotating it by 180º.
- Page 20 S2000 Elite - User's Guide 035-00707 Revision 1 Figure 5: Lamp Connections 1. Center Bar and Lead Within the Cutout. 2. Power Connector 1. Locate power connector with two leads shown in Figure 5 and connect it to the mate located on the side of the lamp-housing wall.
-
Page 21: Inserting And Removing The Light Guide
S2000 Elite - User's Guide 035-00707 Revision 1 3.4. Inserting and Removing the Light Guide 3mm single leg liquid light guides are not compatible with the S2000 Elite. 1. Ensure that any protective end caps are removed from all ends of the light guide prior to installation. - Page 22 S2000 Elite - User's Guide 035-00707 Revision 1 Light Guide 1. Light Guide Strain Relief 1. During installation or removal, grasp the light guide on the strain-relief nearest to the input end of the light guide. 2. To remove the light guide, firmly grip the strain relief near the light guide retainer and pull out firmly.
- Page 23 S2000 Elite - User's Guide 035-00707 Revision 1 The S2000 Elite is designed for use with Excelitas Canada Light Guides. Excelitas Canada can not guarantee the performance of the S2000 Elite if using light guides other than those supplied by Excelitas Canada.
-
Page 24: Installing The Optical Brand-Pass Filter
S2000 Elite - User's Guide 035-00707 Revision 1 3.5. Installing the Optical Brand-Pass Filter The OmniCure S2000 Elite curing system is equipped with user-changeable optical filters cartridges. Listed below are the 7 (seven) different filter options are available. Part #... - Page 25 S2000 Elite - User's Guide 035-00707 Revision 1 When removing filters from the system, ensure not to lose the screws by inserting them back into the same thread holes. If the filter is properly installed, the system will automatically recognize the filter type. It will be shown in the “Information”...
-
Page 26: Powering Up And Powering Down
S2000 Elite - User's Guide 035-00707 Revision 1 3.6. Powering Up and Powering Down Lamp Warm-Up: The ARC lamp has 3 distinct phases of operation: 1. Ignition. 2. Four minute Warm-up period. Excelitas Canada recommends 20 minutes of proper warm-up and to ensure a stable optical output. 3. -
Page 27: Operational, Lamp Off And Sleep Mode
S2000 Elite - User's Guide 035-00707 Revision 1 3.7. Operational, Lamp Off and Sleep Mode The S2000 Elite has three states/modes: 1. Operational 2. Sleep 3. Power Saver In Operational mode, the system's Lamp is turned on and all functions are enabled. In Sleep mode, the system's Lamp is turned off and RUN screen is not accessible. -
Page 28: Running Exposures
S2000 Elite - User's Guide 035-00707 Revision 1 4. Running Exposures Adjusting the Light Output Your S2000 Elite system includes an iris adjustment to control the intensity level of the light output from the unit. When on the RUN screen, the touch panel or navigation keypad can be used to quickly adjust the intensity level of the light output. -
Page 29: Adjusting The Light Output In The Relative Mode
S2000 Elite - User's Guide 035-00707 Revision 1 4.1. Adjusting the Light Output in the Relative Mode Relative mode is the default operational mode for the S2000 when it is not calibrated. In this mode, the user is able to produce UV output as percent fraction of the bulb's maximum output. As such, if the maximum output is known, it can be used to estimate the output power at varying percentages. - Page 30 S2000 Elite - User's Guide 035-00707 Revision 1 • Count down mode: If a time value greater than ZERO is selected, then the timer will be set to COUNT DOWN mode. This will be further indicated by an arrow pointing DOWN above the watch icon.
- Page 31 S2000 Elite - User's Guide 035-00707 Revision 1 lamp aging, subsequent exposures may display a higher iris open percentage value; however, the output intensity will be consistent with the original setting (+/-5% or 200mW/cm , whichever is greater).
-
Page 32: Adjusting The Light Output In The Absolute Mode
S2000 Elite - User's Guide 035-00707 Revision 1 4.2. Adjusting the Light Output in the Absolute Mode Absolute mode allows the user to control the output using irradiance value. It allows for more control over output that is not dependent on the maximum output of the bulb inside. This mode is only available after the S2000 Elite has been calibrated using the R2000 Radiometer. - Page 33 S2000 Elite - User's Guide 035-00707 Revision 1 above the watch icon. In this mode, the shutter will OPEN and remain OPEN for the duration of the count down period. The shutter will CLOSE when the timer hits ZERO. • Count up mode: If the time value is set to ZERO, then the timer will be set to COUNT UP mode.
- Page 34 S2000 Elite - User's Guide 035-00707 Revision 1 OmniCure® S2000 Elite Minimum Adjustable Irradiance Level: 0.5W/cm²...
-
Page 35: Output Intensity Modes/Calibration Process
S2000 Elite - User's Guide 035-00707 Revision 1 4.3. Output Intensity Modes/Calibration Process Calibration of the exposure timer is not required. The S2000 Elite system uses an external oscillator to generate it’s system clock signal. It provides a stable and precise clock signal to the S2000 Elite control system and sub-systems, including the timing module of the light intensity control shutter. - Page 36 S2000 Elite - User's Guide 035-00707 Revision 1 While the CAL button on the radiometer is pressed, the display will indicate the current setpoint and the SET icon will be flashing. If the CAL button on the radiometer is pressed for less than 5 seconds, the current radiometer set-point will be sent to the S2000 Elite.
-
Page 37: Adjusting The Exposure Time
S2000 Elite - User's Guide 035-00707 Revision 1 4.4. Adjusting the Exposure Time Exposure time can be set to either COUNT UP or COUNT DOWN on the RUN SCREEN. • In COUNT UP mode, the timer will start incrementing when the shutter is OPENED and stop once the shutter CLOSED. - Page 38 S2000 Elite - User's Guide 035-00707 Revision 1 Shutter ON Button Shutter PAUSE button The shutter will not open if the light guide is not inserted properly.
-
Page 39: Close-Loop Feedback
035-00707 Revision 1 4.5. Close-Loop Feedback The OmniCure S2000 Elite proprietary and patented Closed-Loop Feedback (CLF) technology utilizes an internal optical sensor to monitor lamp's output in real time and adjust the iris to automatically maintain the irradiance level to within +/-5% of the set point, ensuring repeatable and measurable doses of curing energy for increased yields and quality. -
Page 40: Navigation
S2000 Elite - User's Guide 035-00707 Revision 1 5. Navigation The OmniCure S2000 Elite offers 3 convenient options for operation: the touch-screen display panel, the navigation keypad, and accessing controls via the integrated webserver (WEB UI). • Touch-Screen Interface •... -
Page 41: Touch-Screen Interface
S2000 Elite - User's Guide 035-00707 Revision 1 5.1. Touch-Screen Interface The touch-screen interface is the default control method for the S2000 Elite. The user can access the touch-screen interface after the system has booted up into the main screen. The touch-screen or the physical keypad can be used to navigate through the different screens and options. - Page 42 S2000 Elite - User's Guide 035-00707 Revision 1 Run Screen UV exposure parameters used to control the UV dose is displayed on this screen. The unit can be operated in calibrated and uncalibrated mode. When the unit is not calibrated, the intensity will be displayed as a percentage of the lamp’s maximum output.
- Page 43 S2000 Elite - User's Guide 035-00707 Revision 1 Information Screen Flight Recorder The Flight Recorder is an event viewer which stores historical data of any processes, activities, alarms or configuration changes on the unit. Events will be time-stamped and can be further filtered to display any type of Errors, Warnings, Configurations, Process, and Calibration.
- Page 44 S2000 Elite - User's Guide 035-00707 Revision 1 Flight Recorder Event Types Button Description Displays a list of errors that occurred during operation chronologically. Errors Events that will have a direct negative impact on operation are designated as errors. This can range from improper dose delivery to hardware issues. Displays list of warnings that occurred during operation chronologically.
- Page 45 S2000 Elite - User's Guide 035-00707 Revision 1 Lamp Information Selecting this will present the user with information regarding the lamp inside the S2000 Elite unit. The report includes but is not limited to lamp type, total hours, temperatures, etc. If no lamp is installed when the system turns on, the information on this screen will be blank.
- Page 46 S2000 Elite - User's Guide 035-00707 Revision 1 System Setup Selecting this will present user with the system setup screen, where the user will be able to configure settings on how the system will be used. System Setup screen options: •...
- Page 47 S2000 Elite - User's Guide 035-00707 Revision 1 Network Setup Selecting this will display the network parameters and settings needed for communication over Ethernet. Addresses can be set using DHCP or manually. When set to DHCP, only the Host Name can be configured. IP Address - IP address is the host identification number used for proper communication between devices.
- Page 48 S2000 Elite - User's Guide 035-00707 Revision 1 Daylight Saving - time Select if Daylight Savings should be applied The NTP (Network-time protocol) timestamp is currently from the "pool.ntp.org" which can only be accessed from the system if the system network is connected to the internet.
- Page 49 S2000 Elite - User's Guide 035-00707 Revision 1 Screen Lock PIN Selecting this will immediately ask the user to input a PIN that will be used to lock/unlock the unit from the RUN screen. The default PIN is 1234 Load Save Selecting this will present the user with the screen to load and save configurations, firmware, and system configuration.
- Page 50 S2000 Elite - User's Guide 035-00707 Revision 1 • Language Code • Time Zone • Date Format Code • Exposure Counter (s) • NFC Enabled • Default Lamp State • Lamp Care Enabled • Calibration Time Remaining on Display • Effective Lamp Life on Display •...
- Page 51 S2000 Elite - User's Guide 035-00707 Revision 1 Calibration Selecting this will present the user with the ability to calibrate the unit with a Radiometer. The user will be presented with this screen whenever any calibration effort is made using the R2000 from any point of the unit operation.
- Page 52 S2000 Elite - User's Guide 035-00707 Revision 1 Save - Saves current profile to local or SD card Additional details on StepCure available in the StepCure section.
-
Page 53: Web Interface
S2000 Elite - User's Guide 035-00707 Revision 1 5.2. Web Interface The web interface provides an alternate method of control through an external PC. Even though the amount of information and level of control is identical to the touch-screen interface, there are some graphical differences. - Page 54 S2000 Elite - User's Guide 035-00707 Revision 1 If the lamp is turned OFF, a screen will appear and allow the user to turn the lamp ON. If the lamp Wake Up icon is selected, the lamp will ignite, and a four-minute timer will appear on the screen.
- Page 55 S2000 Elite - User's Guide 035-00707 Revision 1 System Settings – Selecting this will present user with the system settings screen, where the user will be able to configure settings on how the system will be used. The layout of the window is different than that of the touch-screen interface.
- Page 56 S2000 Elite - User's Guide 035-00707 Revision 1 IP Address - IP address is the host identification number used for proper communication between devices over Ethernet. Subnet Mask - The subnet is used to distinguish the subnet part of the IP address, as well as the part that is the host address of that subnet.
- Page 57 S2000 Elite - User's Guide 035-00707 Revision 1 Flight Recorder Event Types Button Description Displays a list of errors that occurred during operation chronologically. Errors Events that will have a direct negative impact on operation are designated as errors. This can range from improper dose delivery to hardware issues. Displays list of warnings that occurred during operation chronologically.
- Page 58 S2000 Elite - User's Guide 035-00707 Revision 1 Command Line: The S2000 Elite system is designed to provide remote automated control of the UV spot curing system from a PC. Control commands can be submitted in the Command Line using commands found in document 035-00724R Software SDK. The Command Line option only exists for the web-interface.
- Page 59 S2000 Elite - User's Guide 035-00707 Revision 1 StepCure allows users to program custom exposure profiles to accommodate different applications. These profiles can be saved, and loaded across other units for simultaneous operations. Return - Navigates back to previous screen New - Clears existing StepCure design and starts a new one...
-
Page 60: Locking And Unlocking The S2000 Elite
S2000 Elite - User's Guide 035-00707 Revision 1 6. Locking and Unlocking the S2000 Elite Your S2000 Elite system allows you to disable all but basic run functions. When the system is locked, no modifications to the set time, the optical output power or the system’s settings can be made. -
Page 61: Interfacing With The S2000 Elite
S2000 Elite - User's Guide 035-00707 Revision 1 7. Interfacing with the S2000 Elite The S2000 Elite is automated via PLC or computer control using the 50pin I/O, USB and Ethernet port. The advanced features ensure the process control and curing repeatability is accessed through built-in standard optically isolated 50pin I/O signals. -
Page 62: Input/ Output Signals And Descriptions
S2000 Elite - User's Guide 035-00707 Revision 1 7.1. Input/ Output Signals and Descriptions All inputs and outputs from the PLC interface are opto-isolated. The digital outputs are implemented using NPN logic and can be configurated as active low or active high. The digital inputs are active low and activate on contact closure to ground. - Page 63 S2000 Elite - User's Guide 035-00707 Revision 1 If input voltage is below 1V, analog input will be ignored. The system keeps the previous intensity setting. Analog intensity settings are saved to the system and will be restored after a power cycle Active Low Signal Circuit Configuration Active High Signal Circuit Configuration...
- Page 64 S2000 Elite - User's Guide 035-00707 Revision 1 Rear Panel Sample Connection One 50pin I/O signal connector is on the rear panel of the S2000 Elite, and the other connector is on the right side of the front panel. Refer to the following pages for signal descriptions and locations.
-
Page 65: Plc Connector: Db50
S2000 Elite - User's Guide 035-00707 Revision 1 7.2. PLC Connector: DB50 In the following pinout table, positive output pins connect to the collector of the optocoupler output, and negative output pins connect to the emitter. Input/ Analog/ Name and Description Output Digital Input... - Page 66 S2000 Elite - User's Guide 035-00707 Revision 1 Intensity Adjust Decrease: Input Digital Remotely decreases output intensity by 1% for each input toggle. Remote Trigger 1 Activation: Input Digital Activates Remote Trigger Input #1 (RT1) of StepCure. If no StepCure is active, RT1 Activation will start the run profile.
- Page 67 S2000 Elite - User's Guide 035-00707 Revision 1 Shutter Mode Select: Input Digital Deactivates the shutter verification output when active. Front Panel Lock: Input Digital Prevents the front panel buttons from being usable when this signal is active. Foot Pedal: Input Digital Simulates the activation of the foot pedal.
- Page 68 S2000 Elite - User's Guide 035-00707 Revision 1 43(-) Channel 1: Used by the StepCure sequencer Output Digital Active: StepCure C1 Output is energized Inactive: StepCure C1 Output is de-energized 26(+) 27(-) Channel 2: Used by the StepCure sequencer Output Digital Active: StepCure C2 Output is energized Inactive: StepCure C2 Output is de-energized...
- Page 69 S2000 Elite - User's Guide 035-00707 Revision 1 Amber: 41(-) Amber status indicator for stack lights, and Tree #2 (T2) when used in StepCure. Output Digital Active: Status indicator is active. 24(+) Inactive: Status indicator is inactive. 40(-) Red: Red status indicator for stack lights, and Tree #3 (T3) when used in StepCure. Output Digital Active: Status indicator is active.
- Page 70 S2000 Elite - User's Guide 035-00707 Revision 1 Active: Lamp is on. Inactive: Lamp is off. 34(+) 19(-) Shutter Verification: Reports shutter position when shutter mode select is enabled Output Digital Active: Shutter is in the open position Inactive: Shutter is in the closed position 35(+) 22(-) Cooling:...
- Page 71 S2000 Elite - User's Guide 035-00707 Revision 1 Do NOT connect anything to this pin. Do NOT connect anything to this pin.
-
Page 72: Audio Style Foot Pedal Connector: Signal Descriptions
S2000 Elite - User's Guide 035-00707 Revision 1 7.3. Audio Style Foot Pedal Connector: Signal Descriptions The rear panel foot pedal connector, a 3 mm audio style jack, has the following pin-out: Connection Signal Name Point Outer Rim Positive input, active low Center Pin Common ground (GND) This is a simple 2-wire, audio style jack that can be connected to a foot pedal (supplied with... -
Page 73: Radiometer Rs-232 Phono Connector: Signal Descriptions
S2000 Elite - User's Guide 035-00707 Revision 1 7.4. Radiometer RS-232 Phono Connector: Signal Descriptions The front panel RS-232 stereo phono connector is labelled “Radiometer”. This connector is used to connect S2000 Elite to the R2000 Radiometer for calibration and setup purposes. It is a RS-232 connector dedicated to communication with the R2000 Radiometer. -
Page 74: Interfacing With The S2000 Elite Using Original S2000 I/Os
S2000 Elite - User's Guide 035-00707 Revision 1 7.5. Interfacing with the S2000 Elite using original S2000 I/Os Replacing an original S2000 (XLA) is made easy using the optional PLC External Adapter (019-00395R). This accessory converts the S2000 Elite's 50pin I/O port into 3 I/O ports meant to replicate the ones found on the original S2000. -
Page 75: Led Light Ring
S2000 Elite - User's Guide 035-00707 Revision 1 8. LED Light Ring The LED light ring indicator displays the status of the following: • Light Guide • Lamp • Shutter • Calibration • Software Update The following table describes LED status and descriptions of each status in details. Description LED Indicator Green –... -
Page 76: Clearing Audible Alarm
S2000 Elite - User's Guide 035-00707 Revision 1 9. Clearing Audible Alarm The S2000 Elite provides an audible alarm to alert the user of various error conditions. To clear the audible alarm: 1. Press the front panel Start/Stop button, prompt on LCD screen or navigation enter button. -
Page 77: Remote Automated Control Requirements
S2000 Elite - User's Guide 035-00707 Revision 1 10. Remote Automated Control Requirements The S2000 Elite system is designed to provide remote automated control of the UV spot curing system from a PC through the USB port, RS232 port, and it is also accessible via TELNET and Direct IP The specification in the following topics are used to describe the communication protocol between the S2000 Elite unit and a PC. -
Page 78: Com Port Configuration
S2000 Elite - User's Guide 035-00707 Revision 1 10.1. Com Port Configuration Baud rate: 19200 Data bits: 8 Parity: None Stop bits: 1 Flow Control: None... -
Page 79: Rs232 Message Format And Protocol
S2000 Elite - User's Guide 035-00707 Revision 1 10.2. RS232 Message Format and Protocol All commands sent to the S2000 Elite and responses from the S2000 Elite include 3 pieces of data: 1. the command section 2. CRC8 3. carriage return (“\r” in C code or chr$(13) in basic code). The CRC8 (one byte value) is entered as a hex string. -
Page 80: Stepcure
S2000 Elite - User's Guide 035-00707 Revision 1 11. StepCure® The OmniCure® S2000 Elite allows automation of your production environment using the StepCure® run-time and programming engine. The StepCure engine runs profiles which are a sequence of instructions that are executed in a prescribed order. These profiles can be created to meet the varying degrees of complexity required by the user's unique application. -
Page 81: Stepcure Profiles
S2000 Elite - User's Guide 035-00707 Revision 1 11.1. StepCure Profiles StepCure profiles are the set of instructions that will be used to automate a task on your production line. Simple profiles are instructions that run one or several UV exposures after an associated trigger. -
Page 82: Stepcure Elements
S2000 Elite - User's Guide 035-00707 Revision 1 11.2. StepCure Elements The StepCure® profile's basic building block are referred to as elements. Each element performs an action. Actions are categorized into two types: 1. Input/Trigger 2. Output For example, a foot petal trigger is an element that performs an input action. Energizing an output channel is an output action. - Page 83 S2000 Elite - User's Guide 035-00707 Revision 1 StepCure Actions The following are types of actions that can be used to build your profile: Action Description Symbol This is a normally open input. This action can be associated with the following elements: 1.
- Page 84 S2000 Elite - User's Guide 035-00707 Revision 1 The latch action will keep the specified output energized until the corresponding output is de-energized with an unlatch action. If there is no corresponding unlatch action, the output is only energized momentarily. This is an unlatch output action.
- Page 85 S2000 Elite - User's Guide 035-00707 Revision 1 • The contact represents if the remote trigger #1 (or #2) were activated. Remote triggers are wired inputs into the DB-50 connector of the S2000 Elite Input Remote Trigger (RT1/RT2) System • See PLC Connector: DB50 for more details...
- Page 86 S2000 Elite - User's Guide 035-00707 Revision 1 detected by the system • It is available as a Normally Open contact • The contact represents an input that is virtualized, and thus does not exist physically but only in the context of StepCure profiles •...
- Page 87 S2000 Elite - User's Guide 035-00707 Revision 1 (energized)/unlatched (de-energized) • See PLC Connector: DB50 for more details on the pin out • This output is a physical output that can be used by the process line to control external equipment •...
- Page 88 S2000 Elite - User's Guide 035-00707 Revision 1 • This virtual output is an internal contact that is synchronized with the corresponding virtual input. For instance, if an instruction is to energize Virtual Output #1, Virtual Input #1 contact will be closed.
- Page 89 S2000 Elite - User's Guide 035-00707 Revision 1 • The load counter action is a special action. Once executed, the counter will be loaded with the provided value. • A zero value Output Load Counter (LCT) 0 to 32 indicates the counter will never stop •...
- Page 90 S2000 Elite - User's Guide 035-00707 Revision 1 • The Interlock StepCure is a special action. Once executed, any running exposures will be suspended and the StepCure will reset Output Interlock (ALM) • To allow the StepCure to resume, supervisor intervention is required •...
-
Page 91: Sample Profiles
S2000 Elite - User's Guide 035-00707 Revision 1 11.3. Sample Profiles The following StepCure profiles can be re-created using the images below, or be downloaded and uploaded to the S2000 Elite. Once downloaded, the intensities and durations can be modified as needed. Example 1 Run one exposure profile once In this example, the following... - Page 92 S2000 Elite - User's Guide 035-00707 Revision 1 Run two different exposure Example 3 profiles and then repeat the cycle for three iterations. In this example, the following behavior occurs when the Start/Stop button is pressed: 1. Shutter ON for 2 seconds at 10% Intensity 2.
- Page 93 S2000 Elite - User's Guide 035-00707 Revision 1 Run three different exposure Example 4 profiles and then repeat the cycle for three iterations. In this example, the following behavior occurs when the Start/Stop button is pressed: 1. Shutter ON for 2 seconds at 10% Intensity 2.
-
Page 94: Routine Care And Maintenance
S2000 Elite - User's Guide 035-00707 Revision 1 12. Routine Care and Maintenance Operate the unit in a well ventilated area with at least six inches clearance at the rear of the unit for proper air flow. Do not place any objects below the unit, between the feet as this will restrict airflow through the bottom of the front face plate. -
Page 95: Replacing The External Fuses
S2000 Elite - User's Guide 035-00707 Revision 1 12.1. Replacing the External Fuses The external (mains) fuses are located in the fuse drawer which is located in the AC inlet module on the rear panel. 1. Turn off the main POWER switch and remove the AC POWER cord from the unit. 2. -
Page 96: Replacing The Air Filter
S2000 Elite - User's Guide 035-00707 Revision 1 12.2. Replacing the Air Filter The external air filter is located under the front faceplate of the S2000 Elite. 1. Turn off the main POWER switch and remove the AC POWER cord from the unit. 2. -
Page 97: Light Guide Cleaning
S2000 Elite - User's Guide 035-00707 Revision 1 12.3. Light Guide Cleaning Instructions for cleaning the light emitting end (output) of the light guide Materials: • Lens Tissue sheets • Optical Swabs • IPA (Isopropyl Alcohol) solution • Wooden stick (eg; tongue depressor/popsicle stick) Before using Isopropyl Alcohol consult the manufactures MSDS Sheets for proper handling and storage. - Page 98 S2000 Elite - User's Guide 035-00707 Revision 1 4. Place the protective cap onto the light guide input end while cleaning the output end. 5. Wipe output end of light guide with non-abrasive lint-free lens tissue or optical swab saturated with an IPA cleaning solution with sufficient pressure until the staining has disappeared.
-
Page 99: Software Updates
S2000 Elite - User's Guide 035-00707 Revision 1 13. Software Updates The S2000 Elite runs two separate software, one for the System software (EES or EEC) and another one for the WEB UI interface (BIN). Both software can be easily updated to the latest versions. -
Page 100: Software Update Via S2000 Elite Touchscreen
S2000 Elite - User's Guide 035-00707 Revision 1 13.1. Software Update via S2000 Elite Touchscreen The S2000 Elite's System Software and Web Software can be upgraded directly using the touchscreen and an SD card. Materials Required 1. S2000 Elite System with reliable power source 2. - Page 101 S2000 Elite - User's Guide 035-00707 Revision 1 Performing the System Software Upgrade Do not disconnect the system power supply once the System Software update has started. Otherwise, you will be required to Software Update via USB method. If updating both the System and the Web Software, the System Software needs to be updated first.
- Page 102 S2000 Elite - User's Guide 035-00707 Revision 1 4. The system will prompt a warning to confirm if you wish to continue with the update, select the Check Mark to continue. 5. The system screen will perform the upgrade and return back to the MAIN screen after the upgrade completes 6.
-
Page 103: Software Update Via Web Ui
S2000 Elite - User's Guide 035-00707 Revision 1 13.2. Software Update via WEB UI The S2000 Elite's System Software and Web Software can be remotely upgraded using the Web UI. Materials Required 1. S2000 Elite System with reliable power source and network connectivity 2. - Page 104 S2000 Elite - User's Guide 035-00707 Revision 1 Performing the System Software Upgrade Do not disconnect the system power supply once the System Software update has started. Otherwise, you will be required to Software Update via USB method. Do not close your browser tab once the System Software update has started and ensure you have a stable network connection.
- Page 105 S2000 Elite - User's Guide 035-00707 Revision 1 If you are not able to remotely access your system after the upgrade: • Your S2000 Elite network settings may have changed after a power cycle. Confirm the network settings on your unit. •...
- Page 106 S2000 Elite - User's Guide 035-00707 Revision 1 Performing the Web Software Upgrade If updating both the System and the Web Software, the System Software needs to be updated first The Web Software can be uploaded using the Web UI in two ways: 1.
- Page 107 S2000 Elite - User's Guide 035-00707 Revision 1 Using a prepared SD card The Web Software Upgrade page is found by navigating to http://[your-host-name- or-ip]/index.htm and clicking the "Web Software Upgrade" button, or directly with the following link: http://[your-host-name-or-ip]/softwareupgrade.htm 1. Power on your S2000 Elite unit and ensure the network cable and SD card are connected to the unit 2.
-
Page 108: Software Update Via Usb
S2000 Elite - User's Guide 035-00707 Revision 1 13.3. Software Update via USB The S2000 Elite's System Software (.EEC) can be upgraded using a Windows PC and a USB cable. Materials Required 1. S2000 Elite System with reliable power source 2. - Page 109 S2000 Elite - User's Guide 035-00707 Revision 1 The Excelitas Firmware Updater application. Hit the "START" button to connect to your device. Select the COM port that was assigned to your S2000 Elite System when it was plugged into your computer. The Software Upgrade has started.
-
Page 110: Technical Specifications
Specifications may vary slightly and are subject to change without notice. • Mechanical Specifications • Orientation • Exposure Specifications • Lamp Module • System Specifications • I/O Ports (including RS-232) • Environmental Conditions • Radio specifications • Noise and the OmniCure S2000 Elite • Miscellaneous... -
Page 111: Mechanical Specifications
S2000 Elite - User's Guide 035-00707 Revision 1 14.1. Mechanical Specifications Dimensions Height: 265mm Depth: 289mm Width: 139mm Unit Weight: 3kg... -
Page 112: Orientation
035-00707 Revision 1 14.2. Orientation The OmniCure S2000 Elite is meant to operate in an upright orientation. Do not place the unit on it’s side when in operation as it may lead to failure. Avoid tilting the system more than 15° from the upright orientation as it may lead to... -
Page 113: Exposure Specifications
S2000 Elite - User's Guide 035-00707 Revision 1 14.3. Exposure Specifications S2000 Elite Exposure Timer Tolerance: +/- 250ms or +/- 1% of the exposure time setting, whichever is greater. S2000 Elite Output Accuracy (with close-loop feedback activated): +/-5% or 200mW/cm whichever is greater. -
Page 114: Lamp Module
S2000 Elite - User's Guide 035-00707 Revision 1 14.4. Lamp Module Figure 1: Lamp Module 1. Reflector Rim 2. Reflector 3. Back Ceramic Mount 4. Intelli-Lamp Chip 5. Intelli-Lamp Connector 6. Power Connector Lamp Excelitas Canada 200W Mercury DC: Standard or Surface Curing Module Focal Point 52.875 mm... - Page 115 S2000 Elite - User's Guide 035-00707 Revision 1 Hg – LAMP CONTAINS MERCURY, Manage in Accord with Disposal Laws. The method in which lamps are disposed of must comply with local rules & regulations for disposal of hazardous materials. Lamps may be returned to Excelitas Canada providing they are returned in its original packaging.
-
Page 116: System Specifications
S2000 Elite - User's Guide 035-00707 Revision 1 14.5. System Specifications Light Delivery: Flexible High Power fiber Light Guides will be available in a variety of lengths with a variety of core diameters. Power: 480VA Maximum Input Power Supply: Power Factor Corrected, Universal Input Input Voltage: 100 - 240VAC, 50/60Hz Current: 3.5A max at 120VAC 2.0A max at 240VAC Input Surge: 50A max. -
Page 117: I/O Ports (Including Rs-232)
S2000 Elite - User's Guide 035-00707 Revision 1 14.6. I/O Ports (including RS-232) The S2000 Elite has five different I/O ports, four located on the back of the unit: 1. Simple 2-wire, audio style jack that can be connected to a foot pedal (supplied with each unit) or any other electro-mechanical triggering device. -
Page 118: Environmental Conditions
S2000 Elite - User's Guide 035-00707 Revision 1 14.7. Environmental Conditions Operating Conditions Ambient Temperature: 15ºC to 40ºC Altitude: 2000m max. Atmospheric Pressure: 700 to 1060 hPa Relative Humidity: 15% to 85% (non-condensing) Installation Category: II Pollution Degree: 2 Transport and Storage Conditions Temperature: -40 to +70ºC Relative Humidity: 10% to 100% Atmospheric Pressure: 500 to 1060 hPa... -
Page 119: Radio Specifications
S2000 Elite - User's Guide 035-00707 Revision 1 14.8. Radio specifications High performance multi-protocol NFC frontend IC supports the following operating modes: Transmitter: Center Frequency: 13.56 MHz +/- 0.01% Modulation: ISO_14443 Type A ASK Percentage: 100% ISO_14443 Type B ASK Percentage: 10% Receiver: Carrier Frequency: 13.56 MHz Subcarrier Frequency: 847.5 kHz... -
Page 120: Noise And The Omnicure S2000 Elite
S2000 Elite - User's Guide 035-00707 Revision 1 14.9. Noise and the OmniCure S2000 Elite Using the S2000 Elite in a Noisy Environment What is Noise? "Electrical noise" is a term used to describe unwanted electronic emissions. Noise is comprised of RFI (Radio Frequency Interference), EMI (Electro-Magnetic` Interference) and other similar sources of energy. - Page 121 S2000 Elite - User's Guide 035-00707 Revision 1 Noise suppression products are also available in the form of AC power bars that incorporate surge suppression and noise suppression circuitry. Either type will help in protecting the S2000 Elite from noise. Providing the S2000 Elite with an AC line that is separate from any other noise-producing equipment will also be beneficial.
-
Page 122: Miscellaneous
S2000 Elite - User's Guide 035-00707 Revision 1 14.10. Miscellaneous Display: 4.3” LCD touch screen Keypad: 6 tactile buttons, 4 navigation, 1 select, 1 start/stop... -
Page 123: Regulatory Compliance
S2000 Elite - User's Guide 035-00707 Revision 1 15. Regulatory Compliance The following topics describe the S2000 Elite's regulatory compliance. • FCC Part 15 Subpart B, Class A - Unintentional Radiators • FCC Part 15 Subpart C, Intentional Radiators • CE Marking •... -
Page 124: Fcc Part 15 Subpart B, Class A - Unintentional Radiators
S2000 Elite - User's Guide 035-00707 Revision 1 15.1. FCC Part 15 Subpart B, Class A - Unintentional Radiators FCC Class A Digital Device or Peripheral - Information to User This equipment has been tested and found to comply with the limits for a Class A digital device, pursuant to part 15 of the FCC Rules. -
Page 125: Fcc Part 15 Subpart C, Intentional Radiators
1. L’appareil ne doit pas produire de brouillage; 2. L’appareil doit accepter tout brouillage radioélectrique subi, même si le brouillage est susceptible d’en compromettre le fonctionnement. Changes or modifications not expressly approved by Excelitas Technologies could void the user’s authority to operate the equipment. -
Page 126: Ce Marking
S2000 Elite - User's Guide 035-00707 Revision 1 15.3. CE Marking Council Directive 2014/35/EU Low Voltage Directive Council Directive 2014/30/EU EMC Directive Council Directive 2012/19/EU WEEE Directive Council Directive 2011/65/EU as RoHS amended by (EU) 2015/863 Council Directive 2014/53/EU Radio Equipment... -
Page 127: Weee Directive
S2000 Elite - User's Guide 035-00707 Revision 1 15.4. WEEE Directive The symbol above indicates that this product should not be disposed of along with municipal waste, that the product should be collected separately, and that a separate collection system exists for all products that contain this symbol within member states of the European Union. -
Page 128: China Rohs
S2000 Elite - User's Guide 035-00707 Revision 1 15.5. China RoHS The following table contains substance information for the Omnicure S2000 Series as required by China RoHS regulations. Hazardous Substances Part Name Hexavalent Polybrominated Polybrominated Lead Mercury Cadmium Chromium biphenyls diphenyl ethers (Pb) (Hg) -
Page 129: Optical Safety Data
S2000 Elite - User's Guide 035-00707 Revision 1 15.6. Optical Safety Data IEC 62471: Photobiological Safety of Lamps and Lamp Systems Resulting Classification and Labelling... -
Page 130: Warranty
S2000 Elite - User's Guide 035-00707 Revision 1 16. Warranty Excelitas Canada warrants the original purchaser for one (1) full year, calculated from the date of purchase that the equipment sold is free from defects in material and workmanship. All repairs are warranted for 90 days. -
Page 131: Replacement Lamp Warranty
S2000 Elite - User's Guide 035-00707 Revision 1 16.1. Replacement Lamp Warranty If the S2000 Elite Lamp fails to strike during the warranty period of 2000 hours, it can be replaced under warranty. In the event of a claim under this guarantee, the lamp is to be sent postage and carriage paid, including a description of the fault, to the Excelitas Canada Service Centre. -
Page 132: Returning Your S2000 Elite To Excelitas Canada
S2000 Elite - User's Guide 035-00707 Revision 1 16.2. Returning your S2000 Elite to Excelitas Canada Please note of the problem encountered, the steps followed to isolate the problem and the result of any troubleshooting steps taken. Telephone the nearest Excelitas Canada Service Centre to obtain a Return Authorization (RA) Number to complete repairs quickly and efficiently. -
Page 133: Contact Information
S2000 Elite - User's Guide 035-00707 Revision 1 17. Contact Information Excelitas Canada 2260 Argentia Road Mississauga, Ontario L5N 6H7 CANADA Tel.:+1 905 821-2600 Toll.:+1 800 668-8752 (USA and Canada) Fax:+1 905 821-2055 https://www.excelitas.com/omnicure-x-cite-inquiries Technical Assistance techsupport@excelitas.com https://www.excelitas.com/ox_service_request_form For a complete listing of Authorized OmniCure Distributors and Service Centers, please go to the main web site: https://www.excelitas.com/dealer-search...
Need help?
Do you have a question about the OmniCure S2000 Elite and is the answer not in the manual?
Questions and answers