DigiDesign Mbox 2 Pro Setup Manual
Hide thumbs
Also See for Mbox 2 Pro:
- Getting started manual (84 pages) ,
- Getting started manual (77 pages)
Table of Contents
Advertisement
Quick Links
Advertisement
Table of Contents

Related Manuals for DigiDesign Mbox 2 Pro


Summary of Contents for DigiDesign Mbox 2 Pro
- Page 1 Setup Guide ® Mbox 2 Pro Version 8.0...
- Page 2 Legal Notices This guide is copyrighted ©2008 by Digidesign, a division of Avid Technology, Inc. (hereafter “Digidesign”), with all rights reserved. Under copyright laws, this guide may not be duplicated in whole or in part without the written consent of Digidesign.
- Page 3 Communications and Safety Regulation Information Mbox 2 Pro Compliance Statement This model Digidesign Mbox 2 Pro complies with the following standards regulating interference and EMC: • FCC Part 15 Class B • EN 55022 Class B • EN 55204 Class B •...
- Page 4 Important Safety Instructions 1) Read these instructions. 2) Keep these instructions. 3) Heed all warnings. 4) Follow all instructions. 5) Do not use this apparatus near water. 6) Clean only with dry cloth. 7) Do not block any ventilation openings. Install in accordance with the manufacturer’s instructions.
-
Page 5: Table Of Contents
Mbox 2 Pro Features ........ - Page 6 Connecting Instruments to the Mbox 2 Pro ........
- Page 7 Before You Call Digidesign Technical Support ........
- Page 8 Mbox 2 Pro Setup Guide...
-
Page 9: Chapter 1. Welcome To Mbox 2 Pro
Mbox 2 Pro lets your Pro Tools LE sessions uti- and output, MIDI In and Out ports, two chan- lize up to six discrete channels of input and up... -
Page 10: Pro Tools Le Capabilities
Pro Tools LE on Mac or Windows provides the of, and in addition to, analog inputs 1–4 following capabilities with Mbox 2 Pro: when clocking to S/PDIF. S/PDIF outputs are • Playback of up to 48 mono or stereo digital always available in Pro Tools. -
Page 11: System Requirements And Compatibility
Recording to your system drive is not recom- mended. Recording and playback on a system Mbox 2 Pro includes one MIDI In port and one drive may result in lower track counts and fewer MIDI Out port, providing 16 channels of MIDI plug-ins. -
Page 12: Conventions Used In This Guide
Conventions Used in This Guide Digidesign guides use the following conven- tions to indicate menu choices and key commands: Convention Action File > Save Choose Save from the File menu Control+N Hold down the Control key and press the N key... -
Page 13: Chapter 2. Installing Pro Tools On Mac
Installation Overview tor for the account where you want to install Pro Tools. Installation of the Mbox 2 Pro on a Mac in- cludes the following steps: For details on Administrator privileges in Mac OS X, see your Apple OS X documen- “Installing Pro Tools LE and Connecting Your... -
Page 14: Launching Pro Tools Le
After the computer has started, connect one CoreAudio Driver standard. end of the included Firewire cable to the FireWire port on Mbox 2 Pro. Connect the other Avid Video Engine This option lets you integrate end of the cable to any available FireWire port ®... -
Page 15: Additional Software On The Pro Tools Installer Disc
If you purchased a Factory version of Mbox 2 Pro, go to the Additional Files/Factory Bundle Installers folder on the Pro Tools LE In- staller disc and run the Install Mbox 2 Pro Fac- tory Bundle installer. Mbox 2 Pro CoreAudio Driver... -
Page 16: Uninstalling Pro Tools
Standalone Mbox 2 Pro CoreAudio Driver The demo session can be opened by double- The Mbox 2 Pro CoreAudio Driver can be in- clicking the Filtered Dream.ptf file (located stalled as a standalone driver on Mac systems in the Filtered Dream Demo Session folder). -
Page 17: Chapter 3. Installing Pro Tools On Windows
Mbox 2 Pro connected to your computer. Installation Overview To install Pro Tools LE: Start Windows, logging in with Administrator Installing the Mbox 2 Pro on a Windows com- privileges. For details on Administrator privi- puter includes the following steps: leges, refer to your Windows documentation. - Page 18 Firewire cable to one of the Firewire ports DigiRack Plug-Ins Installs free plug-ins including on Mbox 2 Pro. Connect the other end of the ca- DigiRack plug-ins, free Bomb Factory plug-ins, ble to any available Firewire (6-pin 1394) port Eleven Free, TL Utilities, and Digidesign D-Fi on your computer.
-
Page 19: Launching Pro Tools Le
Digidesign Command|8 control surface. To authorize Pro Tools LE software: Installing QuickTime Make sure Mbox 2 Pro is connected to your QuickTime is required for Pro Tools if you plan computer and powered on. to include movie files, or import MP3 or MP4 Double-click the Pro Tools LE shortcut on (AAC) files in your sessions. -
Page 20: Additional Software On The Pro Tools Installer Disc
(Digidesign Audio Drivers Bundle Installers folder on the Pro Tools LE In- Setup.exe), which is available on the staller disc and run the Mbox 2 Pro Factory Bun- Pro Tools LE Installer disc. dle Setup.exe. For information on installing and configur-... -
Page 21: Uninstalling Pro Tools Le
Before installing the demo session to your leges, refer to your Windows documentation. audio drive, make sure the drive is config- ured as described in “Formatting an Audio Go to Program Files\Digidesign\ Drive” on page 54. Pro Tools\Pro Tools Utilities and double-click Uninstall Pro Tools.exe. - Page 22 Mbox 2 Pro Setup Guide...
-
Page 23: Chapter 4. Configuring Your Pro Tools System
chapter 4 Configuring Your Pro Tools System After you have connected your system and in- Shut down your Pro Tools system in this order: stalled Pro Tools software, you are ready to start Quit Pro Tools and any other running applica- up and configure your Pro Tools system. -
Page 24: Configuring Pro Tools Le
In addition to causing slower screen re- sponse and monitoring latency, higher Hardware Buffer Size settings can increase Playback Engine dialog for Mbox 2 Pro (Structure plug- the latency caused by RTAS plug-ins, and in installed) affect the accuracy of plug-in automation, In most cases, the default settings for your sys- mute data, and MIDI track timing. - Page 25 RTAS Processors To set the number of RTAS Processors: Choose Setup > Playback Engine. The RTAS Processors setting determines the number of processors in your computer allo- From the RTAS Processing pop-up menu, select cated for RTAS (Real-Time AudioSuite) plug-in the number of available processors you want to processing.
- Page 26 To change the CPU Usage Limit: Choose Setup > Playback Engine. From the CPU Usage Limit pop-up menu, select the percentage of CPU processing you want to allocate to Pro Tools. Click OK. Mbox 2 Pro Setup Guide...
- Page 27 RTAS Error Suppression Options The optimum DAE Playback Buffer Size for most disk operations is 1500 msec; Level 2 (Default). Ignore Errors During Playback/Record When en- • DAE Playback Buffer Size settings lower than abled, Pro Tools continues to play and record 1500 msec;...
- Page 28 To change the Plug-in Streaming Buffer Size: Choose Setup > Playback Engine. From the Plug-in Streaming Buffer Size pop-up menu, select a buffer size. Click OK. Mbox 2 Pro Setup Guide...
- Page 29 Select the Optimize for Streaming Content op- tion. Internal Use this setting if you are recording an- alog signals directly into Mbox 2 Pro. When set Click OK. to internal, Mbox 2 Pro provides four channels of input (analog only).
-
Page 30: Optimizing A Mac System For Pro Tools
To ensure optimum performance with Pro Tools LE, configure your computer before using Pro Tools software. I/O Setup dialog for Mbox 2 Pro Click the Input, Output, Insert, or Bus tab to dis- To optimize a Windows system, see “Opti- play the corresponding connections. - Page 31 For details on qualified versions of Mac OS, Disable or Reassign Mac Keyboard refer to the latest compatibility information Shortcuts Used by Pro Tools on the Digidesign website To have the full complement of Pro Tools key- (www.digidesign.com/compatibility). board shortcuts, you need to disable or reassign...
- Page 32 Select the volume in the left column of the Press and hold Command+Option+Con- Disk Utility window. trol+Shift and select “Control+Option+Shift+Com- mand+Arrow Keys” from the “To switch between Click Enable Journaling in the toolbar. spaces” pop-up menu. Mbox 2 Pro Setup Guide...
-
Page 33: Optimizing A Windows System For Pro Tools
To enable DMA for any IDE hard drives: Optimizing a Windows System Right-click Computer (Windows Vista) or My for Pro Tools Computer (Windows XP). To ensure optimum performance with In the left-hand pane of the Computer Man- Pro Tools LE, configure your computer before agement window under System Tools, click on using Pro Tools hardware and software. - Page 34 Verify that the following settings are set to able Bus Mastering in the manufacturer’s Never: Control Panel. See the manufacturer’s in- • Turn off hard disks structions for details. • System standby • System hibernates Click OK. Mbox 2 Pro Setup Guide...
- Page 35 Optional Optimizations Adjusting Processor Scheduling The following system optimizations may help To adjust Processor Scheduling performance: Pro Tools perform better on some systems. It is Right-click Computer (Windows Vista) or My recommended that you only try these optimiza- Computer (Windows XP) and choose Properties. tions if necessary, as they may disable or ad- versely affect the functionality of other pro- in the System Properties window, click the Ad-...
- Page 36 If performance has not changed, run “msconfig” and return your computer Startup Selection back to Normal Startup - load all device drives and services. Alternatively, try disabling Startup items and non-essential processes indi- vidually. Mbox 2 Pro Setup Guide...
-
Page 37: Chapter 5. Hardware Overview
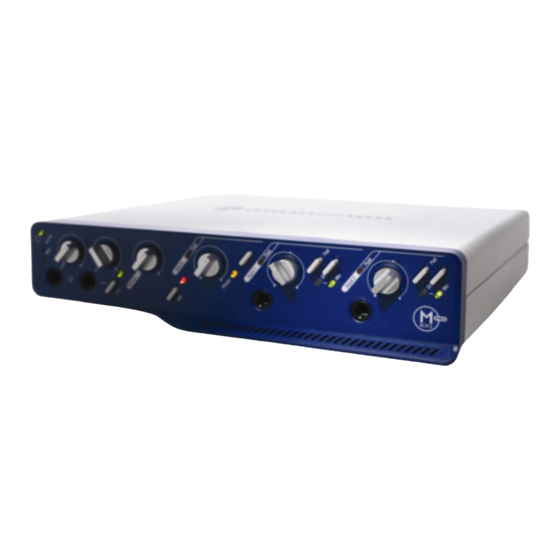
MIDI Activity LED Input 1 DI Input 2 DI Headphone Outputs Switch and LED (A and B) DI/Mic 1 LEDs DI/Mic 2 LEDs 3–4 Switch and LED (Headphone B) Figure 1. Mbox 2 Pro front panel Chapter 5: Hardware Overview... - Page 38 Phantom power is activated by the switch la- phone outputs, A and B, each with its own level beled 48V on the front panel of Mbox 2 Pro. The control. Headphones mirror the Monitor out- LED, when lit, indicates that 48V phantom puts, by default (usually your main Pro Tools power is active on both Mic/Line inputs.
- Page 39 About Phantom Power DI Inputs Dynamic microphones (such as a Shure SM57) Front panel DI connectors are provided for in- do not require phantom power to operate, but put channels 1 and 2, to connect electric guitar, are not harmed by it. Most condenser micro- electric bass, and similar instruments.
-
Page 40: Mbox 2 Pro Back Panel Features
Mbox 2 Pro Back Panel Features Figure 2 identifies the inputs and outputs on the back panel of the Mbox 2 Pro. Inputs 1 and 2 Aux In (3–4) Monitor Line Line Out outputs outputs (5–6) (1–2) (1–4) Phono In L/R... - Page 41 1/4-inch cables. in addition to the four channels of analog audio input when S/PDIF is selected as the Pro Tools Clock Source. This lets Mbox 2 Pro be used as a Line Out (5–6) 6-in/8-out digital audio interface for This connector accepts a 1/4-inch cable, to sup- Pro Tools LE.
- Page 42 RCA connectors. Grounding Post The Grounding Post is for grounding turntables and other types of DJ equipment to Mbox 2 Pro. Mic/Line 1 and 2 Each analog source input channel (Input 1 and Input 2) provides Mic (XLR) and Line (TRS) in- put on combination jacks.
-
Page 43: Chapter 6. Making Studio Connections
Connecting Headphones system, use any of the six available Line Out channels on the back panel. See “Addi- On the front panel of the Mbox 2 Pro are two tional Analog Outputs” on page 36. 1/4-inch headphone connectors, each with an associated level control, labelled A and B. -
Page 44: Connecting A Sound System
Additional Analog Outputs Connecting a Sound System Mbox 2 Pro provides a total of six analog output The main monitor outputs on the back of the channels in addition to the primary Monitor Mbox 2 Pro (Mon Out L and R) support 1/4-inch outputs. -
Page 45: Connecting Audio Inputs
Instruments to the Mbox 2 Pro” on page 40. Overview of Analog Inputs Mbox 2 Pro provides a total of four channels of analog input. On the Mbox 2 Pro, these are la- belled Inputs 1 and 2, and Aux In L-R. -
Page 46: Connecting A Microphone
C3000) require phantom power to operate. Dy- namic microphones (such as a Shure SM57) do There are several ways to use Mbox 2 Pro with a not require phantom power to operate, but are microphone, depending on the type of micro- not harmed by it. - Page 47 To use a microphone that has a 1/4-inch TS sends 48V to both XLR mic inputs. The 48V LED (Tip-Sleeve) connector: on the front of the Mbox 2 Pro will light when Connect the 1/4-inch cable from your micro- phantom power is being supplied.
-
Page 48: Connecting Instruments To The Mbox 2 Pro
To use a guitar with Mbox 2 Pro: the Gain control to the right to increase the in- On the front of the Mbox 2 Pro, plug your gui- put level of your microphone signal. tar cable into one of the DI inputs. - Page 49 Phono LED is on (lit). The switch should be in its “in” position. On the front of the Mbox 2 Pro, set the Source to Mic by pressing the Mic/DI switch until the Digital Input and Output Mic LED is lit.
-
Page 50: Midi Connections
To enable the S/PDIF inputs on Mbox 2 Pro: Make sure your have connected the external The two MIDI ports on Mbox 2 Pro let you take digital device to the correct Mbox 2 Pro S/PDIF advantage of all the MIDI features of connector (In and Out). -
Page 51: Word Clock
MIDI Using Word Clock with Pro Tools LE Pro Tools LE with Mbox 2 Pro can act as Word clock master, or as a slave to Word clock sup- plied by an external device. MIDI connections to Mbox 2 Pro... -
Page 52: Using A Footswitch
Pro Tools Clock source, as follows: nector on the back panel of the Mbox 2 Pro. Launch Pro Tools. To configure Pro Tools LE with Mbox 2 Pro as a Word clock slave: Choose Setup > Hardware. Make sure all Word clock and audio connec-... -
Page 53: Appendix A. Configuring Ams (Mac Os X Only)
MIDI interface and configure your MIDI studio for use with Pro Tools. This chapter shows examples of AMS using Mbox 2. The instructions for Mbox 2 Pro are identical to those presented here. To configure your MIDI studio in AMS:... - Page 54 .middev file in any text editor (such as MIDI setup. TextEdit). To configure an external MIDI device: Select the external device icon and click Show Info (or double-click the new device icon). External Device Icon Mbox 2 Pro Setup Guide...
- Page 55 Click the More Properties arrow to expand the Click the device image. The window expands dialog, then enable the appropriate MIDI chan- to show images for various MIDI devices (such nels (1–16) for the Transmits and Receives op- as keyboards, modules, interfaces, and mixers). tions.
-
Page 56: Midi Patch Name Support
Patch Select button Patch Select button (Edit window) (Mix window) edited in any text editor, or you can use third-party patch librarian and editor soft- Patch Select button ware to create your own custom patch names. Mbox 2 Pro Setup Guide... -
Page 57: Appendix B. Configuring Midi Studio Setup (Windows Only)
appendix b Configuring MIDI Studio Setup (Windows Only) MIDI Studio Setup Window MIDI Studio Setup The MIDI Studio Setup window is organized MIDI Studio Setup (MSS) lets you configure the into three sections. Interface controls are at the MIDI controllers and sound modules that are top of the window. - Page 58 MIDI Studio Setup Properties section I/O), in addition to the MIDI ports on When a previously defined instrument is se- Mbox 2 Pro, the MIDI Studio setup window lected in the Instrument list, the Properties sec- shows both the DirectMusic time-stamped out-...
-
Page 59: Midi Patch Name Support
The Input Port pop-up menu displays a list of MIDI Patch Name Support available MIDI interface input ports. Inputs will include Mbox 2 Pro and any additional MIDI in- Pro Tools supports XML (Extensible Markup terfaces enabled on your system. The MIDI in- Language) for storing and importing patch names for your external MIDI devices. - Page 60 Change button Patch Select dialog In the Open dialog, navigate to C:\Program Files\Common Files\Digidesign\MIDI Patch Names\Digidesign\<name of manufacturer>, and select the MIDI Patch Name file (.midnam) for the MIDI device. Mbox 2 Pro Setup Guide...
-
Page 61: Appendix C. Hard Drive Configuration And Maintenance
Beat Detective in a session. For complete hard drive requirements, visit the Digidesign website at: www.digidesign.com/compatibility Appendix C: Hard Drive Configuration and Maintenance... -
Page 62: Formatting An Audio Drive
SCSI HBA connector on the mother- board. For complete information on track count and the supported number and configuration of SCSI drives, visit the Digidesign website at: www.digidesign.com/compatibility FireWire Hard Drives Digidesign recommends qualified FireWire drives and (on Windows systems) a qualified FireWire host adapter. -
Page 63: Partitioning Drives
Next. To format an audio drive: • When prompted, select the partition type. On Windows Vista, choose Start. Digidesign recommends using Primary par- Right-click Computer (Windows Vista) or My titions, instead of Extended partitions. Computer (Windows XP) and choose Manage. -
Page 64: Defragmenting An Audio Drive
Mbox 2 Pro Setup Guide... -
Page 65: Using Mac Drives On Windows Systems
Defragmenting Windows Audio Drives Using Mac Drives on Windows Systems To defragment an audio drive (Windows Vista): Choose Start > Control Panel. Pro Tools for Windows lets you record and play back sessions directly from a Mac-formatted Click System and Maintenance. (HFS+) drive connected to a Windows system. -
Page 66: Hard Disk Storage Space
24 mono tracks, 60 minutes 7 GB 7.8 GB 10.5 GB 11.6 GB 32 mono tracks, 5 minutes 800 MB 883 MB 1.2 GB 1.3 GB 32 mono tracks, 60 minutes 9.4 GB 10.4 GB 14 GB 15.4 GB Mbox 2 Pro Setup Guide... -
Page 67: Appendix D. Troubleshooting
appendix d Troubleshooting Backing Up Your System Backing Up Your Work Configuration It is highly recommended that you back up your After configuring your system and Pro Tools, work on a regular basis, and especially before you should save an image of your system drive making changes to your system configuration. -
Page 68: Common Issues
Pro Tools. Power Saver Features Some automatic power saver features, such as those that spin down the system hard drive, can affect Pro Tools perfor- mance. These features should be turned off. Mbox 2 Pro Setup Guide... -
Page 69: Before You Call Digidesign Technical Support
• Additional plug-ins from Digidesign Devel- opment Partners Gather Important Information Other Hardware Digidesign wants to help you resolve problems Refer to the manufacturer’s documentation for as quickly and efficiently as possible. If you have operational details. the following information handy when you... - Page 70 Note any DAE errors or other error codes you en- counter. Diagonally, note the ability to repro- duce the problem under different conditions, for example, with another session, or after changing settings (such as the Hardware Buffer Size). Mbox 2 Pro Setup Guide...
-
Page 71: Appendix E. Resources
Guide and other guides in the Pro Tools guide Pro Tools. set can be purchased separately from the • DigiRack Plug-ins Guide, which describes the DigiStore (www.digidesign.com). DigiRack plug-ins included with Pro Tools for both real-time and file-based audio process- Printed Setup Guide ing. -
Page 72: About Www.digidesign.com
Pro Tools. • Get useful information, help, and tips from the worldwide community of Pro Tools users at Digidesign User Conference (DUC). Go to: About www.digidesign.com http://duc.digidesign.com The Digidesign website (www.digidesign.com) • For questions about installation, visit is your best online source for information to Digidesign’s online Answerbase. -
Page 73: Index
Clock Source 21 drive formats 53 Internal setting 21 FireWire requirements 54 S/PDIF (digital) setting 21 formatting 54, 55 connecting Mbox 2 Pro formatting (Mac) 54 Mac 6 IDE/ATA requirements 54 maintenance 53, 56 CoreAudio driver (Mac) 7 optimizing 56... - Page 74 Minimize Additional I/O Latency option 19 installing (Windows) 11 network cards (Windows), disabling 27 removing Pro Tools network connections 60 Windows 8, 13 RTAS Processors setting 17 optimizing hard drives 56 outputs digital 33 Monitor outputs 33 Mbox 2 Pro Setup Guide...
- Page 75 S/PDIF 33 Safe Uninstall (Mac) 8 Sample Rate 21 screen savers 60 SCSI requirements 54 Software Update (Mac), turning off 23 sources digital 33 selecting 31 Spotlight indexing (Mac), disabling 24 Startup items (Windows), disabling 28 system optimization (Mac) 22 optional optimizations (Windows) 27 recommended optimizations (Windows) 26 required optimizations (Windows) 25...
- Page 76 DIGIDESIGN TECHNICAL SUPPORT (USA) PRODUCT INFORMATION (USA) INTERNATIONAL OFFICES Visit the Digidesign website 2001 Junipero Serra Boulevard Tel: 650.731.6100 Tel: 800.333.2137 for contact information Daly City, CA 94014-3886 USA Fax: 650.731.6375 Tel: 650.731.6300 Fax: 650.731.6399...
Need help?
Do you have a question about the Mbox 2 Pro and is the answer not in the manual?
Questions and answers