Table of Contents
Advertisement
Quick Links
SR series/TS2000
INSTRUCTION MANUAL
CASSETTE TRANSFER ROBOT
1.
Make sure that this instruction manual is delivered to the
final user of Toshiba Machine's industrial robot.
2.
Before installing and operating the industrial robot, read
through and completely understand this manual.
3.
After reading through this manual, keep it nearby for future
reference.
MAINTENANCE
Notice
May, 2004
TOSHIBA MACHINE CO., LTD.
TOKYO, JAPAN
STE 73872–0
Advertisement
Table of Contents

Related Manuals for Toshiba SR Series


Summary of Contents for Toshiba SR Series
- Page 1 MAINTENANCE Notice Make sure that this instruction manual is delivered to the final user of Toshiba Machine's industrial robot. Before installing and operating the industrial robot, read through and completely understand this manual. After reading through this manual, keep it nearby for future reference.
- Page 2 MAINTENANCE MANUAL Copyright 2004 by Toshiba Machine Co., Ltd. All rights reserved. No part of this document may be reproduced in any form without obtaining prior written permission from Toshiba Machine Co., Ltd. The information contained in this manual is subject to change without prior notice to effect improvements.
- Page 3 MAINTENANCE MANUAL PREFACE This manual describes how to maintain the robot and controller. Maintenance and inspection are essential to keep the robot performance for a long time, to prevent failures and to assure safety. Be sure to look through this manual and set up a maintenance program before actually starting the robot.
- Page 4 MAINTENANCE MANUAL CAUTIONS ON SAFETY This manual contains the important information on the robot and controller to prevent injury to the operators and persons nearby, to prevent damage to assets and to assure correct use. Make sure that the following details (indications and symbols) are well understood before reading this manual.
- Page 5 Disassembly prohibited • Always use the Toshiba Machine's designated spare parts when replacing the parts. • Maintenance and inspection should be performed regularly. Mandatory Otherwise, the system may malfunction or accidents will be caused.
-
Page 6: Table Of Contents
MAINTENANCE MANUAL Table of Contents Page Section 1 Maintenance Items ................. 1–1 Maintenance Schedule ................ 1–1 Items for Maintenance and Inspection ..........1–2 Maintenance Tools................1–4 Maintenance Contract and Repair ............1–5 Section 2 Maintenance of the Robot .............. 2–1 Cautions on Maintenance and Inspection .......... - Page 7 MAINTENANCE MANUAL Page Appendix Table 1 List of Mechanical Replacement Parts for Maintenance. 4–1 Appendix Table 2 List of Controller Replacement Parts for Maintenance ... 4–3 Appendix Drawing 1 Component Connection Diagram ........4–4 STE 73872 – vi –...
-
Page 8: Maintenance Items
MAITENANCE MANUAL Section 1 Maintenance Items Maintenance Schedule Maintenance comes in the two (2) types; daily inspection, and regular inspection and maintenance. For the regular inspection and maintenance, inspection items are added every 1,200 running hours. 1200 3-month check 2400 3-month check 6-month check 3-month check... -
Page 9: Items For Maintenance And Inspection
MAITENANCE MANUAL Items for Maintenance and Inspection This section describes the items for maintenance and inspection. For the execution procedures, see the relevant paragraph listed in the table below. Daily inspection Item Inspection procedures Relevant Para. Robot harness Make sure that no local torsion or curve is 2.3.1 and cable duct caused in the robot harness and cable... - Page 10 MAITENANCE MANUAL Semi-annual (every six (6)-month) inspection Item Inspection procedures Relevant Para. Orthogonal axis Make sure that the orthogonal axis 2.3.4 stainless belt stainless belt is tightened completely and that it is not damaged and in a good shape. Each axis drive Move each axis by hand and make sure 2.3.1 system...
-
Page 11: Maintenance Tools
MAITENANCE MANUAL Overhaul (every five (5) years) Item Inspection procedures Relevant Para. Inspection of Inspect the ball screws, linear guides, consumable parts flexible cables, reduction gears, bearings and motors and replace them when necessary. Battery Replace the RAM (controller) backup 3.3.3 replacement battery. -
Page 12: Maintenance Contract And Repair
If a fault has occurred or if repair is necessary, turn off the controller power and contact the Toshiba Machine Service Department. At this time, advise us of the details of the fault and the following information stated on the robot and controller. -
Page 13: Maintenance Of The Robot
MAINTENANCE MANUAL Section 2 Maintenance of the Robot Cautions on Maintenance and Inspection When performing inspection or maintenance of the robot, strictly observe the following precautions to protect yourself and coworkers. DANGER • Be sure to turn off the main power switch of the controller before approaching the robot for maintenance and inspection. - Page 14 MAINTENANCE MANUAL Solenoid valve Hand Chuck Axis 1 reduction gear Axis 1 motor Axis 4 reduction gear Axis 4 motor Axis 3 reduction gear Axis 3 motor Axis 2 motor Pool box Manifold For scavenging Air pressure supply Air return Fig.
-
Page 15: Robot Maintenance Procedures
MAINTENANCE MANUAL Robot Maintenance Procedures 2.3.1 Check for Vibration and Abnormal Noise Approach the robot and its peripheral equipment outside the predetermined operating range and make sure that no abnormal noise of operation is heard. Otherwise, locate the source of the abnormal noise. When necessary, turn off the power of the robot and its peripheral equipment and manually move the part suspected to be the trouble source to confirm that the abnormal noise is heard from it. -
Page 16: Check For Lubrication
MAINTENANCE MANUAL 2.3.2 Check for Lubrication Check of ball screw and linear guide for lubrication state Make sure that the ball screw and linear guide of each axis are greased sufficiently and that no rust has developed on them. If they have run out of grease, fill it. - Page 17 MAINTENANCE MANUAL For the greasing procedures of the orthogonal axes, see Section 6 of the COMPO Arm Axis Instruction Manual provided separately. The axis 2 reduction gear is of an oilless type and need not be greased. STE 73872 – 2–5 –...
-
Page 18: Replacement Of Position Detector (Or Encoder) Batteries
MAINTENANCE MANUAL 2.3.3 Replacement of Position Detector (or Encoder) Batteries To back up the data of the position detector attached to each motor, batteries (lithium dry batteries) are used. Replace the batteries every three (3) years. If the controller has detected the battery voltage drop alarm, replace the batteries at an early stage. -
Page 19: Check For Stainless Belt
MAINTENANCE MANUAL 2.3.4 Check for Stainless Belt Make sure that the X-axis stainless belt is not loosened and not damaged at all. To restretch the belt, observe the following procedures. Use the following stainless belt. Material SUS301–H Belt width 40 mm ±0.1 mm (Alignment is necessary.) Maker Dymco Ltd. -
Page 20: Maintenance Of Controller
MAINTENANCE MANUAL Section 3 Maintenance of Controller Cautions on Maintenance and Inspection When performing maintenance and inspection of the controller, follow the items given below so that the work can be carried out safely. CAUTION • Before removing the controller cover for maintenance or inspection, be sure to turn off the main power switch of the controller. -
Page 21: Layout Of Controller Parts
MAINTENANCE MANUAL Layout of Controller Parts X8HN (X8HI) X8HC X8HS X8HP X8HB PWB set bracket Upper side view Fig. 3.1 Layout of controller parts Part name Descriptions P5 V, P24 V switching power supply PWB set bracket PS1 set bracket X8HP Servo power printed board X8HC... -
Page 22: Maintenance Procedures
MAINTENANCE MANUAL Maintenance Procedures 3.3.1 Check for Controller Air Vent Holes If the air vent holes are blocked, the controller may overheat and malfunction. To avoid this, perform check on the air vent holes to make sure that air is flowing freely through them. -
Page 23: Check Of Safety Devices For Function
MAINTENANCE MANUAL 3.3.2 Check of Safety Devices for Function Make sure that the emergency stop pushbutton switches equipped on the control panel and teach pendant work properly. Also make sure that the safety devices controlled by the external operation input signals work correctly. INTERNAL EM... - Page 24 MAINTENANCE MANUAL Make sure that the EMERGENCY (emergency stop) switch [2] provided on the control panel functions properly. Press the SERVO ON switch [1] provided on the control panel to turn the servos on and make sure that the SERVO ON LED is illuminated. Press the EMERGENCY switch [2] and make sure that the servos are turned off.
- Page 25 MAINTENANCE MANUAL [4] [5] Fig. 3.4 EMERGENCY switch provided on teach pendant Turn the EMERGENCY switch in the clockwise (CW) direction and make sure that the same switch turns off. Make sure that the safety devices controlled by the external operation signals work properly.
-
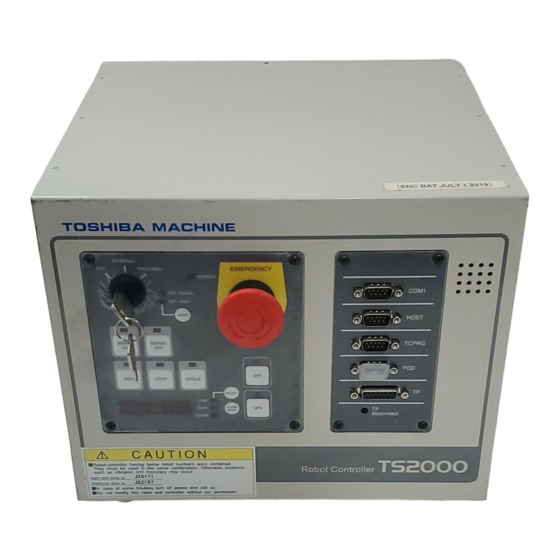
Page 26: Battery Replacement
MAINTENANCE MANUAL 3.3.3 Battery Replacement SRAM equipped on the X8HC printed board of the TS2000 controller is backed up by a lithium battery to save the data. Replace the battery every five (5) years. The lithium battery will turn its life when used for a predetermined time. If it is used, neglecting the life, the battery voltage will drop to below the voltage required for keeping the SRAM data, resulting in data being lost and faults caused by leakage of the battery liquid. - Page 27 (5) years. Only the battery shown in Table 3.1 should be used. As this is an exclusive battery, contact Toshiba Machine at order entry. [Battery replacement procedures] If the battery is kept removed for more than five (5) minutes, save all programs stored in the SRAM into the personal computer.
-
Page 28: Replacement Of Switching Power Supply Unit
MAINTENANCE MANUAL CAUTION • Batteries should be disposed of according to the user's in-house regulations. • NEVER drop the batteries into fire. NEVER short-circuit, charge, disassemble or heat them. Otherwise, liquid leakage or rupture may be caused. 3.3.4 Replacement of Switching Power Supply Unit The life of the switching power supply unit (DC5 V/DC24 V) used in the TS2000 controller differs with the operating conditions. - Page 29 MAINTENANCE MANUAL Remove the screws (3 places) which secure the body and PWB set bracket. (For the position of the PWB set bracket, see Fig. 3.1.) PWB set bracket PS1 (DC 5 V, DC 24 V) Top side view Fig. 3.6 Remove the connectors (2 places) linked to the PS1 with the PWB set bracket inclined slightly, then remove the PWB set bracket from the body.
- Page 30 MAINTENANCE MANUAL PWB set bracket PS1 CN2 PS1 PS1 CN1 Fig. 3.8 10) Return the PWB set bracket where the new power supply units are mounted to the controller, then connect the connectors. Screw the PWB set bracket into the body. (3 places; See Fig. 3.6.) Mount the X8HC, X8HN (X8HI), X8HS (2 pcs.) and X8HP printed boards on the body.
-
Page 31: Replacement Of Fuse (X8Hn, X8Hi Printed Boards)
MAINTENANCE MANUAL 3.3.5 Replacement of Fuse (X8HN, X8HI Printed Boards) If the current exceeding the specified current has run through the I/O unit, the fuse of the X8HN (X8HI) printed board is blown out. If the alarm saying "I/O FUSE Broken (8–273)"... - Page 32 MAINTENANCE MANUAL [Replacement procedures] Turn off the controller main power. Remove the cover attached to the fuse unit as shown above. Remove the fuse and set a new fuse. Mount the removed cover. Turn on the controller main power and make sure that no error will occur. STE 73872 –...
-
Page 33: Replacement Of Output Ics (X8Hn, X8Hi Printed Boards)
Before the replacement, examine and identify an fault circuit, remedy the cause, then replace the ICs. Output ICs Output ICs X8HN X8HI Table 3.1b Type of IC Name of board Type of IC Manufacturer X8HN TD62082AP Toshiba Corp. X8HI MM5456P Mitsubishi Electric STE 73872 – 3–14 –... - Page 34 MAINTENANCE MANUAL [Replacement procedures] Turn off the controller main power. Remove the cover from the body. Remove all connectors in the control panel, which are linked to the X8HC printed board. Remove the X8HC and X8HN (X8HI) printed boards from the body. Remove the ICs shown above from respective sockets.
- Page 35 Axis 3 Timing belt 210–3GT–6 Unitta Axis 4 870–3GT–9 Axis 1 420–5GT–15 Axis 2 970–5GT–25 Axis 3 Timing pulley S720216 Toshiba Machine Axis 3 S720217 Axis 3 S720218 Axis 3 S720236 Axis 4 S720235 Axis 4 S720237 Axis 4 S720238...
- Page 36 Alvania grease 0 Shell Oil CAUTION • With the exception of the grease, all parts listed above are custom-made to Toshiba Machine specifications. Contact Toshiba Machine at order entry. • NEVER replace the parts by the user. STE 73872 – 4–2 –...
- Page 37 PS1 (Switching power LEB100F–0524 Cosel supply) Main power switch IR–11–AB–10A–1B Nippon Thermo Lithium battery ER3VC Toshiba Denchi Fuse (X8HC printed board) 51NM030H PICO Printed circuit board X8HC (main control) Toshiba Machine X8HN, X8HI (I/O printed board) X8HP (servo power supply)
- Page 38 MAINTENANCE MANUAL Appendix Drawing 1 Component Connection Diagram Rotation base Pool box Dividing box (Z-axis, Axis 1 motor (Axis 1, axis 4) axis 1, axis 4) KL1656G KL1652G H04344G KL1653G KL1659G Axis 4 motor Z-axis motor (axis 3) (Z-axis) KL1661G KL1662G Battery KL1668G...