ResMed AirCurve 10 VAUTO Clinical Manual
Hide thumbs
Also See for AirCurve 10 VAUTO:
- User manual ,
- Quick start manual (4 pages) ,
- User manual (23 pages)
Table of Contents
Advertisement
Advertisement
Table of Contents

Related Manuals for ResMed AirCurve 10 VAUTO


Summary of Contents for ResMed AirCurve 10 VAUTO
- Page 1 Clinical guide English...
-
Page 2: Table Of Contents
Contents Welcome ........................... 1 Indications for use ........................ 1 AirCurve 10 VAuto ......................1 AirCurve 10 S ......................... 1 AirCurve 10 ST ....................... 1 Contraindications........................1 Adverse effects ........................1 At a glance ..........................2 About the control panel ......................3 Therapy information......................... - Page 3 Checking ........................... 20 Reassembling ........................21 Reprocessing .......................... 21 Surface disinfection ......................22 Reprocessing the air tubing and Air10 tubing elbow ............22 Disconnecting ......................22 Decontaminating ......................22 Disinfecting ......................... 23 High level chemical disinfection .................. 23 Sterilization ........................24 Inspecting ........................
-
Page 4: Welcome
Indications for use AirCurve 10 VAuto The AirCurve 10 VAuto device is indicated for the treatment of obstructive sleep apnea (OSA) in patients weighing more than 66 lb (30 kg). It is intended for home and hospital use. The humidifier is intended for single patient use in the home environment and re-use in a hospital/institutional environment. -
Page 5: At A Glance
™ • SD card reader • Air10 oximeter adapter • Air10 USB adapter • Power Station II • Air10 tubing elbow. Note: Make sure all parts and accessories used with the device are compatible. For compatibility information, refer to www.resmed.com. -
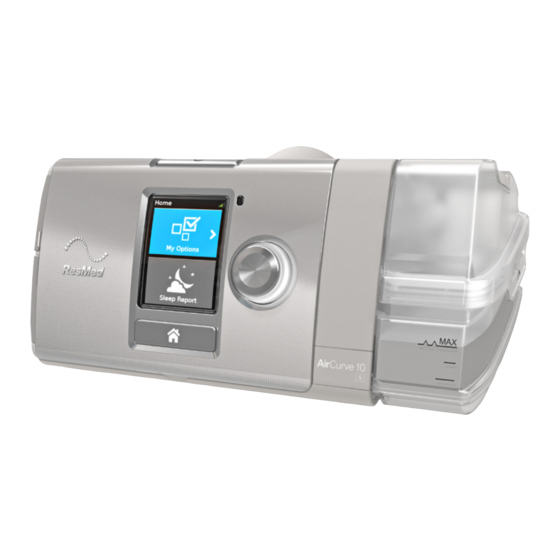
Page 6: About The Control Panel
Air outlet Water tub Air filter cover Screen Power inlet Adapter cover Serial number and device number SD card cover About the control panel Press to start/stop therapy. Start/Stop button Press and hold for three seconds to enter power save mode. -
Page 7: Therapy Information
Therapy information The following modes are available on the AirCurve 10 device: Device Mode VAuto CPAP AirCurve 10 VAuto AirCurve 10 S AirCurve 10 ST Bilevel pressures The AirCurve 10 device assists spontaneous breathing by cycling between two pressures in response to the patient flow or a preset fixed time. -
Page 8: S Mode
Under normal conditions, the device triggers (initiates IPAP) and cycles (terminates IPAP and changes to EPAP) as it senses the change in patient flow. Patient breath detection is enhanced by ResMed's VSync automatic leak management. Rise time adjustment S, ST and T modes only Rise Time sets the time taken for the device to reach IPAP. -
Page 9: Ticontrol - Inspiratory Time Control
TiControl - Inspiratory time control VAuto, S and ST modes only Unique to ResMed bilevel devices, TiControl ™ allows the clinician to set minimum and maximum limits on the time the device spends in IPAP. The minimum and maximum time limits are set at either side of the patient’s ideal spontaneous inspiratory time, providing a ’window of opportunity’... -
Page 10: Central Sleep Apnea Detection
(determined at the mask) to measure the airway patency. Leak management with VSync Using ResMed's VSync algorithm, the AirCurve 10 device monitors and compensates for leak by continuously and automatically adjusting the baseline flow. This enables reliable delivery of therapy pressure while maintaining patient-device synchrony. -
Page 11: Expiratory Pressure Relief
When EPR is enabled, the delivered pressure will not drop below a minimum pressure of 4 cm H (4 hPa), regardless of the settings. Easy-Breathe The comfort feature Easy-Breathe is available in S mode on the AirCurve 10 VAuto and AirCurve 10 S device. The Easy-Breathe waveform intelligently recreates a patient’s individual breathing pattern, so breathing feels more natural and therapy is more comfortable. - Page 12 Tube Temperature If the air in the mask feels too warm or too cold, the patient can adjust the temperature to find what is most comfortable or turn it off completely. The Tube Temperature can be set to anywhere between 60–86°F (16–30°C). The temperature sensor located at the mask end of the ClimateLineAir heated air tubing enables the system to automatically control the temperature of the air delivered to the patient.
-
Page 13: Setup
5. Close the water tub and insert it into the side of the device. 6. Connect the free end of the air tubing firmly onto the assembled mask. See the mask user guide for detailed information. Recommended masks are available on www.resmed.com. -
Page 14: Supplemental Oxygen
Supplemental oxygen The AirCurve 10 VAuto and AirCurve 10 S devices are designed to be compatible with up to 4 L/min of supplemental oxygen in all modes. The AirCurve 10 ST device is designed to be compatible with up to 15 L/min of supplemental oxygen in all modes. -
Page 15: Accessing And Exiting The Clinical Menu
Accessing and exiting the Clinical Menu You can access, view and set parameters relating to a patient's therapy and device configuration in the Clinical Menu. To access the Clinical Menu: • Press and hold the dial and the Home button for three seconds. The Home screen is displayed with an unlock icon in the top right corner of the screen. -
Page 16: Setting The Date And Time
The settings can be changed in different ways depending on the type of screen: Turn the dial to edit live in the Turn the dial to change the Select from a list of options. menu. setting. Setting the date and time Before you set up a new patient and start therapy for the first time, make sure you set the correct local date and time on the device. -
Page 17: Settings Menu
Settings menu You set all parameters relating to a patient's therapy and device configuration in the Settings menu. Note: Some parameters might not be available on all devices in certain modes. Therapy Parameter Description Mode Range VAuto CPAP Mode Sets the therapy mode available ... -
Page 18: Comfort
Select the type of mask used by Full Face / Nasal / Pillows the patient. Refer to Mask Device Compatibility List on www.resmed.com. Comfort Parameter Description Mode Range VAuto CPAP Ramp Time Set the ramp time. -
Page 19: Accessories
Accessories Parameter Description Range Tube Select the type of air tubing used by the patient. ClimateLineAir air tubing SlimLine / Standard / 3m is automatically detected when connected to the device. AB filter Select Yes if you attach an antibacterial filter. No / Yes View Displayed at all times when an oximeter is connected. -
Page 20: Starting Therapy
Parameter Description Selection 24 hours Time Set the current time. If you set a new time that occurs in the past then an error message is displayed. Before this change can be made, erase the compliance data available under the Configuration menu. Press. -
Page 21: Viewing The Sleep Report
Viewing the Sleep Report The Sleep Report screen shows sleep quality and mask seal status for the most recent therapy session. Turn the dial to scroll down to view more detailed usage data. The parameters displayed will depend on the therapy mode. Sleep Report screen parameters Parameter Description... -
Page 22: Cleaning And Maintenance
Parameter Description Pressure Average inspiratory pressure during the selected period (95 percentile for each day; average of 95 percentile values for periods >1 day). Exp. Pressure Average expiratory pressure during the selected period (95 percentile for each day; average of 95 percentile values for periods >1 day). -
Page 23: Disassembling
Disassembling 1. Hold the water tub at the top and bottom, press it gently and pull it away from the device. 2. Open the water tub and discard any remaining water. 3. Hold the cuff of the air tubing and gently pull it away from the device. 4. -
Page 24: Reassembling
WARNING • ResMed cannot give any assurance that deviations from the procedures listed in this guide, and their effect on the performance of the product, will be acceptable. • When using detergents, disinfectants or sterilization agents, always follow the manufacturer's instructions. -
Page 25: Surface Disinfection
Surface disinfection 1. Wipe the exterior of the device including display, externally accessible ports, side cover, power supply unit and accessories with a disposable cloth and mild detergent or alcohol disinfectant (see list below). 2. Remove any excess disinfectant with a disposable dry cloth. Agents recommended for surface disinfection and cleaning: •... -
Page 26: Disinfecting
ResMed has tested the following detergents according to the manufacturer’s instructions: Detergent Water temperature SlimLine / ClimateLineAir ClimateLineAir Air10 Standard tubing elbow Alconox Hot water (approx 140°F or 60°C) ™ (diluted at 1%) Warm water (approx 113 to 140°F or 45 to 60°C) -
Page 27: Sterilization
Sterilization Part Validated number of cycles Sterrad NX Sterrad 100S Standard and Advanced cycles Short cycle ClimateLineAir ClimateLineAir Oxy 1. Sterilize the air tubing using Sterrad by following the manufacturer’s instructions. 2. Rinse and agitate the air tubing in drinking quality water, 5 liters per component at 59°F-68°F (15°C-20°C) for 1 minute. -
Page 28: Reprocessing The Water Tub And Air Outlet
Reprocessing the water tub and air outlet Disassembling The following instructions provide guidance on how to correctly disassemble the cleanable water tub and the air outlet. 1. Remove the water tub from the device, open it and discard any remaining water. 2. -
Page 29: Decontaminating
1. Clean all components with a soft bristled brush for one minute while soaking in detergent solution (see table below). Pay particular attention to all crevices and cavities. 2. Thoroughly rinse each component according to the detergent manufacturer's instructions. ResMed has tested the following detergents according to the manufacturer’s instructions: Detergent Water temperature... -
Page 30: Sterilization
Sterilization Part Validated number of cycles Sterrad NX Sterrad 100S Standard and Advanced cycles Short cycle Air Outlet 1. Sterilize the air outlet using Sterrad by following the manufacturers instructions. 2. Rinse and agitate the air outlet in drinking quality water, 5 liters per component at 59°F-68°F (15°C-20°C) for 1 minute. -
Page 31: Packaging And Storage
For therapy management, the AirCurve 10 device stores patient therapy data on the device and may have the ability to transfer it remotely to the care provider if wireless network is available. Data can then be accessed via ResMed's AirView therapy management solution. -
Page 32: Remote Monitoring
Remote monitoring The AirCurve 10 device has cellular communication which has the ability to automatically transmit summary and detailed data on a regular basis. It also allows you to change settings remotely. The Wireless signal strength icon displayed at the top right of the screen indicates the signal strength. -
Page 33: Software Upgrade
For more information on therapy management with AirView or ResScan, refer to the manuals supplied with the software. Type of data Transmission method Sessions stored Cellular SD card to SD Card to communication ResScan AirView to AirView (card-to-cloud) Summary data (compliance data) ... -
Page 34: Managing Patient Care
The AirCurve 10 device can be used on a plane as it meets the Federal Aviation Administration (FAA) requirements. Air travel compliance letters can be downloaded and printed from www.resmed.com. When using the device on a plane: Make sure the water tub is completely empty and inserted into the device. -
Page 35: Troubleshooting
Troubleshooting If there is a problem, try the following suggestions. If you are not able to fix the problem, contact your local ResMed dealer or ResMed office. Do not open the device. General troubleshooting Problem/possible cause Solution Air is leaking from around the mask Mask may be fitted incorrectly. -
Page 36: Device Messages
SmartStart is enabled, but the device does not automatically stop when the patient removes their mask Incompatible mask being used. Only use equipment recommended by ResMed. Contact ResMed or see www.resmed.com for more information. If the patient is using a nasal pillows mask with set pressure... - Page 37 All other error messages, for example, System fault, refer to user guide, Error 0XX An unrecoverable error has occurred on the device. Contact your local ResMed dealer or ResMed office. Do not open the device.
-
Page 38: General Warnings And Cautions
CAUTION • Use only ResMed parts and accessories with the device. Non-ResMed parts may reduce the effectiveness of the treatment and/or damage the device. • Use only vented masks recommended by ResMed or by the prescribing doctor with this device. -
Page 39: Technical Specifications
IEC 60601-1-2:2014, for residential, commercial and light industry environments. It is recommended that mobile communication devices are kept at least 1 m away from the device. Information regarding the electromagnetic emissions and immunity of this ResMed device can be found on www.resmed.com/downloads/devices Classification: IEC 60601-1:2005+A1:2012 Class II (double insulation), Type BF, Ingress protection IP22. - Page 40 Efficiency: >98% for ~7-8 micron dust; >80% for ~0.5 micron dust Aircraft use ResMed confirms that device meets the Federal Aviation Administration (FAA) requirements (RTCA/DO-160, section 21, category M) for all phases of air travel. Wireless module Technology used:...
- Page 41 The AirCurve 10 device should be used at a minimum distance of 0.8" (2 cm) from the body during operation. Additional information regarding the FCC Rules and IC compliance for this device can be found on www.resmed.com/downloads/devices Operating pressure range...
- Page 42 Accuracy may be reduced by the presence of leaks, supplemental oxygen, tidal volumes <100 mL or minute ventilation <3 L/min. Measurement accuracy verified as per ISO 10651-6:2004 for Home Care Ventilatory Support Devices (Figure 101 and Table 101) using nominal ResMed mask vent flows. Measurement system uncertainties...
- Page 43 Pressure accuracy Maximum static pressure variation at 10 cm H O (10 hPa) according to ISO 80601-2-70:2015 Standard air tubing SlimLine air tubing Without humidification ± 0.5 cm H O (± 0.5 hPa) ± 0.5 cm H O (± 0.5 hPa) With humidification ±...
-
Page 44: Symbols
Device without humidification and SlimLine air tubing / Device with humidification and SlimLine air tubing Breath Inspiratory pressure (cm H O [hPa]) (Means, Standard Deviations) rate 10 BPM -0.26, 0.01 / -0.52, -0.25, 0.02 / -0.53, -0.24, 0.02 / -0.53, -0.25, 0.02 / -0.54, -0.20, 0.02 / -0.51, 0.01... -
Page 45: Servicing
• Portable diagnostic/screening devices This warranty is only available to the initial consumer. It is not transferable. If the product fails under conditions of normal use, ResMed will repair or replace, at its option, the defective product or any of its components. - Page 46 ResMed shall not be responsible for any incidental or consequential damages claimed to have resulted from the sale, installation or use of any ResMed product. Some regions or states do not allow the exclusion or limitation of incidental or consequential damages, so the above limitation may not apply to you.
- Page 47 See ResMed.com for other ResMed locations worldwide. Air10, AirCurve, AirView, AutoSet, ClimateLine, HumidAir, ResScan, SlimLine and SmartStart are trademarks and/or registered trademarks of the ResMed family of companies. For patent and other intellectual property information, see ResMed. com/ip. Actichlor is a trademark of Ecolab US Inc. Alconox is a trademark of Alconox Inc. Cavicide is a registered trademark of Metrex Research, LLC.
Need help?
Do you have a question about the AirCurve 10 VAUTO and is the answer not in the manual?
Questions and answers
AirCurve 10 ASV heater element is failing (stopped heating).
To fix the heating element issue in the ResMed AirCurve 10 VAuto, try the following steps:
1. Check Climate Settings: If using Auto mode, switch to Manual and adjust humidity and temperature settings to a comfortable level.
2. Ensure Proper Connections: Make sure the ClimateLine heated hose is securely connected to the air outlet.
3. Inspect the Hose: Feel the hose to check if it is warming up. If not, the heating element may not be functioning.
4. Water Level: Ensure the water tub is filled up to the maximum level mark.
5. Power Supply: Verify that the power cord is properly connected and supplying sufficient power.
6. Environmental Factors: Ensure the device is in a stable, room-temperature environment (41°F to 95°F or 5°C to 35°C).
7. Check for Condensation: If water is collecting in the hose, try lowering the humidity setting or increasing the tube temperature.
8. Restart the Device: Turn off the device, unplug it for a few minutes, then restart it.
9. Inspect for Damage: Look for any visible damage to the hose or connectors.
If the issue persists, consider replacing the heated hose or contacting ResMed support.
This answer is automatically generated