Table of Contents
Advertisement
Quick Links
Advertisement
Table of Contents

Related Manuals for Innocenti ICONFLEXL90


Summary of Contents for Innocenti ICONFLEXL90
- Page 1 User Manual Instruction Manual Induction Hob MODEL: ICONFLEXL90...
- Page 2 Safety These instructions are for your safety. Please read the following instructions carefully before proceeding with the installation and use of this appliance. WARNING: Before connecting the hob, check that the supplied voltage and frequency match with that indicated on the appliance rating plate. Failure to install the appliance in accordance with these instructions may result in a safety hazard.
- Page 3 Do not use inappropriate child safety shields or hob guards. These can cause accidents. Do not use covers. These can cause accidents or overheating and damage to the electric hob. We recommend that great care be taken during use and cleaning. Read the cleaning and maintenance sections of this appliance carefully.
- Page 4 Risk of fire! The hotplates become very hot. Never place combustible items on the hob. Never store objects on the hob. Risk of fire! Do not use flammable sprays in close vicinity to the appliance. Risk of fire! Do not store detergents or flammable materrials beneath the hob.
- Page 5 WARNING:There is a risk of electric shock and fire if cleaning is not carried out in accordance with these instructions. WARNING:Use only the same size of fittings and mounting screws as recommended in this instruction manual. Failure to follow these instructions may result in electrical hazards.
- Page 6 WARNING: Unattended cooking on a hob with fat or oil can be dangerous and may result in fire. NEVER try to extinguish a fire with water, but switch off the appliance and then cover flame e.g. with a lid or a fire blanket. CAUTION: The cooking process has to be supervised.
- Page 7 IMPORTANT: Heavy-duty scourers, some nylon scourers and • harsh/abrasive cleaning agents may scratch the glass. Always read the label to check if your cleaner or scourer is suitable. • Never leave cleaning residue on the cooktop: the glass may become stained. •...
-
Page 8: Product Overview
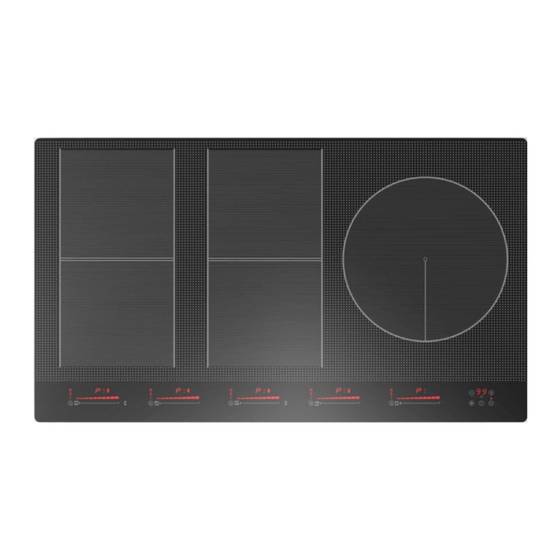
Product Overview Top View User interface... - Page 9 Reference Description ON/OFF key Child lock key Pause key Timer control keys &Timer setting indicator E Power slider regulating key Boost control key Cooking functions key Flexible area key Timer setting indicator Power level indicator Timer Indicator Cooking functions indicator...
- Page 10 Heating zone Power ICONFLEXL90 Heating Zone 2000/2800W(Booster) Front left zone 1500/2000W(Booster) Rear left zone 1500/2000W(Booster) Rear Right zone 2000/2800W(Booster) Front Right zone 2300W/3000W(Booster) Right Central zone Total Rating Power 9000W...
-
Page 11: A Word On Induction Cooking
A Word on Induction Cooking Induction cooking is a safe, advanced, efficient, and economical cooking technology. It works by electromagnetic vibrations generating heat directly in the pan, rather than indirectly through heating the glass surface. The glass becomes hot only because the pan eventually warms it up. iron pot magnetic circuit ceramic glass plate... -
Page 12: Choosing The Right Cookware
Choosing the right Cookware • Only use cookware with a base suitable for induction cooking. Look for the induction symbol on the packaging or on the bottom of the pan. • You can check whether your cookware is suitable by carrying out a magnet test. -
Page 13: To Start Cooking
Using your Induction To start cooking 1. Touch the ON/OFF key(A). After power on, the buzzer beeps once, all displays show “ – “, indicating that the induction hob has entered the state of standby mode. 2. Place a suitable pan on the cooking zone that you wish to use. -
Page 14: When You Have Finished Cooking
When you have finished cooking 1. Touching the slider regulating key to decrease the power to “0” level. Beware of hot surfaces“H” will show which cooking zone is hot to touch. It will disappear when the surface has cooled down to a safe temperature. It can also be used as an energy saving function if you want to heat further pans, use the hotplate that is still hot. -
Page 15: Using The Pause Function
Using the Pause function The hob have a handy restart function to pause and restart the cooking process if you’re interrupted. When the hob is on and working, press the pause key , all burner will stop working,and all LED indicator will show the symbol “=” . press the pause key again, all setting will restart at the previous setting. - Page 16 Using the Timer as an alarm 1. After selecting the cooking zone and the power level required,the dot next to power level indicator will flash for 5 seconds. 2. When the dot stops flashing, touch the timer control key you can realize the setting of timing from 1 to 99 minutes.
- Page 17 4. After that, if the indicator will keep on flashing meaning that the timer setting indicator shows the relevant zone remaining time until the timer expires; or else the indicator will keep on lighting until the timer expires. 5. When cooking timer expires, the corresponding cooking zone will be switch off automatically.
-
Page 18: Flexible Area
FLEXIBLE AREA • Thi s are a can b e use d as a singl e zone , according t o th e cookin g need s anytime. • Flexibl e are a i s mad e of tw o independen t inductors th at can b e controlle d separately . -
Page 19: Over Temperature Protection
2. The flexible zone indicator next to the power lever indicator will be light up. 3. According to the heating zone where the pan is placed, adjust heat setting by touching the front left zone slider regulating key control. 4. If the pot is moved from the front to the rear part (or viceversa),the flexible area detects automatically the new position, keeping the same power. -
Page 20: Auto Shutdown Protection
Auto Shutdown Protection Auto shut down is a safety protection function for your induction hob. It shut down automatically if ever you forget to turn off your cooking. The default working times for various power levels are shown in the below table: Power level Default working timer (min) When the pot is removed, the induction hob can stop heating immediately and the... - Page 21 Connectivity with hood • You can link the hob with any cooker hood with RF Technology in our range. Please contact the service department on 0344 800 1128 for advice if you are unsure. Once the hood and the hob are linked the speed of the hood will change automatically according to the power level the hob is being used at.
-
Page 22: Technical Specification
The above is a table of common failures. Please do not disassemble the unit by yourself to avoid any dangers and damages to the induction hob and please contact the service department. Technical Specification ICONFLEXL90 Cooking Hob Cooking Zones 5 Zones... -
Page 23: Selection Of Installation Equipment
Installation Selection of installation equipment Cut out the work surface according to the sizes shown in the drawing. For the purpose of installation and use, a minimum of 5 cm space shall be preserved around the hole. Be sure the thickness of the work surface is at least 30 mm. Please select heat-resistant work surface material to avoid larger deformation caused by the heat radiation from the hotplate. -
Page 24: Before Locating The Fixing Brackets
Before you install the hob, make sure that The work surface is square and level, and no structural members interfere with space requirements. The work surface is made of a heat-resistant material. If the hob is installed above an oven, the oven has a built-in cooling fan. ... - Page 25 packaging). Do not apply force onto the controls protruding from the hob. fig.1 Fig.2 Fig.3...
-
Page 26: Connecting The Hob To The Mains Power Supply
Cautions The induction hotplate must be installed by qualified personnel or technicians. We have professionals at your service. Please never conduct the operation by yourself. The hob will not be installed directly above a dishwasher, fridge, freezer, washing machine or clothes dryer, as the humidity may damage the hob electronics. -
Page 27: Customer Service
• If the cable is damaged or to be replaced, the operation must be carried out the by after-sale agent with dedicated tools to avoid any accidents. • If the appliance is being connected directly to the mains an omnipolar circuit-breaker must be installed with a minimum opening of 3mm between contacts. - Page 28 Notes...
- Page 30 Apelson Appliances UK Ltd Unit 3 Normandy Landings Pope Street Castleford WF6 2AG United Kingdom IM_ICONFLEXL90 User Handbook V1 20210224...
Need help?
Do you have a question about the ICONFLEXL90 and is the answer not in the manual?
Questions and answers