
Related Manuals for inTest THERMOSTREAM ATS-545


Summary of Contents for inTest THERMOSTREAM ATS-545
- Page 1 41 Hampden Road, Mansfield, MA U.S.A. Tel: +1.781.688.2300 Part Number: LM04050 www.inTESTthermal.com ATS-545 & -645 ® THERMOSTREAM Interface & Applications Manual Revision A January 2013...
-
Page 3: Table Of Contents
Thermal Solutions Support ........ - Page 4 TA B L E O F C O N T E N T S Section D. Placement Requirements Clearances, Dimensions, Weight ........... 2-13 Section E.
- Page 5 TA B L E O F C O N T E N T S Overview ..............3-13 OCM Overview .
- Page 6 TA B L E O F C O N T E N T S ................5-2 Section B.
- Page 7 Preface ........©Copyright 2013 by Temptronic Corporation All Rights Reserved The text of this publication, or any part thereof, may not be reproduced or transmitted in any form or by any means, electronic or mechanical, including photocopying, recording, or...
-
Page 8: Preface
ATS-545 & -645 Interface and Applications Manual LM04050 ATS-545 & -645 Service Manual LM04060 In this Section The following is covered in this preface Topic See Page inTEST Thermal Solutions Support Before You Call viii ATS-545 & -645 Interface & Applications Manual... -
Page 9: Intest Thermal Solutions Support
For further information on module and circuit board repairs, our exchange program, and the availability of spare parts, contact the inTEST Thermal Solutions Service Department. Before returning any module or circuit board for repair, contact the inTEST Thermal Solutions Service Department to obtain a return authorization (RA) number. Spare Parts... -
Page 10: Before You Call
P R E F A C E Before You Call Before You Call Introduction You can help us support your machine in a timely fashion by having on hand specific information when calling in: • Software Version • System Model Number System Model A modular system design allows the customer to select options or features as desired for a Number... -
Page 11: Chapter 1. Safety
Safety ........Chapter Overview Introduction This chapter covers all the safety Warnings and Cautions for the ATS-545 &... -
Page 12: Section A. Safety Precautions, Warnings, Cautions
S A F E T Y Warnings Section A: Safety Precautions, Warnings, Cautions ........Warnings WARNING WARNING: Refer to Accompanying Documentation... - Page 13 S A F E T Y Warnings WARNING 7: Per SEMI S2-93A, energized electrical work (“Hot Work”) is specified by Type as follows: TYPE DESCRIPTION (per SEMI S2-93A) EXPOSURE THRESHOLD Fully de-energized (electrically “cold.”) n.a. Live circuits, covered or insulated. Work performed n.a.
- Page 14 S A F E T Y Warnings WARNING 14: To prevent high-pressure ejection of condensate (which may or may not contain injurious substances) when draining moisture from the air filter elements, first turn off the System's air pressure supply, second bleed all air from the System by turning on ac power to the System just long enough to exhaust air in the System, third disconnect the supply line from the air supply port fitting located on the rear panel.
-
Page 15: Cautions
S A F E T Y Cautions Cautions CAUTION CAUTION: Refer to Accompanying Documentation Electrical Hazard CAUTION: High Voltage, Electrical Shock Hazard Hot Surface CAUTION: Hot Surface Cold Surface CAUTION: Cold Surface CAUTION 1: Observe the precautions given on the equipment and within this manual to prevent damage to the equipment. - Page 16 S A F E T Y Cautions CAUTION 9: When making the system air connection to the System, hold the AIR INPUT fitting with a second wrench while tightening the barb fitting to prevent the AIR INPUT fitting from rotating in the panel. CAUTION 10: Use suitable Clean Dry Air (CDA) compressed air supply for the System: a) to prevent premature fouling of the filters/regulator assemblies provided with the System, b) to prevent ice forming from within the cooling module and possibly reducing or obstructing...
-
Page 17: Section B. Consignes De Sécurité Pour Le Personnel Exploitant
S A F E T Y AVERTISSEMENT Section B: CONSIGNES DE SÉCURITÉ POUR LE PERSONNEL EXPLOITANT ........AVERTISSEMENT WARNING AVERTISSEMENT: Attention... - Page 18 S A F E T Y AVERTISSEMENT AVERTISSEMENT 5: Les pièces à l’intérieur de la tête thermique fonctionnant à des températures très élevées ou très basses, tout contact avec ces pièces est dangereux. N’effectuer aucune maintenance à l’intérieur de la tête thermique tant que le système n’est pas arrêté.
- Page 19 S A F E T Y AVERTISSEMENT AVERTISSEMENT 11: En aucun cas (essai d’étanchéité ou toute autre situation) on ne doit charger le module du refroidisseur d’air avec un gaz à une pression supérieure à 10,34 bars. AVERTISSEMENT 12: Le module de refroidissement d’air sert de contrepoids à la tête thermique.
-
Page 20: Attention
S A F E T Y ATTENTION ATTENTION CAUTION ATTENTION: Attention Electrical Hazard AVERTISSEMENT: Haute tension Hot Surface AVERTISSEMENT: Surface chaude Cold Surface AVERTISSEMENT: Surface froide Se conformer aux mesures de sécurité figurant sur le matériel et dans ATTENTION 1: ce manuel pour ne pas endommager le matériel. - Page 21 S A F E T Y ATTENTION Lors de la dépose de la carte de régulation du débit, éviter ATTENTION 8: soigneusement de plier la carte lors du débranchement des tuyaux d’arrivée et de sortie d’air. Une légère flexion de la carte suffit pour endommager ses composants délicats et/ou son câblage.
-
Page 22: Section C. Sicherheitshinweise Für Das Bedienpersonal
S A F E T Y WARNHINWEIS Section C: SICHERHEITSHINWEISE FÜR DAS BEDIENPERSONAL ........WARNHINWEIS WARNING WARNHINWEIS: Bitte die beiliegende Dokumentation beachten... - Page 23 S A F E T Y WARNHINWEIS WARNHINWEIS 6: Während der Auf- und Abbewegung des Thermokopfes des ® THERMOSTREAM sind die Finger vom Zwischenraum zwischen der Thermalkappe am Kopf und dem DUT-Bereich fernzuhalten. WARNHINWEIS 7: Gemäß SEMI S2-93A werden stromführende Elektroarbeiten („Hot Work“) wie folgt nach Typen eingestuft: BESCHREIBUNG (gemäß...
- Page 24 S A F E T Y WARNHINWEIS WARNHINWEIS 10: Wartungsarbeiten am Kältemodul dürfen nur von (durch lokale Behörden) lizenzierten Kältetechnikern durchgeführt werden, die von der Temptronic ® Corporation zu Arbeiten mit Kältemitteln für das THERMOSTREAM -System zugelassen sind. WARNHINWEIS 11: Auf keinen Fall darf das Kältemodul (zu Dichtheitsprüfungen oder anderen Zwecken) mit einem Gas geladen werden, das unter einem Druck von mehr als 10,34 Bar steht.
-
Page 25: Hinweis
S A F E T Y HINWEIS HINWEIS HINWEIS 1: Die am Gerät und in diesem Handbuch gegebenen Vorsichtsmaßregeln beachten, um Geräteschäden zu vermeiden. Das Gerät darf nur für die vom Hersteller angegebenen Verwendungszwecke benutzt werden. HINWEIS 2: Schutz- und Kühlabdeckungen sowie Abdeckungen, die mit einem Werkzeug abgenommen werden müssen, dürfen nur von dazu befugtem Personal vom Gerät entfernt werden. -
Page 26: Section D. Precauciones De Seguridad Para El Personal De Operaciones
S A F E T Y ADVERTENCIA Section D: PRECAUCIONES DE SEGURIDAD PARA EL PERSONAL DE OPERACIONES ........ADVERTENCIA WARNING ADVERTENCIA: Precaución... - Page 27 S A F E T Y ADVERTENCIA ADVERTENCIA 5: Las piezas dentro de la cabeza térmica funcionan a temperaturas extremadamente calientes y frías y son peligrosas al tocarlas. No efectúe ningún mantenimiento dentro de la cabeza térmica hasta que el sistema no haya sido apagado. Espere hasta que las piezas de la cabeza hayan alcanzado una temperatura segura y estable, cerca a la temperatura ambiente.
- Page 28 S A F E T Y ADVERTENCIA ADVERTENCIA 10: Si se necesita hacer alguna reparación del Módulo del Enfriador de Aire, solamente un técnico de refrigeración con licencia (y/o certificado por EPA) y autorizado por Temptronic Corporation estará calificado para efectuar cualquier carga o manipulación de los refrigerantes en el Sistema.
-
Page 29: Precaucion
S A F E T Y PRECAUCION PRECAUCION PRECAUCION 1: Observe las precauciones indicadas en el equipo y en este manual, para evitar causar daños al equipo. Use el equipo únicamente para los fines especificados por el fabricante. PRECAUCION 2: Personal no autorizado no deberá quitar del equipo los paneles de enfriamiento y/o protección, o aquellos que necesitan una herramienta para quitarlos. -
Page 30: Section E. Säkerhets Föreskrifter Och Varningar, Varsamhet
S A F E T Y Varningar Section E: Säkerhets Föreskrifter och Varningar, Varsamhet ........Varningar WARNING Varningar... - Page 31 S A F E T Y Varningar VARNING 5: Delar i det termiska huvudet arbetar i extrema varma och kalla temperaturer och är mycket farligt att vidröra. Utför inget underhåll på eller i det termiska huvudet innan utrustningen helt har stängts av. Vänta tills huvudets delar erhållit en säker temperatur i närhet av rumstemperaturen.
- Page 32 S A F E T Y Varningar Två personer behövs för borttagning (eller installation) av det termiska VARNING 13: huvudet på den horisontala armen. En person måste lyfta huvudet med båda händer medan den andra personen lossar (eller drar åt) dess fästskruvar. VARNING 14: För att undvika högtrycks utblås eller smällar (vilka kan eller inte oftast täckas av försäkringar) när utrustningens filter skall rengöras, stäng alltid först av lufttillförseln till utrustningen, sedan låt lufttrycket läcka ut genom att sätta på...
-
Page 33: Försiktighet Och Varsamhet
S A F E T Y Försiktighet och Varsamhet Försiktighet och Varsamhet VARSHAMET 1:Observera den varsamhet och försiktighet som angives på utrustningen och dess manual för att undvika skador på utrustningen. Använd enbart utrustningen såsom leverantören angivit och specificerat. VARSHAMET 2: Personal som ej är aktualiserad för ändamålet skall inte avlägsna skydd eller paneler på... - Page 34 S A F E T Y Försiktighet och Varsamhet 1-24 ATS -545 & -645 Interface & Applications Manual...
-
Page 35: Chapter 2. Preparation For Use
Preparation For Use ........Chapter Overview ®... -
Page 36: Section A. Initial System Setup Checklist
P R E P A R A T I O N F O R U S E Setup Checklist Section A: Initial System Setup Checklist ........Setup Checklist STEP INITIAL SYSTEM SETUP CHECKLIST (TP04310) -
Page 37: Section B. General Information
P R E P A R A T I O N F O R U S E Overview Section B: General Information ........Overview In this Section The following topics are covered in this Section:... -
Page 38: Scope Of Manual
P R E P A R A T I O N F O R U S E Scope of Manual Scope of Manual ® This manual supports the Temptronic ATS-545 & -645 THERMOSTREAM Systems for: • General and advanced assembly •... -
Page 39: Related Documentation
P R E P A R A T I O N F O R U S E Related Documentation Related Documentation ® Introduction This manual (LM04050) is one of two used with the ATS-545 & -645 THERMOSTREAM Systems. This section provides a description of the manuals and other related documentation.. TS-545 &... -
Page 40: User/Owner Documentation
P R E P A R A T I O N F O R U S E User/Owner Documentation User/Owner Documentation Introduction The following section details the owner’s warranty and System Specifications for the ® THERMOSTREAM System. Warranty A copy of Temptronic Corporation’s standard Warranty is provided in the back portion of this manual. -
Page 41: Remote Operation Modes
P R E P A R A T I O N F O R U S E Remote Operation Modes Remote Operation Modes Introduction The System provides three I/O’s for three different communication interfaces: • Serial (RS-232) • Parallel Bus (GPIB) (IEEE-488.2) •... -
Page 42: Section C. Unpacking/Receipt Of Shipment
P R E P A R A T I O N F O R U S E Overview Section C: Unpacking/Receipt of Shipment ........Overview In this Section Topic... -
Page 43: Receipt Of Shipment
P R E P A R A T I O N F O R U S E Receipt of Shipment Receipt of Shipment ® Introduction The THERMOSTREAM System is shipped in one large packing carton, on a skid, and can be transported to its location with a single fork-lift. -
Page 44: Unpacking Instructions
P R E P A R A T I O N F O R U S E Unpacking Instructions Unpacking Instructions CAUTION CAUTION 5: Some of the packing materials in the System’s shipment may be a source of Electrostatic Discharge (ESD) potential. Do not unpack in the vicinity of ESD sensitive components. - Page 45 P R E P A R A T I O N F O R U S E Unpacking Instructions Step Action Transport the packaged System on its pallet to its proposed site (if possible). Cut and remove the band seals holding the packing carton on its skid. Lift off the carton cover and the carton shell.
-
Page 46: Repackaging System
If the System is to be shipped to another location, repackage the System in the original shipping carton, by reversing the order of unpacking. Note that prior approval is required before shipping the system to an inTEST Thermal Solutions Office, or to the factory. -
Page 47: Section D. Placement Requirements
P R E P A R A T I O N F O R U S E Clearances, Dimensions, Weight Section D: Placement Requirements ........Clearances, Dimensions, Weight ®... - Page 48 P R E P A R A T I O N F O R U S E Clearances, Dimensions, Weight 2-14 ATS-545 & -645 Interface & Applications Manual...
-
Page 49: Section E. Attaching The Thermal Cap And Shroud
P R E P A R A T I O N F O R U S E Section E: Attaching the Thermal Cap and Shroud ........Introduction Each system is configured to customer specifications at the time of order and shipped complete. -
Page 50: Section F. Rear Panel, Air And Power Connections
P R E P A R A T I O N F O R U S E Section F: Rear Panel, Air and Power Connections ........Rear Panel Input Air Pressure Gauge Input/Output... - Page 51 P R E P A R A T I O N F O R U S E PART DESCRIPTION Main Air In The facility’s compressed air supply is connected here. For greater detail, see Connecting the Main Air Supply (Compressed Air), page 2- Main Power Cord a 32 amp power cord, approximately 3 meters long.
-
Page 52: Section G. Power Connections And Voltage Requirements
P R E P A R A T I O N F O R U S E Overview Section G: Power Connections and Voltage Requirements ........Overview In this Section Topic... -
Page 53: System Power Requirements
P R E P A R A T I O N F O R U S E System Power Requirements System Power Requirements The System includes a 32 amp power cord, approximately 3 meters long. For 60 Hz systems, the power cord is terminated in a standard 230 v plug. For 50 Hz systems, the power cord may not be terminated with a plug: if necessary, attach a plug appropriate to the facility and local electrical power code. -
Page 54: To Re-Configure The Auto Transformer
P R E P A R A T I O N F O R U S E To Re-Configure the Auto Transformer To Re-Configure the Auto Transformer Electrical Hazard Only qualified service personnel familiar with the electrical shock hazards present inside the equipment should perform any disassembly or corrective maintenance. - Page 55 P R E P A R A T I O N F O R U S E To Re-Configure the Auto Transformer Step Action Use the Voltage Configuration Card to re-configure your System according to your new input line voltage and frequency. On the card’s left side, find the Frequency and Voltage that matches your facility power.
-
Page 56: Voltage Configuration Cards
P R E P A R A T I O N F O R U S E Voltage Configuration Cards Voltage Configuration Cards ATS-545 Voltage Configuration Card Models: ATS 545, 547, 710 = “Line” Wire -- Line Voltage -- -- Configuration Block Wiring -- = “Chiller”... - Page 57 P R E P A R A T I O N F O R U S E Voltage Configuration Cards Testing the New Transformer Configuration Step Action Turn BOTH CB4 and CB5 OFF. (downward position is OFF). Plug in Main Power Cord. DO NOT PRESS THE ON BUTTON ON THE SYSTEM FRONT PANEL.
- Page 58 P R E P A R A T I O N F O R U S E Voltage Configuration Cards Step Action Using a volt meter, measure the Heater voltage across the top 2 terminals of CB5. The Heater voltage should be within the range specified on the right side of the Voltage Configuration Card.
-
Page 59: Connecting The Main Power
P R E P A R A T I O N F O R U S E Connecting the Main Power Connecting the Main Power Procedure CAUTION ® CAUTION 3: Before connecting the THERMOSTREAM System to its electrical source, ® check that the ~ (ac) voltage and frequency to be supplied to the THERMOSTREAM System are correct for those listed on its data plate (located on system frame, rear panel). -
Page 60: Section H. Air Connections
P R E P A R A T I O N F O R U S E Overview Section H: Air Connections ........Overview In this Section Topic... -
Page 61: Compressed Air Standards
P R E P A R A T I O N F O R U S E Compressed Air Standards Compressed Air Standards ® The THERMOSTREAM System is supplied with a 3 meter long, 5/8-inch ID braid reinforced, rubber hose and its associated 1/2-inch NPT barb fitting and two hose clamps. Compressed Air Requirements Clean, Dry Air... -
Page 62: Connecting The Main Air Supply (Compressed Air)
P R E P A R A T I O N F O R U S E Connecting the Main Air Supply (Compressed Air) Connecting the Main Air Supply (Compressed Air) Introduction The System is supplied with a 3-meter long, 5/8-inch ID braid reinforced, rubber air hose, two hose clamps, and two 1/2-inch NPT barb fittings. -
Page 63: Connecting Purged Air
P R E P A R A T I O N F O R U S E Connecting Purged Air Connecting Purged Air Introduction To protect the tester platform (test board) and its test cables, socket lead wires and related interconnections from moisture related problems, do the following: direct dry, ambient, Purge Air from the system rear panel Purge Out (PO) port as required. -
Page 64: Section I. Rear Panel I/O Ports
P R E P A R A T I O N F O R U S E I/O Ports Overview Section I: Rear Panel I/O Ports ........I/O Ports Overview DUT K DUT T... -
Page 65: Section J. Interfacing And Attaching Thermocouples
P R E P A R A T I O N F O R U S E Overview Section J: Interfacing and Attaching Thermocouples ........Overview In general, there are two functional modes available in which to operate the ®... -
Page 66: Sensor Interface Guidelines
P R E P A R A T I O N F O R U S E Sensor Interface Guidelines Sensor Interface Guidelines Introduction The System permits the DUT to be placed within the temperature control loop (see illustration below) by accepting input from an external thermocouple temperature sensor. DUT Test Fixture Interface Interfacing... - Page 67 P R E P A R A T I O N F O R U S E Sensor Interface Guidelines ® 8. Mount the sensor beneath the DUT to shield it from high velocity THERMOSTREAM System air. 9. If the sensor is mounted on top of the device and is in the airstream, then time/temperature measurement will not be the required DUT temperature but be some weighted average of both device and air temperatures.
-
Page 68: T-Type Sensors
P R E P A R A T I O N F O R U S E T-Type Sensors T-Type Sensors Introduction Two T-type (Copper/Constantan) thermocouple assemblies are supplied with the system: a disc style and a spring style. The disc style assembly features a circular sensor element to contact the DUT underside. The spring style assembly features a narrow rectangular sensor element mounted on a spring to contact the DUT underside. - Page 69 P R E P A R A T I O N F O R U S E T-Type Sensors Typical Test Socket (Disc Type) ATS-545 & -645 Interface & Applications Manual 2-35...
- Page 70 P R E P A R A T I O N F O R U S E T-Type Sensors Typical Test Socket (Spring Type) 2-36 ATS-545 & -645 Interface & Applications Manual...
-
Page 71: K-Type Sensors
P R E P A R A T I O N F O R U S E K-Type Sensors K-Type Sensors Introduction To interface an operator supplied K-type (Chromel/Alumel) thermocouple, follow these steps in accordance with the Sensor Interface Guidelines, page 2-32. 1. -
Page 72: Non-Standard Thermocouples
P R E P A R A T I O N F O R U S E Non-Standard Thermocouples Non-Standard Thermocouples Introduction Proper thermocouple to DUT contact is essential to insure accurate temperature sensing. If the techniques given above are considered "standard" thermocouple and "standard" sensor to DUT attaching techniques, then below are offered "non-standard"... - Page 73 P R E P A R A T I O N F O R U S E Non-Standard Thermocouples ATS-545 & -645 Interface & Applications Manual 2-39...
-
Page 74: Section K. Static, Moisture, And Extreme Temperature Protection
P R E P A R A T I O N F O R U S E Overview Section K: Static, Moisture, and Extreme Temperature Protection ........Overview Temperature transition times are dependent on mass, specific heat characteristics, thermal coupling and thermal conduction paths to the DUT, test socket, test leads, and other fixturing... -
Page 75: Electrostatic Discharge (Esd) Protection
P R E P A R A T I O N F O R U S E Electrostatic Discharge (ESD) Protection Electrostatic Discharge (ESD) Protection Component damaging static electricity can be generated in the normal course of handling sensitive electronic products, principally when two non-conductive surfaces are either rubbed together or separated. -
Page 76: Moisture Protection
P R E P A R A T I O N F O R U S E Moisture Protection Moisture Protection Introduction With reference to the typical test site, there are two principal areas to protect from moisture: 1. The DUT and the test socket in which the DUT is seated (the area below the thermal cap ®... - Page 77 P R E P A R A T I O N F O R U S E Moisture Protection Air Purging the Condensation, frost and ice can appear on the tester platform (test board) and its test cables, Tester Platform socket lead wires, and related interconnections, during low temperature testing unless the platform area is properly purged with system-supplied dry air as given below.
-
Page 78: Insulation (Minimizing Heat Conductivity)
P R E P A R A T I O N F O R U S E Insulation (Minimizing Heat Conductivity) Insulation (Minimizing Heat Conductivity) Before the testing of devices is initiated, at either elevated and/or reduced temperatures, the DUT site should be carefully prepared by inserting insulation materials to minimize undesired paths of heat transfer and to reduce moisture inflows to the DUT site: 1. - Page 79 P R E P A R A T I O N F O R U S E Insulation (Minimizing Heat Conductivity) The silicone material combines the property of low thermal conductivity with the added feature of elasticity. Cut to fit snugly around a given component configuration, thereby forming a seal to minimize heat transfer.
- Page 80 P R E P A R A T I O N F O R U S E Insulation (Minimizing Heat Conductivity) Section L: MobileTemp Series ThermoChambers ........®...
-
Page 81: Chapter 3. System Operation
System Operation ........Chapter Overview ® Introduction This Chapter contains instructions for front panel (local) operation of the THERMOSTREAM ATS-545 &... -
Page 82: Section A. System Startup And Shutdown
S Y S T E M O P E R A T I O N Overview Section A: System Startup and Shutdown ........Overview In this Section The following topics are covered in this Section:... -
Page 83: Initializing Cold Flow
S Y S T E M O P E R A T I O N Initializing Cold Flow Initializing Cold Flow Introduction To initialize cold air flow, the user must be familiar with basic system operation and the Operator Control Module (OCM). For details on the OCM, see Operator Control Module (OCM), page 3-13. -
Page 84: Initializing Hot Flow
S Y S T E M O P E R A T I O N Initializing Hot Flow Initializing Hot Flow Introduction To initialize hot air flow, the user must be familiar with basic system operation and the Operator Control Module (OCM). For details on the OCM, see Operator Control Module (OCM), page 3-13. -
Page 85: System Shutdown
S Y S T E M O P E R A T I O N System Shutdown System Shutdown Introduction To properly shut down the System, access the TOP MENU Screen and press the “OFF” Program Button: “OFF” Program Button Emergency To perform an Emergency shut down on the System, press the EMO button on the front panel.: Shutdown... -
Page 86: Section B. Thermal Head And Manipulator
S Y S T E M O P E R A T I O N Overview Section B: Thermal Head and Manipulator ........Overview In this Section The following topics are covered in this Section:... -
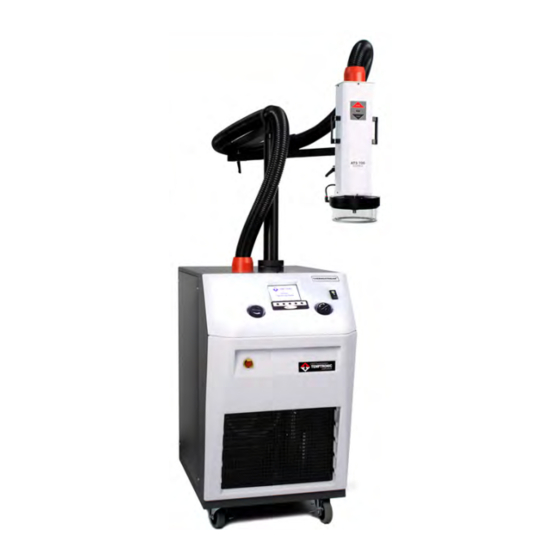
Page 87: Head And Manipulator Introduction
S Y S T E M O P E R A T I O N Head and Manipulator Introduction Head and Manipulator Introduction The Thermal Head is mounted to the manipulator assembly (vertical stand and hinged arm configuration). It allows the Head to be positioned as required near to the DUT site. The four mechanical locks on the manipulator allow the Head to be pivoted, turned, tilted, and vertically swung. -
Page 88: Manipulator Locks
S Y S T E M O P E R A T I O N Manipulator Locks Manipulator Locks Locks Detailed view) Lock #2: Arm Lock Lock #4: Lock #3: Head Lock Manipulator Lock Lock #1: Vertical Stand Lock Lock#1: Vertical Stand... - Page 89 S Y S T E M O P E R A T I O N Manipulator Locks Lock #2: Arm Lock Upper Arm Lock #2: Arm Lock Lower Arm Tighten lock to clamp any horizontal pivot movement of the manipulator lower arm. When tightened, the Arm Lock locks horizontal motion of arm.
- Page 90 S Y S T E M O P E R A T I O N Manipulator Locks Lock #4: Head Lock Thermal Head Lock #4: Head Lock Tighten lock to clamp any horizontal pivoting (rotating, left to right, right to left) movement of the thermal head with respect to the manipulator.
-
Page 91: Stand Motion: Up/Down
S Y S T E M O P E R A T I O N Stand Motion: Up/Down Stand Motion: Up/Down The two directional “STAND” switches, up and down , are located on the Thermal Head. Introduction These two switches raise and lower the vertical Stand post for a 16-inch vertical travel. The manipulator assembly (the lower and upper arms) is attached to the Vertical Stand post. -
Page 92: Thermal Head Motion
S Y S T E M O P E R A T I O N Thermal Head Motion Thermal Head Motion Thermal Head Detailed Flexline Hose Slider Up/Down Track Membrane Switch (Stand/Head Up/Down) (Hidden from View) Lower Arm Lock #4: Thermal Head Head Lock WARNING... -
Page 93: Section C. Operator Control Module (Ocm)
S Y S T E M O P E R A T I O N Overview Section C: Operator Control Module (OCM) ........Overview Introduction The following is covered in this Section:... -
Page 94: Ocm Overview
S Y S T E M O P E R A T I O N OCM Overview OCM Overview Introduction The Operator Control Module (OCM) is a sloping panel assembly located in the front, center of the System. The OCM contains a Graphical Display Screen, Program Buttons, a System Control (Rotary) Encoder, a Flow Control Valve (for airflow adjustment), and a momentary ON-only switch (which contains an “On”... - Page 95 S Y S T E M O P E R A T I O N OCM Overview Part Function Program Buttons There are five (5) Program Buttons in a single horizontal line directly below the Graphical Display Screen. These five buttons provide easy selection of the menu choices displayed along the bottom of the display screen.
- Page 96 S Y S T E M O P E R A T I O N OCM Overview Part Function Emergency Mains Off A recessed, red, Emergency Mains Off switch (EMO) is located (EMO) left of center, below the Flow Control valve. Pressing the EMO trips (opens) the back panel Circuit Breaker (CB1), to interrupt the high voltage power input to the System’s compressor and heater.
-
Page 97: Ats-545 & -645 Screens Overview
S Y S T E M O P E R A T I O N ATS-545 & -645 Screens Overview ATS-545 & -645 Screens Overview *Refer to Appendix B for 11x17 printable ATS-545 & -645 Interface & Applications Manual 3-17... -
Page 98: Air Purge And Compressor Delay Screens
S Y S T E M O P E R A T I O N Air Purge and Compressor Delay Screens Air Purge and Compressor Delay Screens Air Purge Delay Screen AIR PURGE DELAY.jpg Input Air Temp - displays the temperature of the facility air Line - diplays the frequency of the facility power... -
Page 99: Top Menu Screen
S Y S T E M O P E R A T I O N TOP MENU Screen TOP MENU Screen TOP MENU Screen Detailed TOP MENU Screen The TOP MENU Screen can always be accessed by pressing the “ESC” program button in Descriptions consecutive screens. -
Page 100: Configure System Screen
S Y S T E M O P E R A T I O N CONFIGURE SYSTEM Screen CONFIGURE SYSTEM Screen CONFIGURE SYSTEM Screen Detailed CONFIGURE This screen displays the system’s software version and allow configuration of system settings. SYSTEM Screen Descriptions Part Function... - Page 101 S Y S T E M O P E R A T I O N CONFIGURE SYSTEM Screen Part Function TRICKLE FLOW Set Trickle air flow to on/off. Trickle flow bypasses main air controls, to keep the insulated flexline hose cold when main air flow is off. This allows for faster transition time when cooling.
-
Page 102: Manual Operation Screen
S Y S T E M O P E R A T I O N MANUAL OPERATION Screen MANUAL OPERATION Screen MANUAL OPERATION Screen Detailed ® MANUAL This screen allows the user to run the THERMOSTREAM System. to one programmable OPERATION Screen setpoint of either HOT, AMBIENT, or COLD. -
Page 103: Manual Test Setup Screen
S Y S T E M O P E R A T I O N MANUAL TEST SETUP Screen MANUAL TEST SETUP Screen MANUAL TEST SETUP Screen Detailed MANUAL TEST This screen allows for 13 Manual Test Setups that cycles through three setpoints (HOT, SETUP Screen AMBIENT, and COLD). - Page 104 S Y S T E M O P E R A T I O N MANUAL TEST SETUP Screen Part Function SELECT Press to cycle through the TEST SETUPS “0” - “12”. program button ATTENTION - Parameter changes and Test Setups should be saved under Test Setup “1”...
- Page 105 S Y S T E M O P E R A T I O N MANUAL TEST SETUP Screen Part Function Soak Sec. SOAK TIME in seconds for the corresponding Setpoint (SetP°C). • Soak time is the time system remains at setpoint, within Wndw °C, before the "At Temp"...
-
Page 106: Manual Operation "Ramp/Cycle" Screen
S Y S T E M O P E R A T I O N MANUAL OPERATION “RAMP/CYCLE” Screen MANUAL OPERATION “RAMP/CYCLE” Screen MANUAL OPERATION “CYCLE” Screen Detailed Cycle through the enabled Setpoints in a fixed order: Ambient, Cold, Hot. MANUAL OPERATION The parameters for the Setpoints are configured in the MANUAL TEST SETUP Screen. -
Page 107: Define Parameters Screen
S Y S T E M O P E R A T I O N DEFINE PARAMETERS Screen DEFINE PARAMETERS Screen DEFINE PARAMETERS Screen Detailed DEFINE .This screen allows the user to define test setup parameters that are common to both Manual PARAMETERS and Program Test Setups. - Page 108 S Y S T E M O P E R A T I O N DEFINE PARAMETERS Screen Part Function ® DUT sensor (OFF, K, T) Selects the DUT sensor to be used by the THERMOSTREAM ® Off: the THERMOSTREAM is in Air Mode.
-
Page 109: Program Operation Screen
S Y S T E M O P E R A T I O N PROGRAM OPERATION Screen PROGRAM OPERATION Screen PROGRAM OPERATION Screen Detailed ® PROGRAM This screen allows the user to run the ATS-545 & -645 THERMOSTREAM Systems to 12 OPERATION Screen programmable setpoints. -
Page 110: Program Test Setup Screen
S Y S T E M O P E R A T I O N PROGRAM TEST SETUP Screen PROGRAM TEST SETUP Screen PROGRAM TEST SETUP Screen Detailed PROGRAM TEST This screen allows the user to set 13 Program test setups, each with 12 unique setpoints. SETUP Screen Each Program Test Setup can be saved as part of a Test Setup File (numbered “1”... - Page 111 S Y S T E M O P E R A T I O N PROGRAM TEST SETUP Screen Part Function DEFINE Selects the DEFINE PARAMETERS Screen. This screen allows the user to define test setup parameters that are common to both program button Manual and Program Test Setups.
-
Page 112: Program Operation "Ramp/Cycle" Screen
S Y S T E M O P E R A T I O N PROGRAM OPERATION “RAMP/CYCLE” Screen PROGRAM OPERATION “RAMP/CYCLE” Screen PROGRAM OPERATION “RAMP/CYCLE” Screen Detailed “RAMP/CYCLE” Screen Descriptions. Part Function Press to exit the PROGRAM TEST SETUP “RAMP/CYCLE” Screen and return to the previous screen. - Page 113 S Y S T E M O P E R A T I O N PROGRAM OPERATION “RAMP/CYCLE” Screen Part Function SetP°C Setpoint (temperature °C) for each respective row. This parameter may be changed using the Encoder. ® RAMP °C/minute The rate (in °C/minute) at which the THERMOSTREAM System ramps up/down to the corresponding Setpoint (SetP°C).
-
Page 114: Setup Options Screen
S Y S T E M O P E R A T I O N SETUP OPTIONS Screen SETUP OPTIONS Screen SETUP OPTIONS Screen Detailed SETUP OPTIONS Screen Descriptions Part Function Press to exit the SETUP OPTIONS Screen and return to the TOP MENU Screen. -
Page 115: Copy Setup Screen
S Y S T E M O P E R A T I O N COPY SETUP Screen COPY SETUP Screen COPY SETUPS Screen Detailed COPY SETUPS Each Program Test Setup can be saved as part of a Test Setup File (numbered “1” through Screen Descriptions “12”). - Page 116 S Y S T E M O P E R A T I O N COPY SETUP Screen 3-36 ATS-545 & -645 Interface & Applications Manual...
-
Page 117: Chapter Overview
Remote Interfaces ........Chapter Overview In this Chapter This Chapter is divided into the following Sections: Topic See Page... -
Page 118: Section A. Remote Interfaces, Overview And Assumptions
R E M O T E I N T E R F A C E S Remote Interfaces Overview Section A: Remote Interfaces, Overview and Assumptions ........Remote Interfaces Overview ®... -
Page 119: Section B. Syntax
R E M O T E I N T E R F A C E S Syntax Overview Section B: Syntax ........Syntax Overview For both GPIB (IEEE-488.2) and Serial (RS-232C): •... -
Page 120: Section C. Command Processing
R E M O T E I N T E R F A C E S Command Processing Overview Section C: Command Processing ........Command Processing Overview •... -
Page 121: Section D. Error Reporting
R E M O T E I N T E R F A C E S Command Processing Overview Section D: Error Reporting ........Command and query errors are reported by means of the IEEE-488.2 “standard event status register.”... -
Page 122: Section E. Maximizing Communications Throughput
R E M O T E I N T E R F A C E S Command Processing Overview Section E: Maximizing Communications Throughput ........•... -
Page 123: Section F. Ieee-488.2 Interface
R E M O T E I N T E R F A C E S Set: Bus Address Section F: IEEE-488.2 Interface ........Set: Bus Address The IEEE-488 interface requires the following settings: •... -
Page 124: Section G. Serial Interface
R E M O T E I N T E R F A C E S Serial Interface Connector Section G: Serial Interface ........Serial Interface Connector The system I/O panel provides a DB9P (9-pin male) connector with a nonstandard pinout. -
Page 125: Serial Cables: 25 Pin, 9 Pin
R E M O T E I N T E R F A C E S Serial Cables: 25 Pin, 9 Pin Serial Cables: 25 Pin, 9 Pin 25 Pin PC to Models ATS-545 & -645 ATS Connector 9 Pin PC to Models ATS-545 &... -
Page 126: Section H. Remote Command Set
R E M O T E I N T E R F A C E S Remote Commands Overview Section H: Remote Command Set ........Remote Commands Overview In this Section The following topics are covered in this Section:... -
Page 127: Ieee Mandatory Commands
R E M O T E I N T E R F A C E S IEEE Mandatory Commands IEEE Mandatory Commands Command Description *CLS Clear the status (*ESR, TESR) registers. *ESE Set the standard event status enable (mask) register. *ESE nnn -- where nnn is 0 –... - Page 128 R E M O T E I N T E R F A C E S IEEE Mandatory Commands Command Description *STB? Read the status byte. bit 7 - ready bit 6 - master summary status (MSS) bit bit 5 - standard event status (ESB) summary bit bit 4 - message available (MAV) (GPIB only, always 0 for RS-232) bit 3 - temperature event (TESR) summary bit bit 2 - device specific error (EROR) summary bit...
-
Page 129: Rs-232C Serial Commands
R E M O T E I N T E R F A C E S RS-232C Serial Commands RS-232C Serial Commands Command Description Go to local – enables System touch screen controls. NOTE: In accordance with the IEEE-488.2 standard, the System still responds to remote commands in when in local mode. -
Page 130: Device Specific Commands
R E M O T E I N T E R F A C E S Device Specific Commands Device Specific Commands Command Description ADMD Set the air-to-DUT maximum difference. ADMD nnn -- where nnn is 10 - 300 °C in 1 degree increments. ADMD? Read the air-to-DUT maximum difference. - Page 131 R E M O T E I N T E R F A C E S Device Specific Commands Command Description DSNS Set the DUT sensor type. DSNS n -- where n is 0-4 0 – no DUT sensor 1 – type T thermocouple 2 –...
- Page 132 R E M O T E I N T E R F A C E S Device Specific Commands Command Description HEAD Raise or lower the test head (same as STND). HEAD 1 – put head down HEAD 0 – put head up NOTE: Sending this command when the head is locked will NOT cause an error, but the head will not actually move.
- Page 133 R E M O T E I N T E R F A C E S Device Specific Commands Command Description SETN Select a setpoint to be the current setpoint. SETN nn -- where n is 0 – 17 when on the Cycle screen. SETN n –...
- Page 134 R E M O T E I N T E R F A C E S Device Specific Commands Command Description TESR? Read the temperature event status register. bit 7 -- reserved bit 6 -- not used bit 5 -- stopped cycling ("stop on fail" signal was received) bit 4 -- end of all cycles bit 3 -- end of one cycle bit 2 -- end of test (test time has elapsed)
-
Page 135: Section I. Mct Interface
R E M O T E I N T E R F A C E S MCT Interface Section I: MCT Interface ........MCT Interface ATS-545 &... - Page 136 R E M O T E I N T E R F A C E S MCT Interface This interface has 2 inputs: • End of Test (EOT) • Stop On First Fail (SFF), and one output: • Start Test (ST). Set the input/output pulse polarity in the Configuration Screen, refer to Chapter 3 for details.
-
Page 137: Chapter 5. Routine Maintenance
Routine Maintenance ........Chapter Overview In this Chapter This Chapter is divided into the following Sections: Topic See Page... -
Page 138: Section A. Maintenance Log
R O U T I N E M A I N T E N A N C E Section A: Maintenance Log ........Introduction The following log is provided as a suggested long term preventive maintenance schedule. - Page 139 R O U T I N E M A I N T E N A N C E Section B: Inspection and Cleaning ........Introduction Weekly inspection is recommended for frequently used systems to ensure normal operation with no deterioration in performance.
-
Page 140: Section C. Side Panel And Cover Removal
R O U T I N E M A I N T E N A N C E Section C: Side Panel and Cover Removal ........ATTENTION No tools are needed to remove or reinstall the panels. -
Page 141: Section D. Air Path Maintenance
R O U T I N E M A I N T E N A N C E Overview Section D: Air Path Maintenance ........Overview Follow this sequence to inspect the air filters to follow the air path: Particle Filter, Pneumatic Module: a) change element when it is visibly dirty or system is... -
Page 142: Drain Moisture From Pneumatics Filter Elements
R O U T I N E M A I N T E N A N C E Drain Moisture from Pneumatics Filter Elements Drain Moisture from Pneumatics Filter Elements Introduction At least once a week (daily if system is used during multiple shifts), remove the front panel and follow the procedure below to drain moisture from (bleed) the filter elements. - Page 143 R O U T I N E M A I N T E N A N C E Drain Moisture from Pneumatics Filter Elements Step Action Optional: spigot has barb fitting to attach rubber hose; put free end of hose in drainage container.
-
Page 144: Pneumatics Filter Element Replacement
R O U T I N E M A I N T E N A N C E Pneumatics Filter Element Replacement Pneumatics Filter Element Replacement Filter Replacement Detail Filter Element Unscrew HERE Filter Cover (push down and twist to remove) Procedure To replace the Filter Element, use P/N CS158580. -
Page 145: Air Dryer: Post Filter Replacement
R O U T I N E M A I N T E N A N C E Air Dryer: Post Filter Replacement Air Dryer: Post Filter Replacement Post Filter Detailed Post Filter Procedure To replace the Filter, use P/N ZZ10110. WARNING WARNINGS 1, 2, 3, 8, 9 in Chapter 1, Safety. -
Page 146: Muffler Replacement
R O U T I N E M A I N T E N A N C E Muffler Replacement Muffler Replacement Muffler Detailed Muffler Procedure To replace the Muffler, use P/N ZZ09300. WARNING WARNINGS 1, 2, 3, 8, 9 in Chapter 1, Safety. Step Action Power down the System and disconnect power cord. -
Page 147: Section E. Verification Of Dut
R O U T I N E M A I N T E N A N C E Overview Section E: Verification of DUT ........Overview In this Section The following topics are covered in this Section:... -
Page 148: Dut Verification Introduction
To ensure an accurate System sensor verification, follow the proper temperature sensing techniques. Contact the inTEST Thermal Solutions Service Department if you have any questions. The verification procedure must be performed by a qualified technician. Verify that the instrumentation (external precision temperature Monitor and thermocouple sensor) used to sense the working surface temperature is in calibration. -
Page 149: Low Temperature Verification
R O U T I N E M A I N T E N A N C E Low Temperature Verification Low Temperature Verification Procedure Step Action Access the Define Parameters Screen as follows: a) from the TOP MENU Screen, press the “MANUAL” program button to access the MANUAL OPERATION Screen.... - Page 150 R O U T I N E M A I N T E N A N C E Low Temperature Verification Step Action Insert the main Air thermocouple plug which was just disconnected from the thermal Head rear panel into the female connector of the Monitor “Y” cable. Beware of the plug’s pin polarity (do not force the wide pin into the narrow slot).
- Page 151 R O U T I N E M A I N T E N A N C E Low Temperature Verification Step Action If the difference between the Monitor and System readings is between (within the range of) 1 °C, then proceed directly to High Temperature Verification, page 5-17 and begin at Item 10, “Set System temperature to +200.0 °C...”...
- Page 152 R O U T I N E M A I N T E N A N C E Low Temperature Verification Step Action Insert the Monitor male plug into the appropriate sensor port on the System’s rear panel: if verifying the DUT T sensor, then choose the “DUT T” port; if verifying the DUT K sensor, then choose the “DUT K”...
-
Page 153: High Temperature Verification
R O U T I N E M A I N T E N A N C E High Temperature Verification High Temperature Verification Procedure Step Action Access the Define Parameters Screen as follows: a) from the TOP MENU Screen, press the “MANUAL” program button to access the MANUAL OPERATION Screen.... - Page 154 R O U T I N E M A I N T E N A N C E High Temperature Verification Step Action Insert the main Air thermocouple plug which was just disconnected from the Thermal Head rear panel into the female connector of the Monitor “Y” cable. Beware of the plug’s pin polarity (do not force the wide pin into the narrow slot).
- Page 155 R O U T I N E M A I N T E N A N C E High Temperature Verification Step Action If the difference between the Monitor and System readings is between (within the range of) 1 °C, then proceed directly to High Temperature Verification, page 5-17 and begin at Item 10, “Set System temperature to +200.0 °C...”...
- Page 156 R O U T I N E M A I N T E N A N C E High Temperature Verification Step Action Insert the Monitor male plug into the appropriate sensor port on the System’s rear panel: if verifying the DUT T sensor, then choose the “DUT T” port; if verifying the DUT K sensor, then choose the “DUT K”...
-
Page 157: Section F. Calibration
R O U T I N E M A I N T E N A N C E Overview Section F: Calibration ........Overview In this Section The following topics are covered in this Section:... -
Page 158: Calibration Introduction
DUT, page 5-11. To ensure an accurate System calibration, follow the proper temperature sensing techniques. Contact the inTEST Thermal Solutions Service department if you have any questions. The calibration procedure must be performed by a qualified technician. Each temperature sensor calibration requires a precision temperature Calibrator instrument to be substituted for the sensor at the thermocouple panel. -
Page 159: Calibration Choice Screen
R O U T I N E M A I N T E N A N C E Calibration Choice Screen Calibration Choice Screen Calibration Choice Screen Detailed Calibration Choice To navigate to the Calibration Choice Screen: Screen Descriptions TOP MENU > SETUP > CAL BUTTON Description Press to return to the SETUP OPTIONS... -
Page 160: Calibration Procedure (Main Air Sensor)
R O U T I N E M A I N T E N A N C E Calibration Procedure (Main Air Sensor) Calibration Procedure (Main Air Sensor) Procedure To verify if the Main Air Sensor needs calibration, see Low Temperature Verification (page 5- 13) and/or High Temperature Verification... - Page 161 R O U T I N E M A I N T E N A N C E Calibration Procedure (Main Air Sensor) Step Action While "PLEASE WAIT" displays, the system takes a reading based on the Calibrator’s output. The System saves the reading, then advances to the next screen as shown below.
- Page 162 R O U T I N E M A I N T E N A N C E Calibration Procedure (Main Air Sensor) Step Action While "PLEASE WAIT" displays, the system takes a reading based on the Calibrator’s output. The System saves the reading, then advances to next screen as shown below. The Calibration Complete Screen displays as shown below.
-
Page 163: Calibration Procedure (Type T Or K Sensor)
R O U T I N E M A I N T E N A N C E Calibration Procedure (Type T or K Sensor) Calibration Procedure (Type T or K Sensor) Procedure To verify if the Main Air Sensor needs calibration, see Low Temperature Verification (page 5- 13) and/or... - Page 164 R O U T I N E M A I N T E N A N C E Calibration Procedure (Type T or K Sensor) Step Action While "PLEASE WAIT" displays, the system takes a reading based on the Calibrator’s output. The System saves the reading, then advances to next screen as shown below.
- Page 165 R O U T I N E M A I N T E N A N C E Calibration Procedure (Type T or K Sensor) Step Action While "PLEASE WAIT" displays, the system takes a reading based on the Calibrator’s output. The System saves the reading, then advances to next screen as shown below.
-
Page 166: Flow Board Calibration
R O U T I N E M A I N T E N A N C E Flow Board Calibration Flow Board Calibration Introduction Firmware and Software Required for this Calibration: • Flow Board Firmware: PG169050F or later • System Software Version: PG170031F or PG170032F or later WARNING Clean, dry air between 17°... - Page 167 R O U T I N E M A I N T E N A N C E Flow Board Calibration Step Action At the Quick Disconnects, disconnect the Air Out from the filters and the Air Out from the Dryer. Air OUT from Filters...
- Page 168 R O U T I N E M A I N T E N A N C E Flow Board Calibration Step Action Use a wire tie (hand tighten) to pinch off the Bypass Flow Restrictor as shown. Wire tie Bypass Flow Restrictor ATTENTION...
- Page 169 R O U T I N E M A I N T E N A N C E Flow Board Calibration Step Action Assemble and Connect an external flow meter to the System’s main air nozzle as shown. Flexline Hose (SA171782, Connect to Main Air Nozzle) External Flow Meter...
- Page 170 R O U T I N E M A I N T E N A N C E Flow Board Calibration Step Action In the Manual Screen, set the System to Ambient temperature (25° C) and run the System to the Ambient temperature. Adjust the Main Flow Regulator so that the External Flow Meter reads between 18.4 and 18.6 scfm.
- Page 171 R O U T I N E M A I N T E N A N C E Flow Board Calibration Step Action Once the ambient countdown is completed, press START to begin the calibration as shown below. Follow the on screen prompts. Use the Flow Control dial to adjust the flow rates.
- Page 172 R O U T I N E M A I N T E N A N C E Flow Board Calibration Step Action Once the 18scfm calibration point has been entered, the calibration procedure is finished. Press the EXIT button to quit or the REDO button to calibrate again. ®...
-
Page 173: Lcd Screen Contrast Calibration
R O U T I N E M A I N T E N A N C E LCD Screen Contrast Calibration LCD Screen Contrast Calibration 1. Power On the ThermoStream 2. Using a Phillips #0 screwdriver, adjust the contrast as desired 3. - Page 174 R O U T I N E M A I N T E N A N C E LCD Screen Contrast Calibration 5-38 ATS-545 & -645 Interface & Applications Manual...
-
Page 175: Appendix A - Msds Overview
Materials Safety Data Sheets ........MSDS Overview Introduction The Materials Safety Data Sheets (MSDS) for storing, handling, or disposing the following fluids used in the System are presented in this Chapter. - Page 176 MSDS Overview ATS -545 & -645 Interface & Applications Manual...
-
Page 177: Appendix B - Drawings Overview
Drawings ........Drawings Overview In this Chapter The following drawings and schematics are detailed: Drawing/Schematic Drawing #... - Page 178 Drawings Overview ATS-545 & -645 Interface & Applications Manual...
- Page 179 Revisions Revisions Revisions Zone Zone Zone Description Description Description Date Date Date Approved Approved Approved SEE SHEET 1 CBL 24 24 T-T/C CBL 25 24 T-T/C T-T/C SS SHIETH HEAD KEYPAD MOMEN HEAD UP/DOWN +24V CUTOUT 2 (391C) - FUSE BLOW +24V CUTOUT 1 (356C) - RELAY LATCH OUT MOMEN CBL 26 24 K-T/C...
- Page 180 Revisions Revisions Revisions Zone Zone Zone Description Description Description Date Date Date Approved Approved Approved INITIAL RELEASE, for -80-90 Streams , ECO 060717 7/25/06 Formerly 17353, Differences include: 4310 (ATS 5xx) BOARD SET CB4 to 20A, Added CBL11 & 12 Wiring, Add F3 & F4, Chg F1 and F2 to 0.16A, Chg TB30 and 31, Add TB24A, Chg wires 35, 36, 37 and 38, Add CA6,...
-
Page 183: Appendix C - Backwards Compatibility
ATS-545 & -645 to 4310 Backwards Compatibility ........Backwards Compatibility Introduction The ATS-545, -645 remote interface command set exhibits a high degree of backwards... - Page 184 ATS -545 & -645 Interface & Applications Manual...
- Page 185 ATS-545-M THERMOSTREAM ® DATASHEET SPECIFICATIONS -80° to +225°C Advanced Temperature Source for fast and precise thermal conditioning of components, parts, hybrids, modules, subassemblies, and printed circuit boards. Capable of ultra-low temperatures without the use of Liquid Nitrogen (LN ) or Liquid Carbon Dioxide (LCO PERFORMANCE: TEMPERATURE CONTROL:...
- Page 186 Clean, Dry Air (CDA) Filtered to 5 micron particulate contamination. Oil Content: <0.1 ppm, by weight, iltered to 0.01 micron oil contaminant. inTEST Thermal Solutions Dewpoint: <10 °C @ 6.2 BAR (90PSI) Air Supply Pressure 6.2 to 7.6 BAR (90 to 110 PSIG) 6.2 to 7.6 BAR (90 to 110 PSIG)
- Page 187 ATS-545-T THERMOSTREAM ® DATASHEET SPECIFICATIONS -80° to +225°C Advanced Temperature Source for fast and precise thermal conditioning of components, parts, hybrids, modules, subassemblies, and printed circuit boards. Capable of ultra-low temperatures without the use of Liquid Nitrogen (LN ) or Liquid Carbon Dioxide (LCO PERFORMANCE: TEMPERATURE CONTROL:...
- Page 188 Clean, Dry Air (CDA) Filtered to 5 micron particulate contamination. Oil Content: <0.1 ppm, by weight, iltered to 0.01 micron oil contaminant. inTEST Thermal Solutions Dewpoint: <10 °C @ 6.2 BAR (90PSI) Air Supply Pressure 6.2 to 7.6 BAR (90 to 110 PSIG) 6.2 to 7.6 BAR (90 to 110 PSIG)
- Page 189 ATS-645-M THERMOSTREAM ® DATASHEET SPECIFICATIONS -80° to +225°C Designed for 60Hz operation only, this Advanced Temperature Source is for fast and precise thermal conditioning of components, parts, hybrids, modules, subassemblies, and printed circuit boards. Capable of ultra-low temperatures without the use of Liquid Nitrogen (LN ) or Liquid Carbon Dioxide (LCO PERFORMANCE: TEMPERATURE CONTROL:...
- Page 190 Filtered to 5 micron particulate contamination. Clean, Dry Air (CDA) Oil Content: <0.1 ppm, by weight, iltered to 0.01 micron oil contaminant. inTEST Thermal Solutions Dewpoint: <10 °C @ 6.2 BAR (90PSI) 6.2 to 7.6 BAR (90 to 110 PSIG) 6.2 to 7.6 BAR (90 to 110 PSIG)
- Page 191 ATS-645-T THERMOSTREAM ® DATASHEET SPECIFICATIONS -80° to +225°C Designed for 60Hz operation only, this Advanced Temperature Source is for fast and precise thermal conditioning of components, parts, hybrids, modules, subassemblies, and printed circuit boards. Capable of ultra-low temperatures without the use of Liquid Nitrogen (LN ) or Liquid Carbon Dioxide (LCO PERFORMANCE: TEMPERATURE CONTROL:...
- Page 192 Filtered to 5 micron particulate contamination. Clean, Dry Air (CDA) Oil Content: <0.1 ppm, by weight, iltered to 0.01 micron oil contaminant. inTEST Thermal Solutions Dewpoint: <10 °C @ 6.2 BAR (90PSI) Air Supply Pressure 6.2 to 7.6 BAR (90 to 110 PSIG) 6.2 to 7.6 BAR (90 to 110 PSIG)
Need help?
Do you have a question about the THERMOSTREAM ATS-545 and is the answer not in the manual?
Questions and answers