Table of Contents
Advertisement
Quick Links
Advertisement
Table of Contents

Summary of Contents for Inspire Ignire Wired
- Page 1 Ignite - Wired (Heating Hot Water) rev 2.0 www.inspirehomeautomation.co.uk...
-
Page 2: What's In The Box
WARNING Electricity is dangerous. Before commencing work, ensure that you read and This product should only be understand these instructions and isolate the relevant circuit. installed by a qualified electrician or heating engineer and should be installed in accordance BS 7671 (IEE Wiring Regulations) , or to another equivalent standard. -
Page 3: Specification
SPECIFICATION Power Supply: 230V~ 50...60Hz Output: 230V Switch Type: 1 x SPST, 1 x CO Switch Rating: 1 Amp Controllable Temperature Range: 0.5 – 30°C Frost Protection: Programmable from 0.5 - 30°C Radio Frequency: 2.4 GHz WiFi 868 MHz Dimensions: 103 x 103 x 45 mm (max) RADIO SIGNAL The Thermostat uses WiFi, so you need a WiFi signal where the Thermostat is located. - Page 4 BAD POSITIONING The below image shows the path that the signal will travel to communicate between the Router and Thermostat. This is an example of badly positioned items for the following reasons. The signal travels between 2 external walls. GOOD POSITIONING...
- Page 5 INSTALLATION Preparing your new Thermostat There is a back panel that can be used to fully cover single gang back boxes. If this is not required, it can be removed from the wallmount by twisting it anti-clockwise. (Fig Pull the thermostat away from the wall mount. (Fig 2) Finally, remove the Wiring cover from the wall mount by undoing the screw and pulling this away.
- Page 6 Installing the Wall Mount For reliable operation, the Thermostat must mount correctly on the wall mount. If you have a single gang back box, secure the wall mount to this using the two M3 screws provided. If you do not have an existing back box then, using the wall mount as a template, mark the location of the two holes on the wall.
-
Page 7: Wiring Diagrams
WIRING DIAGRAMS... -
Page 8: Testing The System
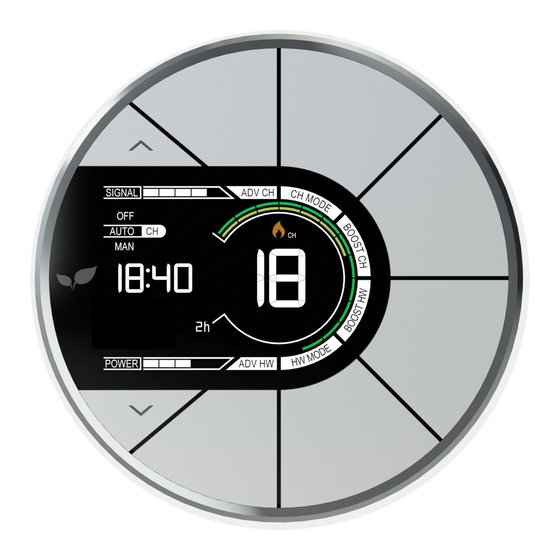
TESTING THE SYSTEM Thermostat must not have a Thermostat Radiator Valve (TRV) fitted to the radiator(s) ONLINE SETUP WIZARD You will need to be in the same location as the inspire system to complete the initial setup... - Page 9 YOUR THERMOSTAT WiFi Signal Current Central Strength Heaing Function Call for Heat Indicator Adjustment Keys Temperature Current Hot Water Function Time...
- Page 10 BASIC FUNCTIONS (HEATING) Your heating will be switched off. Auto Your heating will follow your Temperature Profile The default is: (This can be adjusted via your online account) 15 Degrees between 00:00 and 06:00 20 Degrees between 06:00 and 08.30 17 Degrees between 08:30 and 17:00 22 Degrees between 17:00 and 22:30 15 Degrees between 22:30 and 00:00...
- Page 11 BASIC FUNCTIONS (HOT WATER) Your hot water will be switched off. Auto Your hot water will follow your profile times The default is: (This can be adjusted via your online account) On between 06:00 and 08.30 On between 12:00 and 13:00 On between 18:00 and 20:00 Your hot water will be switched on and will keep your hot water cyclinder at the temperature set by your tank stat.
-
Page 12: Setting The Clock
SETTING THE CLOCK If you have an Internet connection, this will be done automatically. If you are outside of the United Kingdom. you can specify your time zone on the ‘Setup’ page within your online account. To set the clock manually, press the ‘BOOST CH’ and ‘BOOST HW’ keys to enter the menu.


Need help?
Do you have a question about the Ignire Wired and is the answer not in the manual?
Questions and answers