Advertisement
Quick Links
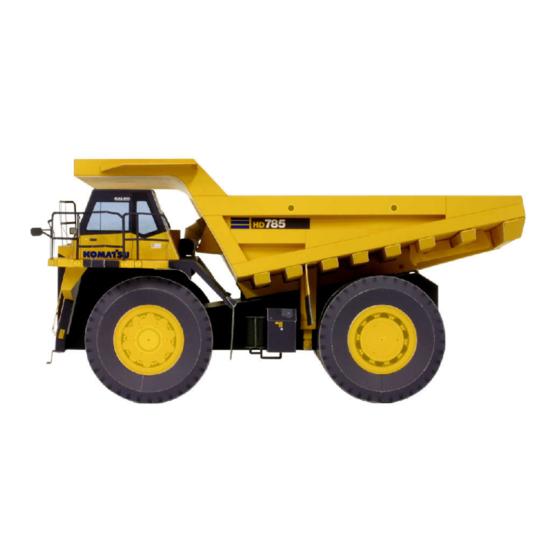
Special Vehicle Series : 04
Dump truck
Dump truck
* This model was designed for Papercraft
View of completed model
and may differ from the original in some respects.
Large-scale off-road dump trucks are mostly used to transport earth and sand. While in
Japan only dump trucks with load capacities of up to 11 tons can drive on ordinary
roads, there is no restriction on the load capacities of off-road dump trucks used on
large-scale civil engineering and construction sites and in locations such as mines and
quarries. Larger models can carry loads of as much as 300 tons. The HD785-7 has a
load capacity of 91 tons, and huge wheels over two meters high.
Parts list (pattern): Twenty-two A4 sheets (No. 1 to No. 22)
No. of Parts: 104
Build this model with careful reference to the Assembly Instructions.
Pattern
1/43 scale
Load capacity (max.) :
Overall length :
Overall width :
Overall height :
* If you prefer that the rear sides of the paper parts not be white,
print the two optional reverse-side printing sheets on thin paper
such as standard printer paper and adhere these to the reverse
sides of sheets No. 19 and No. 20 using spray adhesive, then
build the model as described in the instructions.
Editor:
91.0 ton
10,290 mm
6,885 mm
5,050 mm
Advertisement

Related Manuals for Canon CREATIVE PARK Komatsu Special Vehicle 04 Series


Summary of Contents for Canon CREATIVE PARK Komatsu Special Vehicle 04 Series
- Page 1 Special Vehicle Series : 04 Dump truck Dump truck Pattern * This model was designed for Papercraft View of completed model and may differ from the original in some respects. 1/43 scale Editor: Large-scale off-road dump trucks are mostly used to transport earth and sand. While in Load capacity (max.) : 91.0 ton Japan only dump trucks with load capacities of up to 11 tons can drive on ordinary...
- Page 2 Dump truck Pattern...
- Page 3 Dump truck Pattern...
- Page 4 Dump truck Pattern...
- Page 5 Dump truck Pattern...
- Page 6 Dump truck Pattern...
- Page 7 Dump truck Pattern...
- Page 8 Dump truck Pattern...
- Page 9 Dump truck Pattern...
- Page 10 Dump truck Pattern...
- Page 11 Dump truck Pattern...
- Page 12 Dump truck Pattern...
- Page 13 Dump truck Pattern...
- Page 14 Dump truck Pattern...
- Page 15 Dump truck Pattern...
- Page 16 Dump truck Pattern...
- Page 17 Dump truck Pattern...
- Page 18 Dump truck Pattern...
- Page 19 Dump truck Pattern...
- Page 20 Dump truck Pattern Special Vehicle Series Dump truck...
- Page 21 The ease of boulder assembly depends on the order in Dump truck which glue is applied. Try assembling each boulder without Pattern glue first, and then move on to final assembly using glue.
- Page 22 The ease of boulder assembly depends on the order in Dump truck which glue is applied. Try assembling each boulder without Pattern glue first, and then move on to final assembly using glue.
- Page 23 Print this sheet on thin paper such as standard printer paper and adhere it to the reverse side of Optional reverse-side Hydraulic Excavator Dump truck sheet no. 19 using spray adhesive, then build the model as described in the instructions. There's printing sheet (black) no need to worry about which end of this sheet points up and which points down.
- Page 24 Print this sheet on thin paper such as standard printer paper and adhere it to the reverse side of Optional reverse-side Hydraulic Excavator Dump truck sheet no. 20 using spray adhesive, then build the model as described in the instructions. There's printing sheet (yellow) no need to worry about which end of this sheet points up and which points down.
-
Page 25: Key To Symbols
Special Vehicle Series : 04 Dump truck Dump truck Assembly Instructions View of completed model * This model was designed for Papercraft and may differ from the original in some respects. Tools ools Assembly tip ssembly tip Scissors Write the number of each part on the reverse side of the part in pencil Ruler, set square upon cutting it out, to be sure you can tell which part is which later. - Page 26 Dump truck Assembly Instructions Assemble the cab. Glue flaps a, b, c, d and e in order. Glue flaps a, b, c, and d in order. After first assembling the front section, assemble the rear section following steps a and b, in that order.
- Page 27 Dump truck Assembly Instructions Turn part 3 over and glue the mud flaps (parts 4 and 5) in place before assembly. Glue flaps a, b, c, d, e and f in order. Check the glue positions on the side while attaching this part. Give this piece a light curve before attaching it.
- Page 28 Dump truck Assembly Instructions Check the glue positions on the side while attaching part Apply glue to the rear side of part 3 as well. These are movable parts that support the carrier. Gives these parts a particularly Assemble the base of the body. firm fold before assembly.
- Page 29 Dump truck Assembly Instructions Assemble and attach Attach the cab to the base. the front axle housing. Assemble the outside of the carrier. Take care not to apply glue to the printed surface. Don't forget to cut out this part first. Don't forget to cut out this part first.
- Page 30 Dump truck Assembly Instructions Assemble the inside of the carrier. Take care not to apply glue to the printed surface. Glue these pieces snugly to the rear side of both sides. Assemble the outside and inside of the carrier. Glue these parts closed after After applying glue to the glue tabs on the left assembling the carrier.
- Page 31 Dump truck Assembly Instructions Assemble the bottom of the carrier. Glue these parts in place in numerical order, taking care to ensure the carrier does not become warped. Glue parts 27 and 28 to the cuts in the paper, matching their seams to each other.
- Page 32 Dump truck Assembly Instructions Assemble the axle used to move the carrier, and attach it to the body. Assemble the axle Insert this part to for the opposite side part 45 before in the same way. closing its lid. Glue part 42. Use care to ensure this part faces in the correct direction.
- Page 33 Dump truck Assembly Instructions After attaching wheels to one side of each axle, insert the axles through Assemble the left and the body and attach the other wheels. Take care to assemble these parts right inner rear wheels. in the correct order, referring to the illustration below. Inside of right rear wheel Assembly diagram showing...
- Page 34 Dump truck Assembly Instructions Fold this part twice before gluing it in place. Glue the carrier to the body. Side view Finished! Last, assemble the nameplate and display it together with your model.