
Summary of Contents for Roberts Blutune 200
- Page 1 DAB / DAB+ / FM / CD / SD / USB / Bluetooth Sound System Please read this manual before use...
-
Page 2: Table Of Contents
Contents Introduction ..................2-9 MP3 / WMA CD mode ..............34 Blutune 200 Sound System features ..........3 MP3 / WMA fi le and folder selection ..........35-36 Controls and connections ............... 4-5 SD / USB playback and recording ..........37-44 Remote control ................ -
Page 3: Introduction
The two sections for DAB Radio and FM Radio describe how to use the sound system to listen to radio broadcasts. (page 25) Bluetooth The section for Bluetooth describes how to use your Blutune 200 to play audio fi les or video soundtracks directly from your smart-phone, tablet or similar devices. (page 29) -
Page 4: Blutune 200 Sound System Features
Blutune 200 Sound System features The Roberts Blutune 200 Sound System provides the following range of features in an attractive compact unit:- ● Clock display with time and date when in standby. ● Radio for DAB and FM (with RDS) broadcasts. -
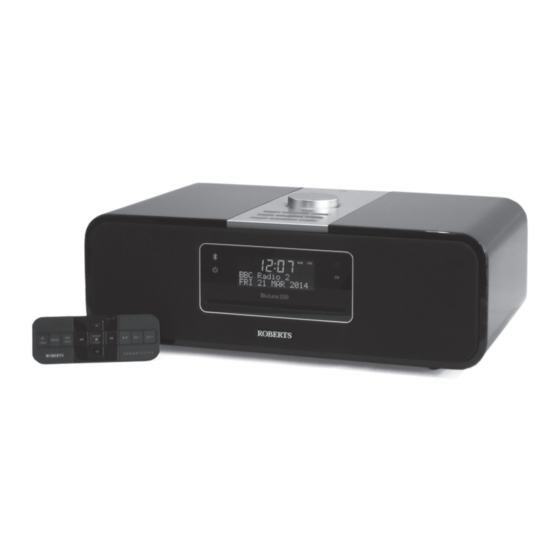
Page 5: Controls And Connections
Introduction Controls and connections (Top) 1. Play / Pause button 5. Select / Preset / Stop button 9. Folder Up button 2. Folder Down button 6. Info / Menu button 10. CD eject button 3. Mode / Record button 7. On / Standby / Volume control 11. - Page 6 Controls and connections (Front) 12. Standby indicator 13. Bluetooth indicator 14. LCD display 15. Infra-red sensor 16. CD loaded indicator 17. CD slot (Rear) 18. Telescopic aerial 19. Mains input socket 20. Headphone socket 21. Auxiliary input socket 22. USB socket (for software DAB/DAB+ ( Band III ) : 5A - 13F upgrades only) 23.
-
Page 7: Remote Control
Introduction Remote control All the functions of the Blutune 200 Sound System can be controlled using either the sound system buttons or the remote control with the exception of the CD Eject function. The CD Eject function can only be controlled using the CD Eject button on the sound system. - Page 8 Remote control battery replacement 1. Remove the battery cover on the rear of your remote control by applying pressure to the catch in the direction shown by the arrow and then lifting off the cover. 2. Remove the battery from the battery compartment by pressing the right hand bottom corner of the battery so that the battery is released from its position.
-
Page 9: Display Icons
Introduction Display icons G H I A. Sleep indicator Stereo indicator B. Alarm 1 and 2 indicators J. Aux input indicator C. Snooze indicator K. Repeat single track indicator D. Radio signal strength indicator L. Repeat all indicator SD USB AUX E. -
Page 10: Using The Sound System For The Fi Rst Time
Using the sound system for the fi rst time 1. Place your sound system on a fl at surface. 2. Fully extend the telescopic aerial. The aerial should be fully extended and positioned vertically for optimum reception. 3. Plug the mains lead into the mains socket located on the back of your DAB/DAB+ ( Band III ) : 5A - 13F sound system ensuring that the plug is pushed fully into the socket. -
Page 11: Dab Radio
DAB Radio Operating your sound system - DAB 1. Fully extend the telescopic aerial. 2. If your sound system is in standby mode, press and release the On / Standby button to switch it on. 3. Press and release the Mode button until the DAB mode is selected. The display will show 'DAB' for a few seconds. -
Page 12: Selecting A Station - Dab
Selecting a station - DAB 1. When the unit is in DAB mode the upper line of the text display normally shows the name of the station currently tuned. BBC Radio 4 Playing 2. Repeatedly press the Tuning Up or Down buttons to scroll through the list of available stations on the lower line of the text display. -
Page 13: Display Options - Dab
DAB Radio Display options - DAB When in DAB mode your radio has a range of display options. 1. Press and release the Info button to cycle through the various options. BBC Radio 4 a. Scrolling text Displays scrolling text messages such I’m sorry I have as artist/track name, phone in number, etc. -
Page 14: Finding New Stations - Dab
Display options - DAB cont. f. Bit rate/audio type Displays the digital bit rate and audio type for the current DAB radio station. BBC Radio 4 128kbps / Mono g. Signal strength Displays signal strength for the station being listened to. The clear rectangle shows the minimum required signal strength for clear DAB reception. -
Page 15: Manual Tuning - Dab
DAB Radio Manual Tuning - DAB Manual tuning allows you to tune your radio to a particular DAB frequency in Band III. Any new stations found will be added to the station list. This function can also be used to assist the positioning of the aerial or sound system to optimise reception for a specifi... -
Page 16: Dynamic Range Control - Dab
Dynamic Range Control (DRC) settings - DAB Dynamic range control (also known as DRC) can make quieter sounds easier to hear when your sound system is used in a noisy environment. DAB Menu < > There are 3 levels of compression: DRC Off - No compression applied. -
Page 17: Station Order Setup - Dab
DAB Radio Station order setup - DAB Your sound system has 2 station order settings from which you can choose. The station order settings are, alphanumeric and ensemble. DAB Menu Note: The default station order setting is alphanumeric. < > 1. -
Page 18: Fm Radio
Operating your radio - Search tuning FM 1. Fully extend the telescopic aerial. The aerial should be fully extended and positioned vertically for optimum reception. 2,10 2. Press and release the On / Standby button to switch on your sound system. -
Page 19: Manual Tuning - Fm
FM Radio Manual tuning - FM 1. Fully extend the telescopic aerial. The aerial should be fully extended and positioned vertically for optimum reception. 2. Press and release the On / Standby button to switch on your sound system. 3. Press and release the Mode button until the FM band is selected. 89.30MHz 4. -
Page 20: Display Options - Fm
Display options - FM Your sound system has a range of display options for FM mode:- The Radio Data System (RDS) is a system in which inaudible digital information is transmitted in addition to the normal FM radio programme. BBC R2 RDS offers several useful features. -
Page 21: Fm Stereo / Mono - Fm
FM Radio Stereo / Mono setting - FM Your sound system will play stereo FM broadcasts in stereo provided that the received signal is of adequate strength. However, as a stereo signal becomes weaker the audio signal will become poorer. It may be preferable to force the radio to play the station in mono in order to reduce the level FM Menu <... -
Page 22: Scan Sensitivity Setting - Fm
Scan sensitivity setting - FM Your sound system will normally scan for FM broadcasts which are strong enough to give good reception. However, you may wish the Auto-scan function to also be able to fi nd weaker signals, possibly from more distant radio transmitters. -
Page 23: Presetting Stations - Dab And Fm
FM Radio Presetting stations - DAB and FM You may store your preferred DAB and FM radio stations to the preset station memories. There are 20 memory presets in your radio, 10 for DAB and 10 for FM. Presets are remembered by your radio in the event BBC Radio 4 of a power failure. - Page 24 Recalling a preset station 1. Press and release the On / Standby button to switch on the sound system. Preset Recall < 1: BBC Radio > 2. Press and release the Mode button to select the desired waveband DAB or FM. 3.
-
Page 25: Language Function - Dab And Fm
FM Radio Language function - DAB and FM If required, your sound system's radio functions can be confi gured to a different language. DAB Menu < > 1. Press and release the On / Standby button to switch on your sound system. -
Page 26: Bluetooth Mode
Metal pipes, foil-lined plasterboard, metal window frames and ● When a Bluetooth enabled device such as your Blutune 200 sound domestic wiring can also have an effect. You should position your Bluetooth system is in a 'discoverable' state other Bluetooth devices can detect, devices closer to each other if you observe communication diffi... -
Page 27: Connecting Bluetooth Devices
'Blutune 200'. Just occasionally it may take longer for the sound system to be found by your device. 5. Select 'Blutune 200' to cause your phone, tablet or PC to pair with your sound system and to establish a connection. -
Page 28: Playing Audio Fi Les In Bluetooth Mode
Playing audio fi les in Bluetooth mode When you have successfully connected your sound system with your chosen Bluetooth device you can start to play your music using the controls on the device. Volume < > 1. Once playing has started adjust the volume to the required setting using the Volume buttons on your sound system or the connected Bluetooth device. -
Page 29: Connecting And Reconnecting A Bluetooth Device
4. Then pair the sound system with the new device using its Bluetooth Bluetooth settings (the sound system will be listed as 'Blutune 200'). The name of Pairing... the newly connected device will be briefl y shown on the sound system's display. -
Page 30: Compact Discs
Use only full size CDs (12cm diameter) with the sound system. Mini Your Blutune 200 sound system can playback CD-DA format audio CD-R/ CDs (8cm diameter) are not compatible with the player and may jam CD-RW discs that have been fi nalised* upon completion of recording. -
Page 31: Cd / Mp3 / Wma
CD / MP3 / WMA Inserting a CD Ensure the CD player is empty before inserting a disc. If there is a disc in the player then the CD loaded indicator will be lit. If you cannot insert a disc, press the CD Eject button to remove the CD currently in the player. 1. - Page 32 5. If you put the unit into standby mode then the next time the unit is switched on it will return to the previously played track. Ejecting a CD EJECT 1. To take out the CD, press and release the CD Eject button. The display will show 'EJECT'.
- Page 33 CD / MP3 / WMA Repeat tracks 1. While the CD is playing, press and hold the Menu button. 2. Press the Tuning Up or Down buttons until 'Repeat' shows on the display. Press the Select button to enter the repeat options menu. <...
- Page 34 Shuffl e tracks 1. While the CD is playing, press and hold the Menu button. 2. Press the Tuning Up or Down buttons until 'Shuffl e' shows on the display. Press the Select button to enter the shuffl e options menu. <...
-
Page 35: Mp3 / Wma Cd Mode
CD / MP3 / WMA MP3 / WMA CD Mode The Blutune 200 sound system is able to play CD-R and CD-RW discs containing MP3 and WMA fi les. It is assumed in this section that a fi le is equivalent to a CD track. -
Page 36: Mp3 / Wma Fi Le And Folder Selection
Playing an MP3 / WMA CD 1. Press the Play / Pause button to start playing from the CD. The display will show the fi rst folder and fi le numbers - '01' and '001'. Title:Lazing on 2. To pause playing press the Play / Pause button. To resume playing 02 001 01:44 press the Play / Pause button again. -
Page 37: Repeat And Shuffl E Options
Repeat and shuffl e options The Blutune 200 allows you to use the same playback options for fi les as can be used for conventional CDs (see pages 30-33). In addition to repeat a single fi le and repeat all options, there is also a repeat folder facility. -
Page 38: Sd / Usb Playback And Recording
In order to minimise the risk of damage to your sound system, your SD or FAT 32 fi ling system in order to operate in the Blutune 200. card or your USB memory, please place the unit such that the device cannot easily be knocked while it is inserted in the socket. -
Page 39: Sd / Usb Fi Le And Folder Selection
SD / USB Playing MP3 / WMA fi les - SD / USB 1. Press the Play / Pause button to start playing from the SD card / USB memory device. The display will show the fi rst folder and fi le numbers - "01"... - Page 40 fi le of the next or previous folder on the memory will be played. Repeat and shuffl e options The Blutune 200 allows you to use the same playback options for fi les as can be used for conventional audio CDs (see pages 30-33). In addition to...
-
Page 41: Recording To Sd / Usb
SD / USB Recording to SD / USB Your Blutune 200 sound system has been designed to allow you to make recordings to SD / SDHC cards or to USB connected memory devices. Recordings are made in MP3 format at 128k bits per second. - Page 42 FM radio. If you need to record from FM radio, some interference The USB connection is intended to be used to allow the Blutune 200 to may be picked up from the memory device unless you have a strong play MP3 and WMA fi...
- Page 43 SD / USB Recording MP3 / WMA fi les from CD / SD / USB In addition to recording from conventional sources, the Blutune 200 sound system can also record from MP3 or WMA fi les that have previously been written to CD, SD or USB media.
-
Page 44: Deleting And Formatting
Deleting and formatting After having recorded fi les to SD or USB media, you may later wish to delete them in order to reclaim the space used. The Blutune 200 can be Delete/Format < > used to delete individual fi les, or to delete all of the media fi les on the card. - Page 45 SD / USB Deleting all fi les 1. With the sound system in USB or SD mode, and with the media inserted, press and hold the Menu button. Delete/Format < > 2. Press the Tuning Up or Down buttons until the display shows "Delete / Format".
- Page 46 Alarms Your sound system has two alarms which can each be set to wake you to DAB, FM radio, CD, USB, SD card or buzzer alarm. The alarms may be set while the unit is in standby mode or while playing. <...
-
Page 47: Clock And Alarms
Clock and Alarms 7. Press the Tuning Up or Down buttons to choose the alarm hour and then press and release the Select button to enter the hour setting. The Alarm minute digits will then fl ash on the display. 8. -
Page 48: Alarms
13. Press the Tuning Up or Down buttons to select the desired alarm volume. 14. Press and release the Select button to confi rm the alarm settings. The sound system will exit the alarm menu. Alarm 1: Vol < > Active alarms are indicated in the display by the symbol and the corresponding alarm number. -
Page 49: Snooze Function
Clock and Alarms Snooze function 1. When the alarm sounds, pressing any button other than the On / Standby or Volume buttons will silence the alarm for 5 minutes. The Snooze symbol ( ) will fl ash. This sequence can be repeated during the 60 minute alarm period. -
Page 50: Sleep Function
Sleep function Your sound system can be set to turn off after a preset time has elapsed. The sleep setting can be adjusted between 15 and 120 minutes. Ensure your sound system is switched On. Sleep time < 15 mins >... -
Page 51: Setting The Clock Manually
Clock and Alarms Setting the clock manually Normally your sound system will set its clock automatically using the DAB radio signal. If no DAB signal is available and you need to set the time manually, please follow the procedure shown below. The clock may be set while the unit is in standby mode or while playing. -
Page 52: To Return To Auto Clock Set Mode
9. Press the Tuning Up or Down buttons to select the current year. Set month 10. Press and release the Select button to enter the year setting. The 9-13 9-13 month will then fl ash on the display. < 10 MAR 2014 >... -
Page 53: Audio And Setup
Audio and Setup Equalizer function The sound on your Blutune 200 can be adjusted to suit your personal taste for the material that you are listening to. The sound system has six preset equalizer options. Alternatively, you may set the treble and bass levels to your own preferences. -
Page 54: Treble And Bass Settings
Treble control 1. Follow steps 1-4 on the proceeding page to enter the Equalizer setup menu. 2. Press the Tuning Up or Down buttons to cycle through the options < Treble > until 'Treble' appears on the display. 3. Press and release the Select button. The current treble setting will be displayed. -
Page 55: Mute Function
Audio and Setup Mute function When playing in DAB, FM radio or Auxiliary input mode, the Play / Pause button has a mute function. Pressing the Play / Pause button will mute the output from the loudspeakers. 1. Press and release the Play / Pause button to mute the sound output. The speaker volume symbol on the display will disappear. -
Page 56: Auxiliary Input Socket
Auxiliary input socket A 3.5mm stereo Auxiliary Input socket is provided on the rear of your sound system to permit an audio signal to be fed into the unit from an external audio device such as iPod, MP3 or CD player. 1. -
Page 57: Standby Brightness Control
Audio and Setup Standby brightness control The brightness of the display when the unit is in standby mode may be adjusted. If you use the unit in the bedroom, you may prefer a lower standby brightness level than the standard setting. The standby brightness level may be set while the unit is in standby or while it is playing. -
Page 58: System Reset
System reset If your sound system fails to operate correctly, or some digits on the display are missing or incomplete carry out the following procedure. < System reset > 1. Press and hold the Menu button. 2. Press the Tuning Up or Down buttons until the display shows 'System reset'. -
Page 59: Software Version Displays
Audio and Setup Software version displays The sound system has the means to display the version numbers of the different software components that allow it to function. These displays are provided for reference in case they are needed for service or customer support. -
Page 60: Aerial Removal
Aerial removal The fi tted telescopic aerial is suitable for most applications. A wire aerial is provided as an alternative, and the telescopic aerial may be removed to allow this to be fi tted, or to allow connection to an external aerial using a coaxial cable. -
Page 61: Information
Information Cautions Do not allow this sound system to be exposed to water, steam or sand. • The sound system shall not be exposed to dripping or splashing and Do not leave your sound system where excessive heat could cause that no objects fi... -
Page 62: Mains Supply
Mains supply The Blutune 200 will operate from a supply of 100-240V ~ 50/60Hz (32W The wire coloured BLUE must be connected to the terminal marked N or max). coloured BLACK. The wire coloured BROWN must be connected to the terminal marked L or coloured RED. -
Page 63: Guarantee
In the event that it is not possible to return the product to the Roberts dealer from whom it was purchased, please contact Roberts Radio using the contact details on the www.robertsradio.com website. - Page 64 ROBERTS RADIO LIMITED PO Box 130 Mexborough South Yorkshire S64 8YT Website: http://www.robertsradio.com © 2014 Roberts Radio Limited Issue 2...
Need help?
Do you have a question about the Blutune 200 and is the answer not in the manual?
Questions and answers