
Related Manuals for Lightmed LightLas 532


Summary of Contents for Lightmed LightLas 532
- Page 1 Service Manual for the LightLas 532 Medical Frequency Doubled YAG Laser System Directive 93/42/EEC as amended by 2007/47/EC Doc. No. : DC2000-532 Rev. No. :...
- Page 2 CAUTIONS - Use of controls or adjustments or performance of procedures other than those specified herein may result in hazardous radiation exposure. Any modification to the LightLas 532 Medical Laser will result in the necessity for it to be reclassified.
- Page 3 November 2010 - Rev. 05 Update the current modification, service procedure.
-
Page 4: Table Of Contents
2.3.2 Avoid Exposure to Laser beams 2.4 Electrical Hazards 2.5 Safety Controls and Features 2.6 Product Labeling 3. PRODUCT SPECIFICATIONS 3.1 LightLas 532 System Specifications 3.2 CSO SL980, SL990 Slitlamp Specifications 3.3 Module Specifications 3.3.1 System Block Diagram 3.3.2 Optical Elements Diagram 3.3.3 Laser Cavity Block Diagram and description... - Page 5 4. PRINCIPLES OF OPERATION 4.1 General Description 4.2 LightLas 532 Laser Controls and Displays 4.2.1 Laser Console 4.2.2 Slitlamp Integrated Delivery Unit 4.2.3 LIO 4.3 CSO SL980, SL990 Slitlamp Controls 4.4 Detailed Description 5. INSTALLATION 5.1 Introduction and Requirements 5.2 Unpacking and Receiving Inspection 5.3 Tools and Equipment...
- Page 6 6.2.3 Console Power Calibration checks 6.2.4 Earth / Ground resistance checking 6.2.5 Aiming Power adjustment 6.2.6 Remote Door Interlock connections 6.2.7 LightLas 532 Laser Power Calibration Procedure 6.2.8 Power Detector Calibration Procedure 6.2.9 Process for upgrading LightLas 532 software 6.3 Checking Delivery Units Laser beam alignment 6.4 Trouble shooting guide...
- Page 7 Figure Description Page System Wiring Drawing System Block diagram Optical Elements Block Diagram Laser Cavity Block Diagram Integrated Slitlamp LDU Beam Diagram LIO Optics Beam Paths Attachment Slitlamp LDU Beam Diagram Endoprobes diagram Laser Console Internal Modules (Old Version) 3.10 Laser Console Internal Modules (New Version CE Mark Version) 3.11 New Laser Console Internal Modules (New Version CE Mark Version)
- Page 8 Moving Safety Filter between Binoculars and Microscope Housing Safety Filter for Haag Streit style Figure Description Page 12(a) Attachment LDU fitted to Haag Streit style Slitlamp with Micromanipulator 12(b) Attachment LDU fitted to Zeiss 30SL Slitlamp with Micromanipulator Original Illumination Tower New modified Illumination Tower fitted Attach the cables and connectors to the back panel of Laser Console Attach the Delivery Fiber and Delivery Key to Laser Console...
- Page 9 The information provided in this manual is subject to change without notice. Only accessories that are designed and approved for use with the LightLas 532 may be used. The Manufacturer and Distribution organization shall not be held liable or responsible for damages or injury caused as a result of using untested and non-approved accessories.
-
Page 10: How To Use The Manual
Meter must be calibrated every 12 months and the Earth connection checked. These procedures are in Section 6.1 and 6.2. Section 6 should also be used, if you have a problem with the LightLas 532, to help identify which module or assembly to replace. - Page 11 Product Classifications The LightLas 532 Medical Laser is a Class IV (4) laser product as specified in the standard IEC60825-1 (2001) and the USA 21 CFR’s 1040.10, 1040.11. The LightLas 532 MEDICAL Laser is classified as Class I Type B Electromedical equipment as specified in the EN60601-1 standard.
- Page 12 IEC60601-1-4 (1996) + A1(1999) ISO14971 (2007) VBG-93 FDA 21 CFR 1010, 886...
-
Page 13: Warnings And Precautions
Warnings and Precautions The following warnings apply to the LightLas 532 Laser and should be observed by all users. DO NOT look directly into or at the Laser beam or at specular laser reflections. Direct and reflected laser light can cause permanent eye injury. -
Page 14: Optical Hazards
CE Mark applied if used in the EU. The LightLas 532 uses a Class II Laser Diode Aiming beam. The wavelength is 635 to 650 nanometers (nm), and the maximum power output is set at the factory to be less than 1mW delivered to the Patients Cornea (eye) however it is always recommended to always use the lowest practical aiming beam intensity during treatments. -
Page 15: 2.3.2 Avoid Exposure To Laser Beams
Standards for Medical Electrical equipment. The Laser System is designed to operate with a 3 terminal mains AC voltage supply with the third pin being the Earth or Ground connection. WARNING: It is not safe to operate the LightLas 532 Photocoagulator Laser without an Earth or Ground connection. Risk of electrical shock is possible. - Page 16 Also of particular importance is that ESD precautions always be observed when servicing the LightLas 532 Console because the Laser Diode source is particularly sensitive to ESD and very small levels (around 50 volts) can cause severe and permanent damage to this high cost device.
-
Page 17: Safety Controls And Features
Safety Controls and Features For the LightLas 532 to comply to the various requirements of the standards referred to previously there are a number of Controls and Features that are provided. A description of these Safety items is provided following the Figure 2.1. - Page 18 Emergency Stop Switch This switch is provided to enable a fast response shutdown of the Laser System in the event of some serious problem occurring. It is a RED push switch that locks down when pushed and in this position all power to the internal parts is removed. The switch actuator ( the red part ) must be rotated to reset to the ON position.
- Page 19 ON. Self Checks When the Laser system of the LightLas 532 is first turned on it operates the Laser and during this time the microprocessor performs various checks to ensure the Laser is functioning correctly. If the test passes then the unit goes to the Standby mode.
-
Page 20: Product Labeling
Product Labeling All the labels on the LightLas 532 comply with the requirements of the various regulatory standards referred to previously. A full facsimile of all the safety and control labels is shown in the figures 2.2 and 2.3. POWER... - Page 21 Manufactured by LightMed Corporation MANUFACTURED: No1-1, Lane 1, Pao-An Street, Section 3 Shulin City, Taipei 238, TAIWAN EU Authorized Representative EC REP (MDD 93/42/EEC as amended by 2007/47/EC) Medical Device Safety Service GmbH Schiffgraben 41, 30175 Hannover, Germany Lightmed Corporation...
- Page 22 VISIBLE LASER RADIATION AVOID EYE OR SKIN EXPOSURE TO DIRECT OR SCATTERED RADIATION CLASS 4 LASER PRODUCT IEC/EN 60825-1:2007 CAUTION/DANGER VISIBLE LASER RADIATION AVOID EYE OR SKIN EXPOSURE TO DIRECT OR SCATTERED RADIATION CLASS 4 LASER PRODUCT IEC/EN 60825-1:2007 Figure 2.4(a) Integrated Slitlamp LDU with labels...
- Page 23 DANGER / CAUTION Visible laser radiation when open AVOID EYE OR SKIN EXPOSURE TO DIRECT OR SCATTERED RADIATION 0434 Lightmed Corporation Safety Filter Model No: OD4@532nm Serial No: DANGER / CAUTION Visible laser radiation when open AVOID EYE OR SKIN EXPOSURE TO DIRECT OR SCATTERED RADIATION Figure 2.4(b)
- Page 24 Lightmed Corporation Safety Filter Model No: OD4@532nm Serial No: Manufactured: DANGER / CAUTION Visible laser radiation when open AVOID EYE OR SKIN EXPOSURE TO DIRECT OR SCATTERED RADIATION 0434 0434 Figure 2.5 LIO LDU with labels...
- Page 25 Lightmed Corporation Safety Filter OD4@532nm Model No: Serial No: Manufactured: Lightmed Corporation Safety Filter OD4@532nm Model No: Serial No: Manufactured: CAUTION/DANGER VISIBLE LASER RADIATION DANGER / CAUTION AVOID EYE OR SKIN EXPOSURE Visible laser radiation when open AVOID EYE OR SKIN EXPOSURE TO...
- Page 26 LightLas 532 System Specifications CSO SL980, SL990 Slitlamp Specifications Module Specifications Optional accessories LightLas 532 System Specification The following are the System Specifications for the LightLas 532 Medical Laser. ______________________________________________________________________________________________________________ Treatment Laser Laser Type Diode Pumped Frequency Doubled YAG Wavelength...
- Page 27 Attachment Slitlamp LDU Slitlamp model To attach on CSO Model SL990 or other Haag Streit Clone 50 to 500 m continuously selectable Spot Sizes on housing of Delivery unit (Truspot) Focus plane All spot sizes Parfocal to Slitlamp focus plane Fiber Length Mounting On adapter fitted to Slitlamp Tonometer Mount...
- Page 28 Operating: 20 to 35°C Storage: -10 to 55°C Relative Humidity Range : Operating: 30% - 85% non-condensing Storage and Transport: up to 95% non-condensing Atmospheric pressure Operating: 800-1060 mbar Storage and Transport: 500-1060 mbar Cooling System Fan cooled and TEC’s for Laser Diode and Crystal Dimensions (Total) 130mm(H) x 370mm(W) x 330mm(D) Weight...
-
Page 29: Cso Sl980, Sl990 Slitlamp Specifications
The following are the Slitlamp Specifications for the CSO SL980, SL990 Slitlamps that are used in the LightLas 532 Photocoagulator Laser System. The SL980 is a Zeiss clone and the SL990 is a Haag Streit clone. Both Slitlamps have very similar specifications however the SL980 uses an illumination source below the viewing path and the SL990 uses illumination from above the viewing path. - Page 30 Figure 3.1 Laser Console Wiring Diagram...
- Page 31 Figure 3.2 System Block Diagram...
-
Page 32: Optical Elements Diagram
3.3.2 Optical Elements Diagram Figure 3.3 Optical Elements Block Diagram... -
Page 33: Laser Cavity Block Diagram And Description
The Laser Cavity is a complete module that is fully aligned and tested in a controlled environment before being assembled into the LightLas 532 Console. The input Laser Power source is the 808 Laser Diode. This input Laser beam is Fiber coupled directly to the Cavity housing and is then collimated and directed into a special YAG Crystal that then provides a 1064nm output Laser beam. -
Page 34: Remote Control Description
The other adjustments on the module include: 1. The Fiber input connector can be adjusted in all planes to accurately align the fiber center to the Collimator lens. 2. The Aiming beam assembly has adjustment screws to align the Aiming beam to the Green beam so that they both can be focused into the Delivery Fiber together. -
Page 35: Slitlamp Delivery Unit (Integrated Model)
The LD is an ESD sensitive device and this means that no service is to be performed to this part in the field. Never disconnect any of the cables from the LD as this may cause irreparable damage to the internal parts. Special care should also be observed not to damage the Fiber cable that connects the LD to the Laser Cavity. - Page 36 Xcel 200 units. Because the focal lengths are the same and the Dovetail system is the same then the LightLas 532 Integrated Delivery unit can be mounted to the Binocular Support Arm after removing the original microscope housing. The original binoculars can be fitted directly to the Laser housing.
-
Page 37: Laser Indirect Ophthalmoscope (Lio) Delivery Unit
Built into the eyepieces for the LIO are Safety Filters that protect the Operator from any accidental reflections of the Treatment Green Beam back through the Optical system. The brightness of the LIO Illumination beam is done from the front panel of the LightLas 532 Console. -
Page 38: Slitlamp Attachment Ldu
3.3.8 Slitlamp Attachment LDU Figure 3.7 Attachment Slitlamp LDU Beam Paths The Laser Delivery Attachment is designed for use on a variety of Slitlamps that are clones or similar in design to the Haag Streit style. The Delivery Attachment will fit directly onto the Tonometer mounting post that is located on top of the Microscope housing for these Slitlamps. -
Page 39: Endoprobes
3.3.10 Endoprobes Figure 3.8 Endoprobe Diagram The Endoprobes are Sterile disposable items that are used for invasive treatments within the eye structure. There are no Serviceable parts on them and if the packaging is opened outside a Sterile field then the Endoprobes are not suitable for use. They are not suitable for re-sterilization. - Page 40 The Laser Console effectively transforms the Main Input voltage supply in to the Controlled Laser source that is used for the Treatment Delivery units on the LightLas 532 Ophthalmic Photocoagulator. Inside the Console, as shown above in the figure, are the basic modules that make up the Console.
- Page 41 EMC requirements of the relevant standards. Therefore the LightLas 532 emits low levels of Radiated and Conducted EMC noise. The LightLas 532 is Auto-ranging on the input Mains Voltage so any voltage between 90 and 240 volts can be used to operate the Laser unit.
- Page 42 I/O Control PCB This PCB provides the link or interface between the CPU PCB which is located next to it and all the input and output signals. The inputs include the Remote Interlock, Fiber connector, Footswitch, Shutter solenoid, Shutter detectors and Moving safety filter detectors The outputs include the Shutter solenoid, TEC control, Moving Safety Filter and Laser Diode Driver.
- Page 43 Figure 3.10 Laser Console Internal Modules (New Version with CE Mark) The Legend to the Internal Modules is: 1. The Laser Cavity 2. Laser Diode Driver PCB 3. Input Mains Filter 4. AC/DC Converter 5. DC/DC Voltage Converter Circuit 6. LIO Dimmer PCB 7.
- Page 44 Figure 3.11 New Laser Console Internal Modules (New Version with CE Mark) The Legend to the Internal Modules is: 1. The Laser Cavity 2. DC/DC main Power PCB 3. DC Power Supply 4. Master CPU and I/O Control PCB 5. TEC Controller PCB 6.
- Page 45 The Laser Cavity The Laser Cavity converts the 808nm Laser Diode source beam that is delivered via the Fiber Link first to a 1064nm beam which is then Frequency Doubled using a special crystal to the 532nm Green Laser beam. The Laser Cavity is a sealed unit and there are no Field Service parts inside.
- Page 46 EMC requirements of the relevant standards. Therefore the LightLas 532 emits low levels of Radiated and Conducted EMC noise. The LightLas 532 is Auto-ranging on the input Mains Voltage so any voltage between 90 and 240 volts can be used to operate the Laser unit.
- Page 47 This PCB contains the main CPU for the System. The PCB is operated from the +/- 12 and +5 volts and all the internal circuits and systems are controlled by this processor. The items controlled include the Shutter solenoid and 2 detectors, the Power Controller to the LD Driver and the inputs from the 2 Power detector photodiodes circuit, the TEC controllers, the inputs and outputs to the Remote Control unit for control switches and the displays, the Aiming Laser control.
- Page 48 Left PCB: TEC Controller PCB Right PCB: Master CPU and I/O Control PCB Laser Diode Source and Heatsink The Laser Diode source is known as a FAP (Fiber Array Package) Laser Diode Bar. This is a semiconductor Laser source that converts a low voltage, high current electrical power source into a circular multi-mode laser beam that is suitable for coupling into an Optical Fiber.
-
Page 50: Optional Accessories
Optional Accessories The following accessories can be purchased from the Distributor to use with the LightLas 532 Laser Product. The accessories are available for customers outside the EU Countries but may not all be available for use within the EU due to the requirements for CE Marking and the manufacturer not having control over the use of the attachments that are available and their indications for use. - Page 51 ( Lightlas577 with SYL9000 combination) The following are spare part accessories: Slitlamp Bulb, Halogen 6 Volt 20 Watt Part Number 240012 Armrest (without Lightmed Logo) Part Number YL0892 Switch Hearder Emergency Stop Push Button Part Number 200039 ...
- Page 52 Remote Interlock Connector Part Number LCA190 Replacement Lamp for LIO Illumination Part Number 240007 Extension cable for LIO Illumination Part Number GL0603 Fiber Tooling Holder Part Number LM8009 Delivery Key for Calibration Part Number LM8008 Green 532 Service Tool Kit: Part Number 610011 &...
- Page 53 Macular Treatments Laser Trabeculoplasty The LightLas 532 Laser beam has a wavelength of 532nm, which is in the visible spectrum and is a green light. A red aiming beam is used to position the treatment Green beam prior to delivery.
- Page 54 Fixed Filter that is mounted in the beam path of the Microscope. All the normal functions of a Slitlamp are available to the operator when using the LightLas 532 on a Slitlamp unit and when the doctor is using the LIO they will use a Laser Lens of either 20D or 28D.
- Page 55 visible spectrum it is readily transmitted through the cornea, lens and vitreous regions of the eye. Where the patient’s eye does not allow for good transmission or introduces some dispersion of the beam then the patient is not indicated for the Laser treatment. Increasing the Laser power and pulse duration will increase the heating effect and therefore the coagulation intensity.
-
Page 56: Lightlas 532 Laser Controls And Displays
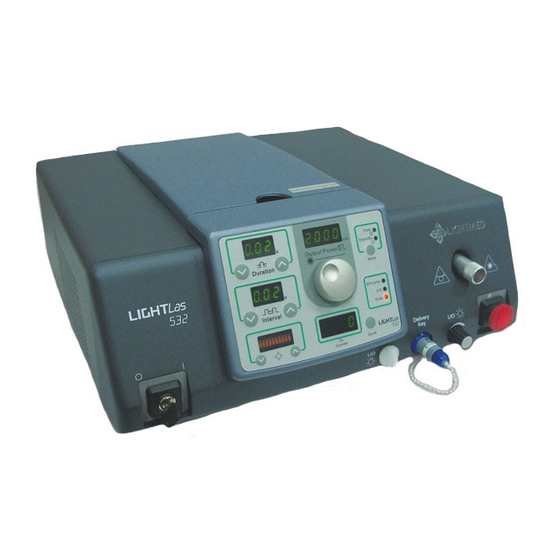
4.2.1 Laser Console All the Controls and Displays for the LightLas 532 Photocoagulator Laser are located either on the Control Box front panel or the rear panel. The following figure 4.2 shows all of these controls and displays and then there is a description following. - Page 57 Treat Stand By Output Power Duration Mode Slit Lamp Interval Endo Counter Figure 4.2 Laser Remote Control and Displays Emergency Stop Switch This switch is provided to enable a fast response shutdown of the Laser System in the event of some serious problem occurring. It is a RED push switch that locks down when pushed and in this position all power to the internal parts is removed.
- Page 58 5. LIO Illumination Control When the LIO is connected to the LightLas 532 Laser Box this control can be used to adjust the intensity of the Illumination lamp. 6. Remote Control Panel This Remote Control Panel fits to the front of the Laser Box and can easily be removed by the operator and placed close to the site of the Laser treatment in order to maintain good control over the Laser settings and displays.
- Page 59 14. Power Control Adjuster This control is used to adjust the Laser Power. When the Laser is first turned ON the Power setting is zero Power and when this control is adjusted for the first time the minimum power of 0.05 watts (50 milliwatts) is automatically set. Rotating the control clockwise will increase the power setting and anti-clockwise will reduce the power.
- Page 60 this switch longer than 2 seconds, current setting, including Exposure Duration, Repeat Interval, Power and Aiming Intensity would be saved following by a beeping sound and “SAVE” shown on the Total Counts display. 24. EndoProbe Delivery Unit Indicator When this indicator is on it shows that the Endoprobe Delivery Key is inserted in the Front Panel.
-
Page 61: Slitlamp Integrated Delivery Unit
4.2.2 Slitlamp Integrated Delivery Unit The controls on the Slitlamp LDU are used to adjust the Laser beam properties for delivery to the patient. The power, pulse duration and pulse interval are only adjusted on the Console. On the Slitlamp LDU it is possible to adjust the spot size and the beam position relative to the Slitlamp Illumination. - Page 62 Figure 4.4(b) Attachment Slitlamp LDU Controls (New One without Micromanipulator-Truspot)
- Page 63 Optical Fiber The Optical Fiber connects the Slitlamp LDU to the Laser Console. The Treatment and Aiming beams are focused into the fiber at the Console end. Zoom System This Optical System allows the Laser beams spot size at the treatment site to be adjusted from 50µ...
- Page 64 4.2.3 Laser Indirect Ophthalmoscope (LIO) The controls on the LIO are used to adjust the position of the Treatment Laser beam to the Illumination spot. All other controls either adjust the Illumination spot or the fitment of the unit for the doctor. Laser beam Mirror and Aperture...
- Page 65 1. Optical Fiber The Optical Fiber connects the LIO to the Laser Console. The Treatment and Aiming beams are focused into the fiber at the Console end. 2. Zoom System This optical System focuses the Laser beams to the correct spot size suitable for the intended application.
-
Page 66: Cso Sl980, Sl990 Slitlamp Controls
CSO SL980 and SL990 Slitlamp Controls The CSO Slitlamps can be used as a standard diagnostic tool and all the standard Slitlamp functions are available. The following figures 4.3 and 4.4 show all of the controls that can be found on the Slitlamps and the description of the components. - Page 67 Figure 4.7 SL980 Slitlamp controls...
- Page 68 Figure 4.8 SL990 Parts List...
- Page 69 Figure 4.9 SL990 Slitlamp controls...
-
Page 70: Detailed Description
Detailed Description Inside the Laser Box there are several operating components that together provide the output Laser beam. They are: Solid state Laser Diode Laser generator and optics system Thermal Electric Coolers and Driver units Electronic Microprocessor control system ... - Page 71 Connector. If it is operated then the System will go into the Interlock condition where no operation is possible. There are two Laser beam wavelengths emitted from the LightLas 532. The treatment beam has a wavelength of 532nm, which is a green beam, and this wavelength provides the Photocoagulation effect to the treated tissue.
- Page 72 Users. Refer to Section 11 of this manual. The patient cannot have any influence over the operation and control of the LightLas 532 Laser during its operation. Depending on the type of surgery being performed, the Delivery unit being used and the condition of the patient the doctor must decide on the modality of the Laser use and whether an assistant is required to be on hand during the surgery.
- Page 73 The installer should also retain a copy and the customer may request a copy also. All reasonable care must be taken when installing the LightLas 532 to ensure that you or others are not exposed to any Hazardous Laser radiation. Always wear Laser Safety glasses suitable for the 532nm wavelength to protect your eyes.
-
Page 74: Unpacking And Receiving Inspection
Section 7.2 of this manual. When installing the LightLas 532 as a System with Slitlamp onto a Table then care must be taken to ensure that the set-up is optimized for the User with all parts of the System correctly installed and mounted so that both the Patient and Doctor are comfortable and safe during the treatment. - Page 75 LIGHTMED www.lightmed.com Large Carry Case For Console Small Carry Case For LIO &/or Attachment LDU Figure 5.2 Portable Carry Cases for Console and LDU’s Upon receiving the system inspect the Packing Cardboard Carton for any signs of mishandling, which must be reported to the freight handler before the instrument is unpacked. If there is damage then the manufacturer reserves the right to decline any warranty claims that may be forthcoming so it is essential that the freight company accepts responsibility for any damages.
-
Page 76: Tools And Equipment
5. Standard tools such as screwdrivers If the LightLas 532 Laser System is to be used as a Portable System and it needs to be relocated at various times then the tools necessary in order to assemble and disassemble are supplied with the Laser. - Page 77 Setting Up and Checking the Laser System Contents 5.4.1 Preparation 5.4.2 Table and Slitlamp 5.4.3 Integrated Slitlamp Delivery Unit 5.4.4 Attachment Slitlamp Delivery Unit 5.4.5 Laser Console 5.4.6 Pre-Laser Operation checks 5.4.7 Alignment Checks 5.4.8 Laser Indirect Ophthalmoscope 5.4.9 Endoprobe 5.4.1 Preparation Below in Figure 1.
- Page 78 All the items above and the rest of the System should be unpacked from their cartons and carry cases and inspected for transportation damage and general condition. Take care not to touch the optic parts and make sure all the items are available. 5.4.2 Table and Slitlamp Prepare the Motorized Table (if used) and then attach the Tabletop and fasten securely.
-
Page 79: Integrated Slitlamp Delivery Unit
5.4.3 Integrated Slitlamp Delivery Unit Below in Figure 3 is the Slitlamp ready to accept the Laser Delivery Unit housing. The housing is fitted to the Slitlamp by sliding it onto the mounting plate. First make sure the locking screw on the housing is loose then slide it on fully until it touches the stop screw then tighten the lock screw (Figures 4 and 5). - Page 80 Figure 5 Lock the housing securely to the Slitlamp when it is pushed against Chrome Stop screw. Figure 6 Align the keyways then fit the Zoom unit to the Delivery housing...
-
Page 81: Attachment Slitlamp Delivery Unit
Figure 7 Rotate the Zoom housing to the end stop 5.4.4 Attachment Slitlamp Delivery Unit On the Slitlamp that is to be used fit the Tonometer mount (Figure 8(a) Haag Streit style and 8(b) Zeiss 30SL). Make sure the Tonometer mount is center fit on the Slitlamp. The Attachment LDU mounting arm will now fit directly onto the Tonometer mount. - Page 82 Figure 8(a) Haag Streit style Slitlamp with Tonometer mount ready for Attachment LDU Figure 8(b) Attaching the Tonometer mount and Attachment LDU Mounting Arm to Zeiss 30SL...
- Page 83 Figure 9(a) Lock the Haag Streit Attachment LDU to the Tonometer mount Figure 9(b) The Zeiss Style Slitlamp with Attachment LDU Mounting Arm ready for LDU...
- Page 84 Figure 10 Moving Safety Filter between Binoculars and Microscope Housing Figure 11 Safety Filter for Haag Streit style...
- Page 85 Figure 12(a) Attachment LDU fitted to Haag Streit style Slitlamp with Micromanipulator Figure 12(b) Attachment LDU fitted to Zeiss 30SL Slitlamp with Micromanipulator...
- Page 86 Zeiss 30SL Unit. For the Zeiss 30SL as well as fitting the Tonometer mount, Attachment LDU and Safety Filter a new Special Illumination Tower must be used. Before changing the Tower get the Target Rod and fix it to the Slitlamp. Turn on the Slitlamp illumination and mark on the rod the smallest aperture spot location with the original Tower and all settings at normal.
-
Page 87: Laser Console
LDU during Production so as to get the best alignment. To replace the Fiber is a Service job and needs special tools and procedures. NOTE: Before operating the LightLas 532 Laser system with any Laser Delivery System there must be a Doctor Safety Filter in the viewing beam path to protect the users eyes. - Page 88 Attach the Delivery Fiber and Delivery Key to Laser Console...
-
Page 89: Pre-Laser Operation Checks
5.4.6 Pre-Laser operation checks Before operating the Green Laser perform the following checks to verify the System functions. An Optical Fiber must be connected to the Laser Console. The fiber used can be either an Endoprobe or normal Delivery Fiber. a. - Page 90 bends of the fiber. Figure 18 Safety filter checks Figure 19 Attach the Delivery fiber to the Zoom unit d. For an LDU with a Fixed Safety Filter (which is the normal configuration used) then it is not necessary to check the operation of the moving mechanism. It is advisable at this time however to verify that the Safety Filter is correctly mounted in the viewing beam path.
-
Page 91: Alignment Checks
5.4.7 Alignment checks When the Laser Delivery unit has been fitted to the Slitlamp then the alignment of the Laser beam with reference to the Slitlamp needs to be checked and adjusted if necessary. First this alignment is done using the Aiming Beam as the reference and then it can be verified using the Green Laser beam. - Page 92 no transmitted Laser beam to the operator in excess of Class 1 Laser limits. Figure 20 Set the eyepieces and slitlamp ready to do alignment checks...
- Page 93 Figure 21 Check Slitlamp focus on Target Rod and Laser focus of aiming beam Figure 22 Checking Laser focus and manipulator operation on black material target...
- Page 94 5.4.7.2 Attachment Slitlamp LDU Set a narrow slit width with low intensity illumination and verify that the slit is focused. If the Slitlamp focus is OK then set it to a smaller spot size aperture and observe the red aiming beam. The red aiming beam intensity can be adjusted to make it more clear and then view its position and focus on the target rod (Figure 23).
- Page 95 Figure 24 Adjust the Attachment LDU Spot Size Focus using the Knob on the Mounting Arm When the focus is set then remove the target rod and place a piece of black tape or thermal paper to the chinrest such that the System can be easily focused onto it. While looking through the binoculars align the slitlamp so the black material is in focus and verify that the slit focus and aiming beam focus both occur together.
- Page 96 Figure 25 Adjusting Micromanipulator Arm to verify the Laser Spot is in the Aperture Center...
- Page 97 Figure 26(a) Release the lock screw for the sideways movement adjustment Figure 26(b) Adjusting sideways movement of Attachment LDU during alignment...
- Page 98 When the alignment looks Ok then set an output power of 50 milliwatts and duration of 0.2 seconds. With the spot size set at 50µ fire the Laser onto the target and a small burn should be visible. Move to a new position on the target and increase the spot size to 120µ and then 200µ...
-
Page 99: Laser Indirect Ophthalmoscope
5.4.7.3 Demonstration Console settings The settings shown below (Figure 27) are typical for doing a demonstration of the Laser as they represent similar settings to what a doctor may use. These settings can be used for spot sizes of 50µ up but the burn mark will be less as the spot size gets larger. Figure 27 Typical Laser settings for demonstration of the Laser System This completes the basic installation procedure and after this the only steps that can follow... - Page 100 Figure 28 Fiber and Delivery Key fitted to Console Front Panel Figure 29 Fiber and Illumination Cable attached to LIO...
- Page 101 Figure 30 Locking Set Screws and Rotation of Optics Tube during alignment On the side of the Indirect is a control for the Illumination spot size and check that it works OK and then set the middle size aperture. Using the small knobs on the side of the Indirect you should be able to adjust the spot position in the vertical plane so that the spot is in the middle of the field of view.
- Page 102 For Keeler All Pupil II, the Laser module controls on the LIO are used to adjust the position of the Treatment Laser beam to the Illumination spot for the doctor. The other controls either adjust the Illumination spot or the fitment of the unit for the doctor. (See the Keeler All Pupil II Operation manual) Figure 31 Figure 31 LIO of Keeler All Pupil Ⅱ...
-
Page 103: Endoprobe
Console operation and for Calibration testing. To fit an Endoprobe into LightLas 532, it is necessary to connect the Endoprobe Plug before screw it into the laser output aperture. Please refer to the instruction label inside the cable cover of LightLas 532 console. -
Page 104: Installation Record Sheet
Installation Record Sheet Model: LightLas 532 Console Serial Number: ___________________ LIO Serial Number: _____________ Slitlamp LDU Serial Number: ______________ Safety Filter Serial Number: _______________ System Setup ( Tick for OK ) □ 1.1 All parts received and checked OK. □... - Page 105 □ 3.3 Fixation lamp is operating OK. □ 3.4 Fixation lamp can be rotated from side to side OK. □ 3.5 Handles are fixed firmly to posts. Laser System Checks 4.1 Laser Power ON is indicated by Display LEDs being ON. □...
- Page 106 Emitted Laser beams. The LightLas 532 is a Class 4 Laser and can cause serious eye and skin damage. Safety Glasses are recommended in Section 3 of this manual. All Collateral Radiation is contained within the Laser Cavity that is a sealed unit.
-
Page 107: General Routine Maintenance Procedures
Cleaning the external surfaces of the Laser To clean the outside of the LightLas 532 wipe over using a damp (but not dripping) cloth. Use a mild cleaning agent and do not use any solvents. Do not spray or pour any cleaning agents directly on the equipment. -
Page 108: Slitlamp Delivery Routine Maintenance
6.1.3 Slitlamp Delivery Routine Maintenance The most important routine maintenance to carry out on the Slitlamp delivery is to clean the optics. The doctor must view the patient through the Slitlamp and optical Laser system so clean optics will ensure the best view. The optics to clean are those that are outside such as the Objective focus lens, eyepieces and Illumination mirrors. -
Page 109: Endoprobe Routine Maintenance
6.1.5 Endoprobe Routine Maintenance The Endoprobes are single use sterile devices so there is no routine maintenance to perform with them. Keep the Endoprobe Plug for the next use on a new Endoprobe. Please contact the Manufacturer for a new Endoprobe Plug if the original one is too exhausted to hook a new Endoprobe. - Page 110 6.2.1 Fiber Focus checking 1. In one of Slitlamp mode, LIO mode or Endo mode, set both of the duration time and interval period to 0.05 sec. 2. Select the laser power to 100mW 3. Measure the laser output power as Picture 6.6(a) Picture 6.6 (a) 4.
- Page 111 Fiber Focus Checking Record Sheet Power Meter Model: _____________ Serial Number:________________ Checked by: __________________________ Date:_________________ Delivery Key type: ____________________________________________ Meter Reading Meter Reading Transmission Pass/Fail Displayed Power Laser Aperture Output Fiber (b) [(b)/(a)]x100% (>80%) Output (a) 100 mW 250 mW 500 mW Fiber Focus Checking Record Sheet Record Sheet 2...
-
Page 112: Aiming Alignment Adjustment
6.2.2 Aiming Alignment adjustment (Aiming Module See Picture 6.7) Picture 6.7 1) Insert the fiber into the Front Panel connector and push the mode switch to go into the Treat Mode. That means the shutter is open. Check the Aiming beam output from the distal end of the fiber on a white surface. -
Page 113: Console Power Calibration Checks
An external Power Meter may be purchased to measure the actual delivered Power from the Laser System and compared to the displayed power on the LightLas 532. The displayed Power is the actual output Power from the various Delivery Units to the Patients Cornea. - Page 114 6. The measured power readings (X2) must be within +/-20% of the set power for the calibration to be a pass. 7. If the readings fall outside the +/-20% tolerance then recheck the system, make sure the External Meter is set up properly and that the fiber has no sharp bends or damage to it. If possible recheck with another fiber.
-
Page 115: Earth / Ground Resistance Checking
One cable should be connected to the Earth pin on the mains plug and the other cable should be placed on various surfaces of the LightLas 532 Laser and the actual resistance is measured. The resistance must be recorded as less than One ohm (1 ohm) for all test points. - Page 116 2 pins are linked together. These are Pins 2 and 3. Pin 2 is the common or ground connection and Pin 3 is the Interlock input to the Microprocessor. When the LightLas 532 is prepared at the factory this connector is always linked so the system can operate normally without the Remote Interlock switches.
-
Page 117: Lightlas 532 Laser Power Calibration Procedure
LightLas 532 Laser Power Calibration Procedure Purpose The purpose of this procedure is to calibrate the Lightlas 532 laser console. Prior to the commencement of this procedure it is assumed that the power calibration of the affected unit has found not to be in specification. Performing this procedure will recalibrate the factors of the Lightlas 532 Laser system. - Page 118 In this mode, the Duration switches give control of Laser Diode Temperature and the Interval switches give control of Laser Cavity Temperature. In this mode, Output Power display indicates the setting power and the turning knob gives the control of setting output power When switching the mode form “Stand By”...
- Page 119 2. In this calibration mode, press the “Mode” button and then switch the mode form “Stand By” to “Treat”. 3. By this setting, Duration display indicates the power detector factor, Interval display indicates the power factor, Output Power display indicates the setting power and Counter display indicates the detected power during laser firing.
- Page 120 3. Turn the Key Switch ON. 4. Enter Power & Power Detector Calibration Mode. 5. After entering Power & Power Detector Calibration Mode, set the “Duration” time to 0.05s and “Interval” time to 0.05s. NOTE: The external power meter reading needs to be doubled (x2) as the output is pulsed with a 50% duty cycle;...
- Page 121 9. Press the Footswitch to fire the laser and measure the output power with the meter. 10. If the output displayed on the power meter reading is between 30mW (actual output power= 60mW) and 20mW (actual output power=40mW), go to step 13. Otherwise continue to step 9.
- Page 122 Recheck the low range 19. Adjust the remote power setting back to 50mW. 20. Press the Footswitch to fire the laser and measure the output power. 21. Recheck whether the output power is still within 50mW20% (Reading on external meter = 25mW20%) or not.
- Page 123 27. Press the footswitch to fire the laser again and check the output power with the meter. 28. Repeat step26 and step27 until the actual output power is close to 100mW (i.e. meter reading is close to 50mW). 29. Now, change the power setting on the remote display to 150mW, 200mW, 300mW, 400mW, 600mW, 800mW, 1000mW, 1500mW and 2000mW respectively and then repeat step26 to step28 to calibrate the output power in the above different power settings.
-
Page 124: Power Detector Calibration Procedure
6.2.8 Power Detector Calibration Procedure Purpose The purpose of this procedure is to calibrate the power detector for Lightlas 532 system with software V3.1 , V3.2 or V3.3, after performing power calibration. Equipment required Calibration Key Interlock over-ride connector ... - Page 125 NOTE: The external power meter reading needs to be doubled (x2) as the output is pulsed with a 50% duty cycle; ex: an external power meter reading is 25mW, which means the actual output power is 50mW 16. Adjust the power on the Remote display to a setting of 50mW. 17.
- Page 126 Calibrate for all different power range 21. Adjust the setting power on the remote display to 100mW. 22. Press the Footswitch to fire the laser and measure the output power with the meter. 23. If the detected power pretty matches the meter reading, go to step17; otherwise, continue to next step.
- Page 127 25. Press the Footswitch to fire the laser again and check the detected power matches the actual meter reading 26. Repeat step14 and step15 until the detected power is pretty close to the actual meter reading. 27. Now, change the power setting on the remote display to 150mW, 200mW, 300mW, 400mW, 600mW, 800mW, 1000mW, 1500mW and 2000mW respectively and then repeat step12 to step16 to calibrate the detected power in the above different power settings.
- Page 128 Power Calibration Record Sheet Serial Number:________________ Power Meter Model: _____________ Checked by: __________________________ Date:_________________ Mode: Temperature Setting Mode Displayed Power Measurement Meter Reading Detected Power Detected Current (on Remote Panel) (actual meter reading) 25 mW ± 20% 50 mW 50 mW ± 20% 100 mW 100 mW ±...
-
Page 129: Process For Upgrading Lightlas 532 Software
Process for upgrading LightLas 532 software PURPOSE The purpose of this procedure is to upgrade or rewrite the software V 3.X for Lightlas 532. Performing this procedure will erase the original program and install the new version into the CPUs for the whole system. - Page 130 3) While executing FET_R453.exe, respond to the prompts to install the FET software. The installation procedure will install the IAR files and the TI file. Finish the installation. 2. Install the USB driver hardware 1). Connect the USB Debug Interface with a USB cable to a USB port of your PC. 2).
- Page 131 4). Click "Next". The Hardware Wizards try to find the driver in the system. If the driver was found, continue with step 8. If not, press "Back" and continue with step 5. 5). Select "Install from a list or specific location (Advanced)" (see Figure 2). Figure 2.
- Page 132 7). The Wizard generates a message that an appropriate driver has been found. 8). Note that WinXP shows a warning that the driver is not certified by Microsoft®. Ignore this warning and click "Continue Anyway" (see Figure 4). Figure 4. WinXP Driver Installation 9).
- Page 133 Figure 5. Completing the Found New Hardware Wizard 3. Write the program into the CPU inside the console 1) Download the programming software by the following link: http://www.elprotronic.com/files/FET-Pro430-Lite-Setup.zip Or download from the following website: http://www.elprotronic.com/download.html selects the part number: CS014X01 and then start download...
- Page 134 2) Unzip the downloaded file; there will be several files in a folder. Select “FET-Pro430-Setup.msi” to setup the programming file.
- Page 135 3) Follow the instruction to complete the installation process. The message will indicate the “Installation Complete”. 4) Connect the USB Debug Interface and Green Console with 14-conductor cable and then turn on the power for the Green Console.
- Page 136 5) Open “Lite FET-Pro430 Elprotronic” on the computer desk And set the parameters as following: Microcontroller Type Group: MSP430F1xx MSP430F:169 Device Action: check Reload Code File 6) Select “Setup”→”Connection/device Reset” to set the parameters as following: Communication With Target Device: JTAG(4 wires) Reset Options: ANY COM Port : USB Final Target Device action: Reset and start application program...
- Page 137 7) Select “Setup”→”Memory Options” to set the parameter as following: Ⅰ.To update the software: Memory Erase/Write/Verify Address Range: Main Memory Only Ⅱ. To rewrite the software: Memory Erase/Write/Verify Address Range: All Memory All the other parameters remain the original.
- Page 138 8) After all the above parameters setting return to the main menu and then “Open Code File” to load the code “Lightmed_V3.X_Console” from Lightmed. 9) Select Device Action: AUTO PROG. and then the program start writing into the CPU inside the Console. When finish the process, “Pass” will display on the “Status” to...
- Page 139 10) Now, remove the connector from the console to the remote to writing the program into another CPU inside the remote control. 11) Repeat from step 5) to step 9), however, in step 8) load the code “Lightmed_V3.X_Remote” instead of the “Lightmed_V3.X_Console” 12) End Procedure...
-
Page 140: Checking Delivery Units Laser Beam Alignment
CPU and correct Error 508. NOTE: “Power Calibration” and “Power Detector Calibration” must be performed after the Lightlas 532 system software is upgraded or rewritten. Checking Delivery Units Laser beam alignment To check the alignment of the Treatment Laser beam to the Aiming beam refer to the procedure as detailed in the Installation procedure that can be found in Section 5 of this manual. -
Page 141: Trouble Shooting Guide
The following items are those that could normally be actioned by the Operator in order to try to find what the problem is with the LightLas 532. These items are listed in the Operator manual to assist the Operator in the event of some failure. - Page 142 power box of slitlamp and make sure the Slitlamp Illumination is working. If you are certain that the lamp is faulty then unscrew the lamp cover, remove the lamp and replace with a new lamp. 6) No Displays on Remote Control When the Power is turned on the displays on the Remote Control should turn on almost immediately to indicate that the power is ON.
- Page 143 this trouble. 1. The Aiming Laser Diode has failed. If the Aiming Laser diode fails then it can sometimes fail to be just like an LED with just a red glow. This is possible but for this to occur then there must be some serious trouble with Electrical Discharge like Lightning or a very bad power surge.
- Page 144 Laser Diode source then an error message will be shown well before the Green Laser completely fails. This is due to the use of the Closed Loop Power control system within the Console. 4) Low Output Green Laser Power from the Delivery systems If there is low output power from the Laser Delivery Units then first the output from the Laser Console should be checked without a fiber connected.
- Page 145 If the Remote Door Interlock is interrupted (only if installed by the customer). If any of the Error conditions occur. To continue to use the System it must be reset back into the TREAT Mode by pressing the “Mode” Set Switch or in the case of an Error condition by turning off the power then turning back on again.
- Page 146 even for a short time. Err 504 Over temperature. There are temperature sensors inside the Laser system to monitor the operating temperature of the Laser diode. If any of the temperatures exceed the normal range then this error message is displayed. Before displaying this message when an over temperature occurs the system goes into a Standby "Hold"...
- Page 147 Err 5053 Remote error rom. Remote Software checks the integrity of the program on system boot-up. If any mismatched code is found, this error message will be shown. Err 5054 Remote error console system. If the Remote Software cannot configure the Laser Console for operation, this error message will be shown.
- Page 148 Err 5124 Photo Sensor error. If any unresolved error occurs, this error message will be shown. LightLas 532 Laser Interlock warnings “inL rE-F” Fiber connector, Interlock warning. When this warning is displayed on the Remote Control panel it indicates that either the Optical Fiber Interlock or Remote Interlock are not correctly in place.
- Page 149 “inL con” Footswitch warning. If the footswitch is not connected correctly or the contact changeover does not function in the correct manner then this warning will be shown. “inL dEL” Delivery Key warning. Before operating the Laser system a Delivery Key must be connected for the type of Delivery system that is to be used.
-
Page 150: Warranty Statement
WARRANTY STATEMENT Section 7 The manufacturer provides a Limited Warranty on the LightLas 532 Laser for a fixed period of time from the date of initial installation. The warranty period is for a minimum of 12 months however some Distributors may offer extended warranty periods. Please contact your Distributor for this information if you are unsure of the details. - Page 151 Contacting the factory Whenever you require help or parts for a LightLas 532 Green Laser it is necessary for you to fill in one of the Service Report forms and send the completed form to the factory marked to the attention of the Customer Service Manager.
- Page 152 You must get a Return Authorization approval number from the factory, which is then recorded, on the form and all other shipping documents when returning any parts or modules to the factory. The available Service Spare parts along with their Part Numbers are listed in Section 3.4 of this manual.
- Page 153 Service Report form ( Record Sheet 4 ) Light Report Reference ________________ Service Report Form Page: 1 of 1 Note: When this form is completed fax to LightMed 886-2-2688-5875. 1. Contact information 2. System details Distributor __________________________ Model number _______________________...
- Page 154 Make sure the parts are packed securely and with sufficient protection from shock. Mark the packaging with Fragile labels and address the goods to LightMed. INTERNATIONAL RETURNS Customer Service Manager LightMed Corporation No.1-1, Ln.
- Page 155 Glossary of Terms Section 9 ABSORB: To transform radiant energy into a different form, usually with a resultant rise in temperature. AIMING BEAM: A low power visible laser beam that is used to indicate the exact location of an invisible treatment laser beam. AMPLIFICATION: The growth of the radiation field in the laser resonator cavity.
- Page 156 ELECTROMAGNETIC WAVE: A disturbance which propagates outward from an electric charge which oscillates or is accelerated. Includes radio waves; X-rays; gamma rays; and infrared, ultraviolet, and visible light. EXPOSURE: A measure of the total radiant energy incident on a surface per unit area; radiant exposure.
- Page 157 LASER: An acronym of Light Amplification by Stimulated Emission of Radiation. A laser is a cavity that has mirrors at the ends and is filled with lasable material such as crystal, glass, liquid, gas, or dye. These materials must have atoms, ions, or molecules capable of being excited to a metastable state by light, electric discharge, or other stimulus.
- Page 158 PHOTON: In quantum theory, the elemental unit of light, having both wave and particle behavior. It has motion, but no mass or charge. POLARIZATION: Restriction of the vibrations of the electromagnetic field to a single plane, rather than the innumerable planes rotating about the vector axis. This prevents optical losses at interfaces between the lasing medium and optical elements.
- Page 159 TEM: Abbreviation for Transverse Electromagnetic Mode, the cross-sectional shape of the working laser beam. An infinite number of shapes can be produced, but only a relatively small number are needed for industrial applications. In general, “the higher the TEM, the coarser the focusing.”...
- Page 161 In this Section we have provided you with some forms that can be used to record the Maintenance History of the LightLas 532. If you are looking after more than one LightLas 532 then we recommend that you copy these sheets and maintain a separate record for each System.
- Page 162 Record Sheet 5 LIGHT Maintenance History Record Page: 1 of 2 LightLas 532 Serial number _______________________ _______________________ Installed OK YES □ NO □ Installation date Installers name _____________________________________ Date Describe Maintenance work done and any problems Name found. Also record module S/Ns if replaced.
- Page 163 LIGHT Maintenance History Record Page: 2 of 2 LightLas 532 Serial number _______________________...
- Page 165 ISO14971 2. Warranty The LightLas 532 Frequency Doubled YAG Laser conforms to the requirements of the MDD (93/42/EEC) and thereby in the EU Countries the Warranty as specified in the applicable regulations will apply. Your local Distributor will be able to confirm the details.
- Page 166 2. Measuring of electrical leakage currents According to DIN VDE 0751, Part 1, 9 (with 230 VAC/50 Hz max. 500uA) 3. Measurement of PE resistance (Rated value: < 0,1 Ohm in appliance inlet plug < 0,2 Ohm in power plug) Der Anwender wird hiermit auf seine Pflichten aus der Unfallverhütungvordchrift LASERSTRAHLUNG (VBG93) in der Fassumg vom 01.01.1993 hingewiesen.
- Page 167 Section 12 Guidance and manufacturer’s declaration – electromagnetic emissions LightLas 532 is intended for use in the electromagnetic environment specified below. The customer or the user of the LightLas 532 should assure that it is used in such an environment.
- Page 168 Guidance and manufacturer’s declaration – electromagnetic immunity LightLas 532 is intended for use in the electromagnetic environment specified below. The customer or the user of LightLas 532 should assure that it is used in such an environment. Immunity test IEC 60601 Compliance level Electromagnetic environment –...
- Page 169 Guidance and manufacturer’s declaration – electromagnetic immunity LightLas 532 is intended for use in the electromagnetic environment specified below. The customer or the user of LightLas 532 should assure that it is used in such an environment. – Electromagnetic environment...
Need help?
Do you have a question about the LightLas 532 and is the answer not in the manual?
Questions and answers