
Related Manuals for Applied Biosystems 2720


Summary of Contents for Applied Biosystems 2720
- Page 1 Applied Biosystems 2720 Thermal Cycler For Amplification of Nucleic Acids User Guide...
- Page 2 NOTICE TO PURCHASER: Label License The Applied Biosystems 2720 Thermal Cycler is covered by US patent claims, and corresponding claims in their non-US counterparts. No right is conveyed expressly, by implication, or by estoppel under any other patent claim, such as claims to apparatus, reagents, kits, or methods such as 5’...
-
Page 3: Table Of Contents
Overview ..............1-1 Introducing the Applied Biosystems 2720 Thermal Cycler ......1-2 About the Control Panel . - Page 4 3 Runs Overview ..............3-1 Using Disposables .
- Page 5 A Specifications Overview ..............A-1 System Specifications.
-
Page 7: How To Use This Guide
Preface How to Use This Guide Purpose of This The Applied Biosystems 2720 Thermal Cycler User Manual describes how to use the Applied Biosystems 2720 Thermal Cycler. The user manual provides information Guide about performing runs and diagnostic tests as well as maintenance and troubleshooting. -
Page 8: How To Obtain More Information
Documentation Applied Biosystems 2720 Thermal Cycler Quick Reference Card – Provides brief, step-by-step procedures for using the 2720 Thermal Cycler. It is designed to help you quickly learn to use the 2720 Thermal Cycler. Portable document format (PDF) versions of this guide and the Applied Biosystems 2720 Thermal Cycler Quick Reference Card are also available on the Applied Biosystems 2720 Thermal Cycler software installation CD. -
Page 9: Safety And Emc Compliance Information
Safety and EMC Compliance Information This section includes the following topics: Safety Conventions Used in This Document....... Symbols on Instruments . -
Page 10: Safety Conventions Used In This Document
Safety Conventions Used in This Document Safety Alert Four safety alert words appear in Applied Biosystems user documentation at points in the document where you need to be aware of relevant hazards. Each alert Words word–IMPORTANT, CAUTION, WARNING, DANGER–implies a particular... -
Page 11: Symbols On Instruments
Safety Symbols The following table describes the safety symbols that may be displayed on Applied Biosystems instruments. Each symbol may appear by itself or in combination with text that explains the relevant hazard (see “Safety Labels on Instruments”... -
Page 12: Safety Labels On Instruments
Indicates the presence of moving parts and to proceed with appropriate caution. Safety Labels on Instruments The following CAUTION, WARNING, and DANGER statements may be displayed on Applied Biosystems instruments in combination with the safety symbols described in the preceding section. English Francais CAUTION Hazardous chemicals. - Page 13 English Francais DANGER Class <<3B, 3R, or 4>> laser DANGER Class <<3B, 3R, or 4>> radiation present when open and interlock rayonnement laser en cas d’ouverture et defeated. Avoid direct exposure to laser d’une neutralisation des dispositifs de beam. sécurité. Eviter toute exposition directe avec le faisceau.
-
Page 14: Instrument Warnings Diagram
Instrument Warnings Diagram The following diagram shows where the hazards and warnings labels are located on rear of the 2720 Thermal Cycler. DRAFT October 22, 2010 3:44 pm, Safety_HW.fm... -
Page 15: General Instrument Safety
“About MSDSs” page xvi. PHYSICAL INJURY HAZARD. Use this instrument as specified by Applied Biosystems. Using this instrument in a manner not specified by Applied Biosystems may result in personal injury or damage to the instrument. Chemical Safety Chemical Hazard CHEMICAL HAZARD. - Page 16 Each time you receive a new MSDS packaged with a hazardous chemical, be sure to replace the appropriate MSDS in your files. Obtaining You can obtain from Applied Biosystems the MSDS for any chemical supplied by Applied Biosystems. This service is free and available 24 hours a day. MSDSs To obtain MSDSs: 1.
-
Page 17: Chemical Waste Safety
Chemical Waste Safety Chemical Waste HAZARDOUS WASTE. Refer to Material Safety Data Sheets and local regulations for handling and disposal. Hazard CHEMICAL WASTE HAZARD. Wastes produced by Applied Biosystems instruments are potentially hazardous and can cause injury, illness, or death. CHEMICAL STORAGE HAZARD. -
Page 18: Electrical Safety
ELECTRICAL HAZARD. Plug the system into a properly grounded receptacle with adequate current capacity. Overvoltage The Applied Biosystems 2720 Thermal Cycler has an installation (overvoltage) category of II, and is classified as portable equipment Rating Electrical Shock ELECTRICAL SHOCK HAZARD. - Page 19 Power on/off switch 3-pronged power cord receptacle The 3-pronged power cord and receptacle at the instrument rear contain the grounding connector. ELECTRICAL SHOCK HAZARD. Severe electrical shock, which could cause physical injury or death, can result from working on an instrument when the high voltage power supply is operating.
-
Page 20: Laboratory Environmental Requirements
IMPORTANT This instrument is designed for indoor use. Humidity, and IMPORTANT Do not operate in a Cold Room or a refrigerated area. The 2720 Thermal Environment Cycler will operate safely when the ambient temperature is 5 °C to 40 °C (41 °F to 104 °F) and will meet performance specifications when the ambient temperature is 15 °C to 30 °C and the... -
Page 21: Safety And Electromagnetic Compatibility (Emc) Standards
Danger of Burns PHYSICAL INJURY HAZARD. Hot Surface. Use care when working around this area to avoid being burned by hot components. AVERTISSEMENT: Surface chaude. Safety and Electromagnetic Compatibility (EMC) Standards This section provides information on: • U.S. and Canadian Safety Standards •... - Page 22 This instrument meets European requirements for emission and immunity (EMC Directive 89/336/EEC). This instrument has been tested to and complies with standard EN 61326 (Group 1, Class B), “Electrical Equipment for Measurement, Control and Laboratory Use – EMC Requirements.” Australian EMC This instrument has been tested to and complies with standard AS/NZS 2064, “Limits and Methods Measurement of Electromagnetic Disturbance Characteristics Standards...
-
Page 23: System Overview
System Overview Overview About This Chapter This chapter provides an introductory overview to the Applied Biosystems 2720 Thermal Cycler. This chapter contains the following topics: In This Chapter Topic See Page Introducing the Applied Biosystems 2720 Thermal Cycler About the Control Panel... -
Page 24: Introducing The Applied Biosystems 2720 Thermal Cycler
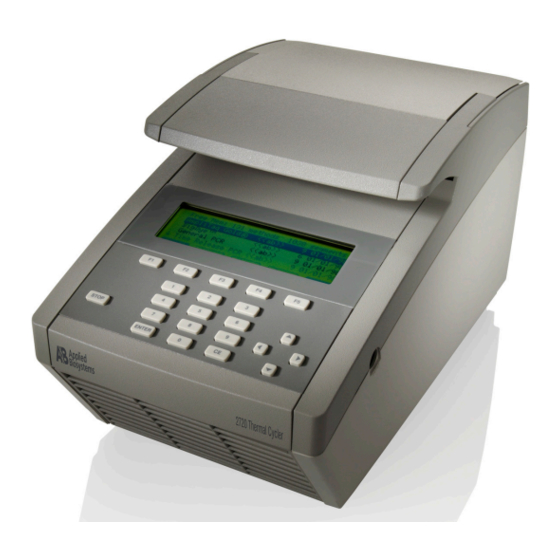
Sample block Control panel Power on/off RS485 port The 2720 Thermal Cycler has an easy-to-use, intuitive user interface, which is described in “About the Control Panel” on page 1-4. 1-2 System Overview... - Page 25 ® Comparing the The 2720 Thermal Cycler can be compared to the GeneAmp PCR System 9700, as shown below: 2720 Thermal Cycler to Previous 2720 Thermal Cycler System 9700 Instruments ♦ Almost the same user interface as ♦ Interchangeable sample blocks with 60,...
-
Page 26: About The Control Panel
About the Control Panel Overview The control panel for the 2720 Thermal Cycler consists of a display screen and keys, including function keys (F1–F5), numeric keys, arrow keys, and the Enter, CE, and Stop keys, as shown in the figure below. -
Page 27: Overview Of Functions
Procedures for performing these functions are given in subsequent chapters. Charts showing screen flows from each path on the Main Menu are provided in Appendix C, “Screen Flowcharts.” 08:00 AM 09/25/00 25.0°C GeneAmp® PCR System 2700 Applied Biosystems Thermal Cycler Version User: adrian Create Edit Util User... -
Page 28: Introducing An Important Screen
Introducing an Important Screen Create/Edit Screen One of the features that makes the 2720 Thermal Cycler easy to use is its graphical representation of a method, as shown below on the Create/Edit screen. The graph is the wavy line. PCR segment repeated... -
Page 29: Getting Started
This chapter walks you through some basic procedures to help you learn to use the Applied Biosystems 2720 Thermal Cycler. The 2720 Thermal Cycler is intuitive and easy to use. We’ll start by using the instrument without samples and experiment with the user interface. The following pages describe how to set yourself up as a user and create a method. -
Page 30: Powering On
Thermal Cycler System Version Wait several seconds for the Main Menu to appear, then you can use any of the functions displayed above the function keys. 08:00 AM 09/25/00 25.0°C Applied Biosystems Thermal Cycler Version User: adrian Create Edit Util User Note The Main Menu should appear within a few seconds. -
Page 31: Adding Yourself As A User
Adding Yourself as a User Purpose It’s important to add yourself as a user because you will want to keep your methods separate from those belonging to others. Also, the system requires a user name when you store a method. Procedure To add yourself as a user: Step... - Page 32 To add yourself as a user: (continued) Step Action Press F5 (Cancel). You can learn about security later. The Select User Name screen appears. Select User Name dave jenife murray <<ab>> adrian doug mamood nayana anna faye mike ngui Accept Edit Delete Cancel...
-
Page 33: Creating A Method
Creating a Method Procedure To create a method : Step Action From the Main Menu press F2 (Create). The Create/Edit screen appears with a default method displayed. 1 Hld 3 Tmp 25 Cycles 2 Holds 94.0 94.0 72.0 72.0 5:00 0:30 55.0 0:30... - Page 34 Action Press F1 (Accept). The Store Method on Instrument screen appears again with “test01” as the method name. On the 2720 Thermal Cycler, a method has a method name, and it is associated with a particular user. Press F1 (Accept).
-
Page 35: Editing Your Method
Editing Your Method Procedure To edit the method : Step Action From the Main Menu press F2 (Edit). The Stored Methods screen appears. You have only one method, so it’s already highlighted. If there were more than one method listed, you would highlight it to select it. -
Page 36: Starting And Stopping A Run
Starting and Stopping a Run Before You Begin Let’s assume that we’ve loaded our samples properly and we’re ready to start a run. Procedure To start, then stop a run : Step Action From the Main menu press F1 (Run). The Stored Methods screen appears. - Page 37 To start, then stop a run (continued) Step Action Press the Stop key. The Confirm Stop screen appears. Sample 50.1 Confirm Stop Press STOP to abort. Press Resume to continue. Resume Press the Stop key again to abort the run. The End of Run screen appears.
-
Page 38: More Features
Consider using a PIN number and locking your methods. Methods Each user of the 2720 Thermal Cycler should have his/her own user name. That way, each person’s methods can be kept separate. When you add a user name, the system prompts you to create a PIN number. - Page 39 safeguards all your methods. Only someone who knows your PIN number can overwrite or delete any of your methods. When you attempt to change and store one of your methods after locking them, the system protects you by prompting you to enter your PIN number before it will allow you to store the method.
-
Page 40: Runs
Runs Overview ® About This Chapter This chapter tells what you need to know to run your samples: the MicroAmp disposables you use to hold your samples, how to load samples, and how to start and stop a run. In This Chapter This chapter contains the following topics: Topic See Page... -
Page 41: Using Disposables
The following section describes the possible tube configurations, choosing a tube configuration, and sample tray and plate configurations. IMPORTANT The Tray or the Tray/Retainer are essential for the operation of the Applied Biosystems 2720 Thermal Cycler. ® The MicroAmp disposables you can use to hold your PCR samples include four Tube Configurations different types of tube configurations, as shown in the figure below. - Page 42 Choosing a Tube Use the table below to help you choose a tube configuration. Configuration You can prepare samples for the instrument using any of the four tube configurations. ® All the tube configurations, except the MicroAmp Reaction Tubes with Caps use the ®...
- Page 43 Tubes or Single Tubes MicroAmp 96-Well Tray MicroAmp Splash-Free Support Base Part Numbers You can order disposables for the system 2720 from Applied Biosystems by part number. Disposable Part Number MicroAmp 96-Well Tray/Retainer Sets 403081 MicroAmp Multipurpose Tool 413950 MicroAmp Splash-Free Support Base...
-
Page 44: Loading Samples
Loading Samples Procedures for The following procedures describe how to load samples for: Loading Samples ♦ Tubes with attached caps. ♦ 96-well reaction plate. ♦ 96-well tray/retainer assembly. Note Do not use mineral oil or glycerine in the sample block or as a vapor barrier over the PCR reaction mixture in the tubes. - Page 45 Placing the Sample The steps for placing the sample tray in the block are the same for a sample tray/retainer, a sample tray without a retainer, for tubes with attached caps, or for the Tray or Plate onto 96-well plate. the Sample Block To place the sample tray in the block: Step...
-
Page 46: Starting A Run
Starting a Run Procedure To start a run: Step Action Load your samples, as described in “Loading Samples” on page 3-5. Note Disposables must be used. If the instrument power is not on, press the power-on button at the back of the instrument. - Page 47 To start a run: (continued) Step Action Wait for the heated cover to reach 103 °C. The Run Time screen displays and the method you selected starts running. Sample 56.7 Cycle 1 of 25 94.0 94.0 72.0 72.0 55.0 0:30 10:00 55.0 0:30...
-
Page 48: Pausing Or Stopping A Run
Pausing or Stopping a Run Overview This section describes how you can pause a run or stop it completely. Pausing a Run During a run, the Run Time screen is displayed. Sample 56.7 Cycle 1 of 25 94.0 94.0 72.0 72.0 55.0 0:30... - Page 49 Stopping a Run The Stop key can be used to stop a run. To stop a run before it completes: Step Action Press the Stop key. The Confirm Stop screen appears. Sample 50.1 Confirm Stop Press STOP to abort. Press Resume to continue. Resume Press the Stop key again to stop the run.
-
Page 50: Reviewing The History Of A Run
Reviewing the History of a Run Reviewing the From the End of Run screen or the Utilities path, you can display the History File screen, which provides information about the run that just ended. This information History includes the events and errors that occured during the run. The instrument stores this information until it is overwritten by the next method used. - Page 51 History File Records The following table lists the history file record, a description of the record, and the type of record. Record Description Type History of method xxxxxxxxxxxxxxx This header record is always created. Report User xxxxxx Reaction volume xxx µL Run started at hh:mm:ss am mm/dd/yy Run ended at hh:mm:ss am mm/dd/yy Length of run hh:mm:ss RampSpeed: 9600...
-
Page 52: When A Run Completes
When a Run Completes End of Run Screen When a run ends, the End of Run screen appears. However, if your method has an indefinite hold of 4 °C (for example), you must first press the Stop key to display the screen shown below. -
Page 53: Methods And Users
Methods and Users Overview About This Chapter This chapter provides procedures for creating and editing a method whether it is simple or more complex. Procedures for adding and handling user names are also included. In This Chapter This chapter contains the following topics: Topic See Page Adding, Changing, or Deleting a User Name... -
Page 54: Adding, Changing, Or Deleting A User Name
Adding, Changing, or Deleting a User Name Introduction On the Applied Biosystems 2720 Thermal Cycler, methods are stored by both method name and user name. It’s important to have your own user name to keep your methods separate from those belonging to other users. Even if you are the only user of the system, you still need a user name. - Page 55 To add a user: (continued) Step Action Spell the name by using the arrow keys to highlight the first letter of the name, then press Enter, then highlight the second letter, then press Enter, etc. When you have finished spelling the name (up to six characters), press F1 (Accept). The Security Code screen appears.
- Page 56 To add a user: (continued) Step Action Optional. Notice that the Protection field is set to Unlocked. Press F4 (Lock) to lock your methods. This toggles between a Locked and Unlocked state. Press F1 (Accept) to accept the protection status displayed and return to the Select User Name screen.
- Page 57 To change a user name: (continued) Step Action When the following screen appears, function key F4 may or may not be active, depending on whether this user has a PIN number. Username: hank PIN number: XXXX Protection: Unlocked Press PIN # to create a #. Then you set protection to Locked to prevent methods from being overwritten or deleted.
-
Page 58: Creating A Method
A method is a set of instructions in which you specify how the instrument should heat and cool your samples in a PCR thermal profile. On the 2720 Thermal Cycler a method is represented graphically, as shown below on the Create/Edit screen. the graph is the wavy line in the middle. - Page 59 Procedure To create a method: Step Action From the Main Menu, press F2 (Create). The Create/Edit screen appears. 1 Hld 3 Tmp 25 Cycles 2 Holds 94.0 94.0 72.0 72.0 5:00 0:30 55.0 7:00 0:30 0:30 Start Store Print More Cancel Change times or temperatures or number of cycles by highlighting each parameter you want to change, typing in a new value with the numeric keys, then pressing...
- Page 60 To create a method: (continued) Step Action Note If you want to use the method name provided by the system (e.g., exp000), skip to step 6. If you want to use a different name, press F3 (Method) to display the Method Name screen.
-
Page 61: Changing A Method Using Advanced Features
Changing a Method Using Advanced Features Introduction The previous section told you how to create and store a method. If you want to change a method or make a more complex method, the features described in this section will help. Editing a Method To edit an existing method: Step... - Page 62 Inserting a Hold A hold is a single time/temperature segment of a method, e.g., samples are held at 94.0 °C for 5 minutes, 00 seconds (5:00). There are two ways you can insert a hold into a method: ♦ You can increment the value of the Hld, Tmp, or Holds fields on the Create/Edit screen, then press the Enter key.
- Page 63 To insert a hold: (continued) Step Action Press F1 (Hold) The Insert-Delete-More screen appears showing the hold you added. 3 Tmp 25 Cycles 2 Holds 2 Pre-PCR 94.0 94.0 72.0 72.0 5:00 0:30 55.0 0:30 7:00 0:30 0:30 Insert Delete More Note The Modify function (F1) also displays if the inserted hold was in the PCR...
- Page 64 To delete a hold: (continued) Step Action Press F3 (Delete). The Insert-Delete-More screen redisplays minus the hold you deleted. 3 Tmp 25 Cycles 2 Holds 94.0 72.0 72.0 0:30 7:00 0:30 55.0 0:30 Modify Insert Delete More Note The Modify function (F1) also displays if the next highlighted parameter was in the PCR segment.
- Page 65 To insert a cycle: (continued) Step Action Press F2 (Cycle) The Modify screen appears showing the cycle (PCR segment) you added. 1 Hld 3 Tmp 25 Cycles 3 Tmp 25 Cycles 94.0 94.0 94.0 72.0 72.0 55.0 5:00 0:30 55.0 0:30 0:30 0:30...
- Page 66 Inserting a A programmed pause is a point in the PCR portion of a method when cycling stops for a specified length of time. You define the frequency and length of the pause and the Programmed Pause cycle at which it begins. To insert a programmed pause: Step Action...
- Page 67 To insert a programmed pause: (continued) Step Action Press F2 (Accept). The Insert-Delete-More-Edit screen appears showing the programmed pause you inserted. 1 Hld 4 Tmp 25 Cycles 2 Holds 94.0 94.0 Pause 72.0 72.0 0:30 5:00 0:30 55.0 0:30 7:00 0:30 Insert Delete...
- Page 68 Deleting a To delete a programmed pause: Programmed Pause Step Action From the Create/Edit screen, use the arrow keys to highlight the word Pause. Press F4 (More). The Insert-Delete-More-Edit screen appears. 4 Tmp 25 Cycles 1 Hld 2 Holds 94.0 94.0 Pause 72.0 72.0...
- Page 69 To automatically increase or decrease temperature control parameters: (continued) Step Action Press F1 (AutoX). The AutoX screen appears. 2 Pre-PCR 3 Tmp 25 Cycles 2 Holds +0.0 +0.0 +0:00 +0.0 +0:00 +0:00 Accept Cancel Note If you have inserted a programmed pause, the AutoX screen displays the pause, but you cannot modify it from the AutoX screen.
-
Page 70: Handling Methods
In this section we describe how to select a method, view method parameters, sort methods, search for a method, and print and delete a method. Predefined Methods The 2720 Thermal Cycler supplies five predefined methods that you can run: ♦ ®... - Page 71 Selecting a Method If the method you want to run has already been created and stored, you can select it from a list. If the method you want to run has not been created, see “Creating a Method” on page 4-6. To select a method: Step Action...
- Page 72 Viewing Method To view the parameters of a method before running it: Parameters Step Action Press F2 (View) from the Stored Methods screen. The View Method screen appears. The screen shows all the parameters of the method you selected. 2 Hld 3 Tmp 25 Cycles 2 Holds 94.0...
- Page 73 To sort methods: Step Action Use the up and down arrow keys to select the type of sort. The following table describes the sort methods. Choose this item... To sort methods... Method name alphabetically. Date last used chronologically in descending order by date of use.
- Page 74 Printing a Method If you have a printer connected to your instrument and have configured your instrument for it, you can print a record of the parameters in a method. For more information see “Configuring the Instrument” on page 5-2. To print a method: Step Action...
- Page 75 To delete a method: (continued) Step Action Use the arrow keys to highlight the method you want to delete, then press F1 (Delete). The Delete Method screen appears. Delete Method Methods on Inst User Size Stored exp001 adrian 02/10/00 Press Yes to delete the method Cancel Press F1 (Yes) to delete the method.
-
Page 76: Utilities
Utilities Overview About This Chapter This chapter provides information about almost all functions that can be performed from the Util (Utilities) selection on the Main Menu. This chapter contains the following topics: In This Chapter Topic See Page Configuring the Instrument Upgrading System Firmware Connecting to a Printer Calculating the Melting Temperature... -
Page 77: Configuring The Instrument
There are about six parameters or features you can enable or disable on the Applied Biosystems 2720 Thermal Cycler. These six fields are spread across two configuration screens. Pressing F4 (More) takes you from screen to screen in a circle. - Page 78 Parameters Below are parameters that are used on the configuration screens. Field Explanation Time Use the numeric keys to enter the time. Choose AM, PM, or 24-Hour using the function keys. Date Use the numeric keys to change the date. Choose M/D/Y, D/M/Y, or Y/M/D format for month, day, and year, using the function keys.
-
Page 79: Upgrading System Firmware
Web site. In order to perform the upgrade, you will need to connect a PC communication cable P/N N805-1327 to the RS485 port on the side of the 2720 Thermal Cycler (shown ®... -
Page 80: Connecting To A Printer
Connect one end of your Applied Biosystems (N805-1326) printer cable to the RS-485 serial port on the side panel of the 2720 Thermal Cycler and connect the other end to the serial adapter card port on the rear panel of the printer. -
Page 81: Calculating The Melting Temperature
Calculating the Melting Temperature Procedure Use the T Calculator to determine the denaturation temperature of a primer set of known sequence. To calculate the melting temperature: Step Action Press F4 (Util) from the Main Menu. The Utilities 1 screen appears. Utilities Diag - Instrument diagnostics... -
Page 82: Running Hardware Diagnostics
Running Hardware Diagnostics Overview The 2720 Thermal Cycler allows you to perform two hardware diagnostic tests: ♦ Visually determine if the Liquid Crystal Display (LCD) screen is functioning properly ♦ Verify the operation of the keypad Both tests are performed from the Hardware Diagnostics screen. - Page 83 Testing the Keypad Use the keypad diagnostic test to verify that all 22 keys on the control panel are functioning properly. To test the keypad: Step Action Access the Keypad Diagnostics screen. a. From the Main Menu press F4 (Util) to access the Utilities 1 screen. b.
-
Page 84: Running The Calibration Verification Test
System 9700. Running the Temperature Non-Uniformity Test Why Use This Test? Use this test to verify the temperature non-uniformity of the sample block in the 2720 Thermal Cycler. This test requires the 0.2-mL Temperature Verification System (P/N 4317939) for Equipment Required 96-well thermal cyclers. -
Page 85: Running System Performance Diagnostics
Running System Performance Diagnostics Overview After you have configured the 2720 Thermal Cycler, conduct the system performance tests to verify the integrity of the cooling and heating system. There are two system performance tests: ♦ Rate Test ♦ Cycle Test... - Page 86 To run the Rate Test: (continued) Step Action At the conclusion of the test, the Cool and Heat Rate Test screen appears. The screen displays the test results and whether the test results passed or failed. Cool and Heat Rate Test Pass Heating rate: x.xx °C/s Cooling rate: x.xx °C/s...
- Page 87 To run the Cycle Test: (continued) Step Action At the conclusion of the test, the display indicates test results and whether the test results passed or failed. Cycle Performance Pass Average Cycle Time: xxx.x sec x.x sec Cycle Time STD: Print Cancel The following table lists the passing ranges for the Cycle Test.
-
Page 88: Maintenance
Thermal Cycler. Do not remove the instrument cover. There are no components inside the 2720 Thermal Cycler that you can safely service yourself. If you suspect a problem, refer to our Web site, http://www.appliedbiosystems.com/2720 This chapter contains the following topics:... -
Page 89: Cleaning The Instrument
Cleaning the Instrument Preparation To clean the sample wells, raise the lid. The cleaning position is shown below. Heated platen Heated cover Sample wells Cleaning the Sample If you use any cleaning or decontamination method, except those recommended in the manual, you risk damaging the equipment. Clean the sample wells once a month Wells or as needed. - Page 90 To clean the sample wells: (continued) Step Action Remove any remaining isopropanol from the cover before reloading the sample tray. Note If the sample wells become contaminated from the samples, clean the wells thoroughly with a cotton swab soaked in bleach and then rinse with water. CHEMICAL HAZARD.
-
Page 91: Replacing Fuses
Procedure To replace the fuses: Step Action Turn off the 2720 Thermal Cycler and disconnect the power cord from the instrument rear. Severe electrical shock, ELECTRIC SHOCK HAZARD. which could cause physical injury or death, can result from working on an instrument when the high-voltage power supply is operating. - Page 92 To replace the fuses: (continued) Step Action Insert the screwdriver tip at the top edge of the fuse compartment door and pry it open. Insert screwdriver tip here. GR1990 The door opens to reveal the red fuse holder. Insert the screwdriver tip at the edges of the red fuse holder and gently remove it from the instrument.
- Page 93 To replace the fuses: (continued) Step Action Remove the two fuses from the fuse holder and replace them with two of the same type (as specified on label found on rear of instrument). Fuse Fuse holder Return the fuse holder to the instrument, and close the fuse compartment door. Press it until it locks into place.
-
Page 94: Troubleshooting
Troubleshooting Overview About This Chapter This chapter explains how to solve instrument problems. In This Chapter This chapter contains the following topics: Topic See Page If There’s a Power Failure Display Screen Error Messages Troubleshooting Information Troubleshooting 7-1... -
Page 95: If There's A Power Failure
If There’s a Power Failure Automated Restart An automated restart function allows for power outages and safe continuation of a PCR run after resumption of power. Function If Power Is The instrument does the following in a power failure: Interrupted 1. -
Page 96: Display Screen Error Messages
Display Screen Error Messages User Input Error The following table lists user input error messages, a description of the message, and recommended action. Messages Message Description Recommended Action Can only enter an infinity hold A method can only have a Hold segment Assign finite time segments to holds at end with an infinity hold as the last segment in a... - Page 97 Message Description Recommended Action Not implemented yet The feature is not implemented in the Upgrade firmware when the new current firmware version. version is available from Applied Biosystems. Printer not responding The printer has been disconnected or is off Check printer connections and power line.
- Page 98 Error 18 Watchdog timeout software failure. a. http://www.appliedbiosystems.com/support/contact/ b. If your instrument has been in storage for more than 3 months, it is possible that the battery has lost its charge but can recover. Contact Applied Biosystems Technical Support. Troubleshooting 7-5...
-
Page 99: Troubleshooting Information
Troubleshooting Information Troubleshooting The following table lists the problem, possible causes, and a check and/or remedy for troubleshooting the 2720 Thermal Cycler. Table Problem Possible Causes Check and/or Remedy ♦ Key stuck in down position. ♦ Look for depressed key and Control panel not responding free it. -
Page 100: Overview
Specifications Overview About This This appendix provides specifications for the Applied Biosystems 2720 Thermal Cycler. Appendix Specifications A-1... -
Page 101: System Specifications
System Specifications Dimensions The table below lists the footprint and the weight of the 2720 Thermal Cycler. Footprint Note You must provide sufficient space around the instrument for unrestricted air circulation. Height 21.5 cm (8.5 in) Width 21 cm (8.25 in) -
Page 102: Sample Temperature Information
4.0 to 99.9 °C. Temperature Calibration Traceable to National Institute of Standards and Technology (NIST). Printer Specifications Serial Interface The 2720 Thermal Cycler can use any printer with a serial (RS-232C) interface board with the following parameters. Board Specifications Baud Rate 9600 Parity... -
Page 103: B Supplied Methods
Supplied Methods Overview About This This appendix describes precoded methods supplied with your instrument. Appendix Supplied Methods B-1... -
Page 104: About The Methods
About the Methods Five Precoded The Applied Biosystems 2720 Thermal Cycler supplies you with five precoded methods stored under the user name <<ab>>: Methods ♦ ® AmpliTaq Gold ♦ ® BigDye Terminator ♦ General PCR ♦ Time Release PCR ♦... - Page 105 ® ® BigDye Terminator The BigDye Terminator protocol is used for cycle sequencing. It consists of 3-temperature PCR for 25 cycles followed by an infinite hold at 4 °C. 3 Tmp 25 Cycles 1 Hld 96.0 60.0 0:10 50.0 4:00 0:05 ®...
- Page 106 Touchdown PCR When the optimal annealing temperature is unknown, one strategy, Touchdown PCR, incrementally decreases the annealing temperature in early cycles in order to maximize the yield of specific products. 2 Tmp x 20 2 Tmp x 10 95.0 95.0 0:15 0:15 65.0...
-
Page 107: C Screen Flowcharts
Screen Flowcharts Overview About This This appendix provides flowcharts showing screen flows for various functions you might want to use. These charts provide an overview of a procedure. Appendix Flowcharts are included for the following topics: In This Appendix Topic See Page Stop or End of Run Create/Edit... - Page 108 Main Menu 08:00 AM 09/25/00 25.0°C GeneAmp® PCR System 2700 Applied Biosystems Thermal Cycler Version User: adrian Create Edit Util User Stored Methods Methods User Size LastUsed 03/04/00 appl01 adrian 02/22/00 exp000 adrian 02/10/00 exp001 adrian 02/02/00 exp002 adrian Start...
-
Page 109: Stop Or End Of Run
Stop or End of Run Stop pressed Confirm Stop Sample 50.1 Confirm Stop Press STOP to abort. Press Resume to continue. Resume Go to Run Time Stop pressed At end of run again End of Run 11:30 AM End of Run 25.1°C Method: General PCR Run completed at 11:30:05 AM, 02/01/00. -
Page 110: Create/Edit
Create/Edit Main Menu 08:00 AM 09/25/00 25.0°C GeneAmp® PCR System 2700 Applied Biosystems Thermal Cycler Stored Methods Version User: adrian Methods User Size LastUsed 03/04/00 Create Edit Util User appl01 adrian 02/22/00 exp000 adrian 02/10/00 exp001 adrian 02/02/00 exp002 adrian... -
Page 111: User
User Main Menu 08:00 AM 09/25/00 25.0°C Applied Biosystems Thermal Cycler GeneAmp® PCR System 2700 Version User: adrian Create Edit Util User Select User Name Select User Name dave jenife murray <<ab>> adrian doug mamood nayana anna faye mike ngui... -
Page 112: Utilities
Utilities Main Menu 08:00 AM 09/25/00 25.0°C GeneAmp® PCR System 2700 Applied Biosystems Thermal Cycler Version User: adrian Create Edit Util User Utilities 1 Utilities Diag - Instrument diagnostics TmCalc - Calculates melting temp Config - Instrument configuration Diag TmCalc... - Page 113 Diagnostics Main Menu Utilities 1 08:00 AM 09/25/00 25.0°C Utilities GeneAmp® PCR System 2700 Applied Biosystems Thermal Cycler Diag - Instrument diagnostics Version TmCalc - Calculates melting temp Config - Instrument configuration User: adrian Create Edit Util User Diag TmCalc...
-
Page 114: Upgrade
Upgrade Main Menu Utilities 1 08:00 AM 09/25/00 25.0°C Utilities GeneAmp® PCR System 2700 Applied Biosystems Thermal Cycler Diag - Instrument diagnostics Version TmCalc - Calculates melting temp Config - Instrument configuration User: adrian Create Edit Util User Diag TmCalc... -
Page 115: D Instrument Warranty Information
Instrument Warranty Information Overview About This Appendix This appendix provides information about the following: Computer Configuration, Limited Product Warranty, and Damages, Claims, and Returns. Instrument Warranty Information D-1... -
Page 116: Computer Configuration
After this warranty period, Applied Biosystems will pass on to the buyer, to the extent that it is permitted to do so, the warranty of the original manufacturer for such accessories. - Page 117 Effective Date installed by Applied Biosystems personnel. For all hardware and software installed by the buyer or anyone other than Applied Biosystems, and for all other products, the applicable warranty period begins the date the product is delivered to the buyer.
-
Page 118: Damages, Claims, And Returns
Returns Do not return any material without prior notification and authorization. If for any reason it becomes necessary to return material to Applied Biosystems, contact Applied Biosystems Technical Support or your nearest Applied Biosystems subsidiary or distributor for a return authorization (RA) number and forwarding address. Place the RA number in a prominent location on the outside of the shipping container, and return the material to the address designated by the Applied Biosystems representative. -
Page 119: Index
C-4 chemical waste safety screen 4-6 screen, described 1-6 customer feedback, on Applied Biosystems viii hardware diagnostics 5-7 to 5-8 documents hazard icons. See safety symbols, on instruments cycle test 5-11 to 5-12 hazard symbols. - Page 120 5-5 instrument operation, safety run time 5-3 Internet address Applied Biosystems 5-4 italic text, when to use RA number D-4 RA number. See return authorization number xvii radioactive waste, handling keypad 1-4 rate test 5-10 to 5-11...
- Page 121 WARNING, description warranty damages, claims, returns D-4 for computers with altered configuration D-2 limitations D-3 warranty claims D-3 warranty exceptions D-3 warranty period, effective date D-3 xvii waste disposal, guidelines xvii waste profiles, description WWW address Applied Biosystems 5-4 Index-3...
- Page 122 150 countries on six continents. For sales office locations and technical support, please call our local office or refer to our Web site at www.appliedbiosystems.com. Applied Biosystems is committed to providing the world’s leading technology and information for life scientists. Headquarters...
Need help?
Do you have a question about the 2720 and is the answer not in the manual?
Questions and answers