Table of Contents
Advertisement
Advertisement
Table of Contents

Related Manuals for Monoprice Mini Delta V2


Summary of Contents for Monoprice Mini Delta V2
- Page 1 MP Mini Delta V2 3D Printer P/N 21666 User's Manual...
-
Page 2: Table Of Contents
CONTENTS SAFETY WARNINGS AND GUIDELINES ............................5 INTRODUCTION ........................................6 FEATURES ............................................. 7 CUSTOMER SERVICE ......................................7 PACKAGE CONTENTS ...................................... 8 PRODUCT OVERVIEW ...................................... 8 GETTING STARTED ......................................9 COMPLETED PRINT REMOVAL ................................11 POLOPRINT PRO WI-FI SETUP................................12 MENU MAP ..........................................16 MENU OPERATION ...................................... - Page 3 Post Setting Screen ....................................27 Powerloss Setting Screen ................................... 27 Diagnosis Screen......................................28 Firmware Parameters Screen ................................. 28 Update Screen ......................................29 Contact Us Screen ..................................... 30 WIIBUILDER SLICING SOFTWARE..............................30 Installation ........................................30 Advanced Configuration..................................34 Speed Tab .......................................... 35 Infill Tab ..........................................
- Page 4 Clearing a Blocked Nozzle ................................. 52 Replacing the Nozzle ....................................53 Cleaning the Feed Gear ..................................54 TECHNICAL SUPPORT ....................................54 SPECIFICATIONS ........................................ 55 REGULATORY COMPLIANCE .................................. 56 Notice for FCC ....................................... 56 RF Exposure Statement for FCC ..............................57 Notice for Industry Canada ................................57 RF Exposure Statement for Industry Canada ........................57...
-
Page 5: Safety Warnings And Guidelines
SAFETY WARNINGS AND GUIDELINES Please read this entire manual before using this device, paying extra attention to these safety warnings and guidelines. Please keep this manual in a safe place for future reference. • This device is intended for indoor use only. •... -
Page 6: Introduction
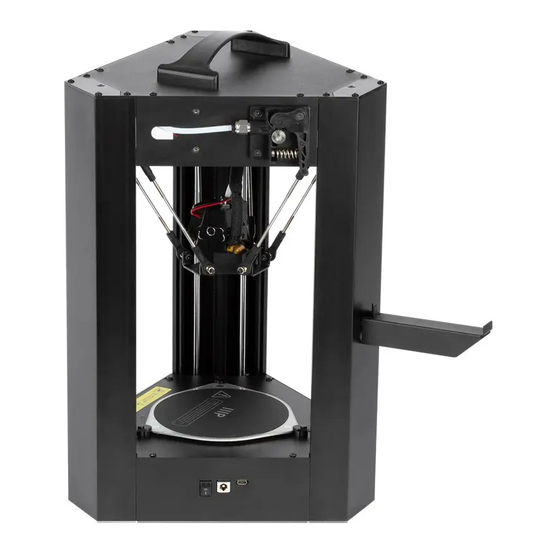
INTRODUCTION Thank you for purchasing this MP Mini Delta V2 3D Printer from Monoprice™! This printer features a single extruder, which is capable of printing with PLA, ABS, wood fill, copper fill, steel fill, bronze fill, and many other materials. You can print from a Windows® or Mac® PC using a Wi-Fi®... -
Page 7: Features
If you have any problem with your order, please give us an opportunity to make it right. You can contact a Monoprice Customer Service representative through the Live Chat link on our website www.monoprice.com or via email at support@monoprice.com. -
Page 8: Package Contents
PACKAGE CONTENTS Please take an inventory of the package contents to ensure you have all the items listed below. If anything is missing or damaged, please contact Monoprice Customer Service for a replacement. 1x MP Mini Delta V2 3D printer 3x Hex wrench (1.5, 2.0, and 2.5 mm) -
Page 9: Getting Started
GETTING STARTED Warning! Take care not to remove or damage the black PEI build mat on the build platform. This mat is essential to ensure the 3D model properly adheres to the build platform during printing. If this mat becomes damaged or wears out, replace it with painter's tape, Kapton® tape, or ordinary masking tape. - Page 10 3. Locate the two vertical slots on the side, then install the Filament Holder and place the sample filament on the holder. Press down on the lever on the Filament Extruder Gear, then feed filament into the hole until you encounter resistance. Release the lever.
-
Page 11: Completed Print Removal
6. The printer will then display the Quick guide screen. Touch the Next option, then follow the on-screen instructions to print your first model. Otherwise, touch the Quit option to exit to the Main Menu. COMPLETED PRINT REMOVAL Perform the following steps to remove a finished print. 1. -
Page 12: Poloprint Pro Wi-Fi Setup
POLOPRINT PRO WI-FI SETUP You can connect the printer to a 2.4GHz Wi-Fi® network to print models from your Android™ or iOS® smartphone or tablet using the free PoloPrint Pro app. Perform the following steps to setup the Wi-Fi connection for your device. Note that you may have difficulty connecting to the Wi-Fi network if you have a 2.4GHz and 5GHz network with the same SSID. - Page 13 2. Launch the app, then sign in using your Facebook® account. Enable the Printer Notification via SNS option. Open Facebook in a web browser, then search for and follow the 3D Printer Message Center page. Post a sample message, such as "hello", to the 3D Printer Message Center page.
- Page 14 4. Select the Printer tab at the bottom of the PoloPrint Pro app, then touch the ╋ icon in the upper right to scan the QR code on the printer's screen or manually type in the Device Serial from the Setting > Info screen. Type in a name for your printer, then touch the Submit button.
- Page 15 7. You can now print a model from a microSD™ card or one of the library files. 8. After a print is finished, you will receive a message in Facebook® to let you know that the print is finished.
-
Page 16: Menu Map
MENU MAP... -
Page 17: Menu Operation
MENU OPERATION Main Menu • Info Bar: The area above the buttons is used to display information about the printer status. From left to right, it shows the current nozzle temperature, the current build platform temperature, the Wi-Fi® signal strength, and the Wi-Fi IP address. -
Page 18: Printer Maintenance Menu
• <: Touch the < icon in the upper left corner of the Select Print File screen to return to the Main Menu. Touch the < icon in the upper left corner of the File Information screen to return to the Select Print File screen. •... -
Page 19: Filament Operation Screen
• Z Offset: Touch the Z Offset button to display the Delta Auto Calibration screen, followed by the Z Offset Setting screen. The Delta Auto Calibration process must be performed before adjusting the Z Offset. • Motor Off: Touch the Motor Off button to display the Motor Off screen. Filament Operation Screen •... -
Page 20: Set Target Temperature Screen
• Feedin: Touch the Feedin button on the Filament Operation screen to display the Filament Type screen. • Retract: Touch the Retract button on the Filament Operation screen to display the Filament Type screen. • PLA: Touch the PLA button on the Filament Type screen to set the target nozzle temperature to the temperature that is appropriate for PLA filament. -
Page 21: Jog Mode Screen
• ��: Touch the �� button to quickly set the temperature to 0°C. • ▬: Touch the ▬ button to reduce the target temperature by 1°C. Press and hold the button to rapidly decrease the target temperature. • ╋: Touch the ╋ button to increase the target temperature by 1°C. Press and hold the button to rapidly increase the target temperature. -
Page 22: Delta Auto Calibration Screen
• Stop: Stops movement of the X, Y, and Z axes. Delta Auto Calibration Screen • <: Touch the < icon in the upper left corner to return to the Main Menu. • Begin: Starts the automatic calibration process. Z Offset Setting Screen When the Z Offset button is touched on the Printer Maintenance Menu, the printer will first display the Delta Auto Calibration screen. -
Page 23: Motor Off Screen
• Save: Touch the Save button to save the Z Offset value. Motor Off Screen • <: Touch the < icon in the upper left corner to return to the Main Menu. • OFF: For the X, Y, and Z axis motors and the Extruder (E) motor, the blue highlight indicates that the motor is ON. -
Page 24: Printer Setting Menu
Printer Setting Menu • <: Touch the < icon in the upper left corner to return to the Main Menu. • Info: Displays the Machine Information screen. • Language: Displays the Language Setting screen. • Wifi: Displays the WIFI screen. •... -
Page 25: Machine Information
Machine Information • <: Touch the < icon in the upper left corner of the Machine information screen to return to the Setting Menu. Touch the < icon in the upper left corner of the Serial number QR code screen to return to the Machine Information screen. •... -
Page 26: Wifi Screen
• Italiana: Touch the Italiana button to change the menu language to Italian. • Japanese: Touch the Japanese button to change the menu language to Japanese. WIFI Screen The label at the top of the WIFI screen indicates the current connection status. •... -
Page 27: Post Setting Screen
Post Setting Screen • <: Touch the < icon in the upper left corner to return to the Setting Menu. • Post: Touch the slide button to the right of the Post label to turn the Power On Self Test function on or off. The green highlight on the button indicates that the function is on. -
Page 28: Diagnosis Screen
Diagnosis Screen • Quit: Touch the Quit button to cancel the diagnostic process and return to the Setting Menu. • Next: Touch the Next button to start the diagnostic process. Firmware Parameters Screen Although this screen is labeled Firmware Parameters, this actually is used to save and load all custom user settings, except the machine name and Wi-Fi®... -
Page 29: Update Screen
Module. In the event that updated firmware is available, a firmware file will be available for download on the product page of the www.monoprice.com website. Download the zip file, then extract the flash.wfm (motor) or lcd.efm (LCD) file to a microSD™ card. -
Page 30: Contact Us Screen
WIIBUILDER SLICING SOFTWARE Installation Wiibuilder is the preferred slicing software program for use with the MP Mini Delta V2 3D Printer and the Windows® operating system. Models sliced with Wiibuilder can be previewed on the File Information screen. For your convenience, a customized version of the Wiibuilder installer is included on the microSD™... - Page 31 2. The installer will now prompt you to select the directory to which Wiibuilder will be installed. If you don't want to use the default directory, click the Browse... button, then select your preferred directory. Click the Next > button to continue.
- Page 32 5. A dialog labeled DriverSetup(x64) will appear. Click the INSTALL button to install the drivers. Once the drivers have been installed, click the OK button on the DriverSetup dialog, then click the X in the upper right corner of the DriverSetup(x64) dialog to clear it.
- Page 33 8. You will now be prompted to select your printer. Select the MP Mini Delta V2 entry, then click the OK button to continue. Congratulations! Wiibuilder is now installed and configured for use. If you want to see the wizard again, click Help >...
-
Page 34: Advanced Configuration
Advanced Configuration 1. Click the Slicing Settings icon to display the Slicing Settings dialog. 2. If the Slicing Settings dialog only shows a Basic tab, click the caret to the right of the Click to show more label to enable the Advanced tab. -
Page 35: Speed Tab
3. Click the Advanced tab to display a second set of tabs. Speed Tab The Speed tab features the following options: • Top/Bottom Speed (mm/s): Sets the printing speed of the top and bottom surfaces of the model. • Outer shell speed (mm/s): Sets the printing speed of the external shell surfaces. •... -
Page 36: Infill Tab
• Initial Layer Speed (mm/s): Sets the printing speed of the first layer of the model. • Travel speed (mm/s): Sets the movement speed of the nozzle when not printing. • Raft Top Print Speed (mm/s): Sets the printing speed of the top raft layer. •... - Page 37 Infill Patterns Lines Grid Triangle Zig Zag Concentric Cross...
-
Page 38: Support Tab
Octet Support Tab • Support Pattern: Use the drop-down list box to select one of five support patterns, including Lines, Grid, Triangles, Zig Zag, and Concentric. The pattern designs are the same as those of the infill patterns of the same name. •... - Page 39 • Support infill density (%): Determines the infill density for supports. The higher the density, the stronger the supports. • Support Top Gap (mm): The distance between the top of the support and the model surface. The smaller the distance, the more effective the support, but it is more difficult to remove from the model surface, resulting in residual material on the model surface.
-
Page 40: Build Plate Adhesion Tab
Build Plate Adhesion Tab • Raft Air Gap (mm): The distance between the raft and the model. This determines the difficulty of removing the raft from the model. • Raft Extra Margin (mm): The distance between the edge of the raft and the model surface. -
Page 41: Retraction Tab
• Skirt Line Count: Sets the number of anti-overflow lines at the end of the model in contact with the build platform. Retraction Tab • Horizontal Travel Retraction: Check this box to enable filament retraction when the nozzle is not printing and is moving in a horizontal direction. •... -
Page 42: Material Tab
Material Tab • Filament flow (%): Sets the flow rate of filament in the melting state. This is set according to the type of filament being used. In general, the flow rate for PLA or PLA Pro is 90 and the flow rate of ABS is 100. •... -
Page 43: Machine Tab
• Layer Start Position Y (mm): This option allows you to change the Y axis coordinates of the position of the model layer. Machine Tab • Right Nozzle Diameter (mm): Sets the diameter of the nozzle on the right extruder. This printer only has a single extruder, which is designated the right extruder. -
Page 44: Warping Protection Tab
• Raft Top Line Width (mm): This is the width of the lines in the top surface of the raft. These lines can be thin, so that the top of the raft is smooth. • Raft Middle Line Width (mm): This is the width of the lines in the middle raft layers. Making the second layer extrude more causes the lines to stick to the build plate. - Page 45 Seam, because the filament continues to ooze at the start/stop location. The options on this screen are used to mitigate this effect. • Z Seam Type: Determines where the Z Seam will appear. • Shortest: This option selects the most time efficient start/stop location. •...
-
Page 46: Others Tab
Others Tab • Skin Layers Thickness (mm): This option determines the thickness of the top and bottom skin layers. • Horizontal Expansion (mm): Thermoplastics tend to shrink when cooling. This option allows you to fine tune the part size to offset shrinkage for prints that require tighter tolerances. -
Page 47: Cura Slicing Software
CURA SLICING SOFTWARE Installation Cura is another good slicing software program for use with the MP Mini Delta V2 3D Printer. Unlike models sliced with Wiibuilder, models sliced with Cura cannot be previewed on the File Information screen. For your convenience, a customized version of the Cura installer is included on the microSD™... - Page 48 3. You will now see the Choose Start Menu Folder dialog. Select an existing folder, type in a new folder name, or leave the default folder name. You can also click the Do not create shortcuts check box to skip shortcut creation. Click the Next > button to continue.
- Page 49 5. Ensure that the check box to the left of Run Ultimaker Cura is checked, then click the Finish button to continue. 6. Once Cura launches, you will see a Welcome dialog, followed by a User Agreement dialog. Click Get Started on the Welcome dialog, then click Agree on the User Agreement dialog to continue.
- Page 50 If you skipped to this step because the First time run wizard is bypassed, click Settings > Printer > Add Printer... to display the Add a printer dialog. Click the radio button to the left of the MP Mini Delta v2 option, then click the Add button. Skip ahead to step 10.
- Page 51 10. Cura will finish launching and leave you on the main screen. The basic parameters have all been set to work with the MP Mini Delta V2. If you want to change or customize the parameters, click the pencil icon in the upper right corner, then select Custom to change the settings you need to change.
-
Page 52: Care And Maintenance
Everywhere option is usually only necessary for very complex models with parts that overhang other parts. In most cases, the Brim option for the Platform adhesion type is sufficient and is easier to remove and clean up. The Raft option builds a flat layer on which the model is then built that will need to be removed once the print is complete. -
Page 53: Replacing The Nozzle
Replacing the Nozzle Improper operation or the use of low quality or old filament can cause blockage in the nozzle, which may require the nozzle to be replaced. Perform the following steps to replace the nozzle. 1. Unload the filament, then turn the printer off. 2. -
Page 54: Cleaning The Feed Gear
TECHNICAL SUPPORT Monoprice is pleased to provide free, live, online technical support to assist you with any questions you may have about installation, setup, troubleshooting, or product recommendations. If you ever need assistance with your new product, please come online to talk to one of our friendly and knowledgeable Tech Support Associates. -
Page 55: Specifications
SPECIFICATIONS 21666 Print Area ø100 x 120 mm Filament Diameter 1.75mm Nozzle Diameter 0.4mm Print Speed 20 ~ 150 mm/sec. XY: 0.011mm Positioning Accuracy Z: 0.0025mm Maximum Nozzle Temperature 260°C Maximum Build Platform Temperature 50°C ABS, PLA, PLA Pro, TPU, Metal fill, Wood Supported Filament Types fill, etc. -
Page 56: Regulatory Compliance
Modifying the equipment without Monoprice's authorization may result in the equipment no longer complying with FCC requirements for Class B digital devices. In that event, your right to use the equipment may be limited by FCC regulations, and you may be required to correct any interference to radio or television communications at your own expense. -
Page 57: Rf Exposure Statement For Fcc
RF Exposure Statement for FCC Caution This equipment complies with radiation exposure limits set forth for an uncontrolled environment. End users must follow the specific operating instructions for satisfying RF exposure compliance. This transmitter must be at least 20 cm from the user and must not be collocated or operated in conjunction with any other antenna or transmitter. - Page 58 Monoprice™ and all Monoprice logos are trademarks of Monoprice Inc. DuPont™ and Kapton® are trademarks or registered trademarks of E.I. du Pont de Nemours and Company or its affiliates. Microsoft® and Windows® are either registered trademarks or trademarks of Microsoft Corporation in the United States and/or other countries.
Need help?
Do you have a question about the Mini Delta V2 and is the answer not in the manual?
Questions and answers