Table of Contents
Advertisement
Quick Links
26/10/21, 3:08 μ.μ.
AURATON Libra
PDF
https://manuals.auraton.pl/en/manuals/auraton-libra-en/
AURATON Libra – AURATON manuals
Weekly, wired thermostat
Description of the AURATON Libra
Turning AURATON Libra on for the first time
Introduction to programming
Programming
Manual control
Anti-freezing temperature
Resetting AURATON Libra
Master reset of AURATON Libra
Configuration settings
PWM operating mode
Additional remarks
The AURATON Libra connection schematics
Cleaning and maintenance
Technical specifications
Disposing of the devices
Download
1/39
Advertisement
Table of Contents

Related Manuals for AURATON Libra


Summary of Contents for AURATON Libra
- Page 1 26/10/21, 3:08 μ.μ. AURATON Libra – AURATON manuals Weekly, wired thermostat Description of the AURATON Libra Turning AURATON Libra on for the first time Introduction to programming Programming Manual control Anti-freezing temperature Resetting AURATON Libra Master reset of AURATON Libra...
- Page 2 Turning AURATON Libra on for the first time Introduction to programming Weekly, wired thermostat Programming Manual control AURATON Libra is a weekly, wired thermostat designed to work with a gas or electric Anti-freezing temperature heating device. Resetting AURATON Libra Master reset of AURATON Libra...
- Page 3 There is a backlit LCD display, four function buttons and a temperature setting knob Weekly, wired thermostat with an OK button on the front part of the regulator’s casing. Description of the AURATON Libra Turning AURATON Libra on for the first time Introduction to programming Programming Manual control...
- Page 4 4 – selection button Weekly, wired thermostat 5 – date/time/day of week setting button Description of the AURATON Libra 6 – temperature setting button Turning AURATON Libra on for the first time Introduction to programming Programming Display Manual control Anti-freezing temperature...
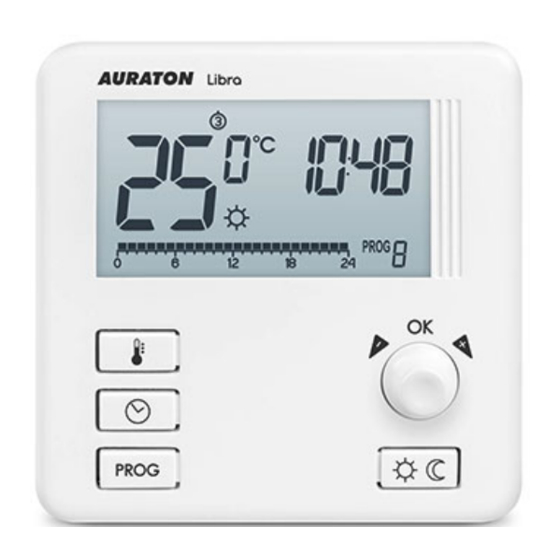
- Page 5 26/10/21, 3:08 μ.μ. AURATON Libra – AURATON manuals 2. Temperature – AURATON Libra displays the temperature of the room in which it is installed in normal operation mode. Weekly, wired thermostat 3. Temperature unit – tells you that the temperature is displayed in Celsius degrees Description of the AURATON Libra (°C).
- Page 6 “Weekly programming”) Description of the AURATON Libra 12. Dead batteries ( Turning AURATON Libra on for the first time The indicator is visible when the minimum permissible battery voltage level is Introduction to programming exceeded. The batteries need to be replaced as soon as possible.
- Page 7 Disposing of the devices Download The correct operation of AURATON Libra is largely influenced by its location. Using the device in a place with no air circulation or a place with direct sunlight may result in incorrect temperature control. AURATON Libra should be installed on the internal wall of a building (a partition wall), in an environment with free air circulation.
- Page 8 Master reset of AURATON Libra Configuration settings PWM operating mode Additional remarks The AURATON Libra connection schematics The terminals are located on the back of AURATON Libra, under the plastic casing. Cleaning and maintenance Technical specifications Disposing of the devices Download ...
-
Page 9: Battery Replacement
26/10/21, 3:08 μ.μ. AURATON Libra – AURATON manuals Weekly, wired thermostat Description of the AURATON Libra Turning AURATON Libra on for the first time Introduction to programming Programming Manual control Anti-freezing temperature Resetting AURATON Libra Master reset of AURATON Libra... - Page 10 26/10/21, 3:08 μ.μ. AURATON Libra – AURATON manuals The battery compartment is located inside AURATON Libra in the front of the casing. To install the batteries, remove the casing of AURATON Libra as shown in the figure Weekly, wired thermostat...
- Page 11 26/10/21, 3:08 μ.μ. AURATON Libra – AURATON manuals Weekly, wired thermostat Description of the AURATON Libra Turning AURATON Libra on for the first time Introduction to programming Programming Manual control Anti-freezing temperature Resetting AURATON Libra Master reset of AURATON Libra...
- Page 12 The AURATON Libra connection schematics 3. Put wall plugs in the drilled holes. Cleaning and maintenance 4. Fix the rear part of the casing of AURATON Libra to the wall using the screws Technical specifications included in the kit. Disposing of the devices 5.
- Page 13 26/10/21, 3:08 μ.μ. AURATON Libra – AURATON manuals Weekly, wired thermostat Description of the AURATON Libra Turning AURATON Libra on for the first time Introduction to programming Programming Manual control Anti-freezing temperature Resetting AURATON Libra Master reset of AURATON Libra...
- Page 14 26/10/21, 3:08 μ.μ. AURATON Libra – AURATON manuals Weekly, wired thermostat Description of the AURATON Libra Turning AURATON Libra on for the first time Introduction to programming Programming Manual control Anti-freezing temperature Resetting AURATON Libra Master reset of AURATON Libra 1 –...
- Page 15 Weekly, wired thermostat Description of the AURATON Libra After inserting the batteries correctly Turning AURATON Libra on for the first time into the battery compartment, the LCD Introduction to programming screen will display all the segments for Programming...
- Page 16 26/10/21, 3:08 μ.μ. AURATON Libra – AURATON manuals A flashing symbol of the day of the week appears in the upper left corner. Turn the knob to the left or right to set the day and confirm the selection using button.
- Page 17 26/10/21, 3:08 μ.μ. AURATON Libra – AURATON manuals 2. Turn the knob to the left or right to set the required hour and confirm with using the button. 3. Turn the knob to the left or right to set the correct value on the minute segment and confirm using the button.
- Page 18 – 21,0°C night temperature – 19,0°C anti-freeze temperature – 7,0°C Programming day and night temperatures AURATON Libra allows you to program 2 types of temperature: Day temperature ( ) – from 5 to 30°C Night temperature ( ) – from 5 to 30°C To set one of the temperatures above: ...
-
Page 19: Introduction To Programming
26/10/21, 3:08 μ.μ. AURATON Libra – AURATON manuals 2. The display will show the currently set temperature with one of the two symbols: – day temperature; – night temperature. 3. Turn the knob to the left or right to set the desired temperature value. -
Page 20: Factory Programs
Example: The figure above shows that from 6.00 A.M. to 11.00 P.M. Auraton Libra will control the heating device in such a way that the room temperature will be day temperature ( AURATON Libra will switch to night temperature from 11.00 P.M. -
Page 21: Weekly Programming
Programming Weekly programming To program AURATON Libra, set the day temperature intervals for individual days of the week. At other time, night temperature will be set. Sample AURATON Libra setting from Monday to Sunday. Outside the intervals programmed, the night temperature will be set. - Page 22 26/10/21, 3:08 μ.μ. AURATON Libra – AURATON manuals 5:00 – 8:00 A.M.; Monday 3:00 – 11:00 P.M. 5:00 – 8:00 A.M.; Tuesday 3:00 – 11:00 P.M. 5:00 – 8:00 A.M.; Wednesday 3:00 – 11:00 P.M. 5:00 – 8:00 A.M.; Thursday 3:00 –...
-
Page 23: Program Selection
26/10/21, 3:08 μ.μ. AURATON Libra – AURATON manuals 8:00 A.M. – Saturday 11:00 P.M. 8:00 A.M. – Sunday 11:00 P.M. Program selection To set the program: 1. Press the key. Program number segment will start blinking. 2. Press the key as many times as required to set the day of the week for the program. - Page 24 26/10/21, 3:08 μ.μ. AURATON Libra – AURATON manuals select the program number requested. Programs 0-2 are factory- set, programs 3-8 can be edited. 4. Confirm selection pressing the key. 5. Repeat the procedure for the following days of the week.
- Page 25 26/10/21, 3:08 μ.μ. AURATON Libra – AURATON manuals 3. Press the key several times to select the program number required. Programs 0-2 are factoryset, programs 3-8 can be edited. 4. All (24) black rectangles will appear on the timeline. Each of them symbolises 1 hour.
-
Page 26: Manual Control
26/10/21, 3:08 μ.μ. AURATON Libra – AURATON manuals (no rectangle). Then, select the time interval for the temperature selected with the knob. 6. By pressing the key and selecting time interval the entire program is modified. 7. Confirm selection with the key. - Page 27 (24 hours at the most) and confirm the setting using the button. AURATON Libra will wait until you choose one of the two temperatures which it should maintain (day or night). The change is made by using the button or the knob.
- Page 28 26/10/21, 3:08 μ.μ. AURATON Libra – AURATON manuals temperature will then be maintained until the next temperature change carried out by the program. To withdraw the above-mentioned action press the button. The symbol will disappear from the display. Anti-freezing temperature In the event of being away for a long time, it is possible to turn on the anti-freezing temperature mode.
-
Page 29: Configuration Settings
AURATON Libra – AURATON manuals MASTER RESET is performed by pressing and holding the button and at the same time installing the batteries. This causes AURATON Libra to return to its factory settings. IMPORTANT: All user-defined programs will be removed! - Page 30 26/10/21, 3:08 μ.μ. AURATON Libra – AURATON manuals AURATON Libra can work in two modes: Heating mode (preset) – set it if you want AURATON Libra to cooperate with heating devices. Air-conditioning mode – set it if you want AURATON Libra to cooperate with air-conditioning devices.
- Page 31 HI 4 – ±0,4 °C, HI P – PWM operating mode (see chapter “PWM operating mode”). Confirm your choice by pressing the button. AURATON Libra will proceed to change the next parameter. Changes in the delay The delay prevents too frequent activation of the actuator, e.g. due to temporary drafts (caused by opening the window, etc.).
- Page 32 Offset allows you to calibrate temperature indications with a tolerance of ± 3°C. AURATON Libra may for example show that the temperature in the room is 23°C, while a regular room thermometer next to it may show 24°C. Changing the offset by +1 degree, will make AURATON Libra show the same temperature as the room thermometer.
- Page 33 (60 + 20 = 80). In this case you should slow down the clock by setting C -80. Example 2: After a week of operation, the clock in AURATON Libra is 2 minutes slow (2 x 60 = 120). In this case you should speed up the clock by setting C 120.
- Page 34 (Pulse-Width Modulation) By changing the hysteresis settings (chapter “Configuration settings”), you can turn on the PWM operating mode. In this mode, AURATON Libra cyclically turns on the heating device in order to minimize temperature fluctuations. AURATON Libra checks temperature rise times and temperature drop times.
-
Page 35: Additional Remarks
At least 30 seconds must elapse between switching the relay off and on again. AURATON Libra enables you to turn on or off the control functions at any time (e.g. after a heating season) by briefly holding down (for about 5 seconds) the button (AURATON Libra will only show the current time and room temperature –... - Page 36 26/10/21, 3:08 μ.μ. AURATON Libra – AURATON manuals https://manuals.auraton.pl/en/manuals/auraton-libra-en/ 36/39...
-
Page 37: Cleaning And Maintenance
26/10/21, 3:08 μ.μ. AURATON Libra – AURATON manuals 1. Heating device e.g. a gas furnace 2. lectric heating device (MAX 230 V AC, 16 A) Cleaning and maintenance The outside part the device should be cleaned with a dry cloth. Do not use solvents (such as benzene, thinner or alcohol). - Page 38 26/10/21, 3:08 μ.μ. AURATON Libra – AURATON manuals Number of temperature levels: Anti-freeze temperature: 7 °C Temperature measurement range: 5 – 30 °C Hysteresis: ±0,2 °C / ±0,4 °C / PWM Relay load capacity: Max. 250 V AC, max. 16 A...
- Page 39 AURATON Libra – AURATON manuals Hereby, LARS Andrzej Szymanski declares that the radio equipment type AURATON Libra is in compliance with Directive 2014/53/EU and 2011/65/EU. The full text of the EU declaration of conformity is available below in the download area.
Need help?
Do you have a question about the Libra and is the answer not in the manual?
Questions and answers