Table of Contents
Advertisement
Quick Links
COD: 60S12/24.B.2021
Installation, use and maintenance manual
SMART 60
Basic 12/24 V DC
Schenker Italia
Via Ferrante Imparato 501 - Condominio Genesis
80146 Naples (Italy)
Tel. +39 081 5593505
Fax. +39 081 5597372
E-mail: info@schenker.it
www.schenkerwatermakers.com
Schenker Italia
THE PRESENT MANUAL BELONGS TO -
- ALL RIGHTS RESERVED
Advertisement
Table of Contents

Related Manuals for Schenker SMART 60


Summary of Contents for Schenker SMART 60
- Page 1 COD: 60S12/24.B.2021 Installation, use and maintenance manual SMART 60 Basic 12/24 V DC Schenker Italia Via Ferrante Imparato 501 - Condominio Genesis 80146 Naples (Italy) Tel. +39 081 5593505 Fax. +39 081 5597372 E-mail: info@schenker.it www.schenkerwatermakers.com Schenker Italia THE PRESENT MANUAL BELONGS TO -...
-
Page 2: Table Of Contents
..........................22 4.5 E LECTRIC CONNECTIONS ..........................25 4.5.1 R EMOTE CONTROL PANEL MOUNTING ......................25 4.5.2 E (SMART 60 12/24V DC) ..............26 LECTRIC CONNECTIONS WIRES 5. FUNCTIONING AND USE ..........................28 5.1 C OMMAND DESCRIPTION ..........................28 5.1.1 A LARMS DESCRIPTION .......................... - Page 3 8. SUGGESTED SPARE PARTS ......................... 42 8.1 S HORT TERM CRUISING ........................... 42 8.2 L ONG TERM CRUISING ............................. 42 8.3 ERS SPARE PARTS ............................43 8.4 A DDITIONAL SPARES ............................44 Schenker Italia THE PRESENT MANUAL BELONGS TO - - ALL RIGHTS RESERVED...
-
Page 4: Layout Of Manual
This symbol indicates accident prevention regulations for the operator and / or for any exposed persons. CAUTION: This symbol indicates that there is the possibility of damaging the system and / or its components. NOTE: This symbol indicates useful information. Schenker Italia THE PRESENT MANUAL BELONGS TO - - ALL RIGHTS RESERVED... -
Page 5: General Warnings And Information To The Recipient
All rights of reproduction of this manual are reserved to SCHENKER ITALIA. This manual cannot be transferred to third parties without the written authorization of SCHENKER ITALIA. -
Page 6: Warranty
In case of repairs under guarantee performed by our technicians on the customer vessel, the faulty parts replacement cost will be at Schenker's expense, while manpower and travel expenses will be charged to the customer. The guarantee does not include faults caused by negligence in operating, maintenance and installation of the device (if not carried out by an authorised Schenker Service point). -
Page 7: Identification Of The Unit
2.4 Identification of the unit All the watermakers manufactured by Schenker Italia can be identified by a serial number printed on a label which is pasted upon the aluminium frame near the manometer. The same serial number is also recorded on the central black block of the energy recovery system (ERS). - Page 8 ATTENTION Different legislations are in force in the different countries, therefore the prescriptions imposed by the laws and by the agencies designated by the Countries must be observed. Schenker Italia THE PRESENT MANUAL BELONGS TO - - ALL RIGHTS RESERVED...
-
Page 9: Product Presentation
The watermaker unit is transported in a cardboard box. In the following table dimension and weight are indicated. MATERIALS HANDLING fig. 3-1 Model L cm. W cm. H cm. Weight Kg. Smart 60 Packaging dimensions and weight tab.3-1 Schenker Italia THE PRESENT MANUAL BELONGS TO - - ALL RIGHTS RESERVED... -
Page 10: Stock
3.3 Packaging 3.3.1 Packaging contents PACKAGING (picture purely for information) FIG. 3-2 SMART 60 Watermaker Pump group with electric box Active carbon filter with electrovalve White filter key Mesh filter Non-return valve with Tee fitting... -
Page 11: Attached Documents
Weight: 21 Kg Hydraulic Connection ¾’’ fitting, 16mm internal diameter reinforced hose. Seawater inlet: ½’’ fitting, 16mm internal diameter reinforced hose. Exhaust: ¼’’ fitting, 6x8mm hose. Fresh water: Schenker Italia THE PRESENT MANUAL BELONGS TO - - ALL RIGHTS RESERVED... -
Page 12: Features Of The Product
(electric safety requirements) 3.6 Features of the product The fresh water produced by a Schenker watermaker, obtained by clean seawater, has a high purity. Despite this, the potability may not be guaranteed: bacterium caused by non-observance of shutdown and cleaning procedures may be present in the watermaker. -
Page 13: Advantages Of The Energy Recovery System
Functioning principles The Schenker watermakers, as alternative to the high-pressure pumps of traditional systems, utilizes the ENERGY RECOVERY SYSTEM patented device, which amplifies the pressure of common low-pressure pumps, and recoup all the hydraulic energy back from the membranes, allowing a high energy efficiency. -
Page 14: Composition Of The Machine
9,5 bar or if it doesn’t reach 0,8 bar. Pump box. Plastic Box with all the electric connections for the power supply of motor, motherboard, pressure transducer, remote panel and electrovalve. Schenker Italia THE PRESENT MANUAL BELONGS TO - - ALL RIGHTS RESERVED... -
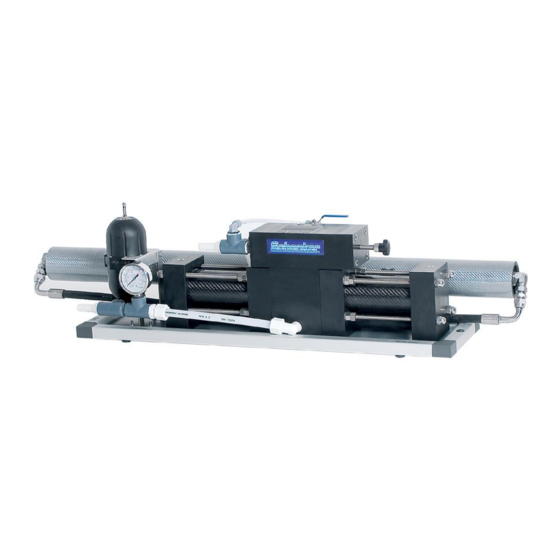
Page 15: Watermaker Group
FIG. 3-7 Manometer Fresh water production (grey plastic fitting) Accumulator Positioner knob Reverse osmosis membrane WATERMAKER GROUP (TOP VALVE VIEW) FIG. 3-8 Reset valve Concentrate discharge Depressurization valve Schenker Italia THE PRESENT MANUAL BELONGS TO - - ALL RIGHTS RESERVED... - Page 16 The valve must be closed during normal functioning (lever perpendicular to the valve). Such valve has the function to allow the reset of the ERS in case of a system block. It must be opened before acting on the valve positioner. Schenker Italia THE PRESENT MANUAL BELONGS TO - - ALL RIGHTS RESERVED...
-
Page 17: Accessories
Mesh filter: The machine is equipped with a strainer to protect the pump from macro sediments. It is placed between the seacock and pre-pump. Schenker Italia THE PRESENT MANUAL BELONGS TO - - ALL RIGHTS RESERVED... -
Page 18: Mounting And Installation
Once individuate the correct installation solution, it is recommended to first make a schematic draft of the hydraulic and electric connection, and attach them to the present manual for future needs as first reference. Schenker Italia THE PRESENT MANUAL BELONGS TO - - ALL RIGHTS RESERVED... -
Page 19: Components Mountings
For a correct installation of the watermaker it is necessary to arrange the following water intake and discharge out of the board: • Seawater intake. • Fresh water intake for washing. • Brine discharge. Schenker Italia THE PRESENT MANUAL BELONGS TO - - ALL RIGHTS RESERVED... -
Page 20: Seawater Intake
• No air is collected in the filter INSTALLATION NOTES The filter has to be connected next to the through-hull fittings, and must be easily accessible for inspection. Schenker Italia THE PRESENT MANUAL BELONGS TO - - ALL RIGHTS RESERVED... -
Page 21: Fresh Water Intake For Washing
It is possible to use offtakes from existing water discharge apparatuses, provided that: • (alternatively) It is not the engine cooling water drain or apparatuses that drain out water with elevated pressure. Schenker Italia THE PRESENT MANUAL BELONGS TO - - ALL RIGHTS RESERVED... -
Page 22: Hydraulic Connections
– 5 m. filter – watermaker inlet connections . For this section is necessary to use a good quality PN 10 min. reinforced hose. An inadequate hose could burst, jeopardizing seriously the safety of the vessel. The hydraulic connections are: Schenker Italia THE PRESENT MANUAL BELONGS TO - - ALL RIGHTS RESERVED... - Page 23 The pump has to be placed as close as possible to the seawater intake and as low as possible respect to the seawater level; furthermore, it is recommended to avoid long and convoluted path of the connection hoses. Schenker Italia THE PRESENT MANUAL BELONGS TO - - ALL RIGHTS RESERVED...
- Page 24 Another option is to Tee into the tank air vent hose. This is only possible if the breather hose section is more than 16 mm. dia. There are no particular limits on the connection length. Schenker Italia THE PRESENT MANUAL BELONGS TO -...
-
Page 25: Electric Connections
The remote control panel can be connected through the pre-wired multiple cable of a 10mt standard length provided. It is possible to require to the factory a longer cable if necessary. REMOTE CONTROL PANEL fig. 4-3 Schenker Italia THE PRESENT MANUAL BELONGS TO - - ALL RIGHTS RESERVED... -
Page 26: Electric Connections: Wires (Smart 60 12/24V Dc)
COD: 60S12/24.B.2021 4.5.2 Electric connections: wires (SMART 60 12/24V DC) The 12/24 V power supply, from the service batteries, must be connected to the +/- clamps on the card of the computer box. A 32 Ampere automatic circuit breaker for 12V systems must be installed on the power supply, while a 16 Ampere for 24V systems. - Page 27 4 – MOUNTING AND INSTALLATION COD: 60S12/24.B.2021 ELECTRIC MAIN BOX SCHEME SMART 60 12/24V DC FIG. 4-4 Schenker Italia THE PRESENT MANUAL BELONGS TO - - ALL RIGHTS RESERVED...
-
Page 28: Functioning And Use
The first start-up procedure is necessary to start a new plant for the first time or to restart it after performed a chemical washing. The purpose of the start-up procedure is to essentially purge the air contained in the system Schenker Italia THE PRESENT MANUAL BELONGS TO - - ALL RIGHTS RESERVED... -
Page 29: Preliminary Checks Before Proceeding With The Start-Up Procedure
4. After 2-3 minutes close the depressurization valve. The system starts going under pressure and the fresh water production begins. Check the working pressure of the unit is correct (6,5 – 7,5 bar). Schenker Italia THE PRESENT MANUAL BELONGS TO - - ALL RIGHTS RESERVED... -
Page 30: Normal Operating Procedure
1. Push ON/OFF to start the watermaker. 2. Push FLUSHING to flush and stop the watermaker. The watermaker will activate a flushing cycle then it will stop after 1 minute Schenker Italia THE PRESENT MANUAL BELONGS TO - - ALL RIGHTS RESERVED... -
Page 31: Working Cycle With Timer
Both ON/OFF and FLUSHING lights of the buttons are on. 2. The unit can be stopped at any time by pushing the ON/OFF button Schenker Italia THE PRESENT MANUAL BELONGS TO - - ALL RIGHTS RESERVED... -
Page 32: Reset Procedure
5. Unscrew the positioner knob counterclockwise up to the original position, until when it is blocked back. 6. Close the reset valve (lever in vertical position). Schenker Italia THE PRESENT MANUAL BELONGS TO - - ALL RIGHTS RESERVED... - Page 33 5 – FUNCTIONING AND USE COD: 60S12/24.B.2021 7. Restart the system. 8. After some seconds close the depressurization valve. Schenker Italia THE PRESENT MANUAL BELONGS TO - - ALL RIGHTS RESERVED...
-
Page 34: Maintenance (Routine And Special)
2- 3 minutes the depressurization valve. Unscrew the filter housing cup counter clockwise by using the specific key provided Replace the active Once per year carbon fiber filter Schenker Italia THE PRESENT MANUAL BELONGS TO - - ALL RIGHTS RESERVED... -
Page 35: Check The Plant Working Pressure
It is necessary to perform the shutdown procedure if the membranes result dirty. If cleaning also results insufficient it could be necessary to perform an alkaline washing using the chemical product SCHENKER CLEANING 2 (SC2). It is recommended to contact a Schenker certified service center. -
Page 36: Necessary Equipment
3. A bottle of powder SCHENKER CLEANING 1 (SC1). The solution must be prepared following the instruction indicated on the product label, and using chlorine free water (water produced by the system can be an option). -
Page 37: Shutdown Operating Procedure
Hoses under the free water surface 3. Check they are well dipped in the solution and don't inhale air. 4. Open the depressurization valve (turn counter clockwise). Schenker Italia THE PRESENT MANUAL BELONGS TO - - ALL RIGHTS RESERVED... - Page 38 CAUTION Avoid inhaling product powders. It is strongly recommended to wear a protective mask during solution preparation. Schenker Italia THE PRESENT MANUAL BELONGS TO - - ALL RIGHTS RESERVED...
-
Page 39: Antifreeze Procedure (Winterizing Procedure In Cold Climate - Under 5°C)
Before proceeding with any kid of service it is strongly recommended to read carefully the instruction contained in this manual. Schenker Italia THE PRESENT MANUAL BELONGS TO - - ALL RIGHTS RESERVED... -
Page 40: Periodic Maintenance
Reverse osmosis membranes have an average lifetime of about 7 years If correctly maintained. It is anyway recommended to check the efficiency of the membranes after 5 years of functioning and verify the needed of a replacement. Please, refer to a certified Schenker service center for this operation. 6.8 Adjustments... -
Page 41: Troubleshooting
(> 13 Bar) Clogged membranes Perform washing procedure Cold inlet water Contact a customer service Loss in the system Loose fittings Tighten fittings ERS leaks Contact a customer service Schenker Italia THE PRESENT MANUAL BELONGS TO - - ALL RIGHTS RESERVED... -
Page 42: Suggested Spare Parts
CRUISING KIT CRK136 SPARE PUMP SM-MOD 30/60 12V SP36/12 SPARE PUMP SM-MOD 30/60 24V SP36/24 MEMBRANE 2540 M2540 PORTABLE SALINITY TESTER PRESSURE TRANSDUCER SPARE SEALS KIT 2.0 SS36-2.0 Schenker Italia THE PRESENT MANUAL BELONGS TO - - ALL RIGHTS RESERVED... -
Page 43: Ers Spare Parts
8 –SUGGESTED SPARE PARTS COD: 60S12/24.B.2021 8.3 ERS spare parts Schenker Italia THE PRESENT MANUAL BELONGS TO - - ALL RIGHTS RESERVED... -
Page 44: Additional Spares
Spare part name Code COUPLE HIGH PRESSURE HOSE SM 30/60/80 END CUP VESSEL 2,5” SINGLE CONNECTION EV2,5 END CUP VESSEL 2,5” DOUBLE CONNECTION EV2,5-2 M16B MANOMETERS 0-16 EV2,5-2 EV2,5 M16B Schenker Italia THE PRESENT MANUAL BELONGS TO - - ALL RIGHTS RESERVED...
Need help?
Do you have a question about the SMART 60 and is the answer not in the manual?
Questions and answers