Table of Contents
Advertisement
Quick Links
Advertisement
Table of Contents

Related Manuals for Newworld LOMOND100DFCRM


Summary of Contents for Newworld LOMOND100DFCRM
- Page 1 100cm Dual Fuel Range Cooker LOMOND100DFCRM MUNROS100DFIN Instruction manual...
- Page 2 You’ll soon be enjoying your new Freestanding Cooker It all begins here, with your instructions. Don’t worry, there’s nothing too technical coming up. Just simple, step-by-step guidance to get you up and running quickly. Sound good? Then let’s get started. Help and Guidance We’re here to help you get the most from your Freestanding Cooker.
-
Page 3: Table Of Contents
Contents Safety information Care and Maintenance Safety information Cleaning Removing the door Getting to know your Replacing the lamps Freestanding Cooker Maintenance Ready? Let’s begin Technical specifications Energy fiche Accessories Installing your Freestanding Cooker Product support Installation requirements Troubleshooting Data Label Help and assistance First Use Declaration of conformance to product... - Page 4 Safety information Important - Please read these instructions fully before installing or operating INSTALLATION WARNINGS DURING USAGE IMPORTANT: This product MUST be installed by a IMPORTANT: This appliance can be used by children qualified Gas Safe registered installer in accordance aged from 8 years and above and persons with with local regulations.
- Page 5 Safety information Important - Please read these instructions fully before installing or operating IMPORTANT: Position pans over the centre of the IMPORTANT: When the door of the oven is open, do not hang or lean anything on it. You may unbalance burners and turn handles to a safe position where they can not be knocked or grabbed.
-
Page 6: Getting To Know Your Freestanding Cooker
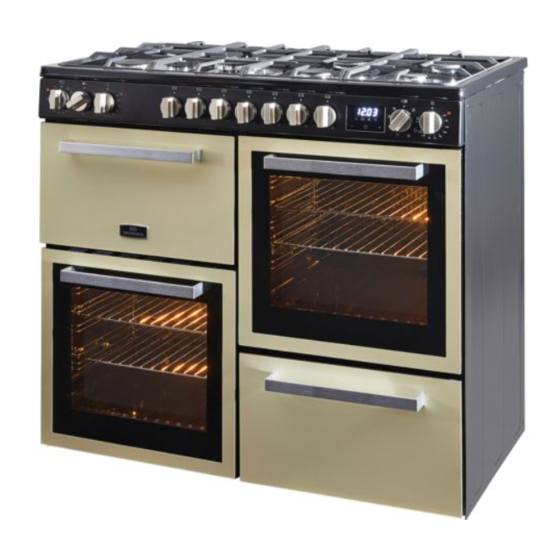
Getting to know your Freestanding Cooker You’ll be up and running in no time Ready? Let’s begin... Please read these instructions carefully. They contain important information which will help you get the best from your freestanding cooker and ensure safe and correct installation and operation. - Page 7 Getting to know your Freestanding Cooker You’ll be up and running in no time Control Panel Rapid Burner Wok Burner Trivets Semi-rapid Burner Auxiliary Burner Oven Door Anti-Slip Feet ℃ ℃ Oven indicator light Gas hob control knobs Function/temperature control knob - upper left oven Programmable timer Function control knob - lower left oven Function control knob - upper right oven...
- Page 8 Getting to know your Freestanding Cooker You’ll be up and running in no time Oven Accessories 1. Grill pan 2. Wire shelf x4 3. Grill pan wire insert and handle x1 Other Accessories Included...
-
Page 9: Installing Your Freestanding Cooker
Installing your Freestanding Cooker Bringing it all together Installation requirem ents Data Label The Data Label is located on the rear of the THIS COOKER MUST BE INSTALLED ACCORDING TO BS 6172: 2010 BY A SUITABLY appliance is suitable for Natural Gas QUALIFIED GAS SAFE REGISTERED INSTALLER and Universal LPG;... - Page 10 Installing your Freestanding Cooker Bringing it all together Installation of Cooker This modern cooker was manufactured with parts and There must be enough natural ventilation to provide materials of the highest quality and was designed to the gas to be used in the environment. The average air meet your cooking needs.
- Page 11 Installing your Freestanding Cooker Bringing it all together Gas Connection IMPORTANT - All Gas installations must be carried out by a suitably qualified pe son. For information on choosing a gas installer contact the ‘Gas Safe Register’. www.gassaferegister.co.uk The appliance can be placed close to other furniture on condition that the furniture’s height does not exceed the height of the cooker panel.
- Page 12 Installing your Freestanding Cooker Bringing it all together Anti-tilting chain The cooker is supplied with an anti-tilting chain to prevent the appliance from tilting forward and causing accidental damage to the gas pipe. Make a hole in the wall behind, at the same height as the fixing chain.
- Page 13 Installing your Freestanding Cooker Bringing it all together Electrical connection IMPORTANT: Electrical connections must be carried The electrical cable should not be routed through out by a suitably qualified pe son and in accordance any area that may be a°ected by heat from the with all relevant local building and installation oven, especially the area directly behind the oven.
-
Page 14: Gas Conversion
Installing your Freestanding Cooker Bringing it all together Gas Conversion (NG to U-LPG) Parts needed Setting the minimum level - Test Point Assembly - ULPG Gas Type label 1. Light one of the burners and turn the tap to - Auxiliary Jet 0.5mm - Semi-Rapid Jet 0.65mm minimum flame. -
Page 15: Using Your Freestanding Cooker
Using your Freestanding Cooker Getting the most from your appliance Controls Instructions for use (hob top burners) Control knob (Hob top Burners) The symbols on the control knobs mean the following: Maximum gas flow or ‘high’ flame and lighting position Upper &... - Page 16 Using your Freestanding Cooker Getting the most from your appliance To light the hob burners The use of pans in excess of the maximum To light the burner, press the control knob fully diameter recommended in the table above can down and hold the knob down before rotating result in over heating/discoloration of hob surface.
- Page 17 Using your Freestanding Cooker Getting the most from your appliance Positioning the oven trays & shelves The Baking Tray, Grill Tray or Oven Shelves can be located in any of the four height positions in the oven. When fitting the trays or shelves, ensure they are fitted between the two moulds inside the cavity that are closest together.
- Page 18 Using your Freestanding Cooker Getting the most from your appliance MAIN OVEN COOKING MODES Grill Mode Convection mode Select ‘Grill’ mode with cooking mode selection When set to Convection mode, the top and knob and turn cooking temperature selection bottom heating elements operate together like a knob to ‘Max’...
- Page 19 Using your Freestanding Cooker Getting the most from your appliance Programmable Timer As an example: If cooking time takes 45 minutes This model has a digital display, 24hr clock with 3 and you want it to finish at 14:00 control buttons. When the power is connected, the screen displays ‘AUTO’...
- Page 20 Using your Freestanding Cooker Getting the most from your appliance Note: When cooking is finished, the cooking fan The oven starts immediately, and ‘AUTO’ will continues to operate until the oven cools down flash. When the finish time is reached, the oven and then switches off automatically.
- Page 21 Using your Freestanding Cooker Getting the most from your appliance Cooking pizza Cooking fish and meat For best results when cooking pizza: When cooking white meat, fowl and fish, use a • Preheat the oven for at least 10 minutes. temperature setting from 180°C to 200°c.
- Page 22 Care and maintenance Looking after your appliance Cleaning WARNING! Isolate the power supply to the cooker and Burner Caps: Periodically, the enamelled pan support, make sure that the oven is cool. enamelled covers and burner heads must be washed with warm soapy water, rinsed and dried. Before cleaning your oven or performing After drying them thoroughly, place them back in maintenance, make sure that the cooking mode...
- Page 23 Care and maintenance Looking after your appliance Replacing the oven lamps WARNING: Ensure that the appliance is switched off before replacing the lamp to avoid the possibility of electric shock. Remove the glass cover of the lamp-holder as shown below. Remove the lamp and replace with a lamp resistant to high temperatures (300°C) with the following characteristics:...
- Page 24 Care and maintenance Looking after your appliance Routine maintenance Have the condition and efficiency of the gas pipe and the pressure regulator (if installed) checked periodically. If anomalies are found, do not repair components but have the faulty component replaced. To ensure good performance and safety, the gas regulator taps must be greased periodically.
-
Page 25: Technical Specifications
Care and maintenance Looking after your appliance Technical specification MUNROS100DFIN/ Upper right cavity Upper left cavity Lower left cavity LOMOND100DFCRM Cavity volume (L) 1100-1400 1100 1400 Top element power (W) 1550 1550 Rear element power (W) 1100 Bottom element power (W) -
Page 26: Energy Fiche
Energy fiche Brand Model MUNROS100DFIN/ LOMOND100DFCRM Type of oven Electric Mass 87 (+/-2) 84.74 (upper-left oven) N.A.(lower-left oven) 103.9 (upper-right oven) N.A. (upper-left oven) 95.00 (lower-left oven) 105.1 (upper-right oven) Energy Class A (upper-left oven) A (lower-left oven) A ( upper-right oven) -
Page 27: Product Support
3. DO NOT ATTEMPT TO REPAIR THIS 1. If no electrical functions appear to work, check the cooker isolation switch has not been turned COOKER YOURSELF. CALL NEWWORLD off also check the fuse in the switch and the Product Support on 0333 305... -
Page 28: Help And Assistance
Product support Help is always at hand Help and assistance If you require any technical guidance or find that your washing machine is not operating as intended, a simple solution can often be found in the Troubleshooting section of these instructions or online at www.newworldassist.co.uk If you still require further assistance, call one of our experts on 0333 305 2263*. -
Page 29: Declaration Of Conformance To Product Standards
Declaration of conformance to Disposal product standards This appliance/fitting is marked according to the European directive This appliance conforms to all relavant standards 2012/19/EU on Waste Electrical and applicable to domestic appliances sold in the UK Electronic Equipment (WEEE). By ensuring this product is disposed of correctly, you will help prevent potential negative consequences for the environment and human health, which could otherwise be... -
Page 30: Guarantee
Call us now and activate your 24 month guarantee Thank you for choosing New World. Your new product is guaranteed against faults and breakdowns for 24 months. Don’t forget to register it with us today so we can provide you with our best possible after-sales service and useful updates. - Page 32 Contact: www.newworldassist.co.uk Helpline: 0333 305 2263...
Need help?
Do you have a question about the LOMOND100DFCRM and is the answer not in the manual?
Questions and answers