Advertisement
Quick Links
Advertisement

Related Manuals for Evil Mad Scientist EggBot Pro


Summary of Contents for Evil Mad Scientist EggBot Pro
- Page 1 The Original Egg-Bot by Evil Mad Scientist Laboratories EggBot Pro User Guide Rev A, August 2014...
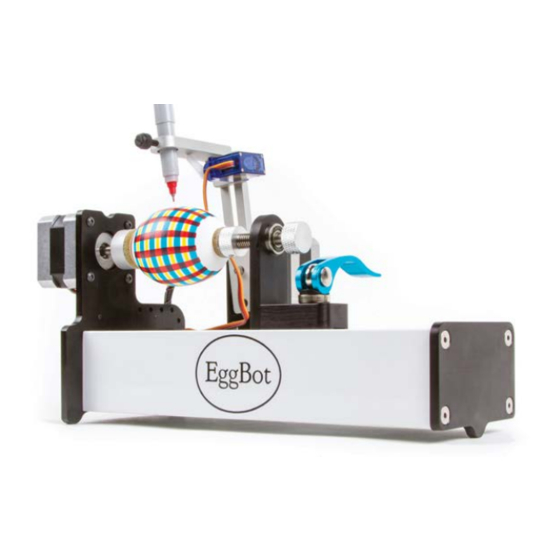
- Page 2 In 2014, the team drew upon the lessons learned over several years of making EggBot kits to make the finest EggBot ever: The EggBot Pro. The Pro is built from CNC machined alumi- num, with quick release adjustments, a ball-bearing tailstock and a new, open geometry, for easier adjustments and better visibility while printing.
- Page 3 5/64” 4. Power supply 5. Hex ball drivers 1.1 EggBot kit contents Here are the parts that come with the EggBot Pro: 7. Rubber Washer 1. The EggBot Pro itself, fitted with EBB driver board, 8. 5/8” Screw two stepper motors, and the pen arm.
- Page 4 §1.2, EggBot anatomy, continued: Distal pen arm Servo (pen lift) motor Pen arm bracket Headstock Tailstock Proximal pen arm Tail coupler Ball bearings Egg coupler Draw knob Tailstock quick release Spring Pen motor support EBB driver board Central Strut Tail Cap EggBot anatomy, front view Pen height thumbscrew...
-
Page 5: Part 2: Quick Start / Overview
Part 2: Quick Start / Overview In brief, here are the steps to getting started with the EggBot Pro: 1) Install the software. 2) Plug in power & USB, and check the pen up & pen down heights. 3) Moving the tailstock into place, center the object that you will print upon between the egg and tail couplers. - Page 6 Part 4: Preparing to print with the EggBot Pro 4.1 Using the Quick Releases There are two quick releases on the EggBot Pro, at the tailstock and pen motor support. Move the handle of a quick release to the vertical position (A) to release (loosen) it or to the directly horizontal position (B) to tighten it.
- Page 7 4.2 Inserting an object to print upon: Setting the tailstock position & centering the object When preparing to print upon an object (a literal or figurative “egg”), the tailstock needs to be in the right position to hold it in place. Loosen the quick release, so that the tailstock can move (A).
- Page 8 4.3 Centering the Pen Motor The pen motor quick release is located on the rear side of the EggBot. Release it, and slide the pen motor as- sembly until the shaft of the motor shaft points directly at the widest part of the “egg” (A). Lock the quick re- lease in place (B).
- Page 9 4.5 Inserting a pen, and checking alignment Bring the EggBot into the “Pen up” state, with the other motors (egg and pen) off. The best way to do this is by using Eggbot Control, from the “Setup” tab (as in §3.3), but with the “Raise pen, turn off motors”...
- Page 10 Part 5: Using the EggBot Pro 5.1 Making your first plot To make a plot, you should begin with an object in the EggBot, a pen in the holder, and the machine in the “pen up” configuration. (For your very first, you may want to leave the pen out on the first try, just to watch and make sure that everything looks good.)
- Page 11 5.7 Attaching attachments (Kistka & Diamond Engraver) Besides the pen holder, there are two other attachments available for the EggBot Pro: a kistka (hot wax tool) and a diamond engraving tool. To attach either, first remove the two indicated hex screws that hold the distal pen arm.
- Page 12 EggBot. See additional notes at: http://wiki.evilmadscientist.com/pens 10. The EggBot Pro can normally fit objects up to 4.5 inches long. But, with a trick, one may be able to fit objects up to 6.25 inches long: Loosen up the nut below the tailstock quick release by several turns;...
Need help?
Do you have a question about the EggBot Pro and is the answer not in the manual?
Questions and answers