
Related Manuals for Devine RX Series


Summary of Contents for Devine RX Series
- Page 1 RX Series (RX-5A / RX-6A / RX-8A) Active Studio Monitor User Manual The information in this user manual is subject to change at any time without notice. Version 1.0 Date of creation and author's initials:21-07-2020 RV Revision date and author's initials: -...
- Page 2 Introduction Thank you for purchasing this Devine RX Series active studio monitor. We advise that you read this user manual in its entirety before unpacking the contents of the box, so that you are familiar with all of the functionality that this product has to offer. Please be sure to check that all of the parts and accessories listed below under 'box contents' are included in the package.
-
Page 3: Safety Instructions
Safety Instructions WARNING! Keep this device away from moisture, water and rain to avoid the chance of electric shocks. Everyone involved with the installation, operation and maintenance of this device must: - Be qualified - Be skilled - Have read the instructions in this user manual - Be sure that neither the device nor the included accessories are damaged. - Page 4 - Should the device not be used in the manner described in this user manual, damages or even injuries could occur. Devine cannot be held responsible for any injuries or damages that occur as a result of improper use of this product.
-
Page 5: Overview Of The Device
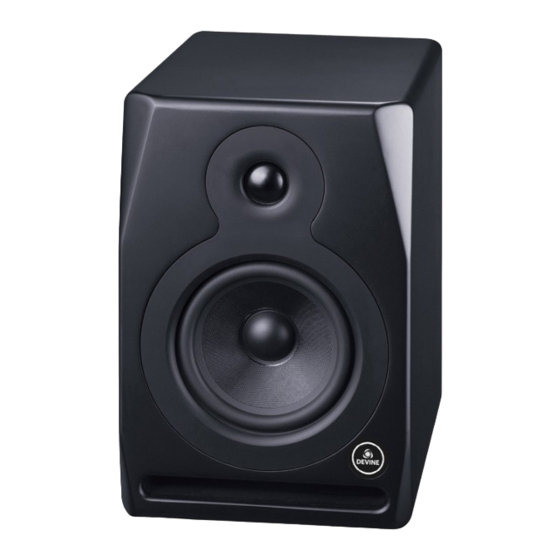
7. Voltage switch (default 230V) IEC C14 Power input with fuse holder Please note: The image shows the back panel of the Devine RX-5A. The information in this user manual is subject to change at any time without notice. Version 1.0... - Page 6 The RX Series includes 5”, 6” and 8” models, referring to the size of the built-in woofer. The differences in size and matching power capacities make sure the perfect monitor can be selected for any preferred style of music.
- Page 7 Be aware that if your monitors are placed on a desk, they may not be positioned at the right height (ear height). Isolating and the Right Height Placement Once your monitors are in the right place, it's important to ensure that they are also positioned at the right height.
- Page 8 Making Volume Adjustments These Devine studio monitors are equipped with a volume control that can regulate the incoming signal if necessary. It is designed to be used to adjust the monitors, not to correct issues with the incoming signal.
- Page 9 If your monitors are close to a wall and produce unwanted and annoying low frequencies, this can compensated for with the HF trim. Status LED The monitors are equipped with a status LED on the front (behind the Devine logo) that lights up when they are powered on. Overload and security There is no overload indicator on this monitor because it is not designed to be used for listening at high volume levels, especially for longer periods of time.
- Page 10 Studio Monitor Troubleshooting If you have a problem with your studio monitors, please consult the troubleshooting section for possible solutions. If, after consulting this section, the problem remains unresolved, please contact your retailer for more information and/or help. This troubleshooting section contains information on how to solve the most common studio monitor problems, but it does not and cannot cover every eventuality.
- Page 11 connect all of your studio equipment to the same power group with no other devices attached. If this is not possible, experiment by connecting your devices to different power groups to see if that solves the interference problem. Audible resonance or Speakers not isolated from When your speaker is placed on a surface vibrations...
-
Page 12: Specifications
– Solid wooden housing – Black or white finish – Various connection possibilities (RCA, 6.35mm TRS jack, XLR) – HF trim control – Integrated bass port on the front – Backlit Devine logo (status-indicator) – Built-in overload protection Model RX-5A RX-6A...
Need help?
Do you have a question about the RX Series and is the answer not in the manual?
Questions and answers