Advertisement
Quick Links
Advertisement

Related Manuals for Broyhill A102010903


Summary of Contents for Broyhill A102010903
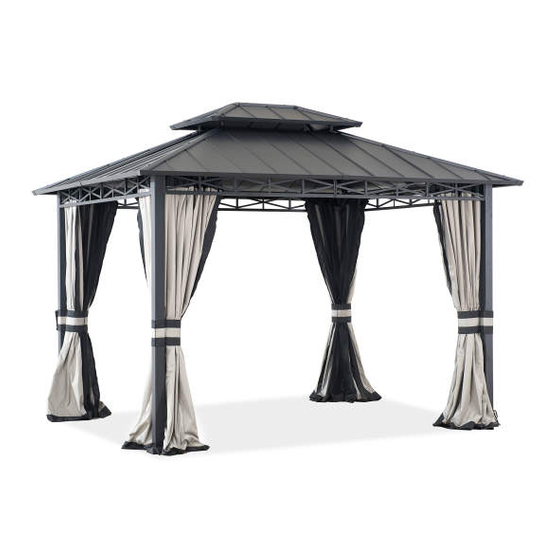
- Page 1 A102010903/A102010904 810490386/810490387 CASTLE PINES HARD TOP GAZEBO...
- Page 2 GENERAL BEST PRACTICES FOR ASSEMBLY: • Please read and understand this entire manual before attempting to assemble or install the product. • Before beginning assembly of product, make sure all parts are present. Compare parts with package contents list and hardware contents list.
- Page 3 EXPLODED DRAWING 3/29...
- Page 4 Label Part Number Description Part Image P000200557 Post P006100206 Base cover P000100405 Base plate Connector for P000501514 slant beam P000401082 Short screen1 P000401083 Short screen2 P000401080 Long screen1 P000401081 Long screen2 P005700789 Short netting tube P005700787 Long netting tube Connector for P000501515 middle beam P000500239...
- Page 5 P005800001 Hook Small roof top P000600523 beam (short side) Small roof top P000600537 beam (long side) P000700889 Small roof cover1 Small roof middle P000700891 cover P000700890 Small roof cover2 Small roof sloping P000800320 beam cover plate P000700888 Small top cover Big roof short P000600577 beam1...
- Page 6 Big roof middle P000700894 cover 3 Big roof middle P000700895 small cover (left) Big roof middle P000700896 small cover (right) P000700897 Big roof left cover Big roof right P000700898 cover Big roof sloping P000800321 beam cover plate P001300120 Curtain P001200245 Mosquito Netting Stake Φ8*180...
- Page 7 HELPFUL HINTS • Tools needed and not included: • How many people needed for the installation work • Estimate assemble time: 150-180 minutes How many people needed for the installation work 7/29...
- Page 8 Attach the Base plate(C) and Base cover (B) to the Post(A) by by Bolt(H1), then attach Connector for cant beam(D) to the upper Post(A), tight them by Wrench(HW1) 8/29...
- Page 9 Insert the screen(G/E) to screen(J/F),fixed with bolt(H1). Then attached netting tube(L/ K) and Connector for middle beam(M) with bolt(H1) to screen(E/F/G/J),tighten with wrench(HW1). 9/29...
- Page 10 Attached the assembled short screen(E/F) to the post (A) with bolt(H1), tighten with wrench(HW1). 10/29...
- Page 11 Attached the assembled long screen(G/ J) to the post (A) with bolt(H1), tighten with wrench(HW1). 11/29...
- Page 12 Assemble the Big roof frame long side(Q), Big roof frame short side(P) and Big top connector(N) by Bolt(H1), tighten with wrench(HW1). 12/29...
- Page 13 Assemble the Slanting beam(R), Connector for slant beam(D) and Big top connector(N) by Bolt(H1), tighten with wrench(HW1). 13/29...
- Page 14 Attached the Middle beam(S) to Connector for middle beam(M) on Big roof frame (P/Q) with bolt(H1), tighten with wrench(HW1). 14/29...
- Page 15 Attach Small roof connection tube(T) to Slant beam for small roof (U) by Bolt(H1) and Wrench(HW1), then tight up the Hook(V) to Small roof connection tube(T). 15/29...
- Page 16 Assemble the small roof top beam(W/X) to Slant beam for small roof (U) by Bolt(H1) and Wrench(HW1),then locked them to the Big top connector (N) by Bolt(H1) and Wrench(HW1). 16/29...
- Page 17 Refer to upper image to place the Cover(Y/AA/AB) to the correct location, then locked them by Bolt(H1) and Wrench(HW1) 17/29...
- Page 18 Attached Small roof sloping beam cover plate (AC)to samll roof with bolt(H2), tighten with wrench(HW1). 18/29...
- Page 19 Attached Small top cover (AD)to samll roof with bolt(H1), tighten with wrench(HW1). 19/29...
- Page 20 Attach Big roof short beam1(AE), Big roof long beam 1(AG) to Slanting beam(R) and Middle Beam(S) with Bolt(H1), tighten with wrench(HW1). 20/29...
- Page 21 Attach Big roof left lower beam(AF/AJ) and Big roof right lower beam(AK/AL) to Slanting beam(R) and Middle Beam(S) with Bolt(H1), tighten with wrench(HW1). 21/29...
- Page 22 Put Big roof middle cover 1 (M) to the middle location of l ong side like right image 22/29...
- Page 23 Put the Big roof middle cover 2 (AN) and Big roof middle cover 3 (AP) beside the Big roof middle cover 1(AM) at the long side, then put the Big roof middle cover 2 (AN) and Big roof middle cover 3 (AP) at the short side, locked them by Bolt(H1) and Wrench(HW1) 23/29...
- Page 24 Put the Big roof middle small cover (AQ,AR) beside the Big roof middle cover 2(AN) and Big roof middle cover 3(AP) ,lock them by Bolt(H1) and Wrench(HW1) 24/29...
- Page 25 Put the Big roof left cover(AS) and Big roof right cover(AT) beside the Big roof middle small cover (AQ/AR), lock them by Bolt(H1) and Wrench(HW1) 25/29...
- Page 26 Attach Big roof sloping beam cover plate(AU) to the Big top by Bolt(H2) and Wrench(HW1) 26/29...
- Page 27 Please do the matching of zippers for different panels as showing the picture Hang the Curtain(AV)on the netting tube (K/L) with Ring(HR) 27/29...
- Page 28 Please do the matching of zippers for different panels as showing the picture Hang the Mosquito Netting(AW)on the netting tube (K/L) with Ring(HR) 28/29...
- Page 29 Pulling UP the Base Cover(B), the fixed the Gazebo to the ground by Stake(HS) and Base Plate(C) Production number: 2021100351 29/29...
Need help?
Do you have a question about the A102010903 and is the answer not in the manual?
Questions and answers