Table of Contents
Advertisement
Quick Links
Advertisement
Table of Contents

Summary of Contents for ABB ACS880-7407LC
- Page 1 — ABB INDUSTRIAL DRIVES ACS880-7407LC semiconductor switch units Hardware manual...
- Page 3 ACS880-7407LC semiconductor switch units Hardware manual Table of contents 3. Electrical installation 4. Start-up 3AXD50000738984 Rev A Original instructions EFFECTIVE: 2021-10-01...
-
Page 5: Table Of Contents
Table of contents 5 Table of contents 1 Introduction to the manual Contents of this manual ................Applicability ..................Safety instructions ................. Target audience ..................Categorization by option code ..............Use of component designations ..............Terms and abbreviations ................Related manuals ................... Related drive manuals ................. - Page 6 6 Table of contents 6 Fault tracing Contents of this chapter ................Indicators .................... Fault mode of the DC breaker switch ............7 Maintenance Contents of this chapter ................Maintenance intervals ................Description of symbols ................ Recommended maintenance intervals after start-up ........Cabinet ....................
- Page 7 Table of contents 7 Applicable standards ................Markings ..................... Disclaimers ..................Generic disclaimer ................Cybersecurity disclaimer ..............Further information...
-
Page 9: Introduction To The Manual
Contents of this manual This chapter gives basic information on the manual. Applicability This manual is applicable with ACS880-7407LC semiconductor switch units. Safety instructions Obey all safety instructions delivered with the drive. • Read the complete safety instructions before you install, commission, use or service the drive. -
Page 10: Categorization By Option Code
10 Introduction to the manual Categorization by option code The option code (option +A123) identifies information which concerns only a certain optional selection. The options included in the unit are listed on the type designation label. Use of component designations Some device names in the manual include the item designation in brackets, for example [Q20], to make it possible to identify the components in the circuit diagrams of the drive. -
Page 11: Related Dc Breaker Switch Manuals
Converter module lifting device for drive cabinets hardware manual 3AXD50000210268 Manuals for I/O extension modules, fieldbus adapters, safety options etc. You can find manuals on the Internet. See www.abb.com/drives/documents. For manuals not available in the document library, contact your local ABB representative. Related DC breaker switch manuals ■... -
Page 13: Operation Principle And Hardware Description
Contents of this chapter This chapter describes the intended use and construction of the semiconductor switch unit ACS880-7407LC. The chapter also presents the type designation label and the type code. Operation principle The semiconductor switch unit protects the drive DC bus in a short-circuit situation. The main component is a semiconductor DC breaker switch. -
Page 14: Overview Diagram Of The Drive System
14 Operation principle and hardware description • The unit operates independently and does not require any external control system. • The unit provides interfaces to external control systems for monitoring, interlocking/triggering and configuration purposes. Overview diagram of the drive system This diagram shows an example multidrive. -
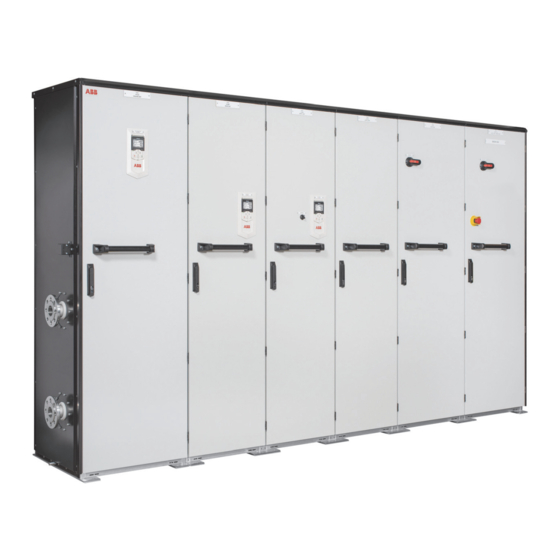
Page 15: Overview Diagram Of The Semiconductor Switch Unit
Operation principle and hardware description 15 Overview diagram of the semiconductor switch unit DC breaker switch: • On the left: DC+ busbar connection (default configuration, option +F322). • On the middle: DC- busbar connection (option +F323). • On the right: DC+ busbar connection and DC- busbar connection (option +F322 and F323). •... -
Page 16: Layout Drawings
16 Operation principle and hardware description Layout drawings Layout of a drive system with a semiconductor switch unit ■ Auxiliary control cubicle Incoming cubicle (AC) Supply module cubicle 1…3 Supply unit Inverter unit Semiconductor switch unit... -
Page 17: Layout Of A Semiconductor Switch Unit
Operation principle and hardware description 17 Layout of a semiconductor switch unit ■ Door devices. See Control of the semiconductor switch unit (page 18). DC breaker switch [Q3] Terminal block for external control connections [X330] Modbus connector (Ethernet RJ485) [R3.1:X20] on the breaker control interface unit (behind the support) Backup fuses [F3.1, F3.2, option +F260] Cooling inlet manifold with stop and drain valves Heat exchanger... -
Page 18: Control Of The Semiconductor Switch Unit
18 Operation principle and hardware description Control of the semiconductor switch unit Green indicator [P30.2]: DC breaker switch closed Yellow indicator [P30.1]: DC breaker switch open Default control connection diagram (page 26) for information on the control signal interface. -
Page 19: Type Designation Label(S)
Each unit has a type designation label attached onto the inside of the cubicle door. The type designation label includes the ratings, appropriate markings, a type designation and a serial number of the unit. An example is shown below. ACS880-7407LC-1250A-7+A012+C121+F260 G300+G320+G330+H367 MADE IN FINLAND... -
Page 20: Type Designation Key
(common for the whole product series), followed by descriptive digits. The plus codes are separated by plus signs. Basic code ■ The basic code is described in the table below for an example code ACS880-7407LC-3000A-7. Code Description ACS880 Product series 7407LC Product type. - Page 21 Operation principle and hardware description 21 Code Description G300 Cabinet and module heating elements (external supply) G301 Cabinet lighting G304 Control (auxiliary) voltage 115 V AC G315 Tin-plated copper DC busbars G320 Control (auxiliary) voltage 230 V AC G330 Halogen-free wiring and materials G338 Wire marking class A1 G339...
-
Page 23: Electrical Installation
Electrical installation 23 Electrical installation Contents of this chapter This chapter contains the electrical safety precautions, and the instructions for connecting the external control cabling to the semiconductor switch unit ACS880-7407LC. -
Page 24: Electrical Safety Precautions
24 Electrical installation Electrical safety precautions These electrical safety precautions are for all personnel who do work on the drive, motor cable or motor. WARNING! Obey these instructions. If you ignore them, injury or death, or damage to the equipment can occur. If you are not a qualified electrical professional, do not do installation or maintenance work. - Page 25 Electrical installation 25 Important! Repeat the measurement also with the DC voltage setting of the tester. Measure between each phase and ground. There is a risk of dangerous DC voltage charging due to leakage capacitances of the motor circuit. This voltage can remain charged even long time after the drive power off.
-
Page 26: Connecting The Control Cables
26 Electrical installation Connecting the control cables Default control connection diagram ■ +24 V -K30 -K30 DOOR X330 -P30.1 -P30.2 -R3.1 -R3.1 -24 V -X20 -X11 Interlock Trigger Feedback Modbus By default non-functional (not activated by a parameter). See the delivery-specific circuit diagrams for the delivery-specific use. -
Page 27: Connection Procedure
Electrical installation 27 Connection procedure ■ WARNING! Obey the safety instructions of the drive. If you ignore them, injury or death, or damage to the equipment can occur. If you are not a qualified electrical professional, do not do installation or maintenance work. 1. - Page 28 28 Electrical installation Note 1: Keep the shields continuous as close to the connection terminals as possible. Secure the cables mechanically at the entry strain relief. Note 2: If the outer surface of the shield is non-conductive: • Cut the shield at the midpoint of the bare part. Be careful not to cut the conductors or the grounding wire (if present).
- Page 29 Electrical installation 29 Cable diameter in mm Max. number of cables per grommet ≤ 13 ≤ 17 < 25 Electrical installation ≥ 25 5. Arrange the bunches according to size from thickest to the thinnest between the E 5. Arrange the bunches according to size from thickest to the thinnest between the EMI conductive cushions.
-
Page 31: Start-Up
Start-up 31 Start-up Contents of this chapter This chapter contains the start up instructions for the semiconductor switch unit ACS880-7407LC. Start-up procedure Tasks Safety WARNING! Obey the safety instructions of the drive. If you ignore them, injury or death, or damage to the equipment can occur. - Page 32 Tuning the settings of the DC breaker switch in the semiconductor switch unit The parameter settings are adjusted by ABB for each delivery on basis of the project specification. The user does not need to change these settings typically. If you need to adjust the settings, see the DC breaker switch user's manual (AD-10811-020) by Astrol Electronics AG: www.astrol.ch...
-
Page 33: Operating Instructions
35). Adjusting the settings of the DC breaker switch The parameter settings of the DC breaker switch are adjusted by ABB for each delivery on basis of the project specification. The user does not need to change these settings typically. -
Page 35: Fault Tracing
Fault tracing 35 Fault tracing Contents of this chapter This chapter contains descriptions of status indicators of the semiconductor switch unit ACS880-7407LC. It also contains a description of the Fault mode of the DC breaker switch, and related instructions. Indicators Desig. -
Page 37: Maintenance
Contents of this chapter This chapter specifies the user maintenance tasks and their intervals for the semiconductor switch unit ACS880-7407LC. It also contains instructions for maintenance tasks. Maintenance intervals The tables below show the maintenance tasks which can be done by the end user. The complete maintenance schedule is available on the Internet (www.abb.com/drivesservices). -
Page 38: Recommended Maintenance Intervals After Start-Up
Cabinet auxiliary power supplies Note: • Maintenance and component replacement intervals are based on the assumption that the equipment is operated within the specified ratings and ambient conditions. ABB recommends annual drive inspections to ensure the highest reliability and optimum performance. -
Page 39: Cabinet
Maintenance 39 Cabinet Cleaning the exterior of the drive ■ WARNING! Obey the safety instructions of the drive. If you ignore them, injury or death, or damage to the equipment can occur. If you are not a qualified electrical professional, do not do installation or maintenance work. 1. -
Page 40: Fans
40 Maintenance Fans Replacing the cooling fan ■ WARNING! Obey the safety instructions of the drive. If you ignore them, injury or death, or damage to the equipment can occur. If you are not a qualified electrical professional, do not do installation or maintenance work. WARNING! Use the required personal protective equipment. -
Page 41: Dc Breaker Switch
Maintenance 41 DC breaker switch Replacing the DC breaker switch ■ Tools: • Wrenches, socket set, screw drivers etc. standard installation tools. Recommendation: A 24 mm and a 34 mm open-jaw crowfoot wrench and an extension bar for opening and removing of the cooling pipe connectors below the module. - Page 42 42 Maintenance 1. Stop the drive and do the steps in section Electrical safety precautions (page 24). 2. Open the door of the cubicle. 3. Remove the shrouds at the top and bottom of the cubicle (option +C121). 4. Disconnect any cabling from the control interface of the DC breaker switch (on top). Mark down the connections for later use.
- Page 43 Maintenance 43 5. A) If the semiconductor unit is not equipped with fuses (without option +F260): Remove the DC busbar assemblies. WARNING! Be very careful when you remove bolts and screws. Do not drop anything inside the cabinet. Pay extra attention to the horizontal rear busbar plates. When you remove the bolts, hold the plate to prevent it from falling behind the DC breaker switch.
- Page 44 44 Maintenance • Remove the bolts (a) that attach the lower fuse busbars (b) to the busbars of the DC breaker switch. There are 6 bolts on the right and 6 on the left. • Remove the bolts (c) that attach the the lower fuse busbars to the fuses from below. •...
- Page 45 Maintenance 45 7. Disconnect the inlet and outlet pipes from the DC breaker switch, and remove the inlet and outlet connectors. • Disconnect the outer nut (a) that attaches the pipe onto the connector. Slide it down the pipe as low as possible. Recommendation: Use a 24 mm open-jaw crowfoot wrench with extension bar.
- Page 46 46 Maintenance 9. Install the front lifting eyes and attach the hoist. WARNING! Align lifting slings as upright as possible (~0° lifting angle). The lifting angle must never exceed 60°. It can cause danger, and damage to the DC breaker switch. Use lifting beams if necessary. •...
- Page 47 Maintenance 47 11. Pull the DC breaker switch out of the cubicle. At the same time, keep constant tension on the lifting slings to transfer the whole weight of the DC breaker switch onto the hoist gradually. 12. Lift the DC breaker switch on a pallet. 13.
-
Page 48: Fuses (Option +F260)
48 Maintenance Fuses (option +F260) Replacing the fuses ■ WARNING! Obey the safety instructions of the drive. If you ignore them, injury or death, or damage to the equipment can occur. If you are not a qualified electrical professional, do not do installation or maintenance work. WARNING! Be very careful when you remove bolts and screws. -
Page 49: Ordering Information
The information is intended for system integrators and panel builders who construct the unit out of components and need to acquire them separately. The information is not relevant for the cabinets-installed semiconductor switch units (ACS880-7407LC). The cabinet-installed units include all components as standard. DC breaker switch Refer to Technical data (page 57) for the DC breaker switch types. -
Page 50: Cooling System Parts
52), Pipe connect- Pipe connectors: Included in the manifold kit. To be ordered separately or for the DC break- for the DC breaker switch (ABB kit available). er/switch (page 53) Inlet or outlet manifolds Coolant distribution manifold kits (page 51) Inlet or outlet stop valves (part of the manifold kits). -
Page 51: Coolant Distribution Manifold Kits
Connectors for PA piping Plugs for unused piping connectors Chokes for flow limitation – not used with the ACS880-7407LC. You must order the following parts separately as they are not included in the manifold kits: • Connectors to attach to inlet, outlet and drain valves •... -
Page 52: Piping
50 m, PA11P40, 8/6 mm, L50m 3AXD50000419302 Note: The piping between the manifolds and main pipes (1), the drain pipes (2), or the main pipes (3) are not part of the standard offering. Contact ABB for availability. Heat exchanger ■... -
Page 53: Cooling Fan
Ordering information 53 Cooling fan ■ The fan blows air through the heat exchanger, circulating the air inside the cabinet. The kit contains the fan installed into its cowling which mounts to the heat exchanger bottom guide. The fan is selected according to the auxiliary voltage. Auxiliary voltage Ordering code Illustration... -
Page 55: Internal Cooling Circuit
Internal cooling circuit 55 Internal cooling circuit Contents of this chapter For information on the internal cooling circuit of the drive, refer to ACS880-107LC inverter units hardware manual (3AXD50000196111 (English)). Cooling circuit of the semiconductor switch unit Refer to Cooling circuit overview (page 50). -
Page 57: Technical Data
Technical data 57 Technical data Contents of this chapter This chapter contains technical data for the semiconductor switch unit ACS880-7407LC. Electrical ratings ACS880- Frame size DC breaker switch Nominal ratings Input data 7407LC-... A (DC) V DC A DC 0500A-7 SSU1 CBM-0.5-1.5-O3-IB-BN-... -
Page 58: Fuses (Option +F260)
58 Technical data Fuses (option +F260) ACS880- DC fuses 7407LC-... Quantity Manufacturer Type 0500A-7 1250 Bussmann Eaton 170M6546 1250A-7 2000 1000 Bussmann Eaton 170M7608 3000A-7 5000 1000 Bussmann Eaton 170M7622 Dimensions and weights ACS880- Height Width Depth Weight 7407LC-... 0500A-7 2002 1250A-7 2002... -
Page 59: Auxiliary Circuit Current Consumption
Auxiliary circuit current consumption Auxiliary circuit current consumption varies depending on the actual drive configuration and options. Contact ABB for the delivery-specific value. Energy efficiency data (EU ecodesign) Energy efficiency data is not provided for the drive/unit. The multidrives are not in the scope of the EU ecodesign requirements (Regulation EU/2019/1781) or the UK ecodesign requirements (Regulation SI 2021 No. -
Page 60: Materials
60 Technical data Operation Storage Transportation installed for stationary in the protective package in the protective package Contamination IEC/EN 60721-3-3:2002: IEC 60721-3-1:1997 IEC 60721-3-2:1997 Classification of environ- Chemical gases: Class Chemical gases: Class mental conditions - Part 3- 3: Classification of groups Solid particles: Class 1S3 Solid particles: Class 2S2 of environmental paramet-... -
Page 61: Package
IEC 62635 guidelines. To aid recycling, plastic parts are marked with an appropriate identification code. Contact your local ABB distributor for further information on environmental aspects and recycling instructions for professional recyclers. End of life treatment must follow international and local regulations. -
Page 62: Disclaimers
Notwithstanding any other provision to the contrary and regardless whether the contract is terminated or not, ABB and its affiliates are under no circumstances liable for damages and/or losses related to such security breaches, any unauthorized access, interference, intrusion, leakage and/or theft of data or information. - Page 63 Product and service inquiries Address any inquiries about the product to your local ABB representative, quoting the type designation and serial number of the unit in question. A listing of ABB sales, support and service contacts can be found by navigating to www.abb.com/searchchannels.
- Page 64 3AXD50000738984A © Copyright 2021 ABB. All rights reserved. Specifications subject to change without notice.