Table of Contents
Advertisement
Quick Links
Table of Contents
1
Read this First ...............................................................................................1
Safety...............................................................................................................1
Declaration of Conformity (EU only).................................................................1
About this manual............................................................................................1
2
How this Help Works ....................................................................................3
Help Menu........................................................................................................3
User Guide.......................................................................................................4
Remote Assistance (optional)..........................................................................5
3
Meet your Document System ......................................................................6
Introduction......................................................................................................6
Operating Controls...........................................................................................9
Control Panel.................................................................................................10
Power Up........................................................................................................11
How to Operate the Touch Screen.................................................................12
Use a Web Browser.......................................................................................13
What is a Job?...............................................................................................14
Job List...........................................................................................................15
Job Overview.................................................................................................16
MaxiFeeder....................................................................................................18
Installation of the Side Exit.............................................................................19
High Capacity Vertical Stacker.......................................................................19
Shut Down the System...................................................................................20
4
Working with Jobs ......................................................................................21
Introduction....................................................................................................21
Use an Existing Job.......................................................................................21
Create a New Job..........................................................................................22
About Automatic Jobs....................................................................................23
Advertisement
Table of Contents
Troubleshooting

Summary of Contents for Neopost DS-64I
-
Page 1: Table Of Contents
Table of Contents Read this First ....................1 Safety.......................1 Declaration of Conformity (EU only)..............1 About this manual....................1 How this Help Works ..................3 Help Menu......................3 User Guide.......................4 Remote Assistance (optional)................5 Meet your Document System ..............6 Introduction......................6 Operating Controls...................9 Control Panel....................10 Power Up......................11 How to Operate the Touch Screen..............12 Use a Web Browser..................13 What is a Job?....................14... - Page 2 Create an Automatic Job................23 Create a Manual Job..................24 Create a test mail set..................33 Mail Sets......................39 Change to Another Feeder Tray..............43 Link Feeder Trays...................44 Edit a Job.......................45 Save a Job.....................45 Delete or Move an Enclosure.................46 Copy a Job.....................47 Delete a Job....................47 Rename a Job....................48 Lock a Job......................49 Loading the System ...................50...
- Page 3 BCR Code Description...................92 OMR Code Description..................96 Flex Reading Code Description..............99 Create Jobs with Reading................100 Reading Settings..................105 Operator Maintenance ................107 Maintenance Schedule................107 Clean and Replace Brushes................108 Replace or Clean Moistening Cloth.............109 Calibrate Photocells..................110 Fault Finding .....................111 Messages.....................111 Clearing stoppages..................114 Operator Troubleshooting................118 Troubleshooting....................119 Specifications ...................123 Technical Specifications................123...
-
Page 5: Read This First
Read this First Safety Ensure you have read and fully understood the safety requirements in the Safety Guide. Declaration of Conformity (EU only) The product presented in this guide meets the requirements of applicable directives. For more details refer to the Declaration of Conformity. Contact your authorized distributor for availability of this document. - Page 6 Symbols This manual uses the symbols listed below. This symbol... Indicates... WARNING: Indicates a human safety hazard. ATTENTION: A risk to the equipment or mail could result from an action you may perform. NOTE: A remark that explains different cases or specificities. TIP: Advice to help save you time when processing your mail.
-
Page 7: How This Help Works
How this Help Works Help Menu The help button [?] gives access to help topics via a pull-down menu. The contents of the help menu can be different for your situation. The help menu can contain the following topics: • Search: use the search engine to find a specific topic. •... -
Page 8: User Guide
User Guide You can use this guide as follows: Use the contents overview to browse the contents. When you are finished you can close the User Guide with the Close button. To keep the topic from the User Guide active, you can use the Minimize button. When you click the active Help button, the User Guide is restored. -
Page 9: Remote Assistance (Optional)
Remote Assistance (optional) Ask your authorized distributor if this feature is available for your system/organization. It is necessary that the system is connected to the internet. (Online) Remote Assistance is a tool for help desk guidance. The Remote Assistance screen can be entered by tapping on the "Remote Assistance" button in the Help menu. Add the support key supplied by the support assistant and follow the instructions as indicated by the support assistant. -
Page 10: Meet Your Document System
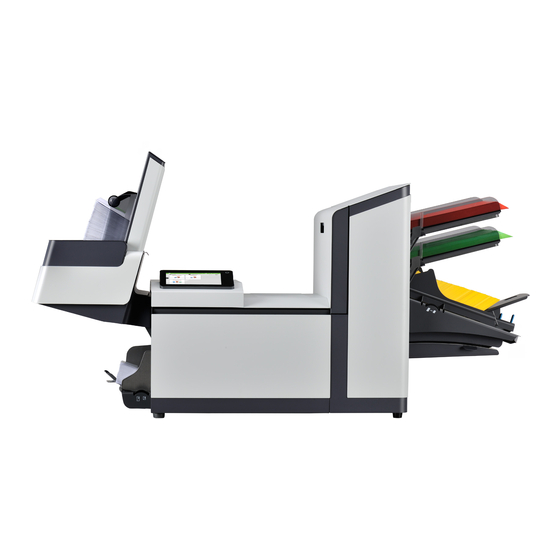
Meet your Document System Introduction The system is a folding and inserting system for processing mail easily. The system: • feeds documents • folds the documents • inserts the documents into envelopes • seals the envelopes • stacks the envelopes Automatic monitoring ensures the correct number of documents per envelope. - Page 11 The figure shows an overview of the system. Document Feeders (1) The Feeder is the feeding part of the system. There are two types of feeders: the automatic and the special feeder. The automatic feeder does not require any adjustments for the separation.
- Page 12 Envelope feeder (4) Envelopes that are placed on a stack by the user, are fed one by one into the system by the envelope feeder. Inserter (5) After the documents are folded, the documents are transported to the inserter. The inserter inserts the documents into a waiting envelope.
-
Page 13: Operating Controls
Operating Controls A - Envelope catch tray (optional) K - Airplugs for cleaning the sensors B - Envelope slide (optional) L - Bellows C - Control panel M - Handle for clearing stoppages D - Upper unit N - Sealing liquid reservoir E - Unlocking handle / hand grip upper unit O - Side cover (opened) F - Document feeders... -
Page 14: Control Panel
Control Panel On/Off (B): The touch sensitive button in the upper right corner of the display switches the system on or off. If the system is not used for one hour, the system switches off to safe power. Status LED (C): A status LED indicates the state of the machine, a green LED indicates that the system is switched on, a blinking red LED indicates the system is switched off. -
Page 15: Power Up
Power Up To start up the system: Connect the system to the mains power supply. You can severely damage the machine if it is connected to the incorrect mains voltage. Before plugging in the machine, check if the local voltage is the same as the voltage mentioned on the type plate. -
Page 16: How To Operate The Touch Screen
The touch screen shows the Job list screen. How to Operate the Touch Screen You can operate the touch screen like a tablet: • Tap : touch and release the screen with your finger. • Swipe: touch the screen, hold it and move your finger(s) left, right, up or down. •... -
Page 17: Use A Web Browser
Tap again on a random white space position in order to return to normal view again. Use a Web Browser You can open a web browser in the user interface of the system. Use the web browser as follows: Tap on the icon in the upper left corner of the screen to open the Web browser. You can tap or swipe to navigate through web sites. -
Page 18: What Is A Job
Tap the Close button (4) in the upper left corner of the screen to close the web browser. What is a Job? If you have to process a lot of mail sets of the same type (for example bills), you can save the settings to a 'job'. -
Page 19: Job List
Job List When you start up the system, the ‘Job list’ menu appears. Here you can do the following: 1. If you want to open the web browser tap the icon at (1). See also Open a web browser on page 13. 2. -
Page 20: Job Overview
Job Overview If you want more information on a job, select the job in the Job List menu. The touch screen shows the following information of the selected job: • Job name • Job settings (for example the document and envelope type) •... - Page 21 The following is a list of symbols or icons and their descriptions. Main document. Document with reading Shows the correct document Shows the correct document orientation; A is the address. orientation; A is the address. Daily mail Enclosure Feature to manually insert mail-sets one by one into the system.
-
Page 22: Maxifeeder
Dfc/mail set thickness de- Fold type tection This icon shows what kind of Double feed control and/or fold type has been set. mail set thickness detection has been set to 'off'. By default the dfc/mail set thickness detection will be set to 'on' and the icon will not be shown. -
Page 23: Installation Of The Side Exit
Installation of the Side Exit The system can be equipped with a side exit and catch tray. The side exit can be fitted instead of the envelope receiving tray. The side exit allows a conveyor or a franking system to be fitted in line with the system. The side exit can also be used with a catch tray to achieve vertical stacking. -
Page 24: Shut Down The System
Lift the stacker with the suspension hooks over the two rods (upper and lower) and lower it. Connect the connector Adjust the side guides with wheel A until a margin of 3 to 5 mm is left between the envelopes and the side guides. For small envelopes it can be necessary to remove the extensions B from the envelope support. -
Page 25: Working With Jobs
Working with Jobs Introduction With the system you can process mail sets in the following ways: • Using an existing job: Existing jobs are shown in the Job list and saved via the 'automatic' or 'manual' job creation process. How to use an existing job is described Using an existing job on page 21. -
Page 26: Create A New Job
If example mail set is OK: tap [Start]. If the example mail set is not OK: adjust the address position or envelope stop position or check and re-adjust the job settings. If desired tap the counter button to set the counters. See Counter settings on page 29. -
Page 27: About Automatic Jobs
About Automatic Jobs You can save every automatically created job and edit it like any job. An Automatic job processes mail sets according to the following rules: • The machine picks one sheet from each filled feeder; • The picked documents will be folded (if necessary) and inserted into an envelope; •... -
Page 28: Create A Manual Job
Make sure that the address position and the envelope stop position is correct. If not, adjust the address position on page 34 and envelope stop position on page 37. If necessary, tap the counter symbol to set the counters. See Counter settings page 29. - Page 29 Mail Settings Envelope Tap [Envelope]. Select a predefined envelope or create a custom envelope on page 41. Optionally tap [Use envelope] to set the use of envelopes to 'off' if you want to Create a job without the use of envelopes. Tap [Sealing] to switch it on or off.
- Page 30 Main document Tap [Main document]. Select a predefined document or create a custom document on page 42. Change the [Number] to add more than one document from a feeder (multiple sheet feeding). Optionally tap Daily Mail to set Daily Mail to 'on' (see also Daily Mail on page 40) or tap [Advanced] to set the DFC settings (refer to...
- Page 31 Tap [Advanced]. Tap Double Feed Control to switch it on or off. Confirm the settings with [OK] and continue with the document settings. Enclosure Tap [Add enclosure]. Select a predefined document or create a custom document as your enclosure (see Create a custom document) on page 42.
- Page 32 Fold Settings Default the machine suggests the most logical fold type. This fold type is highlighted. However, you can select other fold types and change their settings. Tap a fold type. If necessary, tap [Settings] to change the fold settings. Tap [>].
- Page 33 Optionally tap the [Advanced] button to set the Advanced settings per job (see also Advanced settings on page 74). Tap [>]. Finish the job defenition and start the job (see Finish the job definition and start the job page 31) or set the Counters (see counter settings on page 29).
- Page 34 In the Counter submenu you can set the (daily) Job counter, the Stop counter and the Job total counter. The following will be shown in the Counter submenu: • Job counter (as shown), the daily job counter: number of mail sets that have been processed using this job, after tapping [Start].
- Page 35 Tap the reset button for the Job total counter to set it to zero. If you set the Job total counter to zero the number history of this job will be lost. Tap [OK] to go back to the job overview screen and tap [Start]. Finish the Job Definition and Start the Job When you have finished the exit settings, the touch screen shows an overview of the job settings.
- Page 36 Tap [1x] to create a test mail set (see Test mail set on page 33). If desired, you can save the job (see Save a job on page 45). Tap [Start] to start the job.
-
Page 37: Create A Test Mail Set
Create a test mail set Create a Test Mail Set Before starting an existing job or a new, manual created job, it is possible to create a test mail set. This test run is intended to validate the settings of the Inserting System: •... - Page 38 Adjust the Address Position If the address on your mail is not correctly positioned behind the envelope window, change the address position as follows: Adjusting the address position is only possible after creating an example mail set (by using the [1x] button). Choose a job and tap [1x].
- Page 39 Adjust the Envelope Insert Fingers To verify that the position of the fingers is correct: Choose a job and tab [1x] (envelope only). Tap the 'Envelope stop position' button. Unlock the unlocking lever A of the upper unit and pull up the upper unit. Tap the arrow to move to the next screen.
- Page 40 Follow the instructions on screen. If the insert fingers are not correct, adjust the fingers as follows: Loosen the knurled knob C on top of each finger. Adjust each finger A so that the tip enters about 5 mm (0.2 inch) into the envelope. Re-tighten the knurled knob.
- Page 41 Make sure that the finger position is correct. If not, repeat the steps for adjusting the fingers. Verify the Insert Position This adjustment must only be checked in case of problems or when changing the envelope type. To verify the insert position: Choose a job and tap [1x] (envelope only).
- Page 42 Follow the instructions on screen. Tap the envelope button to fetch another envelope. Make sure that the insert position is correct. If not, repeat the steps for adjusting the insert position.
-
Page 43: Mail Sets
Mail Sets Adjust the Separation of Special Feeders Adjust the separation of special feeders as follows: Push knob A forward until it clicks. Turn knob A counter clockwise to open the separation gap. Place a document on the feeder tray and slide it into the system until it can go no further. - Page 44 Pull the knob A back again when ready. Process a Mail Set with BRE or Inserts A mail set with BRE or insert consists of a main document (address carrier), a BRE or an insert and perhaps other enclosures. This set is inserted into an envelope. From the Job list menu, tap [New job].
- Page 45 Turn down the left side guide A of the upper tray. Now you can see the Daily Mail handle B. Move the handle B to the right to enable the Daily Mail function. Turn side guide A upwards. Place the document or document set in the feeder tray. The document or document set will be folded and inserted into the envelope as described in the selected job.
- Page 46 Enter the envelope height. Tap the [Flap] tab if you use open flap envelopes. Select if you want to feed envelopes with flaps up (On) or with flap down (Off). Tap [OK] to save and close the envelope settings. Complete the Fold Settings and Exit Settings to complete the job and tap [Save] to save the job.
-
Page 47: Change To Another Feeder Tray
Enter the height of the document. Confirm the document settings with [OK]. Complete the Fold Settings and Exit Settings to complete the job and tap [Save] to save the job. Follow the instructions as described in 'Create a test mail set' on page 33. -
Page 48: Link Feeder Trays
Tap the dotted box of the feeder tray where you want to move your document to. The new feeder tray is selected for feeding of the document. Tap [Save] to save the feeder tray selection to the job. Link Feeder Trays Link feeder trays as follows: Select a job from the Job list. -
Page 49: Edit A Job
Edit a Job To edit an existing job: From the Job list menu, select a job you want to edit. Tap [Edit]. When you tap [Edit], you enter the guided job flow that enables you to make the desired changes. Make the changes you want to make. -
Page 50: Delete Or Move An Enclosure
If necessary, add a description to the job. The description is visible in the job list. Tap [OK] to save the job. The job is added to the job list. Delete or Move an Enclosure If you want to delete an enclosure in your job or change the order of the enclosures, proceed as follows: From the Job list menu, select a job you want to edit. -
Page 51: Copy A Job
Tap [Save] to save the changes. Tap [1x] to make sure that the Insert Position and Address Position are correct (see Verifying the Insert Position on page 37 and Adjusting the Address Position page 34). Copy a Job To copy existing job settings to a new job: Tap and hold the job in the Job list menu. -
Page 52: Rename A Job
Tap [Delete]. Tap [OK] to confirm. Rename a Job To rename a job: Tap and hold the job in the Job list menu. Tab [Rename]. Enter the name of the new job and tab [OK]. -
Page 53: Lock A Job
Lock a Job To lock an existing job: Log on as supervisor. Tap and hold the job in the Job list menu. Tap [Lock]. Tap [OK] to confirm. The job shows a lock in the job list. If the supervisor is logged on, the lock is open. If the operator is logged on, the lock is closed. -
Page 54: Loading The System
Loading the System Document Orientation The touch screen shows how to load documents and envelopes into the feeders. The table shows the meaning of the symbols: Address carrier face up and leading (top address) Address carrier face down and trailing (top address) Enclosure face up Enclosure face down... -
Page 55: Document Feed Trays
Document Feed Trays Install the Document Feed Trays Place the document feeder trays in position: Hold the document feeder tray slightly inclined as shown in the figure. Place the front end of the document feeder tray underneath the two black rollers. - Page 56 Move the document feeder tray upwards (lifting the black rollers), until it is possible to ‘hook’ the feeder tray into place. Move the document feeder tray towards the machine and move the hooks over the mounting points (on both sides). Let the document feeder tray rest on the machine.
- Page 57 Lift the document feeder tray upwards to unhook it and then pull it out from the feeder. Loosen the knob B half a turn. Grab the side guides in the middle and push them apart as far as possible. Put a small stack of documents between the side guides. Grab the side guides in the middle and push them towards the documents.
- Page 58 Load Documents Fill the document feeder tray as follows: Open the left-hand side guide A by turning it downwards. The feed rollers will automatically be lifted. Place a stack of documents between the side guides. Turn the left side guide upwards again.
- Page 59 Document Separation The term ‘Document separation’ refers to the adjustment required for separating the upper document from the rest of the documents in the stack. This prevents pulling too much documents from the stack at the same time. The document separation for the automatic feeders is set automatically; there are no manual adjustments needed.
- Page 60 BREs with flap down and leading (top side pointing to system). Adjust the side guides by turning the thumb wheel A such that the documents/BREs just fit and can move without resistance. Too much play causes skewing. Adjust the maxiFeeder Document Separation When the maxiFeeder is used at an automatic separation feeder, the separation is set automatically.
- Page 61 The lowest feeder is feeder 1. Squeeze the two blue handles A and B and shift the feeding plate C as far as possible to the front. Push knob D forward until it clicks. Place a document/BRE on the feeder tray and slide it in the system till the leading edge is not visible anymore.
- Page 62 Load Documents (maxiFeeder) When loading the maxiFeeder, make sure that the document/BREs are positioned parallel in relation to the feeding plate assembly to ensure correct feeding. The feeding plate assembly will be shifted up automatically (when the system starts processing) until documents/BREs are underneath the rubber paper pullers.
- Page 63 To load documents: Squeeze the two blue handles A and B. Shift the feeding plate assembly C to the rear position. Loosen the stack of documents and place them in the feeder tray. BREs with flap down and leading (top side pointing to system).
-
Page 64: Loading Envelopes
Loading Envelopes Before you load the envelopes, make sure the envelope separation and side guides are correctly set. Proceed as follows: Rotate thumb wheel D to move the side guides C apart. If the distance between the side guides is too large, the envelopes will twist sidewards, when transported into the machine. - Page 65 Turn knob A counter-clockwise as far as possible. Slide an envelope (with closed flap) between the rollers in the machine and turn knob A clockwise until a slight resistance is felt when moving the envelope in and out of the machine. When the resistance is too high, turn knob A counter-clockwise, until only a slight resistance is felt.
-
Page 66: Fill The Sealing Liquid Reservoir
Fill the Sealing Liquid Reservoir Open the front cover B. Fill the reservoir A to the "Max" lip with sealing liquid. Close the front cover B. Before starting the job, wait approximately 5 minutes for the brushes to moisten or use moistened brushes. -
Page 67: Settings Menu
Settings menu Open the Settings Menu In the settings menu for the operator it is possible to edit the display settings and to set the localisation. If you want to view or edit any of the Operator Settings: Go to the Job list and tap the side menu on the left side and select [Settings]. Tap [Localisation] if you want to change the document standard, weight standard or the language. -
Page 68: The Settings Menu Supervisor
Tap [Display settings] if you want to: - set the 'Key' click to on/off - set the Volume - set the Backlight - set the Brightness To set the backlight and brightness, a test pattern is available as a reference. For more information on Open source licenses, see License information on page 78. -
Page 69: Supervisor Settings Menu
Supervisor Settings Menu Open the settings menu Supervisor If you want to view or edit any of the Supervisor settings proceed as follows: Login as Supervisor with pin code 2546. Go to the Job list and tap the side menu on the left side and select [Settings]. - Page 70 Configuration Configuration The Configuration menu contains the configuration information settings for the system. System Info The System info part of the Configuration menu shows the following information: • Flex certificate - this option is used for reading • Counter since last visit - the counter value since the last service visit •...
- Page 71 Licensed Options The Licensed options part of the Configuration menu shows the following information: • Chip ID • Serial number • Installed options The installed options are enabled with license codes. These license codes, together with the identification number of the machine enable the relevant options. The enabled and available software options are displayed in this screen.
- Page 72 Online Feature (Licenses) Management At powerup the system does an online check, provided that it is connected to a network, to determine if new features have become available or if the licensed features are still active. If for example the license end date is nearing, the machine will give a popup which license(s) almost expire(s).
- Page 73 Add a Licensed Option To add a licensed option: In the Configuration, Licensed options screen, enter the license code. Tap [Add]. The system verifies the license key. If the license key has been verified successfully, the option is added to the system and can be used.
- Page 74 Localisation Tap [Localisation] if you want to change the document standard or the language. When you need a keyboard to enter e.g. a job name, you get a special keyboard in case of Russian, Czech and Katakana. But the keyboard has always a button to switch back to the English keyboard.
- Page 75 Display Settings the settings menu for the operator on page 63. Date-time Tap [Date/time] to set the: • Date • Time • Date format; you can choose between three format to show the date: dd-mm-yyyy, mm-dd-yyyy or yyyy-mm-dd • Time format; you can choose between a '12 hours' notation or a '24 hours' notation...
- Page 76 Production Settings The Production Settings part of the Settings Menu covers settings regarding the clearing of the envelope track when selecting a (another) job from the job list or when starting a new automatic job. The screen shows three options: •...
- Page 77 Switch to an existing job If the user selects "Always"; after tapping 1x or Start: the system shows a popup asking to clear the envelopes or continue without clearing. The following two options are possible: The user chooses to clear the envelope: a.
- Page 78 Create a new automatic job If the user selects "Always"; after tapping 1x the system shows a popup asking to clear the envelopes or continue without clearing. The following two options are possible: The user chooses to clear the envelope: a.
- Page 79 The default job settings part of the Settings menu covers settings that improve the processing of jobs: • Flap closer offset: to improve the sealing of specific envelopes you can delay or advance the moment of sealing. You enter the number of pulses. A minus value means the sealing is advanced, a plus value means the sealing is delayed.
- Page 80 • BRE offset: in the case of offset is “yes”, the last document that was added to the set is shifted from the rest of the set (offsetting, see below). Explanation of BRE offset: if a BRE is longer than the set fold but shorter than the envelope height, this BRE can get folded (A in the figure).
- Page 81 The conditions are: • No multi-feed is used for the BREs. • The document directly under the BRE must have a height of at least 60 mm (2.4 inch) more than the BRE. • The height of the BRE is more than the set fold length. •...
- Page 82 License information License information shows information on the open source software that is used in the system. Diagnostics Diagnostics The diagnostics menu contains the basic diagnostics functions available for a supervisor. System Test Use the [System test] to check if all motors, clutches and sensors are correctly connected. The test briefly activates the actuators and clutches and measures the current.
- Page 83 Remove all documents and envelopes and close all covers before starting the diagnose. Tap [Start test]. When the test is finished, the Status report is shown, showing the status of all tested items. If the tests fail, contact your service organization. Inserter photocells When too much paper dust is built up at the sensors a warning message will be displayed.
- Page 84 OMR Code Definition The Reading OMR code definition screen shows the configuration of the system for OMR. For every OMR code option, it shows if it is on or off. If it is on, the screen shows information on what the system does, when it reads a mark or no mark. BCR 1D Configuration Sheet The Reading BCR 1D configuration sheet allows you to read a configuration sheet.
- Page 85 BCR 1D Code Definition The BCR 1D code definition screen shows only information when a configuration sheet is read. It shows which codes are enabled and how they work. BCR 2D Configuration Sheet The Reading BCR 2D configuration sheet allows you to read a configuration sheet. The result is visible in this screen, but also in the BCR 2D code definition screen.
- Page 86 BCR 2D Code Definition The BCR 2D code definition screen shows only information when a configuration sheet is read. It shows which codes are enabled and how they work. Last Image The Last image screen shows the result of the last code that the system read. The figure shows an example of the image of an OMR code.
- Page 87 History The History screen shows an overview of the jobs run. Tap on the [History] tab to view the Job history. Tap on the [Today] pull down button if you want to view the jobs that are run 'Today', 'Last week' or 'All'. The history is displayed on the touch screen.
-
Page 88: Connect The System To The Internet
Connect the System to the In- ternet Options for Connection Connect the system to the internet in one of the following ways: • Wired connection with the gigabit ethernet connection: • Connect with DHCP (Automatic IP address) • Manual Configuration •... - Page 89 Open the supervisor settings menu. Tap the Settings tab, [Connectivity]. Tap [LAN settings].
-
Page 90: Set Up A Wireless Connection
Select Wired from the Connection type pulldown menu. Set Automatically obtain IP address (DHCP) to Yes or No. If Yes, the system connects automatically to the LAN. If No, set up a connection manually. Enter the necessary details to setup a manual connection. Set up a Wireless Connection Set up a wireless connection as follows: Open the supervisor settings menu. - Page 91 Select Wireless from the Connection type pulldown menu. Choose if you want to enter the SSID manually or if you want to search for a wireless network. If you want to search for a network, tap [Choose network]. When you have entered the network details or selected a network from the search, tap [Connect] to connect to the network.
-
Page 92: Test The Connection
Test the Connection When you have connected to a network, test the connection as follows: Open the supervisor settings menu. Tap the Settings tab, [Connectivity]. Tap [Test connections]. Tap the [Test] button. The system tests the IP addresses that are defined at the LAN settings. If the result is 'Not OK', make sure that the settings are correctly defined. -
Page 93: Reading
Reading Introduction Code Types The reading option allows the system to read special codes that are printed on the documents. The code contains information about the processing of the documents. The system can read the following code types: • OCR: Optical Character Recognition; the system can scan an area of the document for page number information in the page "n of m"... -
Page 94: Ocr Code Description
General Requirements for Printing Codes If you print documents for reading: • Make sure the ribbon or toner quality is sufficient. • Print the code in black on white background. • Codes on the same sheet must have equal intensity. •... - Page 95 Positions Only one region of interest per job Only horizontal text (portrait) supported All text on the same line Example: Position of the code on the document (example)
-
Page 96: Bcr Code Description
BCR Code Description Bar codes are used for mail sets that are processed in Document Systems. The bar codes tell the system if: • The document set is complete • The envelope should be sealed • Enclosures should be added •... - Page 97 Supported 2D barcodes Datamatrix - Minimum cell size 0.35mm (0.014”) - Label size 30mm (1.18”) square max - Preferred print quality 600dpi - Print drift from page to page +/-2mm max - Colour background: White - Minimum white space 6.5mm (0.26”) - Datamatrix can be read in all directions.
- Page 98 Position of the code on the document BCR license types There are two BCR license types: • Basic • Advanced BCR basic license For the BCR basic license the following functions are supported: • Page N of M: as long as N is below M, the document set is not complete. As soon as N=M, the set is complete and will be inserted into an envelope.
- Page 99 BCR advanced license For the BCR advanced license the following functions are supported: • The basic functions (page N of M, insert/accumulate). • Sheet sequence - Every sheet has a number, regardless of the document set it is part of. If a sheet is missing, an error is generated. •...
-
Page 100: Omr Code Description
OMR Code Description Position of the code on the document Minimum line thickness of a mark: 0.2 mm (0.008 inch). Default the first mark from the top is set to: 100 mm (3.9 inch). This parameter is set in the job settings. - Page 101 OMR basic license For the OMR basic license the following functions are available: • Start mark: indicates the start of the code. • Insert/Accumulate: defines when a document set is complete and must be inserted into an envelope. • Parity check: by adding a parity mark the reading code can be checked. The sum of the marks must be even.
- Page 102 OMR general remarks General remarks: • In case of OMR the marks must always be used in the sequence as shown in the figure. • If a function is suppressed the following function will move upwards one line. • The mark definition is a service setting.
-
Page 103: Flex Reading Code Description
An Example of OMR Code In the figure the legend for the following example is shown. In this example, a set of 8 sheets with one selective feed and three sequence check marks is shown. • The first position is used for the start mark which must be printed on every sheet. •... -
Page 104: Create Jobs With Reading
Create Jobs with Reading Create a BCR Job To create a job with BCR: From the Job list menu, tap [New job]. Choose [Manual] to define the job settings. Select an envelope. Tap [Main document]. Tap [Custom]. Enter the document size or select a standard type. Tap the [Reading] tab. - Page 105 If required the maximum number of sheets can be reconfigured. Refer to Reading Settings on page 105 for more details on how to change these settings. Read a Configuration Sheet If you want to set the code definition for BCR, use a BCR configuration sheet. The configuration sheet function is available when you are logged on as a supervisor on page...
- Page 106 Tap [Save] to save the new barcode definition. After reading a configuration sheet, jobs with BCR reading might have changed. These jobs are marked with an exclamation mark, verify the job settings before running the job. You can also read a configuration sheet when you create or edit a BCR job. The function is available in the side menu.
- Page 107 13. Tap the information button to verify the read OMR marks. 14. Tap [OK] and follow the remaining steps to complete the job. 15. When you completed the job creation, tap [Save] to save job. If required the maximum number of sheets can be reconfigured. Refer to Reading Settings on page 105 for more details on how to change these settings.
- Page 108 Tap the [Reading] tab. Select the code type [OCR]. Configure the location of the n / m characters by setting the offset of the top and left side of the sheet [1] and [2]. 10. Configure the width of the n / m characters [3]. 11.
-
Page 109: Reading Settings
Select the code type [Flex ..]. Depending on the flex code type the OMR or BCR settings have to be configured. Follow the remaining steps to complete the job. If required the maximum number of sheets can be reconfigured. Refer to Reading Settings on page 105 for more details on how to change these settings. - Page 110 • Maximum number of sheets: use the [-] or [+] button to select the maximum amount of sheets in the set of documents. The maximum number of sheets in a set is 25. When the number of sheets exceeds 5 or 8, depending on the fold, the document can not be folded anymore.
-
Page 111: Operator Maintenance
Operator Maintenance Maintenance Schedule Disconnect the mains power supply before performing any maintenance. The user must not attempt to service the appliance beyond that described in this operator manual. All other servicing must be carried out by qualified service personnel only. Please contact your authorized distributor. -
Page 112: Clean And Replace Brushes
Clean and Replace Brushes When dirty or saturated, clean the brushes of the envelope sealing or replace them as follows: Moisten the new brushes in water. Unlock lever A of the upper unit and pull up the upper unit. Remove the brushes one by one by pulling them down from the brush holder. Replace the brushes. -
Page 113: Replace Or Clean Moistening Cloth
Replace or Clean Moistening Cloth When dirty or saturated, clean the moistening cloth or replace if necessary. Proceed as follows: Open the front cover A. Remove the sealing liquid reservoir B from the system. Remove the cover with moistening cloth D. Remove clips C to remove the moistening cloth. -
Page 114: Calibrate Photocells
Calibrate Photocells When too much paper dust is built up at the sensors, a warning message is displayed. In that case, calibrate the photocells as follows: Log in as supervisor. In the settings menu, tap the [Diagnostics] tab. Tap [Maintenance]. Remove all documents and envelopes and close all covers before starting the calibration. -
Page 115: Fault Finding
Fault Finding Messages Introduction There are three different types of messages: • Indications • Warnings • Errors Indications When you run a job, indications can appear like the ones in the example. - Page 116 Warning message When a warning message is shown, the screen shows the following information: • An indication of the area in which the event occurred • A warning description • A suggested solution behind the arrow • An event message number; use this number in case that you call support Tap the [i] button to view more information about the event.
- Page 117 Error messages When an error occurs the touch screen shows a screen with the following information: • An indication of the area in which the error occurred • An error description • A suggested solution behind the arrow • An event message number; use this number in case that you call support Tap the [i] button to view more information about the occurred error and about the possible actions to avoid the error from re-occurring.
-
Page 118: Clearing Stoppages
Clearing stoppages Clearing Stoppages For clearing of stoppages, three system sections can be opened: A - The upper unit to reach the Folder and Feeder area. B - Collator plate to reach the collator area. C - Front cover to reach the envelope track and inserter area. - Page 119 Lower Envelope Track When a stoppage occurs in the lower envelope track, remove the envelopes as follows: If needed, envelopes can be transported manually to the insert table or lower envelope track by means of handle F. To transport a mail set manually, turn handle E. Open the side cover C.
- Page 120 Feeder area When a stoppage occurs in the Feeder area, remove the documents as follows: Open the upper unit by unlocking lever A. Remove the documents from the Feeder area. Close the upper unit. Press the [Reset] button to reset the error and restart the job. Collating Area When a stoppage occurs in the collating area, remove the documents from the collating area as follows:...
- Page 121 Remove the documents from the collator area. Move the collator plate B up in position. Press the [Reset] button to reset the error and restart the job. Folder area When a stoppage occurs in the Folder area, remove the documents as follows: Open the upper unit by unlocking lever A.
-
Page 122: Operator Troubleshooting
Remove the documents from the Folder area. Close the upper unit. Press the [Reset] button to reset the error and restart the job. Operator Troubleshooting To resolve problems: Write down the event message number that is shown in the message on the screen. Try to solve the problem by consulting the Troubleshooting Table. -
Page 123: Troubleshooting
Troubleshooting Symptom Possible cause Remedy Reference The system cannot System not connec- Connect the system be started after ted to mains. to the mains. switching on. Fuse is blown. Replace fuse below power switch. A cover is opened. Close the covers. System stops with Envelopes stacked Check envelope feed... - Page 124 Flap is wrinkled and Envelope not within Check specifications Envelope Specifica- sometimes not specifications. and change envel- tions on page 127 opened. opes if needed. Flap sticks. Store envelopes ac- Envelope Specifica- cording to specifica- tions on page 127 tions. Flap curled.
- Page 125 Flap not sufficiently Water level low. Check water level, Filling the Sealing Li- moistened. refill if needed. quid Reservoir page 62 Brushes dry. Check brushes, re- Clean and replace place if needed by the brushes on page 108 extra soaked set. Brushes dirty.
- Page 126 No document fed. Feeder tray empty. Refill feeder tray. Loading documents standard feeder trays on page 54 Loading documents maxiFeeder Separation set too Adjust the separation. Adjusting the Separa- wide / too tight. tion of Special Feed- on page 39 Adjusting the Separa- tion of the maxiFeed- on page 56...
-
Page 127: Specifications
Specifications Technical Specifications Model DS-64i, FPi 2700, FD6210, TSI-4s Type Folder and inserter system for medium office use. Theoretical Basic version: max. speed • 2000 inserts per hour (depending on application) Premium version: • 2500 inserts per hour (depending on application) -
Page 128: Hopper And Feeder Capacity
Approvals RED (Radio Equipment Directive) 2014/53/EU FCC Certificate conform 47CFR, part 15 CB Certificate conform IEC 62368-1 UL Listed I.T.E. (Information Technology Equipment), conform UL-IEC 62368-1, file E153801 Conform NEN-EN-IEC 62368-1 and derivatives. Noise Level Basic version: • 64,8 dBA (with catch tray) •... -
Page 129: Configuration Dimensions And Weight
Configuration Dimensions and Weight 1 station 1,5 station 2 station 2,5 station Length* incl. Catch 1270 - 1360 1270 - 1360 1270 - 1360 1270 - 1360 tray mm (50.0 - mm (50.0 - mm (50.0 - mm (50.0 - 53.5 inch) 53.5 inch) 53.5 inch) -
Page 130: Document And Insert Specifications
Document and Insert Specifications Paper quality Minimum 60 g/m² (15 lb bond) Maximum 250 g/m² (62.5 lb bond), when folded max. 170 g/m² (42.5 lb bond) Booklets up to approximately 1 mm (0.04 inch) thickness, depending on stiffness Paper size Minimum width: 130 mm (5.1") Maximum width: 236 mm (9.3"), when folded 230 mm (9.1") Minimum length: 90 mm (3.5") -
Page 131: Envelope And Document Set Specifications
Envelope and Document Set Specifications Minimum 160 mm 90 mm 32 mm 10 mm 130 mm 84 mm 60 g/m2 size 6.3” 3.5” 1.25” 0.4” 5.1” 3.3” Maximum 248 mm 162 mm B-32 35 mm A-12* 2 mm size 9.7” 6.38”... -
Page 132: Maxifeeder Specifications
between store room and mailing area, the material has to be stored near the machine at least 24 hours before use. • Self-copying paper may cause rubber parts to wear quicker. The rubber used in this machine has the best resistance to Wiggins Teape material. maxiFeeder Specifications Model Model MF-4 (A0023987) -
Page 133: High Capacity Vertical Stacker Specifications
High Capacity Vertical Stacker Specifications Model HCVS-1 Type High Capacity Vertical Stacker. Suitable for all kinds of mail sets that consist of at least one 80 grams envelope and one folded document (80 gram). Power con- Low voltage supplied by the inserter system. sumption Approvals EMC Certificate conform EMC-Directive. -
Page 134: Terminology
Terminology Terminology Term Description Address carrier The address carrier is the document that carries the address of the person for who the mail-set is meant. The address must remain visible while enclosures are added and the document-set is folded. The fold type and selected envelope must ensure that the address is visible be- hind the window in the envelope. - Page 135 C-fold Fold type in which a document-set is folded twice in which the folded flaps are on top of each other. This fold is illustrated in the picture below. The position of both folds is adjustable. Synonym: Letter fold. Clear The function of an inserting system in which all mail-sets in progress are finished and the document path is left empty.
- Page 136 Double V-fold The double V-fold is a type of fold where the document is first folded halfway and the resulting folded set is again folded halfway. This fold is illustrated in the picture below. The position of both folds is adjustable. Synonym: double parallel fold. Envelope The envelope is the packaging of a mail set.
- Page 137 Flexcode An OMR/BCR code for which the meaning of the marks can be pro- OMR/BCR grammed in a dedicated way for a specific customer. This is normally used to support the OMR/BCR codes from other suppliers. High Capacity Optional stacker that is mounted on the exit of the system, to stack filled Vertical Stacker envelopes.
- Page 138 Operator The person operating a document system. Optical Mark Re- Optical Mark Recognition is intended for reading and interpreting printed cognition (OMR) codes. These codes are one or more black marks which are read from a document. These marks give information to the Inserting system about how to build-up and handle a set.
- Page 139 Vertical transport The vertical transport section between feeders and collator. Z-fold A Z-fold means that a document is folded twice in such a way that each folded flap is on a different size of the folded document, resulting in a Z-shape.
Need help?
Do you have a question about the DS-64I and is the answer not in the manual?
Questions and answers