Advertisement
Advertisement
Table of Contents

Related Manuals for Timeguard TRT036N


Summary of Contents for Timeguard TRT036N
- Page 1 7 Day Digital Programmer 2 Channel – Surface Mount Model: TRT036N...
-
Page 2: General Information
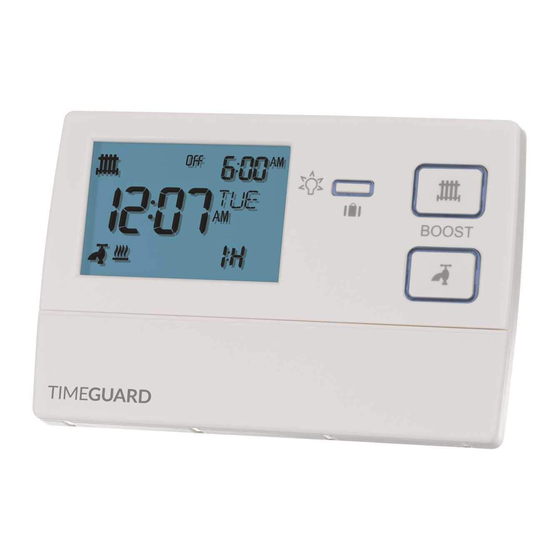
1. General Information These instructions should be read carefully and retained for further reference and maintenance. 2. Safety • Before installation or maintenance, ensure the mains supply to the Programmer is switched off and the circuit supply fuses are removed or the circuit breaker turned off. - Page 3 • CE Compliant • Dimensions (H x W x D): 90 x 135 x 30mm TRT036N Front View 12hr am/pm or 24hr clock timer Display light/Holiday 1, 2 and 3 hour display (illuminated on setting)
-
Page 4: Installation
4. Siting • The TRT036N should be located at a position which eases wiring runs and gives good access for programming. • It should be mounted approximately 1.5m above floor level. 5. Installation 5.1 Ensure the mains supply is switched off and the circuit supply fuses are removed or the circuit breaker turned off. - Page 5 TRT036N Wall Plate Alternate mounting holes Retaining tabs Mounting holes Loop terminal Wall plate retaining screws...
-
Page 6: Connection Diagram
6. Connection Diagram Connect the 230V 50Hz mains supply and load cables to the terminal block which are marked as follows; • Note: Check boiler instructions before connecting. Switch Live from Switch Live from NO1 NO2 (normally (normally open open 2 contact) 1 contact) to Heating to Hot Water Heating... -
Page 7: Dip Switch Settings
DIP switch positions. • You can set the TRT036N to run a Pumped or Gravity system. It is important to check which system you have before setting the DIP switches and operation. This can also be set using the DIP switches located on the rear of the unit. -
Page 8: Setting The Time And Date
8. Reset from Power-up • Restore mains to the unit after making sure to check all system wiring is complete, and after you have selected the desired DIP switch settings. • Press the reset button located beneath the flip down cover on the front of the unit, all of the characters will briefly appear on the display, followed by the 12hr clock format screen. - Page 9 9.3 Use the Up/Down arrow buttons to either select 24Hr format, or leave it at 12Hr format, and then press the Select button once to confirm. 12Hr AM/PM format Use the Up/Down arrow 24Hr format Use the Select buttons to change button to the time format confirm...
- Page 10 9.7 The month will flash, use the Up/Down arrow buttons to alter the year and press the Select button once to confirm. The month will flash Use the Up/Down Use the Select arrow buttons to button to change the month confirm 9.8 The day will flash, use the Up/Down arrow buttons to alter the day and press the Select button once to confirm.
- Page 11 10. Programme Entry Note: • If you have selected weekday/weekend (5-2) Programming via the DIP switches (see section 7. DIP Switch Settings) you will be able to group Monday – Friday for the same ON and OFF times, and then group Saturday – Sunday for the same ON and OFF times. •...
- Page 12 10.3 The heating (HTG) icon will start to flash with the hot water (HW) remaining solid. Use the Up/Down arrow buttons to change the channel you wish to program, the chosen icon is the flashing one, and press the Select button once to confirm. Use the Select button to confirm...
-
Page 13: Copy Function
Note: • If no button is pressed, it will time out after 60 seconds and return to the mains screen showing day, time and output status. • The display light will also time out after 15 seconds after the last button is pressed. - Page 14 10.13 Press the Advance and Mode Copy button once. Use the Up/Down arrow button to choose the day of the week you wish to copy, and press the Select button once. Use the Up/Down arrow button if you wish to change the day of the week to copy Press the Advance...
-
Page 15: Operation
Note: • If no button is pressed, it will time out after 60 seconds and return to the mains screen showing day, time and output status. • The display light will also time out after 15 seconds after the last button is pressed. -
Page 16: Boost Function
Boost Function • The boost options are 1 hour, 2 hours, 3 hours and 0 hours to cancel. • Press the Boost button once for 1 hour, the display light will illuminate as well as the Boost button surround. While setting, and during the boost period, the On flashes ON and OFF. -
Page 17: Holiday Mode
Display Light/Holiday Button • Pressing the Display light/Holiday button once illuminates the display for 15 seconds. • Any key press will illuminate the screen also, with a 15 second time out after the last button press. • Any time the back light is on, the Display light/Holiday button surround illuminates. - Page 18 • The holiday duration will be displayed in the top right had corner of the screen. Holiday duration Suitcase symbol • To cancel the holiday, press the Display light/Holiday button and hold for 3 seconds. The holiday duration and suitcase symbol will disappear.
-
Page 19: Year Guarantee
020 8450 0515. Note: A proof of purchase is required in all cases. For all eligible replacements (where agreed by Timeguard) the customer is responsible for all shipping/postage charges outside of the UK. All shipping costs... - Page 20 If you experience problems, do not immediately return the unit to the store. Telephone the Timeguard Customer Helpline; HELPLINE 020 8450 0515 or email helpline @ timeguard.com Qualified Customer Support Co-ordinators will be on-line to assist in resolving your query.
Need help?
Do you have a question about the TRT036N and is the answer not in the manual?
Questions and answers
have not been able to set time despite following all instructions
To set the time on a Timeguard TRT036N:
1. Press and hold the Select button for 3 seconds to begin setting the clock.
2. The 12-hour symbol will be displayed.
3. Use the arrow buttons to switch between 12-hour and 24-hour formats.
4. Press the Select button to move to setting the hour (the hour will blink).
5. Use the arrow buttons to adjust the hour to your local time.
6. Press the Select button to move to setting the minutes (the minutes will blink).
7. Use the arrow buttons to adjust the minutes.
8. Press the Select button to move to setting the year.
9. Use the arrow buttons to set the correct year.
10. Press the Select button to move to setting the month.
11. Use the arrow buttons to set the correct month.
12. Press the Select button to move to setting the day.
13. Use the arrow buttons to set the correct day.
Once all settings are adjusted, the clock will be set.
This answer is automatically generated