Table of Contents
Advertisement
Quick Links
Advertisement
Table of Contents

Related Manuals for Verizon LVM1


Summary of Contents for Verizon LVM1
- Page 1 Document Type/Customer Name Verizon Wi-Fi Extender User Guide Version 5 ...
- Page 2 Document Type/Customer Name Federal Communication Commission Interference Statement This device complies with Part 15 of the FCC Rules. Operation is subject to the following two conditions: (1) This device may not cause harmful interference, and (2) this device must accept any interference received, including interference that may cause undesired operation. This equipment has been tested and found to comply with the limits for a Class B digital device, pursuant to Part 15 of the FCC Rules. These limits are designed to provide reasonable protection against harmful interference in a residential installation. This equipment generates, uses and can radiate radio frequency energy and, if not installed and used in accordance with the instructions, may cause harmful interference to radio communications. However, there is no guarantee that interference will not occur in a particular installation. If this equipment does cause harmful interference to radio or television reception, which can be determined by turning the equipment off and on, the user is encouraged to try to correct the interference by one of the following measures: Reorient or relocate the receiving antenna. ‐ Increase the separation between the equipment and receiver. ‐ Connect the equipment into an outlet on a circuit different from that to which the receiver is connected. ‐ Consult the dealer or an experienced radio/TV technician for help. FCC Caution: Any changes or modifications not expressly approved by the party responsible for compliance could void the user's authority to operate this equipment. This transmitter must not be co‐located or operating in conjunction with any other antenna or transmitter. ...
-
Page 3: Radiation Exposure Statement
Document Type/Customer Name Radiation Exposure Statement This equipment complies with FCC radiation exposure limits set forth for an uncontrolled environment. This equipment should be installed and operated with a minimum distance of 27cm between the radiator & your body. Safety Warnings Adapter Do not use any other power adaptor except the one that accompanies this unit or a power adaptor identified in the list below. Use of another adapter could result in damage to the unit. The following power adaptor is qualified for use with this Verizon Wi‐Fi Extender: This unit must be powered by LUCENT TRANS, model 1A95 or equivalent UL listed power source rated @ output 19Vdc, Maximum 2.37A. ii ... -
Page 4: Table Of Contents
Document Type/Customer Name Table of Contents Federal Communication Commission ........................ i Interference Statement ............................ i Radiation Exposure Statement .......................... i i Safety Warnings .............................. i i Chapter 1 Introduction ............................... 1 Unboxing Information ............................ 1 Key Features .............................. 1 ... -
Page 5: Chapter 1 Introduction
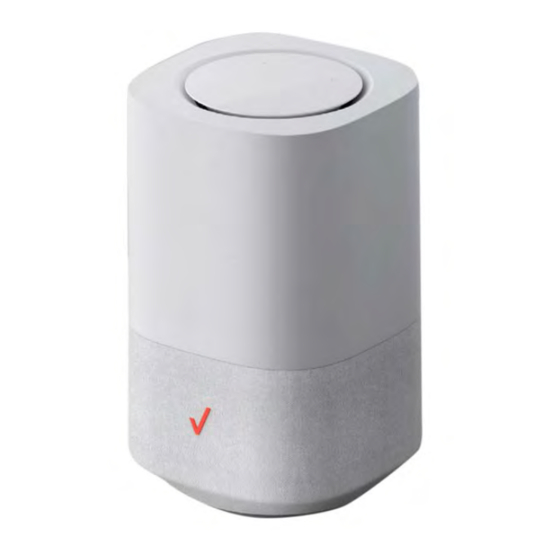
Document Type/Customer Name Chapter 1 Introduction This chapter includes a list of items included with the LVM1 Wi‐Fi Extender, an overview of the Wi‐Fi Extender’s features, and a description of the user interface and ports on the Wi‐Fi Extender. Unboxing Information Inside the product package for the LVM1 Wi‐Fi Extender, you should find the following items: • Extender • AC adaptor • Ethernet cable Key Features • Tri‐Band Wi‐Fi 802.11AX capable extender to maximize throughput and coverage • Two 1GbE ports • Built‐in mic and speaker for Alexa Voice Service (future update) • Bluetooth for music playback Top Panel (LEDs) 1. Touchpad A circular touchpad is located on the top panel of the LVM1 Wi‐Fi Extender. This is the main interface for setting up the Wi‐Fi Extender. Note: Please remove the clear protective film from the top before use. 2. Action Button A touch‐sensitive action button is located in the center of ... - Page 6 Document Type/Customer Name 3. Volume Adjustment Buttons Touch‐sensitive volume adjustment buttons are located on the left and right sides of the touchpad on top of the Wi‐Fi Extender. The “+” button raises volume, while the “‐” button lowers volume. 4. Mute Button A touch‐sensitive mute button is located near the upper edge of the touchpad above the action button. 5. Microphones Four microphones are located on the touchpad, arranged in a square pattern to determine the direction of the user’s voice. 6. Circular LED Light A recessed circular LED light surrounds the touchpad on top of the Wi‐Fi Extender. The LED will light up in different ways to indicate the connectivity status of the Wi‐Fi Extender. LED Light Guide LED Ring Function Status Animation Pairing (WPS / Not paired to Receiver (CPE) Red/Amber Bluetooth®) Until changed to other state Animation Pairing mode active Blue (WPS or Ethernet pairing) Lit towards the pairing button side If WPS fails, use an Ethernet cable to pair the Wi‐Fi ...
- Page 7 Document Type/Customer Name Animation Wi‐Fi Extender connected to CPE, but no Internet Red/Amber connection (5G node might be down) Until changed to other state Solid Wi‐Fi Extender connected to CPE, Wi‐Fi and White Internet working well. For 30 seconds before turning OFF Fast Blink Firmware upgrade Usual Functions White Blinks during upgrade installation (FOTA) Until firmware is updated Fast Blink Hard reset / Reboot White Triggered through app / FOTA (For 1–2 seconds before turning OFF) Animation Turn ON device White to Red/Blue (when device turns on) Until changed to other state The Wi‐Fi Extender is on and waiting for your Alexa Voice Service Al lights are off. request. ...
-
Page 8: Back Panel
Document Type/Customer Name Back Panel 1. LAN Ports Two 1 Gbps LAN ports enable you to connect devices to the Wi‐Fi Extender via Ethernet cables. 2. Reset Pinhole To reset the Wi‐Fi Extender to factory defaults, insert a pin into the pinhole, press down, and hold for 5 seconds. 3. Power Jack Connect the AC adaptor to the Power Jack to provide power to the Wi‐Fi Extender from an electrical outlet. 4. Multi‐purpose Pairing Button Press this button once to connect the Wi‐Fi Extender to other devices via WPS or Bluetooth®. 4 ... -
Page 9: Chapter 2 Connecting The Wi-Fi Extender
Document Type/Customer Name Chapter 2 Connecting the Wi‐Fi Extender This section describes how to set up and configure your Wi‐Fi Extender. Setting up the Wi‐Fi Extender 1. Unbox the Wi‐Fi Extender, AC adaptor, and Ethernet cable. 2. Plug the AC adaptor into an electrical outlet, then connect the other end to the power jack on the back of the Wi‐Fi Extender. To connect the Wi‐Fi Extender to your 5G Home Router, plug an Ethernet cable into one of the LAN ports on the back of the Wi‐Fi Extender, and plug the other end of the Ethernet cable into an Ethernet port on your 5G Home Router. The circular LED light will illuminate blue for two seconds to indicate pairing success. Optional If an Ethernet cable is not used, you can connect to the 5G Home Router’s network with WPS: Set up a WPS connection between the Wi‐Fi Extender and the 5G Home Router by pressing their multi‐purpose pairing buttons. Place them so that they are less than a meter apart to make it easier to press these buttons within the allotted 2 minutes in the WPS procedure. After the pairing is successful, the circular LED light will illuminate blue for two seconds to indicate pairing success. You can then move the Wi‐Fi Extender to the location of your choice and check the LED for Wi‐Fi signal strength at the chosen location. You may also use the WPS button in the Web User Interface to activate WPS by clicking Wi‐Fi Settings > WPS, and click on the Primary Wi‐Fi WPS button. Connecting Other Devices The Wi‐Fi Extender can connect to other devices via Ethernet and via wireless connection. Ethernet 1. Take an Ethernet cable and plug one end into one of the LAN ports on the back of the Wi‐Fi Extender. 2. Plug the other end of the Ethernet cable into an Ethernet port on one of the other devices. 3. - Page 10 Document Type/Customer Name 1. Ensure that the devices you wish to connect wirelessly to the Wi‐Fi Extender have Wi‐Fi capability. 2. Make sure the devices are using the same SSID and password as the Wi‐Fi Extender by launching each of the devices’ wireless applications. WPS 1. Press the multi‐purpose pairing button on the Wi‐Fi Extender. 2. Press the WPS button on a WPS‐enabled device you wish to pair, making sure the device is within range of the Wi‐Fi Extender. 3. The circular LED light of the Wi‐Fi Extender will illuminate blue for two seconds to indicate pairing success. Note: You may also use the WPS function in the Web User Interface to activate WPS by clicking Wi‐Fi Settings > WPS, and click on the Primary Wi‐Fi WPS button. 6 ...
-
Page 11: Chapter 3 Product Specifications
Document Type/Customer Name Chapter 3 Product Specifications Wi‐Fi 2.4GHz 802.11ax 2x2 MIMO 5GHz low band 802.11ax 4x4 MIMO 5GHz high band 802.11ax 2x2 MIMO Backward compatible with 11ac/11n/11b IoT Bluetooth Processors Qualcomm IPQ8074A + QCN5054 + QCN5024 Memory DDR4 RAM 2GB Storage eMMC 8GB Dimension Height: 235.8 mm Diameter: 144.0 mm Weight 1.4 KG Connector 1GbE/100Mbps/10Mbps LAN port × 2 ...