Table of Contents
Advertisement
Quick Links
Advertisement
Table of Contents

Related Manuals for Elektron Digitakt


Summary of Contents for Elektron Digitakt
- Page 1 Digitakt User Manual...
- Page 2 Elektron may also make improvements and/or changes in the products and programs described in this document at any time without notice. In no event shall Elektron be liable for any special, indirect, or consequential damages or any damages whatsoever resulting from loss of use, data, or profits, whether in an action of contract, negligence, or other action, arising out of or in connection with the use or performance of this information.
- Page 3 • Do not exceed the limitations specified in the Electrical specifications. SOUND PEAKS • A brief signal will be sent to all audio outputs of the Digitakt when the Test mode on the STARTUP Menu is activated. Remember to turn down the volume on all speakers and headphones before activating Test mode.
-
Page 4: Table Of Contents
4.2 EFFECTS ................. . 13 5. OVERVIEW OF THE DIGITAKT DATA STRUCTURE ......14 5.1 +DRIVE . - Page 5 TABLE OF CONTENTS 8.2 ROTARY ENCODERS ............... 21 8.3 KEY BEHAVIOR .
- Page 6 15.2.6 REMOVING UNUSED SAMPLES FROM RAM ..........63 15.2.7 TRANSFERRING SAMPLES FROM A COMPUTER TO DIGITAKT ......63...
- Page 7 TABLE OF CONTENTS 15.2.9 TRANSFERRING SAMPLES FROM DIGITAKT TO A COMPUTER ......64 15.3 MIDI CONFIG ................64 15.3.1 SYNC .
-
Page 8: Introduction
1. INTRODUCTION 1. INTRODUCTION Thank you for purchasing Digitakt. The Digitakt is a compact drum machine from Elektron. It contains all the necessary tools to make people move to the beat. A digital and highly flexible sound engine, sampling capa- bility, a live-friendly sequencer, the means to control external MIDI gear, and Overbridge support. -
Page 9: The Digitakt
Fast forward. It’s May 2017 and Digitakt will start shipping in about a week. The Elektron HQ is bristling with activity. Factory patterns are being made, tweaks to the Digitakt OS implemented, content for the Elektron website created. -
Page 10: Panel Layout And Connectors
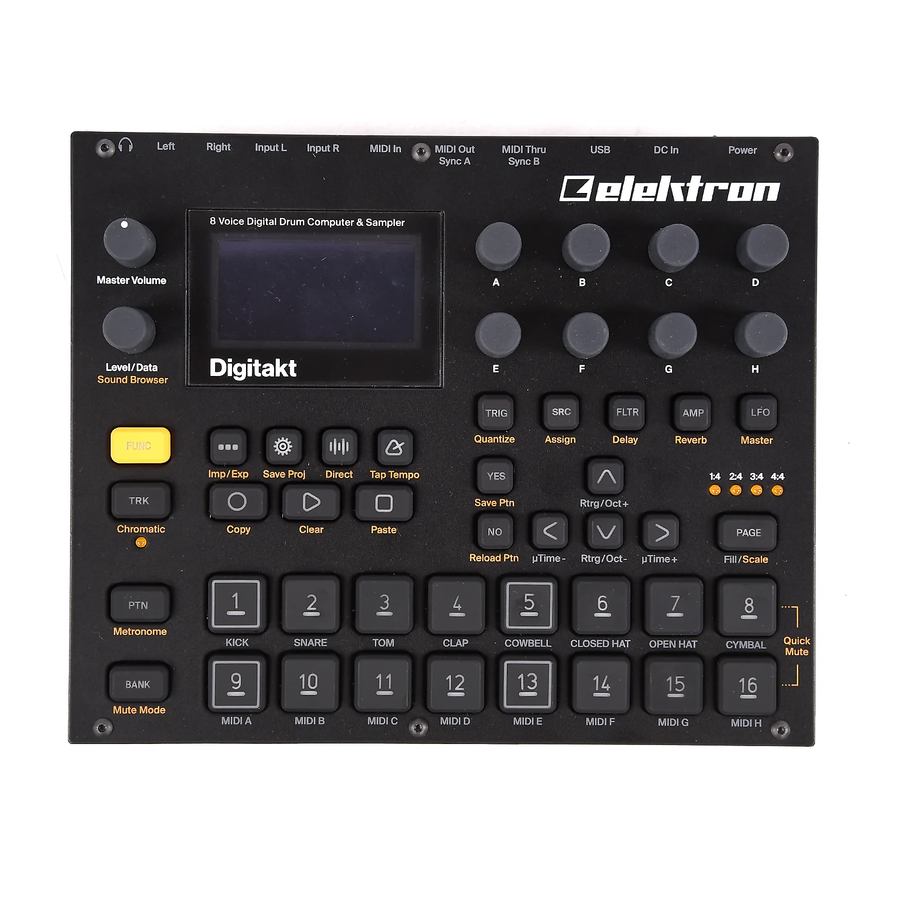
Right Input L Input R MIDI In MIDI Out MIDI Thru DC In Power Sync A Sync B 8 Voice Digital Drum Computer & Sampler Master Volume Digitakt Level/Data Sound Browser TRIG FLTR Quantize Assign Delay Reverb Master FUNC Imp/Exp... - Page 11 20. [FUNC] key. Press, hold and press another key to access the secondary function of that key. The sec- ondary functions are written in orange on the Digitakt front panel. 21. LEVEL/DATA sets the overall volume level of the active track. It is also used for setting parameters and...
-
Page 12: Rear Connectors
MIDI IN port, so it can be used for chaining MIDI units together. Connect the MIDI OUT port of the Digitakt to the MIDI IN port of the of the device you want to control if you want to use Digitakt to control other devices using MIDI. -
Page 13: Digitakt Sound Architecture
4. DIGITAKT SOUND ARCHITECTURE 4. DIGITAKT SOUND ARCHITECTURE The illustrations below show the Digitakt sound architecture, with its eight audio voices, two send effects (delay and reverb), and master effect (compressor). 4.1 AUDIO VOICES FILTER ENVELOPE SAMPLE OVER- MULTIMODE FILTER... -
Page 14: Overview Of The Digitakt Data Structure
A project contains 128 patterns. General settings and states are also stored in the project. When a project is loaded it becomes the active working state of the Digitakt. From here it is possible to edit the patterns and Sounds of the project. Every time the Digitakt is switched on, it boots to the active working state, the active project. -
Page 15: About The Tracks
5.3 ABOUT THE TRACKS 5.3.1 THE AUDIO TRACKS The Digitakt has eight audio tracks. Each audio track contains one sample, and the parameter settings in the PARAMETER pages TRIG, SRC, FLTR, AMP, and LFO. To select an audio track for editing, press and hold [TRK] key and then press one of the [TRIG 1–8] keys. -
Page 16: Interacting With The Digitakt
6. INTERACTING WITH THE DIGITAKT 6. INTERACTING WITH THE DIGITAKT The screen shows all the information needed for real-time interaction and editing on the Digitakt. The eight DATA ENTRY knob parameters shown will vary depending on the given situation. Below is the main inter- face screen of the SRC page. -
Page 17: Control All
6. INTERACTING WITH THE DIGITAKT 6.2.2 CONTROL ALL If you press and hold [TRK] and change a parameter setting, this change will affect this parameter in all the audio tracks in the pattern. Press [NO] before you release [TRK] to revert the parameter changes. -
Page 18: Overbridge
The Overbridge software enables a tight integration between the Digitakt and a computer DAW software. When using Overbridge, the user interface for the Digitakt presents itself as a plug-in window in your DAW. Access, edit and automate parameters for sound shaping on screen. Always find your device preset param- eters in the same state as you left them when you return to your DAW project, with the useful total recall functionality. -
Page 19: Quick Start
7. QUICK START 7. QUICK START This quick start will guide you through some of the basic operations to start using the Digitakt right away. First, connect it as described in section “3.3 SETTING UP AND STARTING THE DIGITAKT” on page 12. -
Page 20: Editing Parameters
Try out the rest of the PARAMETER page parameters to explore a variety of sound shaping possibilities. 7.2 SAMPLING FROM THE EXTERNAL INPUTS Digitakt can also sample audio. It can sample audio from external sources, via the external inputs, and it can also sample audio internally from the Digitakt itself. -
Page 21: Digitakt Controls
Some functions can be triggered by sending MIDI note values from an external MIDI device (a MIDI key- board or a computer, for example) connected to the Digitakt via a standard MIDI cable or a USB 2.0 A to B connector cable. -
Page 22: Mute Mode
MIDI Auto Channel (SETTINGS > MIDI CONFIG > CHANNELS) to the same MIDI channel. Then play the keys on the external keyboard to play the active tracks Sound chromatically. You can play the active track’s Sound chromatically even if the Digitakt is not in CHRO- MATIC mode. -
Page 23: Patterns, Kits, Sounds, And Samples
9. PATTERNS, KITS, SOUNDS, AND SAMPLES The patterns are the primary data container for the Digitakt. Sixteen patterns are available for each of the eight banks, which means that 128 patterns are available for each project. A pattern contains up to eight Sounds (one for each audio track), sequencer data like trigs and parameter locks. -
Page 24: Sound Browser
9. PATTERNS, KITS, SOUNDS, AND SAMPLES 4. Press [RIGHT] to open the SOUND OPERATIONS menu. 5. Select COPY TO ... and then press [YES]. 6. Select SOUND POOL, and then press [YES]. 9.2 SOUND BROWSER Press [FUNC] + LEVEL/DATA to open the SOUND BROWSER. The SOUND BROWSER is used to pre- view and load Sounds. - Page 25 9. PATTERNS, KITS, SOUNDS, AND SAMPLES Press [LEFT] to access the SORTING menu. Press [YES] to execute the commands. Press [NO] or the [RIGHT] arrow key to exit the menu. VIEW POOL lists Sounds available in the Sound pool of the active project. The command is only available when you browse the +Drive Sound library.
-
Page 26: Playing A Sound
PLAYING A SOUND WITH AN EXTERNAL MIDI UNIT The Sounds can also be played using an external MIDI device connected to Digitakt. The MIDI channels for of each of the audio tracks can be assigned in the MIDI CHANNELS menu, covered in the section “15.3.3 CHANNELS”... -
Page 27: Assigning A Sample
9. PATTERNS, KITS, SOUNDS, AND SAMPLES 4. On the NAMING screen, name your sound and then press [YES]. For more information, please see “6.5 THE NAMING SCREEN” on page 17. 5. On the TAGS screen, use the [ARROW] keys and [YES] key to select the appropriate tags for your sound, and then select <SAVE>... -
Page 28: The Sequencer
10. THE SEQUENCER 10. THE SEQUENCER The sequencer of the Digitakt stores information in patterns. A pattern controls the playback of the audio tracks, the MIDI tracks and various pattern-specific aspects of the tracks. Each of the eight banks, A to H, contains 16 patterns, which means 128 patterns are available for each project. -
Page 29: Trig Types
• If you use an external MIDI controller to record to the Digitakt MIDI tracks, the sequenc- er receives data on the Auto MIDI channel and records on the active track. For more information, please see “15.3.3 CHANNELS”... -
Page 30: Step Recording Mode
10. THE SEQUENCER 2. Enter trigs in real time by tapping the [TRIG] keys. If CHROMATIC mode is active, the pitch value of the note trig will be recorded according to which [TRIG] key is pressed. Any changes to PARAM- ETER page settings, using the DATA ENTRY knobs, will be recorded as parameter locks and add lock trigs where needed. -
Page 31: Micro Timing Menu
• Press [PLAY] to listen to the sequence while you are programming it. Press [STOP] to stop the sequencer and stay in STEP RECORDING mode. • If you use an external MIDI controller, you must set it to send MIDI data on the Digitakt’s defined AUTO CHANNEL. For more information, please see “15.3.3 CHANNELS” on page 66. -
Page 32: Pattern Menu
• SEQUENCE DATA Reloads the active pattern’s all sequence data from the +Drive. A prompt appears when you select this option. Press [YES] to reload, or [NO] to cancel the operation. 10.5.5 IMPORT/EXPORT Here you can manage the Sounds on the Digitakt. -
Page 33: Audio Routing (Pattern)
10.5.6 AUDIO ROUTING (PATTERN) Here you find number of audio routing options that affects the Digitakt on a pattern level. You can also set the audio routing on a global level. For more information, please see “15.5 AUDIO ROUTING (GLOB- AL)”... -
Page 34: Metronome Menu
A 2X scale setting is useful for increasing the base resolution of the step sequencer to 32nd notes. A 3/4X setting is useful when Digitakt is playing alongside other instruments set to the same BPM, and you want Digitakt to play triplets. -
Page 35: Per Track Mode
10. THE SEQUENCER 10.9.2 PER TRACK MODE In this mode, you can assign individual length and scale to the tracks of the pattern. Press [FUNC] + [YES] to switch between the two scale modes. In PER TRACK mode, two columns exist, TRACK and PATTERN. -
Page 36: Sound Locks
10. THE SEQUENCER Adding parameter locks in LIVE RECORDING mode. 1. Press and hold [RECORD], then press [PLAY] to enter LIVE RECORDING mode. 2. Turn a DATA ENTRY knob, or play the [TRIG] keys in CHROMATIC mode, to add parameter locks to the active track. -
Page 37: Fill Mode
10. THE SEQUENCER NEI is true when NEI is false. A trig with this trig condition is active if the most recently evaluated trig condition on the neighbor track was not true. (PRE and PRE conditions on the neighbor track are ignored and not evaluated.) 1ST is true the first time the pattern plays (when looped). -
Page 38: Temporary Save And Reload Pattern Commands
10. THE SEQUENCER [FUNC] + [RECORD]. Select another pattern, and then press [FUNC] + [STOP] to paste the copied pattern to this location. Press [FUNC] + [PLAY] to clear all the trigs in the current pattern. Individual sequencer tracks can be copied, pasted and cleared in the same way as patterns. To do so, GRID RECORDING mode must be active. - Page 39 Please note that the chain will be lost when you create a new chain or when you select a new bank/pattern. Chains cannot be saved and will be lost when you switch the Digitakt off. • Chains can be created while the sequencer is running.
-
Page 40: Audio Track Parameters
Trig Probability setting. For example, if you set PROB to 70% and a FILL trig condition on a trig, that trig will only (and always) play when the Digitakt is in FILL mode. For more information, please see “10.10.3 TRIG CONDITIONS AND CONDITIONAL LOCKS” on page... -
Page 41: Src
11. AUDIO TRACK PARAMETERS 11.2.5 FLT.T Filter Trig controls if the filter envelope will be trigged or not. (ON, OFF) 11.2.6 LFO.T LFO Trig controls if the LFO will be trigged or not. (ON, OFF) 11.3 SRC PAGE 1 The parameters on the SOURCE page control the playback of the user samples. Within each pattern, the samples may be dynamically allocated, modulated and customized. -
Page 42: Src
11. AUDIO TRACK PARAMETERS 11.3.7 LOOP Loop Pos sets the position in the sample to where playback will return to after reaching the Length Position (defined by STRT + LEN) of the sample if PLAY MODE is set to FORWARD LOOP or REVERSE LOOP. -
Page 43: Fltr
11. AUDIO TRACK PARAMETERS 11.5.1 ATK Attack Time sets the length of the attack phase of the filter envelope. (0–127) 11.5.2 DEC Decay Time sets the length of the decay phase of the filter envelope. (0–127) 11.5.3 SUS Sustain Level sets the sustain level of the filter envelope. (0–127) 11.5.4 REL Release Time sets the length of the release phase of the filter envelope. -
Page 44: Amp Page
11. AUDIO TRACK PARAMETERS The base-width filter is basically a Highpass filter and a Lowpass filter connected in series. The filters BASE and WIDTH parameters define the base-width filters frequency range. Examples of how the BASE and WIDTH parameters affect the filter frequency range: Width Width Width... - Page 45 11. AUDIO TRACK PARAMETERS TRIG PARAMETERS PAGE” on page 33), releasing a [TRIG] key or a key on an external controller. Setting HOLD to NOTE means the hold phase will be determined by Note On and Note Off events. (0–126, NOTE) If you set HOLD to NOTE and use an external keyboard to trigger the envelope, then the sound will be sustained for as long as you press a key on the keyboard (or until the sample ends).
-
Page 46: Lfo
11. AUDIO TRACK PARAMETERS 11.8 LFO PAGE 1 The Low-Frequency Oscillator can be used to modulate the parameters found on the audio tracks SRC, FILTER and AMP pages. Customize the low-frequency oscillator behavior, orientation, and depth on this page. This page controls the behavior of LFO 1 Press [LFO] to access this parameter page. - Page 47 11. AUDIO TRACK PARAMETERS LFO waveforms and trig modes. TRIG FREE TRIG HOLD HALF TRIG TRIG TRIG TRIG TRIG TRIG TRIG TRIG The table below shows the LFO speed measured in whole note values. One whole note equals 16 se- quencer steps in 4/4 with SCALE set to 1x.
-
Page 48: Midi Track Parameters
Trig Probability setting. For example, if you set PROB to 70% and a FILL trig condition on a trig, that trig will only (and always) play when the Digitakt is in FILL mode. For more information, please see “10.10.3 TRIG CONDITIONS AND CONDITIONAL LOCKS” on page 12.2.6 LFO.T... -
Page 49: Src Page
12. MIDI TRACK PARAMETERS 12.3 SRC PAGE Here you can set the MIDI channel that the MIDI track should use to send data. Bank and program change values are also set here, together with a few standard CC parameters. The default value of the parameters on this page is OFF, meaning they are disabled and will not send out any data. -
Page 50: Amp Page (Cc Select)
12. MIDI TRACK PARAMETERS 12.4.1 VAL1-VAL8 CC 1–8 Value controls the values that are sent for the CC commands, which are specified on the AMP (CC SELECT) page. These parameters default value is OFF. Press [TRIG] + DATA ENTRY knobs to acti- vate the parameters and then set a value. - Page 51 12. MIDI TRACK PARAMETERS 12.6.6 PHAS Start Phase sets the point within the wave cycle where the LFO will start when it is trigged. 0 makes the LFO start at the beginning of a complete wave cycle, 64 makes it start at the center. A small square at the start of the waveform shows that the wave cycle starts at a zero-crossing.
-
Page 52: Fx And Mixer Parameters
13.1 EDITING THE FX PARAMETERS The Digitakt’s Delay and Reverb are send effects and are set on a pattern level. It means that all the Sounds in a pattern shares the same effect settings but have individual send levels to the effects. The Delay and Reverb parameters are set on their respective PARAMETER page, but their incoming signals are set by the DEL and REV send parameters on the AMP page of each audio track. -
Page 53: Reverb
13. FX AND MIXER PARAMETERS TIME setting Divide ratio 42.67 1/3 (1/2T) 1/4. 1/2. 13.2.2 X Ping-pong sets the delay signal to alternate across the stereo field. There are two settings: • OFF lets you manually set the position of the delay signal in the stereo field. Use the WID parameter to change the stereo field position. -
Page 54: Compressor (Master
13. FX AND MIXER PARAMETERS 13.3.3 FREQ FB Shelving Freq sets the shelving filter frequency. Together with the GAIN parameter, it can be used to dampen the reverberated signal above a chosen frequency, making the reverberation sound more promi- nent or more muffled. (0.00–127.00) 13.3.4 GAIN FB Shelving Gain affects the damping of the reverberated signal above the shelving frequency set by the FREQ parameter. -
Page 55: Internal Mixer (Master
0 results in a completely uncompressed signal. A setting of 127 lets only the compressed signal pass through. All values in between mix the uncompressed signal with the compressed signal, which is known as parallel compression. (0–127) The Digitakt compressor Sidechain Filter... -
Page 56: External Mixer (Master
13. FX AND MIXER PARAMETERS 13.6 EXTERNAL MIXER (MASTER PAGE 3) The EXTERNAL MIXER page contains a number of parameters related to when you use the INPUT L/R inputs to process incoming audio. Press [FUNC] + [LFO] three times to access this parameter page. 13.6.1 IN L Volume input L sets the level of the audio from the INPUT L audio input. -
Page 57: Sampling
• MAIN L sets the input source to the Digitakt internal main audio left channel. • MAIN R sets the input source to the Digitakt internal main audio right channel. • MAIN L+R sets the input source to the Digitakt internal main audio L+R channels. The audio is summed together to mono. -
Page 58: Sampling Audio
6. Press [YES] when you want to stop sampling. The Digitakt then automatically normalizes the sample. 7. Use the DATA ENTRY knobs A and C to set the parameters TRIM START and TRIM END to trim the sample to the desired length. -
Page 59: Sample Playback
14. SAMPLING 7. Press [SRC] access the SOURCE menu, and then use DATA ENTRY knob D to select the sample you want to load. 8. Press [YES] to load the sample to the track. For more information, please see “15.2 SAMPLES” on page 61. 14.5 SAMPLE PLAYBACK Once the sample is assigned to a track, it can be triggered either by the sequencer or manually by pressing a [TRIG] key. -
Page 60: Settings Menu
15. SETTINGS MENU 15. SETTINGS MENU The SETTINGS menu offers settings that affect Digitakt and can also be used to manage Projects. Press [GLOBAL SETTINGS] to access the SETTINGS menu. Scroll the list by using [UP]/[DOWN] or the LEVEL/DATA knob. Open a highlighted menu by pressing [YES]. -
Page 61: Samples
RECORDED. A wide array of preset samples are available in the write protected FACTORY directory. The INCOMING directory is the default destination for samples sent to the Digitakt +Drive storage via the C6 software. RECORDED will contain the samples you create when you sample with the Digitakt. -
Page 62: Unloading A Sample
15. SETTINGS MENU Select VIEW RAM and press [YES]. A list appears that shows all 127 sample slots. On this screen, the 127 samples may be unloaded individually or collectively to empty the slots. 15.2.2 UNLOADING A SAMPLE You can unload one or several samples from the RAM memory of the active project. 1. -
Page 63: Renaming A Sample
8. Drag and drop the files or folders to your preferred location on your device. Transfer automatically converts all audio files to 16 bit, 48 kHz, mono audio files, the Digitakt native audio format. To use the samples, they need to be loaded to the active project. For more information, please see “15.2.1 LOADING A SAMPLE”... -
Page 64: Transferring Samples From Digitakt To A Computer
USB MIDI. You also have to enable the trans- mission of the Extended SDS header if you want the sample name to be sent to the Digitakt. This procedure is only for when you use the Elektron C6 software transfer tool. If you use Elektron Transfer you can create a new destination directory in the Digitakt directly from Transfer. -
Page 65: Port Config
• USB will make Digitakt listen only to MIDI data sent to the USB port. • MIDI+USB will make Digitakt listen to MIDI data sent to both the MIDI IN and USB ports. OUTPUT TO selects the destination to which Digitakt will send MIDI data. -
Page 66: Channels
ENCODER DEST controls whether the DATA ENTRY and LEVEL/DATA knobs sends MIDI data or not. When set to INT, the knobs only affects the Digitakt and no MIDI data is sent. When set to INT + EXT, the knobs affects the Digitakt and also sends MIDI data to external devices. -
Page 67: Sysex Dump
In the SYSEX DUMP menu, project, pattern, and Sound data can be sent and received via the MIDI OUT port or the USB port of the Digitakt. Select a menu option using [UP]/[DOWN] or the TRACK LEVEL knob. Press [YES] to open the highlighted menu selection. -
Page 68: Audio Routing (Global)
15.5 AUDIO ROUTING (GLOBAL) Here you find number of audio routing options that affects the Digitakt on a global level. You can also set the audio routing on a pattern level. For more information, please see “10.5.6 AUDIO ROUTING (PATTERN)”... -
Page 69: Global Fx/Mix
USB AUDIO/MIDI sets the Digitakt to send and receive audio and MIDI over USB. Select this option if you want to use the Digitakt together with a class compliant USB audio host. For more information, please see “6.7 CLASS COMPLIANT DEVICE” on page 18. -
Page 70: Remember Subpage
(ON, OFF). 15.7.4 OS UPGRADE Use this menu option is used when you want to upgrade the Digitakt OS. To send the OS file, use our free Elektron Transfer software. Elektron Transfer can be downloaded from the Elektron website. The device sending the OS file must be connected to the USB port of Digitakt. -
Page 71: Startup Menu
For testing purposes, a short sound is heard through all outputs of the unit. If you have any trouble with your Digitakt and suspect it may be due to a hardware problem, perform this self-test. The [UP] and [DOWN] keys can be used to scroll through the test log. A fully functional device should not report any errors. -
Page 72: Setup Examples
3. Connect the Digitakt audio outputs to the mixer using 2 x Mono or Stereo jack 6.3 mm male cables. 4. Use a DIN connector cable to connect the MIDI OUT of the Digitakt to the SYNC IN of the bass machine. -
Page 73: Controlling A Synthesizer Using The Midi Tracks
Digitakt can make use of its class compliant audio and MIDI functionality together with your computer, smart phone or tablet. You can let Digitakt sample audio from the phone or maybe use it the other way around and record audio from the Digitakt on your phone. You can use your phone as an effect processor for the Digita- kt, and among many other things. -
Page 74: Useful Key Combinations (Quick Keys)
18. USEFUL KEY COMBINATIONS (QUICK KEYS) 18. USEFUL KEY COMBINATIONS (QUICK KEYS) Use the key combinations below to quickly perform certain tasks. GENERAL [FUNC] + [REC] performs a copy command. Action depends on the currently active page or mode. [FUNC] + [PLAY] performs a clear command. Action depends on the currently active page or mode. [FUNC] + [STOP] performs a paste command. - Page 75 18. USEFUL KEY COMBINATIONS (QUICK KEYS) SEQUENCER RECORDING [RECORD] + [PLAY] starts LIVE RECORDING. [RECORD] + [STOP] activates STEP RECORDING. [RECORD] + double-press [PLAY] activates/deactivates QUANTIZE LIVE RECORDING. [NO] + [TRIG] key during LIVE RECORDING clears the trigs from a sequencer track. [FUNC] + [PTN] (long press) toggles the metronome on/off.
-
Page 76: Technical Information
CREDITS CONTACT INFORMATION PRODUCT DESIGN AND DEVELOPMENT ELEKTRON WEBSITE Oscar Albinsson http://www.elektron.se Johannes Algelind OFFICE ADDRESS Ali Alper Çakır Elektron Music Machines MAV AB Shelby Cinca Banehagsliden 5 Ufuk Demir SE-414 51 Gothenburg Oscar Dragén Magnus Forsell Sweden Anders Gärder... -
Page 77: Appendix A: Midi
APPENDIX A: MIDI APPENDIX A: MIDI This appendix lists the CC and NRPN specification for the Digitakt. A.1 TRACK PARAMETERS TRACK Parameter CC MSB CC LSB NRPN MSB NRPN LSB Mute Track level A.2 TRIG PARAMETERS TRIG PARAMETERS Parameter CC MSB... -
Page 78: Amp Parameters
APPENDIX A: MIDI A.5 AMP PARAMETERS Parameter CC MSB CC LSB NRPN MSB NRPN LSB Attack Time Hold Time Decay Time Overdrive Delay Send Reverb Send Volume A.6 LFO PARAMETERS Note that the LFO 1/2 depth are high-resolution parameters, with CC LSB values. LFO 1 Parameter CC MSB... -
Page 79: Val Parameters
APPENDIX A: MIDI REVERB Parameter CC MSB CC LSB NRPN MSB NRPN LSB Predelay Decay Time Shelving Freq Shelving Gain Highpass Filter Lowpass Filter Rev Pre/Post Comp Mix Volume COMPRESSOR Parameter CC MSB CC LSB NRPN MSB NRPN LSB Threshold Attack Time Release Time Makeup Gain... -
Page 80: Misc Parameters
APPENDIX A: MIDI CC VAL Parameter CC MSB CC LSB NRPN MSB NRPN LSB VAL5 VAL6 VAL7 VAL8 A.9 MISC PARAMETERS MISC Parameter CC MSB CC LSB NRPN MSB NRPN LSB Pattern Mute... -
Page 81: Appendix B: Lfo Modulation Destinations
APPENDIX B: LFO MODULATION DESTINATIONS APPENDIX B: LFO MODULATION DESTINATIONS The following are the modulation destinations for the Digitakt’s LFOs: AUDIO TRACKS MIDI TRACKS META: None META: None LFO1: Speed (Only available for LFO2) SRC: Pitch Bend LFO1: Multiplier (Only available for LFO2) -
Page 82: Index
INDEX INDEX +DRIVE 14, 23 LED INTENSITY 69, 70 LFO 46, 50 AUDIO ROUTING Modulation destinations 81 Global 68, 69 Pattern 33 AUDIO TRACK PARAMETERS 40 MICRO TIMING 31 Amp 43 MIDI CC & NRPN 77 Filter 42, 43 MIDI CONFIG 64 LFO 46 MIDI TRACK PARAMETERS 48 Source 41... - Page 83 Grid recording mode 29 Live recording mode 29 Step recording mode 30 SETTINGS 60 MIDI config 64 Project 60 Sample management 61 System 69 SETUP EXAMPLES 18, 72 Controlling a synthesizer using the MIDI tracks 73 Digitakt with a monophonic bass machine 72...
Need help?
Do you have a question about the Digitakt and is the answer not in the manual?
Questions and answers