Table of Contents
Advertisement
Quick Links
Advertisement
Table of Contents

Related Manuals for Elektron Digitakt


Summary of Contents for Elektron Digitakt
- Page 1 Digitakt Beat making powerhouse User Manual...
- Page 2 Elektron may also make improvements and/or changes in the products and programs described in this document at any time without notice. In no event shall Elektron be liable for any special, indirect, or consequential damages or any damages whatsoever resulting from loss of use, data, or profits, whether in an action of contract, negligence, or other action, arising out of or in connection with the use or performance of this information.
- Page 3 • Do not exceed the limitations specified in the Electrical specifications. SOUND PEAKS • A brief signal will be sent to all outputs of the Digitakt when the Test mode on the STARTUP Menu is activated. Remember to turn down the volume on all speakers and headphones before activating Test mode.
-
Page 4: Table Of Contents
4.2 EFFECTS ................. . 13 5. OVERVIEW OF THE DIGITAKT DATA STRUCTURE ......14 5.1 +DRIVE . - Page 5 TABLE OF CONTENTS 8.5.2 MUTE MODE ................22 9.
- Page 6 15.2.3 REPLACING A SAMPLE ..............54 15.2.4 TRANSFERRING SAMPLES FROM A COMPUTER TO DIGITAKT ......54 15.2.5 CREATING A NEW DESTINATION DIRECTORY .
- Page 7 TABLE OF CONTENTS 18. USEFUL KEY COMBINATIONS (QUICK KEYS) ....... . 63 19.
-
Page 8: Introduction
1. INTRODUCTION 1. INTRODUCTION Thank you for purchasing Digitakt. The Digitakt is a compact drum machine from Elektron. It contains all the necessary tools to make people move to the beat. A digital and highly flexible sound engine, sampling capa- bility, a live-friendly sequencer, the means to control external MIDI gear, and Overbridge support. -
Page 9: The Digitakt
Fast forward. It’s May 2017 and Digitakt will start shipping in about a week. The Elektron HQ is bristling with activity. Factory patterns are being made, tweaks to the Digitakt OS implemented, content for the Elektron website created. -
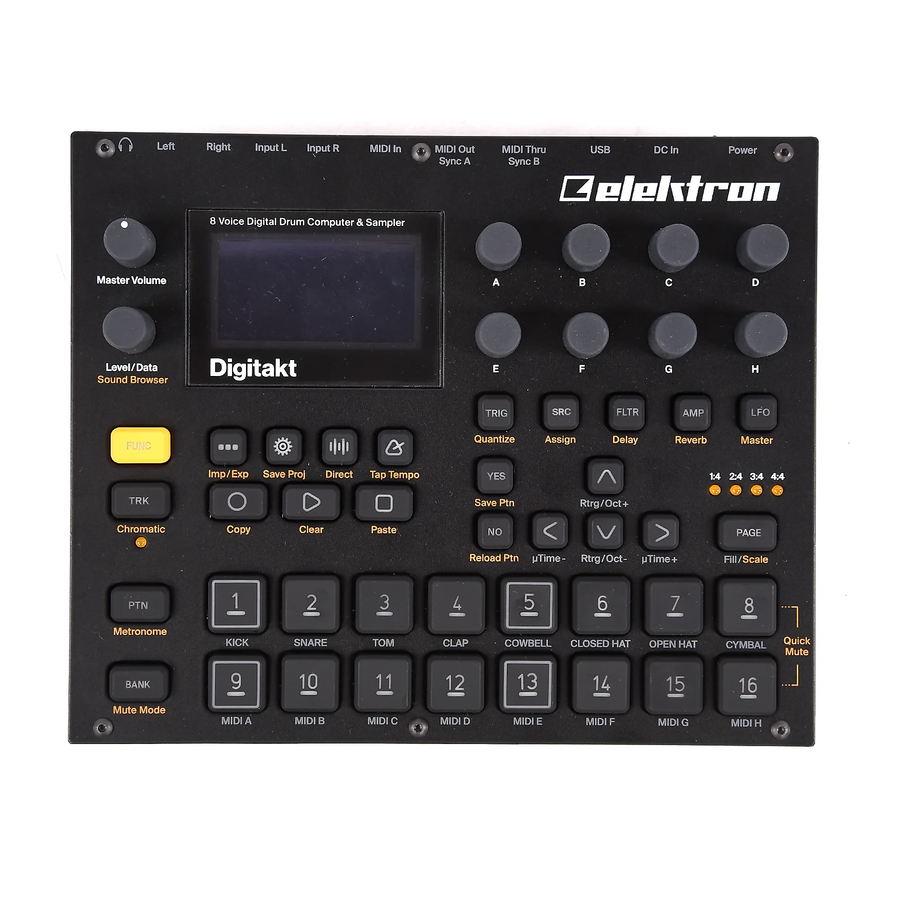
Page 10: Panel Layout And Connectors
Right Input L Input R MIDI In MIDI Out MIDI Thru DC In Power Sync A Sync B 8 Voice Digital Drum Computer & Sampler Master Volume Digitakt Level/Data Sound Browser TRIG FLTR Quantize Assign Delay Reverb Master FUNC Imp/Exp... - Page 11 20. [FUNC] key. Press, hold and press another key to access the secondary function of that key. The sec- ondary functions are written in orange on the Digitakt front panel. 21. LEVEL/DATA sets the overall volume level of the active track. It is also used for setting parameters and...
-
Page 12: Rear Connectors
MIDI IN port, so it can be used for chaining MIDI units together. Connect the MIDI OUT port of the Digitakt to the MIDI IN port of the of the device you want to control if you want to use Digitakt to control other devices using MIDI. -
Page 13: Digitakt Sound Architecture
4. DIGITAKT SOUND ARCHITECTURE 4. DIGITAKT SOUND ARCHITECTURE The illustrations below show the Digitakt sound architecture, with its eight audio voices and two send effects (delay and reverb). 4.1 AUDIO VOICES FILTER ENVELOPE SAMPLE FILTER MULTIMODE OVER- PLAYBACK TO MIXER... -
Page 14: Overview Of The Digitakt Data Structure
A project contains 128 patterns. General settings and states are also stored in the project. When a project is loaded it becomes the active working state of the Digitakt. From here it is possible to edit the patterns and sounds of the project. Every time the Digitakt is switched on, it boots to the active working state, the active project. -
Page 15: About The Tracks
5.3 ABOUT THE TRACKS 5.3.1 THE AUDIO TRACKS The Digitakt has eight audio tracks. Each audio track contains one sample, and the parameter settings in the PARAMETER pages TRIG, SRC, FLTR, AMP, and LFO. To select an audio track for editing, press and hold [TRK] key and then press one of the [TRIG 1–8] keys. -
Page 16: The User Interface
6. THE USER INTERFACE 6. THE USER INTERFACE The screen shows all the information needed for real-time interaction and editing on the Digitakt. The eight DATA ENTRY knob parameters shown will vary depending on the given situation. Below is the main inter- face screen of the SRC page. -
Page 17: Func] Key Press Combinations
Copy, paste, and clear commands are available on the NAMING screen. 6.6 OVERBRIDGE The Overbridge software suite enables a tight integration between the Digitakt and a computer DAW. When using Overbridge, the user interface for the Digitakt will present itself as a clearly laid out plug-in... - Page 18 To use Overbridge, you need a Digitakt, a USB cable, a computer running Overbridge, and a DAW. N.B. You must have Digitakt OS 1.10 or later, and Overbridge 1.20 or later to run Overbridge with Digitakt. Read more about Overbridge for Digitakt on the Elektron website.
-
Page 19: Quick Start
7. QUICK START 7. QUICK START This quick start will guide you through some of the basic operations to start using the Digitakt right away. First, connect it as described in section “3.3 SETTING UP AND STARTING THE DIGITAKT” on page 12. -
Page 20: Editing Parameters
Try out the rest of the PARAMETER page parameters to explore a variety of sound shaping possibilities. 7.2 SAMPLING FROM THE EXTERNAL INPUTS Digitakt can also sample audio. It can sample audio from external sources, via the external inputs, and it can also sample audio internally from the Digitakt itself. -
Page 21: Digitakt Controls
Some functions can be triggered by sending MIDI note values from an external MIDI device (a MIDI key- board or a computer, for example) connected to the Digitakt via a standard MIDI cable or a USB 2.0 A to B connector cable. -
Page 22: Mute Mode
MIDI Auto Channel (SETTINGS > MIDI CONFIG > CHANNELS) to the same MIDI channel. Then play the keys on the external keyboard to play the active tracks sound chromatically. You can play the active track’s sound chromatically even if the Digitakt is not in CHRO- MATIC mode. -
Page 23: Patterns, Kits, Sounds, And Samples
9. PATTERNS, KITS, SOUNDS, AND SAMPLES The patterns are the primary data container for the Digitakt. Sixteen patterns are available for each of the eight banks, which means that 128 patterns are available for each project. A pattern contains up to eight sounds (one for each audio track), sequencer data like trigs and parameter locks. -
Page 24: Sound Manager
9. PATTERNS, KITS, SOUNDS, AND SAMPLES LEVEL knob or by pressing [UP]/[DOWN]. Press [YES] to load a sound. Press the [TRIG] key of the active track to preview the sound. Press [LEFT] to access the SORTING menu. Press [YES] to execute the commands. Press [NO] or the [RIGHT] arrow key to exit the menu. -
Page 25: Playing A Sound
PLAYING A SOUND WITH AN EXTERNAL MIDI UNIT The sounds can also be played using an external MIDI device connected to Digitakt. The MIDI channels for of each of the audio tracks can be assigned in the MIDI CHANNELS menu, covered in the section “15.3.3 CHANNELS”... -
Page 26: Assigning A Sample
9. PATTERNS, KITS, SOUNDS, AND SAMPLES Edit a sound by adjusting the parameters found on the PARAMETER pages. Access these pages by pressing a [PARAMETER] page key. Use the DATA ENTRY knobs A-H to change the parameters. For more information, please see “11. AUDIO TRACK PARAMETERS” on page 36. SRC controls sample selection and playback of samples. -
Page 27: The Sequencer
10. THE SEQUENCER 10. THE SEQUENCER The sequencer of the Digitakt stores information in patterns. A pattern controls the playback of the audio tracks, the MIDI tracks and various pattern-specific aspects of the tracks. Each of the eight banks, A to H, contains 16 patterns, which means 128 patterns are available for each project. -
Page 28: Grid Recording Mode
10. THE SEQUENCER • Note trigs trigger sounds or MIDI notes. • Lock trigs triggers parameter locks, but without triggering notes. Note trigs are indicated by red [TRIG] keys and lock trigs are indicated by yellow [TRIG] keys. Unlit [TRIG] keys indicate steps that does not contain any trigs. Read more about parameter locks in section “10.11.1 PARAMETER LOCKS”... -
Page 29: Micro Timing Menu
10. THE SEQUENCER • You can use an external MIDI controller such as a keyboard to input NOTE, TRIG VELOCITY, and TRIG LENGTH data in LIVE RECORDING mode. Just play the notes on the external keyboard and they will be recorded by the sequencer. On MIDI tracks, you can add up to a four note chord to every trig. -
Page 30: Pattern Menu
Press [YES] to reload, or [NO] to cancel the operation. 10.5.5 IMPORT/EXPORT Here you can manage the sounds on the Digitakt. • IMPORT SOUND Imports (copies) a sound from the +Drive to the active pattern. Turn the LEVEL knob or press [UP]/[DOWN] to scroll through the list. -
Page 31: Trig Parameters Page
Press [FUNC] + [YES] to apply quantization to the pattern. Press [NO] to exit the menu. 10.8 METRONOME MENU The METRONOME menu controls the internal metronome of the Digitakt. Press [FUNCTION] + [PTN] to open the METRONOME menu. Use the DATA ENTRY knobs to change the settings. -
Page 32: Length Per Track Mode
A 2X time signature setting is useful for increasing the base resolution of the step sequencer to 32nd notes. A 3/4X setting is useful when Digitakt is playing alongside other instruments set to the same BPM, and you want Digitakt to play triplets. -
Page 33: Master Page
10. THE SEQUENCER 10.10 MASTER PAGE Press [FUNC] + [LFO] to access this menu. Here you can conveniently access the TRACK LEVEL parameter of all the eight audio tracks. (0–127) 10.11 SEQUENCER FEATURES 10.11.1 PARAMETER LOCKS Parameter locks makes it possible to set every trig to have its own unique parameter values. The note trigs of an audio track can, for example, have different pitch, amp or filter settings. -
Page 34: Fill Mode
10. THE SEQUENCER NEI is true if the most recently evaluated note condition on the neighbor track was true. The neighbor track is the track before the one being edited. For example, the neighbor track of track 4 is track 3. If no conditions exist on the neighbor track, the condition is false and no sound is played. -
Page 35: Temporary Save And Reload Pattern Commands
Please note that the chain will be lost when you create a new chain or when you select a new bank/pattern. Also, chains cannot be saved and will be lost when you switch the Digitakt off. • Chains can be created while the sequencer is running. -
Page 36: Audio Track Parameters
11. AUDIO TRACK PARAMETERS 11. AUDIO TRACK PARAMETERS Here follows a description of all of the parameters that are available on the audio tracks PARAMETER pages. The parameters on the TRIG page are not saved together with the sound, but are instead saved with the pattern. - Page 37 11. AUDIO TRACK PARAMETERS 11.3.1 TUN Tune sets the pitch of the sample. The knob works in a bipolar fashion, and a value of 0 leaves the pitch unchanged. (-24.00–+24.00, equivalent to four octaves.) 11.3.2 PLAY Play Mode sets the play mode of the sample. It controls how the sample will be played back when it is trigged.
-
Page 38: Src
11. AUDIO TRACK PARAMETERS The STA, LEN, and LOP parameters. Start Loop Position Length FORWARD LOOP play mode. Loop Loop Loop Start Position Length Start Length Position Position Start Length 11.4 SRC PAGE 2 Same parameters as on SRC page 1 but with a graphical representation of the parameters. Press [SRC] twice to access this parameter page. -
Page 39: Amp Page
11. AUDIO TRACK PARAMETERS 11.5.4 REL Release Time sets the length of the release phase of the filter envelope. (0–126, INF) 11.5.5 FREQ Frequency sets the cutoff frequency of the multimode filter. (0.00–127.00) 11.5.6 RESO Resonance sets the resonance behavior of the filter. Resonance introduces a peak in the spectrum at the cutoff frequency. -
Page 40: Lfo Page
11. AUDIO TRACK PARAMETERS 11.6.4 OVER Overdrive sets the amount of overdrive and clipping distortion of the signal entering the filter. (0.00–127.00) 11.6.5 DEL Delay Send sets the amount of the sound that is sent through to the Delay effect. For more information, please see “13. - Page 41 11. AUDIO TRACK PARAMETERS 11.7.1 SPD Speed sets the speed of the LFO. Try settings of 8, 16 or 32 to sync the LFO to straight beats. The knob is bipolar. The LFO cycle can be played backward by using negative values. (-64.00–63.00) 11.7.2 MULT Multiplier multiplies the SPD parameter by the set factor either by multiplying the current tempo (BPM settings), or by multiplying a fixed tempo of 120 BPM.
- Page 42 11. AUDIO TRACK PARAMETERS LFO waveforms and trig modes. TRIG FREE TRIG HOLD HALF TRIG TRIG TRIG TRIG TRIG TRIG TRIG TRIG...
-
Page 43: Midi Track Parameters
12. MIDI TRACK PARAMETERS 12. MIDI TRACK PARAMETERS Here follows a description of the parameters that are on the MIDI tracks PARAMETER pages. The MIDI tracks parameters are saved together with the pattern. The parameters may be locked to other settings on any step of the pattern by first pressing and holding a [TRIG] key, then changing the parameters settings with the DATA ENTRY knobs. -
Page 44: Fltr Page (Cc Value)
12. MIDI TRACK PARAMETERS 12.3.1 CHAN Channel sets the MIDI channel the track will send MIDI data to. If this parameter is set to OFF, it basically turns the MIDI track off. Please note that this parameter cannot be parameter locked. (OFF, 1–16) 12.3.2 BANK Bank is used for sending out a bank change message. -
Page 45: Lfo Page
12. MIDI TRACK PARAMETERS 12.5.1 SEL1-SEL8 CC 1–8 Select specifies the CC commands that are controlled by the parameters on the AMP PAGE 1 (CC VALUE) page. The selectable values are the standard MIDI Control Change Messages. (0–119) 12.6 LFO PAGE The Low-Frequency Oscillator can be used to interact with the parameters found on the MIDI tracks’... - Page 46 12. MIDI TRACK PARAMETERS • ONE will make the LFO start from the beginning when a note is trigged, run for one cycle and then stop. This makes its function similar to an envelope. • HLF will make the LFO start from the beginning when a note is trigged, run for half a cycle and then stop.
-
Page 47: Fx Parameters
13.1 EDITING THE FX PARAMETERS The Digitakt’s Delay and Reverb effects are send effects and are set on a pattern level. It means that all the sounds in a pattern shares the same effect settings but have individual send levels to the effects. The Delay and Reverb parameters are set on their respective PARAMETER page, but their incoming signals are set by the DEL and REV send parameters on the AMP page of each audio track. -
Page 48: Reverb
13. FX PARAMETERS 13.2.8 VOL Mix Volume adjusts the volume of the Delay output signal. (0.00–127.00) 13.3 REVERB The Reverb send effect controls the persistence, and ambient characteristics, of the sound reverberations. It can simulate many different sonic locations, from huge spaces to small rooms. Press [FUNC] + [AMP] to access this parameter page. -
Page 49: Sampling
• INT L sets the input source to the Digitakt internal audio left channel. • INT R sets the input source to the Digitakt internal audio right channel. • INT L+R sets the input source to the Digitakt internal audio L+R channels. The audio is summed together to mono. -
Page 50: Direct Sampling
14.4 ASSIGNING A SAMPLE TO A TRACK FROM THE +DRIVE You can also assign samples from the +Drive storage in the Digitakt to the tracks. 1. Press [SETTINGS] to access the SETTINGS menu, and then select SAMPLES and press [YES]. - Page 51 14. SAMPLING • FORWARD LOOP The sample will loop continuously between Loop Position and Length. How long it will loop for is set with the LEN parameter on the TRIG page. The loop time is also constrained by the AMP page envelope parameters HLD and DEC. •...
-
Page 52: Settings Menu
RECORDED. A wide array of preset samples are available in the write protected FACTORY directory. The INCOMING directory is the default destination for samples sent to the Digitakt +Drive storage via the C6 software. RECORDED will contain the samples you create when you sample with the Digitakt. -
Page 53: Loading A Sample
15. SETTINGS MENU Use the [ARROW] keys to highlight a directory, and then press [YES] to open it. To exit a directory and back one step up in the directory hierarchy, select the item labeled “..” at the very top of the screen and press [YES]. -
Page 54: Unloading A Sample
USB MIDI. You also have to enable the trans- mission of the Extended SDS header if you want the sample name to be sent to the Digitakt (if not, the samples will simply be named 1, 2, 3 ... and so on in the destination directory of the Digitakt). -
Page 55: Creating A New Destination Directory
15. SETTINGS MENU 15.2.5 CREATING A NEW DESTINATION DIRECTORY This procedure is only for when you use the Elektron C6 software transfer tool. If you use Elektron Transfer you can create a new destination directory in the Digitakt directly from Elektron Transfer. -
Page 56: Port Config
• CC will make the knobs send out CC MIDI messages. ENCODER DEST controls whether the DATA ENTRY and LEVEL knobs sends MIDI data or not. When set to INT, the knobs only affects the Digitakt and no MIDI data is sent. When set to INT + EXT, the... -
Page 57: Channels
TRIG KEY DEST controls whether the [TRIG] keys sends MIDI data or not. When set to INT, the [TRIG] keys only affects the Digitakt and no MIDI data is sent. When set to INT + EXT, the [TRIG] keys affects the Digitakt, and also sends MIDI data to external devices. When set to EXT, the [TRIG] keys do not affect the Digitakt but MIDI data is sent externally. -
Page 58: Format +Drive
15. SETTINGS MENU 1. Press [YES] to make Digitakt start listening for incoming OS SysEx data. If you wish to cancel the waiting state, press [NO]. 2. Open Elektron Transfer and select Elektron Digitakt for MIDI Input device as well as MIDI Output device. -
Page 59: Startup Menu
OS data, and “READY TO RECEIVE” will be shown on the screen. For the transfer to be possible, the device sending the OS syx file must be connected to the MIDI IN port of Digitakt. To send the OS syx file, use our free SysEx utility software C6. -
Page 60: Setup Examples
3. Connect the Digitakt audio outputs to the mixer using 2 x Mono or Stereo jack 6.3 mm male cables. 4. Use a DIN connector cable to connect the MIDI OUT of the Digitakt to the SYNC IN of the bass machine. -
Page 61: Sampling From A Smart Phone
Digitakt has extensive capabilities to use its sequencer’s MIDI tracks to control other MIDI-equipped synthesizers. 1. Use a standard MIDI cable to connect the Digitakt MIDI OUT jack with the synthesizer’s MIDI IN jack. 2. On the Digitakt, press [SETTINGS], and then navigate to MIDI CONFIG > PORT CONFIG and set OUT PORT FUNC to MIDI. - Page 62 6. Make sure to set your synthesizer to receive MIDI input in a way that corresponds to the settings you made in the Digitakt. You are now ready to use the Digitakt sequencer to control your synthesizer. For more information about using the Digitakt sequencer, please see “10. THE SEQUENCER” on page 27.
-
Page 63: Useful Key Combinations (Quick Keys)
18. USEFUL KEY COMBINATIONS (QUICK KEYS) 18. USEFUL KEY COMBINATIONS (QUICK KEYS) Use the key combinations below to quickly perform certain tasks. GENERAL [FUNC] + [REC] performs a copy command. Action depends on the currently active page or mode. [FUNC] + [PLAY] performs a clear command. Action depends on the currently active page or mode. [FUNC] + [STOP] performs a paste command. - Page 64 18. USEFUL KEY COMBINATIONS (QUICK KEYS) [FUNC] + [PTN] (long press) toggles the metronome on/off. MUTES [FUNC] + [TRIG] keys mutes/unmutes one or several tracks. MODES [FUNC] + [BANK] enters GLOBAL MUTE mode. [FUNC] + double-tap [BANK] enters PATTERN MUTE mode. [FUNC] + [TRK] enters CHROMATIC mode.
-
Page 65: Technical Information
Digital S/N ratio: 110 dB (20–20.000 Hz) Sturdy steel casing Unit power consumption: 7 W typical Dimensions: W 215 × D 176 × H 63 mm Compatible Elektron power supply: PSU-3b (8.5” × 6.9” × 2.5”) (including knobs and feet) Weight: approximately 1.45 kg (3.2 lbs) 100 × 100 mm VESA mounting holes. Use M4 screws with a max length of 7 mm. -
Page 66: Appendix A: Midi
APPENDIX A: MIDI APPENDIX A: MIDI This appendix lists the CC and NRPN specification for the Digitakt. A.1 TRACK PARAMETERS TRACK Parameter CC MSB CC LSB NRPN MSB NRPN LSB Solo Mute Track level A.2 TRIG PARAMETERS TRIG PARAMETERS Parameter... -
Page 67: Lfo Parameters
APPENDIX A: MIDI Parameter CC MSB CC LSB NRPN MSB NRPN LSB Hold Time Decay Time Overdrive Delay Send Reverb Send Volume A.6 LFO PARAMETERS Note that the LFO depth is a high-resolution parameter, with CC LSB value. Parameter CC MSB CC LSB NRPN MSB NRPN LSB... -
Page 68: Index
INDEX INDEX +DRIVE 14, 23 LFO 45 Source 43 Trig 43 AUDIO TRACK PARAMETERS 36 MUTE MODE 22 Amp 39 Filter 38 NAMING SCREEN 17 LFO 40 Source 36 Trig 36 OS UPGRADE 57 OVERBRIDGE 17 OVERDRIVE 40 BIT REDUCTION 37 PANEL LAYOUT 10 CHAINS 35 PARAMETER LOCKS 33... - Page 69 Project 52 Sample management 52 System 57 SETUP EXAMPLES 60 Controlling a synthesizer using the MIDI tracks 61 Digitakt with a monophonic bass machine 60 Sampling from a smart phone 61 SOUND ARCHITECTURE 13 SOUND BROWSER 23 SOUND MANAGER 24...
Need help?
Do you have a question about the Digitakt and is the answer not in the manual?
Questions and answers