Table of Contents
Advertisement
Trademark Acknowledgement
X-Star™, Starlink™ and Starpoint™ are trademarks of Autel Robotics Co., Ltd.,
registered in China, the United States and other countries. The Autel
trademark of Autel Intelligent Technology Corp., Ltd. registered in the United States
and other countries. All other marks are trademarks or registered trademarks of
their respective holders.
Copyright Warning
No part of this manual may be reproduced, stored in a retrieval system or
transmitted, in any form or by any means, such as electronic, mechanical,
photocopying, recording, or otherwise, without the written permission of Autel
Robotics.
Disclaimer
All information, specifications and illustrations in this manual are based on the
latest information available at the time of printing. The content of this manual is
subject to change. Autel Robotics reserves the right to make changes at any time
without notice. Please download the latest version from http://www.autelrobotics.
com. While information of this manual has been carefully checked for accuracy,
no guarantee is given to the completeness and correctness of the contents,
including but not limited to the product specifications, functions, and illustrations.
When using the X-Star/X-Star Premium, always refer to and follow the safety
instructions in this manual. Autel Robotics takes no responsibility and accepts no
warranty for direct or indirect product damage or injury if the user fails to follow the
safety instructions. Autel Robotics will not be liable for any direct damages or for
any legal, special, incidental, indirect damages or for any financial consequences
(including the loss of profits).
The safety instructions herein covers situations which Autel Robotics is aware
of. Autel Robotics cannot know, evaluate or advise you as to all of the possible
hazards. You must be certain that any condition or service procedure encountered
do not jeopardize your personal safety.
Safety Information
IMPORTANT
Before operating or maintaining this unit, please read this manual carefully,
paying extra attention to the safety warnings and precautions.
For your own safety and the safety of others, and to prevent damaging the product
and its features, it is important for you to read and understand the instructions and
logo is a
®
Advertisement
Table of Contents

Related Manuals for Autel Robotics X-Star


Summary of Contents for Autel Robotics X-Star
- Page 1 (including the loss of profits). The safety instructions herein covers situations which Autel Robotics is aware of. Autel Robotics cannot know, evaluate or advise you as to all of the possible hazards. You must be certain that any condition or service procedure encountered do not jeopardize your personal safety.
- Page 2 This product is not intended for use by children without adult supervision. Do not use incompatible components or alter the product in any way inconsistent with the instructions provided by Autel Robotics. Take-off and Landing • The aircraft should be placed in a distance of approximately 5 meters heading away from you on a leveled surface.
- Page 3 Battery Use • Use only the battery and battery charger provided by Autel Robotics. An unqualified battery or charger may present a risk of fire, explosion, leakage, or other hazards. Autel Robotics takes no responsibility for any damage caused by non-Autel-Robotics batteries or charging devices.
- Page 4 Leave the battery in an open area and keep a safe distance away until it is completely dry. Stop using the battery and contact Autel Robotics customer support for a replacement. Battery Charging • Do not use a damaged battery charger.
- Page 5 • Check the weather before flying, including air temperature and wind speed. • Make a thorough preflight check before each flight ( • Use only authorized accessories approved or provided by Autel Robotics. • Do not attempt to disassemble, modify or reconstruct any part of the devices.
-
Page 6: Table Of Contents
Contents BEFORE STARTING USING THIS MANUAL BEFORE YOUR FIRST FLIGHT GETTING TO KNOW THE SMART DRONE AIRCRAFT REMOTE CONTROLLER PREPARING THE FLIGHT PREPARING THE BATTERY REMOVING THE GIMBAL HOLDER PREPARING THE REMOTE CONTROLLER CONNECTING YOUR MOBILE DEVICE CALIBRATING THE COMPASS INSTALLING THE PROPELLERS ... -
Page 7: Before Starting
Before Your First Flight Before using the X-Star/X-Star Premium, download and install the Starlink on the App Store or Google Play by searching for ‘Autel Starlink’. The app enables a live stream and full functions of flight and camera control on your mobile device. -
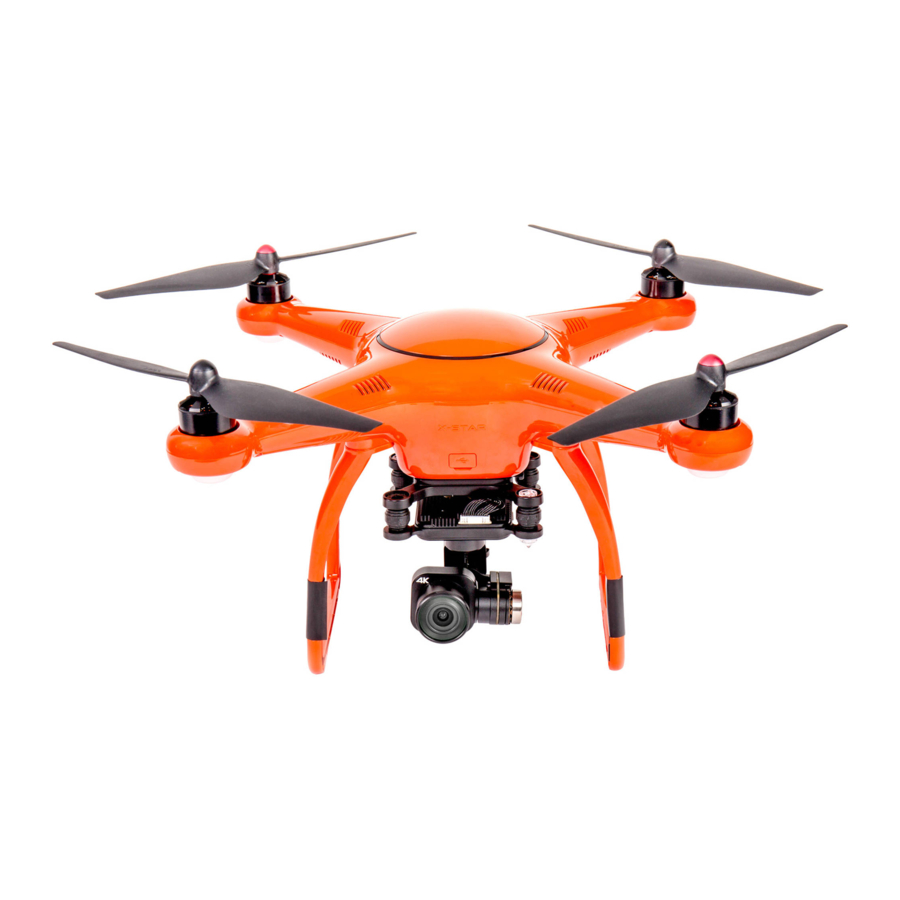
Page 8: Getting To Know The Smart Drone
The X-Star series comes in two models: the X-Star and X-Star Premium, which are both equipped with an integrated 4k camera gimbal. The X-Star adopts a self- generated WiFi network, while the X-Star Premium utilizes HD video streaming to establish a live video link with the mobile app Starlink as you fly. - Page 9 ⑫ Landing Gear Built-in Smart Flight System The X-Star/X-Star Premium features a built-in smart flight system which provides stable and user-friendly flight control. The system consists of various sensors such as the Global Navigation Satellite System (GNSS) receiver, the Compass, the Inertial Measurement Unit (IMU) and barometer. It works as the...
- Page 10 Measures atmospheric pressure to determine the pressure altitude of Barometer the aircraft. Ultrasonic Measures the distance between the aircraft and the ground. Sensors Monochrome Tracks the x- and y-axis location of the moving aircraft relative to the Camera ground. Smart Flight System Functions Function Description Configures the aircraft to fly in the direction relative to the home point.
- Page 11 NOTE It is highly recommended to operate outdoor flights in GPS mode for maximum safety. ATTI mode is disabled by default, and GPS mode is always enabled when good GPS reception is available. ATTI mode can be enabled through the mobile app: Settings ( ) >...
- Page 12 Aircraft Battery The aircraft battery is a rechargeable Li-Po battery with the capacity of 4900mAh specially designed for the X-Star/X-Star Premium aircraft. It can only be charged with the charger supplied in the X-Star/X-Star Premium package, and can provide up to 25 minutes of continuous flight if fully charged.
- Page 13 • Cuts off power supply when a short circuit occurs. Short Circuit Protection • All LED lights on the battery front panel will flash green when a short circuit is detected. Turns off the battery automatically after 10 minutes of Power Saving inactivity.
- Page 14 Do NOT install or remove the gimbal after the aircraft is powered up, as this may cause a short circuit of the video link module. The Xteady R12 gimbal for X-Star/X-Star Premium has three axes (pitch, roll, yaw) and supports two working modes (Stabilized mode, FPV mode):...
- Page 15 Stabilized Mode – The gimbal’s yaw movement is synchronized with the aircraft while its pitch roll movements remain independent aircraft for maximum stabilized aerial photography. FPV Mode – The gimbal’s roll and yaw movements are synchronized with the aircraft while its pitch movement remains independent of the aircraft for an immersive piloting experience from a first...
-
Page 16: Remote Controller
You will hear a clicking sound when the gimbal is properly mounted. Camera The X-Star and X-Star Premium are both equipped with a 4K UHD camera. The camera supports various shooting modes including single shot, burst, AEB and timelapse. Videos can be recorded in MOV or MP4 formats, and photos can be saved in DNG or RAW formats. - Page 17 ① Antennas • Both antennas receive 2.4 GHz WiFi signal (X-Star) or 900 MHz HD video signals (X-Star Premium) from the aircraft and transfer the flight data and camera data to the connected mobile app.
- Page 18 Go Home Button Commands the aircraft to stop moving and hover in ⑩ Pause Button position when necessary. Connected to the X-Star/X-Star Premium charger to ⑪ Power Port charge the built-in battery of the remote controller. ⑫ Turn the dial to control the tilt angle of the gimbal.
- Page 19 Connects to a mobile device through a USB cable. USB Port Flight Information Panel The LCD Flight Information Panel found on the X-Star/X-Star Premium remote controller is designed to provide you with intuitive information during the flight, including the flight status, warning messages, real-time instructions, etc. This section introduces the function of this panel.
- Page 20 The remote controller and the aircraft are bound by default when both devices are powered up. However, when you change an aircraft or remote controller, or activate the RC Binding Button on the aircraft, you need to rebind your aircraft and remote controller. To bind the aircraft and remote controller ¾...
- Page 21 Indicates the signal strength of GNSS ① GPS Signal satellites. Indicates the WiFi video signal (X-Star) or HD ② Video Link Signal video signal (X-Star Premium) strength. ③ Indicates the yaw angle relative to the north. Flight Orientation Indicates the control signal strength of the ④...
- Page 22 The following table describes the definitions of the indicator light status. Indicates solid light Indicates red colored light ● Indicates flashing light Indicates green colored light ◎ Indicates no light Indicates yellow colored light ○ Example: “R-●” stands for SOLID RED light. A.
- Page 23 G-●: Simply press the button shortly to activate the Pause function 1s after you release each button ○: Remote Controller Buzzer Alerts The built-in buzzer of the remote controller makes different alert sounds according to various status alarms, such as low battery warning, video link error or lost aircraft communication.
-
Page 24: Preparing The Flight
Preparing the Flight The X-Star/X-Star Premium features a user-friendly design that requires very simple assembly to get the aircraft ready to fly. However, it is essential to read and follow all the instructions and warnings in this manual prior to assembly, setup or use, in order to operate safely. - Page 25 Charging The aircraft battery and the remote controller can be charged simultaneously with the charger supplied in the X-Star/X-Star Premium package. There are two connectors attached to the adaptor block on the charger. The wide square connector with a cooling fan goes with the aircraft battery. The fan will automatically turn on and off as needed during the charging cycle.
-
Page 26: Removing The Gimbal Holder
Flip over the protector on the Power Port of the remote controller, and plug the small circular connector into the Port. Plug the charger into a power outlet. ● The battery level indicator lights on the aircraft battery will illuminate and indicate the current battery level during charging, and will turn off when the battery is fully charged. -
Page 27: Preparing The Remote Controller
Reinstall the gimbal holder after using the aircraft to protect the gimbal from unwanted movements when not in use. Preparing the Remote Controller ¾ To power up the remote controller Press and hold the button for 2 seconds until it lights up as solid green. IMPORTANT •... -
Page 28: Connecting Your Mobile Device
GPS locations. Connecting Your Mobile Device By connecting your mobile device to the aircraft, the X-Star mobile app Starlink configures your mobile device to perform as a First Person View (FPV) monitor and a ground station for remote piloting, flight configuration and waypoint navigation. -
Page 29: Calibrating The Compass
Launch the mobile app ( ) on your mobile device. When the connection is successful, the Home Page of the app displays Connected in the upper left corner, and the Flight Information Panel on the remote controller displays App Connected in the Flight Status Bar. Calibrating the Compass Make sure to calibrate the compass every time when flying in a new location. -
Page 30: Installing The Propellers
Hold the aircraft horizontally by its arms and turn around until the 4 LEDs on the aircraft change into solid green light, which will switch to a flashing pattern later, ready for the next step. Hold the aircraft vertically by its arms with the nose facing downwards and turn around until the 4 LEDs on the aircraft... - Page 31 IMPORTANT It is recommended to wear protective gloves when assembling or removing the propellers to protect you from the sharp edges. Use tools (e.g., wrench, plier, etc.) when necessary. On each of the propellers there is one Lock icon and one Unlock icon indicating the rotate direction to fasten or unfasten the propellers.
-
Page 32: Flight Operations
• The mobile app is properly installed and your mobile device is connected to the aircraft. • The camera view on the X-Star mobile app is synchronized with the mounted camera. • The firmware has been updated to the latest version. -
Page 33: Remote Controller And Flight Operations
Remote Controller and Flight Operations The remote controller has 2 command sticks designed for convenient remote flight controls for aerial maneuvers, including aircraft ascent/descent, left/right rotation, forward/backward and left/right sideway movements. WARNING When the GPS signal is not strong enough, the aircraft will not take off in GPS mode. - Page 34 ¾ When the motors are turned on, use one of the following methods to take off the aircraft: Takeoff/Landing Button: Ascent Stick: Hold for 2s push gently If you command the aircraft to take off using , the aircraft will ascend automatically to a height of 4 meters.
- Page 35 Rotate Left/Rotate Right – commands the heading of the aircraft to rotate left or right by pushing the stick left or right. z Right Command Stick Forward/Backward – commands the aircraft to move forward or backward by pushing the stick upward or downward. Move Left/Move Right –...
- Page 36 Smart Flight Features z Intelligent Orientation Control (IOC) To activate the IOC function during flight, slide the Flight Mode Switch at the side of the remote controller to the left. IOC mode is also known as Carefree Mode. It is used to keep the aircraft’s direction controls locked regardless of its nose direction.
- Page 37 NOTE • The flight direction is relative to the home point instead of the location of the pilot. • IOC mode can only be activated when the aircraft is at least 10 meters away from you. z Go Home The Go Home function only works in GPS mode. To manually activate the Go Home function, you can press the Go Home button ( ) on the remote controller.
- Page 38 Alternatively, you can simply press the Pause Button ( ) to regain control of your aircraft. z Failsafe The Failsafe function is designed to help your X-Star/X-Star Premium automatically return home or land onsite when necessary. • Communication Lost Failsafe will be triggered 5s after the communication between your aircraft and remote controller gets lost.
- Page 39 Starpoint Positioning System The Starpoint Positioning System installed on the X-Star/ X-Star Premium aircraft functions through a monocular camera ① and two ultrasonic sensors ② on the bottom of the aircraft. The sensors help to identify the current height of...
- Page 40 TIPS • Always keep the monocular camera lens clean for a clear view. • Do not use other 40KHz ultrasonic devices nearby when the Starpoint Positioning System is activated. Landing and Motor Shut-down The aircraft can be landed manually, automatically, or passively. IMPORTANT The aircraft must be landed gently on a flat surface to avoid damage.
-
Page 41: Using The Starlink Tm App
When Failsafe is triggered by any of the following conditions, the aircraft will be forced to land onsite automatically. • Low Battery Warning is activated in non-GPS environment. • Critical Low Battery Warning is activated. Using the Starlink The X-Star/X-Star Premium application, Starlink , is a full-featured program... - Page 42 MEDIA View and edit the photos and videos that you have downloaded. STORE Enter Autel Robotics’ online store where you can purchase the products and accessories. Register or log into your Autel Robotics account.
- Page 43 When your aircraft is used for the first time, you will be guided to the registration page after the connection is completed. Please follow the on- screen instructions to activate your X-Star/X-Star Premium: Create an account and set a password for your account.
- Page 44 ① ④ Flight Control Panel General Information Bar ② ⑤ Aircraft Status Bar Map Split Screen ③ Camera Operation Panel z Flight Control Panel AUTOPILOT FUNCTIONS Command the aircraft to fly automatically according to the intelligent flight mode you have selected, including Orbit, Follow and Waypoint modes.
- Page 45 STARPOINT POSITIONING SYSTEM The distance between the surface and the Starpoint Positioning System’s sensors. This icon is highlighted only when the Starpoint Positioning System is in working state. FLIGHT STATUS • The arrow indicates the yaw angle of the aircraft’s nose. •...
- Page 46 CAMERA SETTINGS Perform Photo Settings ( ), Video Settings ( ) and Camera Settings ( (* default value) Mode *Single Shot, Burst Shooting (3/*5/7), AEB (*3/5), Timelapse (*5/7/10/20/30) Size *4000×3000(4:3), 4000×2250(16:9) Format *RAW, DNG, RAW+DNG Style *Standard, Soft, Landscape, Custom *Auto, Sunny, Cloudy, Incandescent, Neon Color *None, Nostalgia, Art, Beach, Classic, Vivid, Dream, Film, Log, B&W...
- Page 47 WARNING The Format SD Card option in Camera Settings will format the inserted SD card. Make sure to back up your files beforehand. For whatever reasons, Autel Robotics will not be responsible for any unrecorded or unreadable image or video.
- Page 48 The three function icons on the right provide different options for you to view the map: Icon Name Function Choose the area around the home point. Location Choose the area around the aircraft’s location. Compass Lock/unlock the compass of the map. Choose a map view from Normal, Hybrid and Satellite Map View view.
- Page 49 • Aircraft: The current location of the aircraft • Me: Your current location • New: Pin a new point within a safe round zone displayed on the map Follow one of the methods below to set the orbit radius before starting the program.
- Page 50 A Go Home Altitude setting will pop up for you to set a safe altitude for the aircraft to perform Go Home at low battery level. Once you click OK, your aircraft will initiate Autopilot. Use the left and right command sticks to adjust the position of the aircraft as illustrated on the right side of the screen.
- Page 51 The table below illustrates how to control the relative position of the aircraft using the remote controller during Follow mode. Adjust the altitude of the aircraft. Change the direction of the aircraft’s nose. Adjust the distance between you and the aircraft. Command the aircraft to follow you in a circular course leftward or rightward.
- Page 52 IMPORTANT For X-Star Premium, you can use this function directly and the map will be downloaded automatically. For X-Star, if you use the app on an Android mobile device, you need to download the map before using this function for the first time; this is not necessary if you use an iOS device, as the iOS system allows simultaneous connection with the aircraft self-generated WiFi network and the 3G/4G network.
- Page 53 Waypoints button is used to delete the entire route. When you have confirmed your route, tap Finish. • Point on Map - Select Point on Map from the drop-down box of Waypoint Location and your screen will display the map. Tap on the map to pin down up to 15 waypoints and they will be linked automatically as a route.
- Page 54 Set a safe altitude for the aircraft to perform Go Home at low battery level. When the aircraft is performing a Waypoint mission, you may adjust the aircraft's speed with the right command stick and command its nose to face next waypoint with the Face Next Waypoint button. The Exit button is used to exit this mode.
- Page 55 TIPS To terminate the Waypoint mission at any point, perform one of the following actions: • Regain control of the aircraft by sliding the Flight Mode Switch on the remote controller to ATTI position. (Only available when ATTI is enabled on the app) The aircraft will terminate the mission and respond to the remote controller.
- Page 56 protect the aircraft from losing signal or flying out of sight. (default: 120m) Distance Limit Slide this button to enable or disable the default distance limit (800m) when Beginner Mode is disabled. NOTE When the altitude and distance limits are determined, the aircraft cannot fly outside the preset boundaries under GPS mode.
- Page 57 Slide the scroll bar left or right to adjust the speed of the Gimbal Pitch Dial on the remote controller. RC Calibration This function includes the calibration of the Left Command Stick, Right Command Stick and Gimbal Pitch Dial. You will only need to calibrate your remote controller when using it for the first time or after your remote controller has been replaced.
- Page 58 RC Binding Press the Bind button and then hold the RC Binding Button on the aircraft for 3s as instructed on the app to bind your aircraft and remote controller. You will be prompted when this is done successfully. Command Stick Mode Choose a command stick mode to control your aircraft.
- Page 59 To connect your mobile device and the remote controller, you need to use WiFi for X-Star and a USB cable for X-Star Premium. z Video Link Settings For the X-Star, you can rename the WiFi SSID and reset the password in this section. NOTE To reset the WiFi video link, toggle the Flight Mode Switch back and forth quickly for at least 4 times.
- Page 60 You can also enter this section by tapping ) on the Aircraft Status view the current status and general Bar. This function allows you to information of the aircraft battery. Low Battery Warning and Critical Low Battery Warning settings are also available in this section. NOTE For your own safety, the Low Battery Warning cannot be set below 25%, i.e., the minimum battery level for Go Home;...
- Page 61 Slide this button to display or hide your flight route on the map. • Calibrate Coordinates (For Mainland China) Slide this button to enable or disable the map calibration. • Background Caching Slide this button to enable or disable map caching in the background. •...
-
Page 62: Maintenance And Service
Maintenance and Service Firmware Upgrade To optimize the performance of your X-Star/X-Star Premium, firmware updates will be provided on a regular basis. You can download the latest firmware (Flight Control, Gimbal, Camera, Remote Controller, etc.) in one package from our official website. -
Page 63: Troubleshooting Tips
Reboot the remote controller and aircraft before use. NOTE • Do not turn off any device or take out your SD card from the camera during the process. Do not start the motors. • After the upgrade is completed, the remote controller may be disconnected from the aircraft, and you will need to rebind the devices. -
Page 64: Storage And Maintenance Instructions
• Avoid dropping your devices, especially on a hard surface. Check it in detail after any crash or impact, and contact a local Autel Robotics agent in time if you have any problem. • Only use the battery chargers or other accessories authorized by Autel Robotics. - Page 65 • Proof-of-purchase for warranty repairs • Preferred method of payment for non-warranty repairs Autel Robotics’ support team will review your application within 72 hours after receiving your application. After a preliminary evaluation of the problem, our customer support will contact you for further updates or follow-ups.
-
Page 66: Warranty
Warranty Autel Robotics (the Company) warrants to the original retail purchaser of this product, that should this product or any part thereof during normal consumer usage and conditions, be proven defective in material or workmanship that results in product failure within the valid warrant period from the date of purchase, such defect(s) will be repaired, or replaced (with new or refurbished parts or products) at the Company’s option, with Proof of Purchase, without charge for parts or labor... -
Page 67: Appendix
Autel Robotics announces that the X-Star and X-Star Premium are in compliance with the essential requirements and other relevant provisions of Directive 1995/5/ IC RSS Warning This device complies with Industry Canada license-exempt RSS standard(s). - Page 68 pilots’ safe and legal operations of the product. The flight restricted areas are divided into 2 protection categories. Category I: Major airports and flight areas where manned aircrafts operate at low altitudes • Take-off Restricted Zones (No-Fly Zones) These areas are set within 2.4km around the central point of specified airports. •...
-
Page 69: Technical Specifications
Max Horizontal Speed 15 m/s Diagonal Wheelbase 352 mm Propeller Size 9.4”x5.5” X-Star: 2.412 GHz~2.462 GHz Video Link Frequency X-Star Premium: 902 MHz~928 MHz Receiver Frequency 5.745 GHz~5.799 GHz Flight Modes GPS, ATTI, IOC Operating Environment Temperature -10°C~45°C (14°F~113°F) Storage Temperature -20°C~80°C (-4°F~176°F) - Page 70 Discharging Environment -10°C~45°C (14°F~113°F) Temperature Temp: 18°C~28°C (64°F~82.4°F); Storage Temperature & Humidity Humidity: 52~78% Camera Gimbal Specifications 650 mA@12 V (Non-video Mode) Operating Current 760 mA@12 V (Video Mode) Input Voltage 12 V Operating Temperature -10°C~50°C Weight 175g (Camera incl.) Dimensions (Damping Device excl.) 88 mm X 76.5 mm X 80 mm Control Accuracy...
- Page 71 Remote Controller Specifications RF Receiver Operating Frequency 5.745 GHz~5.799 GHz X-Star 2.412 GHz~2.462 GHz Video Link Frequency 902 MHz~928 MHz (America) X-Star Premium 915 MHz~928 MHz (Australia) Operating Temperature -20°C~60°C (-4°F~140°F) Charging Temperature 10°C~45°C (50°F~113°F) Less than 1 month: -10°C~45°C (14°F~113°F) Storage Temperature 1~6 months: -10°C~35°C (14°F~95°F)
Need help?
Do you have a question about the X-Star and is the answer not in the manual?
Questions and answers