Advertisement
Advertisement
Table of Contents

Related Manuals for Jands Stage


Summary of Contents for Jands Stage
- Page 1 LIGHTING CONTROL CONSOLE Manual STAGE Software V 1.2...
- Page 2 Jands Electronics. 10 September 1993 Technical Help and Support If you have queries regarding the use of the STAGE or any other Jands product, please contact us at: Phone: +61 2 9582 0909 between 9:00am and 5:00pm Australian Eastern Standard Time...
-
Page 4: Introduction
Introduction Stage 12/24 lighting control consoles are primarily designed to provide the user with an economically priced unit of compact size offering features and capabilities not available in similar units. These consoles are also engineered to provide the user with the ability to expand the scope of a lighting control system without the console becoming obsolete. -
Page 5: Design Features
- Audio trigger enabling the chase sequence to follow audio signal - Wide Mode operation doubles the number of available control channels which enables the Stage 12 console to operate as a single preset 24 Channel Console (48 single presets in the case of the Stage 24). -
Page 6: Getting Started
Connecting Power Plug the socket end of the plugpack output into the power receptacle located on the rear face of the Stage 12/24 console. The plugpack should be plugged into a mains outlet, and then the outlet switched on. Please note that when power is removed from the console, all settings are lost. -
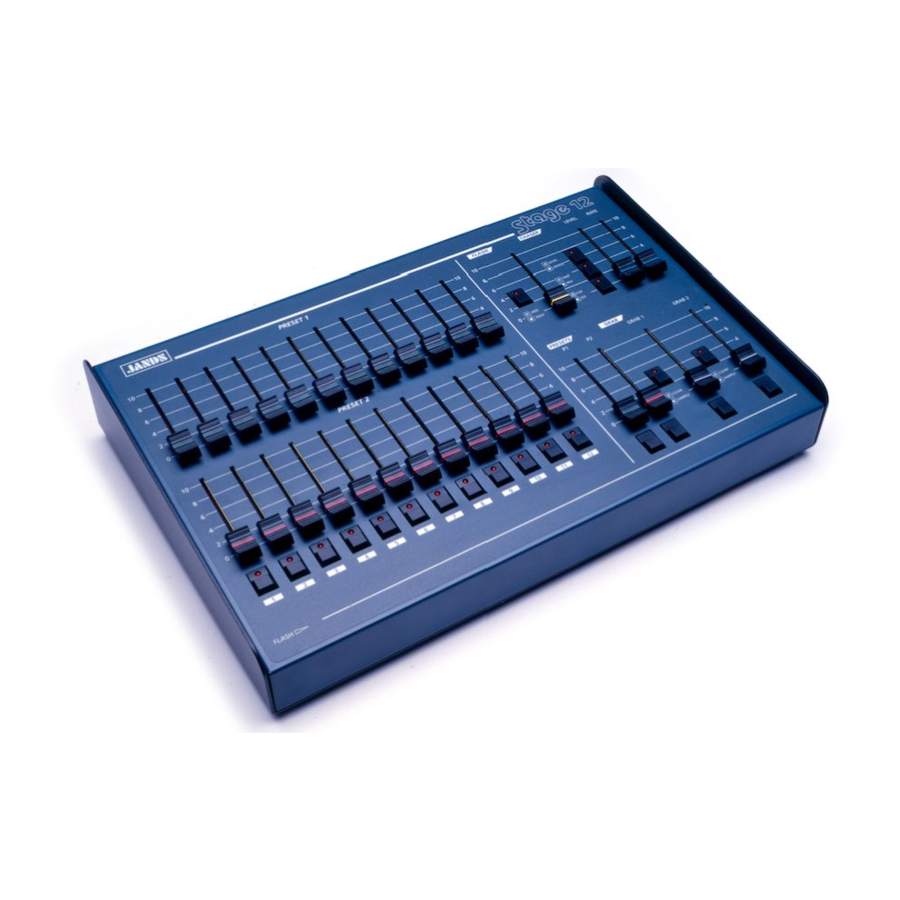
Page 8: Description Of Major Parts
Preset bank while the output from the other Preset bank is sent live to the stage. B Flash Buttons (Channel) are used to momentarily flash on a channel to the level of the Add/Solo Master. - Page 9 H DMX Output. Control output for connection to a dimmer system or other interfaces using the DMX-512 protocol. DIP Switch allows the user to customise the operation of the console. This is described in further detail on pages 10 and 11. Audio Input allows the operator to automatically step the chaser in time with the audio programme.
-
Page 10: Using Presets
Using Presets Channel Preset Faders There are two (2) rows of preset faders on the Stage 12/24. The top row of faders is Preset 1 and the bottom row is Preset 2. These faders are used to set lights to desired levels. The output level produced by the Preset faders is dependent on the level of the P1 (or P2) Master fader. -
Page 11: Using The Master Controls
Using Master Controls P1 and P2 Master Faders The P1 Master fader scales the top row of Preset faders. Likewise the P2 Master fader scales the overall level of the bottom row of Preset faders. By moving the P1 fader up while moving the P2 fader down it is possible to crossfade between the settings on the two rows of Preset faders. -
Page 12: Working With Grabs
Working with Grabs The Stage 12/24 has two (2) fully independent Grab controls. The Grab Controls:- Grab Faders 1 and 2 These Level faders control the output level of the Grab scene ranging from 0 to 100%. Grab Flash Buttons 1 and 2... -
Page 13: Working With Chases
Working with Chases The Stage 12/24 has the ability to chase through all or selected channels in either ascending or descending order. The Chase Controls:- The chase controls are used to set the speed, direction, level of the Chase output, assign channels to the chase, and enable the output. - Page 14 When DIP switch #3 is off, pressing the Go/Cue button alternately activates/ deactivates the Chase. When the chaser is not active, the LED in the switch flashes at the chase step rate; when the chaser is active, the LED is on continuously.
-
Page 15: Configuring The Console
These are as follows:- Use the STAGE as a slave console to an Event or ESP II master console. Reverse the operation of the P2 master fader such that it is at full when it is at the 0 position. -
Page 16: Appendix
To slave a STAGE console to expand an Event, Event Plus, or ESP II console connect a cable wired as detailed below between the DMX output of the STAGE to the MIDI input on the Event, Event Plus, or ESP II console. Set DIP switch #1 on and apply power to the STAGE console. -
Page 17: Table Of Contents
Table of Contents Introduction..................1 Design Features...................2 Getting Started..................3 Description of Major Parts..............5 Using Presets..................7 Using the Master Controls.............8 Working with Grabs................9 Working with Chases ..............10 Configuring the Console..............12 Appendix ..................13...
Need help?
Do you have a question about the Stage and is the answer not in the manual?
Questions and answers