Table of Contents
Advertisement
Advertisement
Table of Contents

Related Manuals for Topcon KB-50


Summary of Contents for Topcon KB-50
- Page 1 INSTRUCTION MANUAL CV 1DIAL CONTROLLER KB-50...
- Page 2 ...
-
Page 3: Introduction
• The large 10.4-inch touch panel liquid crystal display unit is used to carry out tests easily. • The difficult cross cylinder test can be automatically performed. This instruction manual outlines the KB-50 Software, including the basic operation and trouble shooting. To ensure the best use of the instrument (safely and efficiently), carefully read "DIS- PLAY FOR SAFE USE"... -
Page 4: Cautions For Use
(4) Do not store the instrument where chemicals are stored or gas is generated. 3. Usage period 8 years from delivery providing regular maintenance is performed (according to the self-certification [Topcon data]) ENVIRONMENTAL CONDITIONS FOR PACKAGING IN TRANSPORTATION Temperature : -20°C ~ 50°C... -
Page 5: Display For Safe Use
DISPLAY FOR SAFE USE To encourage safe and proper use and to prevent danger to the operator and others or potential damage to property, important cautionary messages are placed on the instrument body and inserted in the instruc- tion manual. We suggest that everyone using the instrument understands the meaning of the following displays, icons and text before reading the "SAFETY CAUTIONS"... -
Page 6: Safety Cautions
SAFETY CAUTIONS WARNING Icons Prevention Item Page To avoid electric shock, do not attempt disassembling, rebuilding and/or repairs on your own. Ask your dealer for repairs. To avoid electric shock, do not remove the covers from the back of the monitor and the bottom of the instrument. - Page 7 CAUTION Icons Prevention Item Page To prevent the instrument from tipping over or falling and to avoid injury, do not ----- install the instrument on an uneven or unsteady surface, including a slope. ----- To avoid electric shock, do not handle the plugs with wet fingers. To avoid injury caused by pinching when moving the monitor unit, do not place your hand between the monitor unit and the main unit.
-
Page 8: Usage And Maintenance
USAGE AND MAINTENANCE USAGE The CV 1Dial Controller KB-50 is an electric instrument. Use this instrument according to the instruction manual. USER MAINTENANCE To ensure the safety and performance of this instrument, all maintenance work, unless specified in this manual, shall be conducted by trained service engineers. -
Page 9: Warning Displays And Positions
To ensure safety, the machine provides warning displays. Use the instrument correctly by observing the display instructions. If any of the following display labels are missing, contact your TOPCON dealer or your local Topcon office listed on the back cover of this man- ual. -
Page 10: Table Of Contents
CONTENTS INTRODUCTION ..........................1 CAUTIONS FOR USE ........................2 ENVIRONMENTAL CONDITIONS FOR USE .................. 2 STORAGE, USAGE PERIOD AND OTHERS .................. 2 ENVIRONMENTAL CONDITIONS FOR PACKAGING IN TRANSPORTATION ......2 CHECKPOINTS FOR MAINTENANCE .................... 2 DISPLAY FOR SAFE USE ....................... 3 SAFETY CAUTIONS ........................ - Page 11 OTHER FUNCTIONS SMART CC FUNCTION ......................... 48 ORIGINAL COURSES ........................49 REGISTRATION OF ORIGINAL COURSE ..................49 SETTING AND CHANGING THE SOFTWARE Data ..............................57 Chart ............................... 58 Mode .............................. 64 Step ..............................66 Local & Time ..........................67 Course Construction ........................68 Sub View ............................
-
Page 12: Component Names And Functions
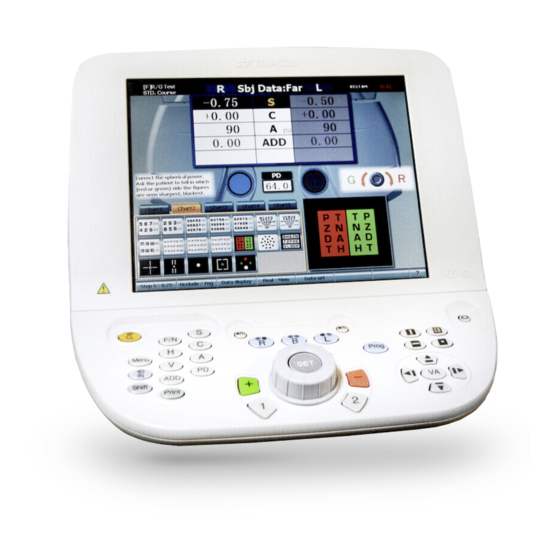
COMPONENT NAMES AND FUNCTIONS In this instruction manual, the buttons of the keyboard are expressed as "switches" and, when using any of these switches, the expression "Press the switch" is used. The buttons of the touch panel are expressed as "buttons" and, when using any of these buttons, the expression "Touch the button"... -
Page 13: Basic Operation Switches
BASIC OPERATION SWITCHES (10) (7) (5) (8) (4) (6)(9)(11) (12) (13) (14) (15) (1) [Dial] This dial is used to change the refractive power or astigmatic axis of the lens. Select the data to be changed according to the tests or setting. Turn clockwise: The value is changed toward the negative side. - Page 14 (7) [R] switch The right eye is selected for the test and the left eye is occluded. In binocular test, change only the object for the dial operation. (8) [L] switch The left eye is selected for the test and the right eye is occluded. In binocular test, change only the object for the dial operation.
-
Page 15: Function Selector Switches
FUNCTION SELECTOR SWITCHES (1) (7) (6) (8) (5) (4) (3) (2) (1) [F/N] switch Change the far- and near-point test modes to each other. The current mode is displayed on the title bar at the upper section on the screen. When the power is ON and when the system is reset, the far-point test mode is automatically accessed. -
Page 16: Special Switches
The test result data can be printed by the thermal printer attached to the power unit installed to the table or by the external printer or by both of them. (4) [CL] switch The CV-5000 and KB-50 are reset. (5) [Monitor power] switch You can turn off the power of the monitor. -
Page 17: Names On Monitor Screen
NAMES ON MONITOR SCREEN (1) Title bar Displays the type of the displayed main data, the test name, the time, the lapse of test time, etc. (2) Main data Displays the data set in the CV-5000 and besides, displays the set visual acuity, etc. (3) Data reference When you want to compare the main data with the objective data or lens data measured by an external device, those data are displayed in small areas near the main data. - Page 18 The PD value set in the CV-5000 is displayed. (7) Touch panel operation unit On KB-50, you can operate the instrument not only by keyboard but also by touching the screen directly. The touching operation is possible on the lower half of the screen.
-
Page 19: Title Bar
Prescription data Measured value with unaided eyes Uncorrected visual data Last prescription data registered in database Last prescription data Data 1 stored in KB-50 M1 data Data 2 stored in KB-50 M2 data Data 3 stored in KB-50 M3 data... - Page 20 (2) Test name Displays the current test and course. There are "program course" and "Semi-Auto course". For the program course, the program con- tents can be customized by [Settings]. For the "Semi-Auto" course, each chart can be customized by [Settings]. (3) Time and lapse of test Displays the date and time, and the lapse of test.
-
Page 21: Main Data
MAIN DATA (1) Right eye data Displays the lens data, which are set for the right eye of the CV-5000. When each value is highlighted, it can be changed by turning the dial. The colors for the values of the spherical, astigmatic and addition refractive powers are changed according to the value or occluding status. -
Page 22: Data Reference
DATA REFERENCE There are two data reference areas. Data can be displayed in the fixed status in one area by [Set- tings]. You can select one of the following modes: the mode to display only the one eye data in one data reference area, and the mode to display the both eyes data there. -
Page 23: Mini Help
MINI HELP Displays a simple guide about the current test. You can select "Displayed" or "Not displayed" by [Settings]. DIAL INFORMATION For the dial operation for each test, pictures and symbols display the proper turning direction of dial. This information is set to turn the dial so that the patient can see the target better. You can select "Displayed"... -
Page 24: Auxiliary Lens/Pd Display
Displays the status of the auxiliary lens set in the CV-5000, the cross cylinder lens being used in the astigmatism test and the TOPCON cross lens. In the open status, you can check the astigmatic axis for a lens with axis. -
Page 25: Touch Panel Unit
TOUCH PANEL UNIT (1) Chart page Touch directly a chart to be used. The test registered by [Settings] is executed. When you touch the [Help] button, "Help" is displayed here. (2) Chart selector tab Charts can be registered up to five pages. You can change the chart page by pressing this tab. (3) Large chart The chart, which is selected by "chart page", is enlarged and displayed. - Page 26 (4) Side button These are auxiliary buttons to access the necessary functions for each of the chart being displayed or the test being executed. • Visual acuity input button Displayed when the visual acuity chart is set. Touch the [visual acuity input] button, and the visual acuity is inputted into the relevant place in the main data.
- Page 27 • Prism cancel/reset button Displayed when a prism is set to the CV-5000 while the phoria or fixation deviation test is being exe- cuted. [Mem & Clea:] The prism set in the CV-5000 is stored and it is temporarily removed. [Restore] The stored prism data are reset to the CV-5000.
- Page 28 (5) Function button The display and functions of the function buttons are changed according to the dial functions and modes. The display status and functions are described for each case in this chapter. The five buttons from the left end and the eighth button at the right end are usually permanent but- tons, and they have fixed functions.
- Page 29 • Function 3: [Data display] Displays the selected data on the data display unit. Touch the [Data display] button, and the menu is displayed. Touch the [Hide] button, and the displayed data disappears. Example of display Meaning Operation by touching This data is displayed in the data reference This data exists and can be area instead of the data being displayed...
- Page 30 • Function 5: [Data set] The data of the selected item is displayed in the main data area and a lens is set to the CV-5000. Touch the [Data set] button, and the menu is displayed. Example of display Meaning Operation by touching This data is displayed in the No operation...
- Page 31 Example of display Contents This button is displayed when the targets applicable to the random function are indicated on the TOPCON liquid crystal visual acuity chart (PC-50). Touch this button, and you can execute the random func- tion of the visual acuity chart.
- Page 32 • Function buttons in cross cylinder test Example of display Contents Changes the type of the cross cylinder lens, [Jackson cross cylinder] or [Topcon cross cylinder], for the cross cylinder test. Changes the [Smart] mode and [Manual] mode for the cross cylinder test.
- Page 33 • Function buttons in near point phoria test Example of display Contents Touch this button, and the Sheard’s criteria test is exe- cuted. When heterophoria is measured in the horizontal phoria test, the button is valid. Touch this button, and the measurement test of AC/A ratio is executed.
- Page 34 • Convergence/divergence [#16, 17] American 21 test: #16, #17 Performs the near-point convergence and divergence tests. When the test starts, the function buttons are as follows. After registering the prism values, the function buttons are as follows. When using the [Shift] switch together, the function buttons are as follows. •...
- Page 35 When the test starts, the function buttons are as follows. The [Scale Simulate] button is displayed on [F6] when this test is being executed with the targets applicable to the vertical aniseikonia simulation function on the TOPCON liquid crystal visual acuity chart (PC-50).
- Page 36 • Worth 4 dots Performs the near-point worth 4 dots test by using the red/green auxiliary lens. Let the patient answer how the four dots are seen. When the test starts, the function buttons are as follows. • Other binocular tests For the far-point binocular test, the buttons are set in the same way as the near-point test.
-
Page 37: Standard Accessories
STANDARD ACCESSORIES Upon unpacking, make sure that all the following standard accessories are included. Numbers in ( ) are the quantities. Instruction manual (1) KB connection cable (1) COMPONENT NAMES AND FUNCTIONS... -
Page 38: Preparations
PREPARATIONS INITIAL SETTING Setting of date and time Press the [Shift] and [Menu] switches on the keyboard. The following [Settings] menu is displayed. Touch [Local & Time]. Touch each item to adjust the values. PREPARATIONS... -
Page 39: Perparation Before Measurement
PERPARATION BEFORE MEASUREMENT Turning on the power Turn on the power of the connected chart presentation device. Turn on the system. Set the power switch of the system to "ON". The visual acuity chart is shown. Preparation for optometry Set the CV-5000 in front of the patient. Wipe the forehead rest, examination window and face shield beforehand for sanitation. -
Page 40: Basic Operation
The measured value is printed and is automatically transferred to the memory of the controller. Data input from the lens meter (CL) When the TOPCON lens meter (CL) is connected, the measured value is automatically transferred to KB-50 by printing in CL. - Page 41 Select the measurement data of RM or CL to be set in the CV-5000 with [Settings]. If there is only one data (RM or CL), the data is set in the CV-5000. • When the data input to KB-50 is set to "always newest (select)" The function buttons are displayed as shown below.
- Page 42 • When you select the CL data The IDs of the data measured by the lens meter is displayed for the CL data. Touch the ID of the patient. If ID is not displayed, touch the [Reload] button. Touch the [OK] button. The data is registered as the eyeglass data and the lens is set in the CV-5000.
-
Page 43: Automatic Optometry By Courses
AUTOMATIC OPTOMETRY BY COURSES Program course You can execute tests in order by the programmed course optometry. The refractionist can concentrate upon each test without minding the test order. Press the [Prog] switch. The course selection window appears on the screen. You can select only the registered courses. -
Page 44: Lens Specification And Dial Operation
LENS SPECIFICATION AND DIAL OPERATION Turn the dial to set a lens in the CV-5000. Lens specification Press the function selector switch [S], [C] or [A], and the lens type to be changed by operating the dial is changed. • To change PD, press the [PD] switch. •... -
Page 45: Specification And Change Of Auxiliary Lens
SPECIFICATION AND CHANGE OF AUXILIARY LENS As pressing the [Shift] switch, touch the function button [Aux. lens]. The list of auxiliary lenses is displayed as shown below. Select an auxiliary lens. Touch a desired auxiliary lens directly. If you want to stop the selection of the auxiliary lens, press the [Aux. lens] button. The auxiliary lens is set in the CV-5000. -
Page 46: Change Of Chart
• Touch the chart picture as pressing the [Shift] switch. → Only changing the chart When the TOPCON liquid crystal visual acuity chart PC-50 is set at a distance of more than 4m, the targets of visual acuity 0.02 (in "decimal" notation)/300 (in "meter" notation)/1000 (in "feet"... - Page 47 When the TOPCON liquid crystal visual acuity chart PC-50 is set at a distance of less than 3m, the targets of visual acuity 2.0 (in "decimal" notation)/3 (in "meter" notation)/10 (in "feet" notation) are not indicated. To register the chart including the targets of this visual acuity in the chart page, regis- ter the substitute charts shown in the following example according to the setting distance of PC-50.
-
Page 48: Specification/Change Of Mask And Input Of Visual Acuity
SPECIFICATION/CHANGE OF MASK AND INPUT OF VISUAL ACUITY When the visual acuity chart is used, you can apply a mask and input the visual acuity. (Sometimes a mask is not applied by the specified operation because of the chart device being used.) When applying the mask through keyboard: •... - Page 49 When applying the mask by touching: Only the character mask or horizontal mask can be applied by touching the screen. • When applying the horizontal mask Touch the [horizontal mask] button, and the horizontal mask is set to show only the specified line. •...
-
Page 50: Other Functions
OTHER FUNCTIONS SMART CC FUNCTION KB-50 is equipped with the "Smart CC" function. By using this function, the astigmatism test with the cross cylinder is automatically performed. In "Smart CC", the axis or refractive power to be com- pared is automatically set. The customer can perform the cross cylinder test for axis and refractive power by only the following two procedures. -
Page 51: Original Courses
ORIGINAL COURSES In KB-50, there are two course functions. In the Semi-Auto course, you can execute the tests by touching the chart on the chart page. In the program course, you can execute the tests in the already determined sequence. - Page 52 You can register the chart where you release the chart. In the same way, register the charts on the chart page. It is possible to register the charts up to five pages of tab. Register the chart in your optional page.
- Page 53 Touch the chart registered in the chart page and press the function button [Modify]. By touching the chart registered on the chart page, you can customize the test to be executed and the test start status. You can also relate other test to the same chart. Set the test, auxiliary lens, mask, etc.
- Page 54 Deletion of chart on the chart page Touch the chart to be deleted. As touching, drag the chart to the outside of the chart page. Release the chart. By the above operation, it is possible to delete a chart on the chart page. It is possible to change the chart registered position by releasing the chart on the chart page.
- Page 55 Registration of program course Press the [Shift] key and [Menu] key on the keyboard. Touch the [Course Construction] button on the [Settings] screen. Touch the course button to be changed. The course registration screen appears. Touch [Basic course]. Touch the course if you register the program course as referring to the standard course or the already registered course.
- Page 56 Touch the [Default] button. It is possible to set the test parameters on the charts. OTHER FUNCTIONS...
- Page 57 After customizing the chart, touch the [OK] button. After registering the course, touch the [OK] button. By the above operation, you can register the program course. Refer to "SETTING AND CHANGING THE SOFTWARE" for the details of the setting method. OTHER FUNCTIONS...
-
Page 58: Setting And Changing The Software
SETTING AND CHANGING THE SOFTWARE To change the setting, press the [Menu] switch as pressing the [Shift] switch. SETTING AND CHANGING THE SOFTWARE... -
Page 59: Data
Data Set the data about the connection method with external devices, and the data to be used as initial data for starting tests. • Connection to RM Set the connection method of the auto refractometer or auto refracto-keratometer. • Connection to CL Set the connection method of the lens meter. -
Page 60: Chart
Chart Set the chart device to be used, the registration of chart page and the charts to be used in tests. • Chart Set the chart device to be used. Touch the [down arrow] button, and the selection list of the chart devices is displayed. Select a relevant chart. - Page 61 • Chart page registration KB-50 is equipped with the function to customize the charts to be displayed on the chart page. (1) List of charts Displays the list of charts contained in the chart device to be used. (2) Chart page The charts registered here are usable.
- Page 62 (3) Test information When you execute the test related to the chart, which has been registered in the chart page, the system status is displayed. • Test name Displays the test name. • Auxiliary lens Displays the type of the auxiliary lens to be automatically set when starting the test. •...
- Page 63 (4) Chart page registration menu function Displays the command buttons to be used when registering the chart page. Press the [Default] button, and the test parameters are set according to the already set chart. • Default Return all the chart pages to the default setting. •...
- Page 64 • (4) Setting the auxiliary lens Displays the auxiliary lens to be used in the test to be executed when touching the chart. Touch the [Aux. lens] button, and the list of auxiliary lenses is displayed. When you want to set an auxiliary lens in advance at the start of test, select it. •...
- Page 65 (3) Changing the CC chart Change the chart to be used in the cross cylinder test. The [Customize Cross Cylinder Chart] screen appears. The mask button is also displayed when a mask can be applied to the chart. SETTING AND CHANGING THE SOFTWARE...
-
Page 66: Mode
Mode Set the status during test. • Start Mode Set which course should be used when starting (resetting). • S. E. Mode Set the spherical power to be activated on the equivalent sphere. • ADD linked with Far SPH Set whether the addition refractive power should be adjusted not to change the near-point spherical power when changing the spherical power in the far-point measurement status. - Page 67 • CC Power Set the power of the cross cylinder lens. This set data is valid only when you select the use of Jack- son cross. • VD (Printout) Set the VD value to be printed. • WD Set the near-point distance to be used in near-point measurement. •...
-
Page 68: Step
Step Set the step quantity when changing the refractive power by the controller. Step Set the step quantity when operating the controller's dial. • SPH Set the changing step of the spherical power. • CYL Set the changing step of the astigmatic refractive power. •... -
Page 69: Local & Time
Local & Time Set the language to be used, time and date. • Language Set the language to be used. • Duration time for display Set whether the lapse of time for tests should be displayed or not. When the lapse of time for tests is displayed, date is not displayed. -
Page 70: Course Construction
Course Construction The list of courses is displayed. You can register or edit the selected course. • Title bar Displays the course, which is being edited. • Chart list Displays the list of charts to be used in tests. Select a chart in the list. The chart is registered into "Exam. list" with the test data related to it. SETTING AND CHANGING THE SOFTWARE... - Page 71 • Exam list Displays the list of the tests registered into the course in the order of registration. • List registration mode You can select a mode when registering the chart selected from the chart list into "Exam list". • Insert Add the new test selected from the chart list to before the test selected in "Exam list".
-
Page 72: Sub View
Sub View Set the display of the sub information such as the reference data, dial navigation and help. • Mini-Help Set "Displayed" or "Not displayed" of "Mini-Help". • Dial Navigation Set "Displayed" or "Not displayed" of the dial information. • Settings of Comparison data •... -
Page 73: Other
1,2 Switch Set which cross cylinder test should be done when pressing the [1] or [2] switch. "Jackson CC test", "Topcon CC test" or "Smart CC test". Print Switch Set which operation should be done when pressing the [Print] switch. -
Page 74: Trouble Shooting
If, after following the instructions below, you still cannot restore the instrument to a normal condition or if the problem does not fall into any of the categories below, contact your dealer or TOPCON office (listed on the back cover). - Page 75 ERROR: Language DLL is not correct ver- The file, which should display the set language, sion. cannot be used in the KB-50 of the current version. Update the language file to the newest version. The font for ××× character is not fount on The font, which should display the set language, is this system.
- Page 76 • Make sure that the CV power supply unit is cor- ERROR: Data export failure. rectly connected to the device, which is the desti- nation of the data exported from KB-50 with serial communication, through the serial cable. • Check whether the setting is correct for the serial port on the CV power supply unit, which is con- nected to the device as the output destination.
- Page 77 CV power supply unit, which is con- nected to the visual acuity chart. • If the trouble is not solved, update the softwares of the KB-50 and the CV power supply unit to the newest version. Communication ERROR (Timeout CTS-ON An error has occurred in the data transmission to Check: CV THREAD SEND).
- Page 78 Start Semi Auto mode. Register the course when the course optometry method is used. ERROR! Invalid Handle Value. The memory of KB-50 may be damaged. Ask the serviceman to repair it. ERROR! Can't Open Volume List. The memory of KB-50 may be damaged.
- Page 79 Phenomena and remedial measure Can't show the examination list. The examination list cannot be displayed because No examination is registered. there is not the examination list in the DLL file of the chart being used. Update the KB-50 to the newest version.
-
Page 80: Specifications & Performance
SPECIFICATIONS & PERFORMANCE SPECIFICATIONS Specifications of KB-50 Changing the lens in the main unit and others in Operation by the switches, dial and touch each model panel display Touch panel display 10.4 inches Adjustment angle of touch panel display 128°~238°... -
Page 81: Dimensions And Weight
KB-50 has no applied part. Degree of protection against harmful ingress of water: IPx0 KB-50 has no protection against ingress of water. (The degree of protection against harmful ingress of water defined in IEC60529 is IPx0.) Classification according to the method(s) of sterilization or disinfection recommended by the manufacturer: Not applicable. -
Page 82: Reference Material
REFERENCE MATERIAL SYMBOL Symbol IEC Publication Description Description (French) 60417-5031 Direct current Courant continu Attention, consult accompanying Attention, consulter les documents 60348 documents d'accompagnement MAINTENANCE DAILY CHECKUPS Do not store the instrument where there is much dust. When not in use, turn off the power. CLEANING To avoid injury caused by pinching when moving the monitor unit, do not CAUTION... -
Page 83: End User License Agreement
RESTRICTED FUNCTIONALITY. You are licensed to use the SOFTWARE to provide only the limited functionality (specific tasks or pro- cesses) for which the DEVICE has been designed and marketed by TOPCON. This license specifically prohibits any other use of the SOFTWARE programs or functions, or inclusion of additional software programs or functions that do not directly support the limited func- tionality on the DEVICE. - Page 84 Support Software you may install on your DEVICE. Please contact TOPCON if you have any questions regarding any Support Software that you are considering installing on your DEVICE. (b) The DEVICE may use terminal services protocols (such as Remote Desktop Protocol, Remote Assistance or Independent Computer Architecture) to connect or access Applications (as defined below) running on a server;...
- Page 85 DEVICE; and • TOPCON is solely responsible for providing technical support, if any, to you in connection with your installation of Windows Updates installed on your DEVICE using WUA functionality provided by the SOFTWARE. Please contact TOPCON if you have any questions regarding any Windows Update that you are considering installing on your DEVICE or otherwise regarding the WUA functionality.
- Page 86 SOFTWARE. To be valid, the label must be affixed to the DEVICE, or appear on TOPCON's software packaging. If you receive the label separately other than from the TOPCON it is invalid. You should keep the label on the DEVICE or packaging to prove that you are licensed to use the SOFTWARE.
- Page 87 • TERMINATION. Without prejudice to any other rights, TOPCON or MS may terminate this EULA if you fail to comply with the terms and conditions of this EULA. In such event, you must destroy all copies of the SOFTWARE and all of its component parts.
- Page 88 ...
- Page 89 Please inform us of the purchase date of this instrument. • State of malfunction: Please inform us of this data as minutely as possible. CV 1DIAL CONTROLLER KB-50 INSTRUCTION MANUAL Version of 2008 (0804-100TH Date of issue: Apr. 1, 2008...
- Page 90 CV 1DIAL CONTROLLER KB-50 43221 96994 Printed in Japan 0804-100TH...
Need help?
Do you have a question about the KB-50 and is the answer not in the manual?
Questions and answers
My kb 50s is not recognizing data from the autorefractor when selecting input on the kb 50s. What do I need to do?
If your Topcon KB-50 is not recognizing data from the autorefractor, follow these steps:
1. Ensure the CV power supply unit is correctly connected to the device receiving data from the KB-50 via the serial cable.
2. Check that the serial port settings on the CV power supply unit are correct.
3. Update the KB-50 to the newest version.
4. If the issue persists, update the software of the connected device to the latest version.
If the problem continues, you may need to contact support with details such as the model name, serial number, purchase date, and a description of the malfunction.
This answer is automatically generated
THE LENS IN THE REFRACTOR HEEAD REST BLOCKED WHAT CAN I DO ?
How do you perform a Jackson cross cylinder?
To perform a Jackson cross cylinder test with the Topcon KB-50:
1. Use the [+] or [-] switch on the keyboard:
- Press [+] if the black frame lens is seen better.
- Press [-] if the red frame lens is seen better.
- When both lenses appear similar, press the [SET] switch.
2. Repeat the lens comparison several times until "Axis test is finished" appears in "mini help."
3. Start the refractive power test and perform it in the same way.
4. Repeat lens comparisons for refractive power several times. When done, the cross cylinder test is finished.
5. In "Smart CC" mode, you can perform the test by pressing the switch based on the patient's answer.
This answer is automatically generated