Table of Contents
Advertisement
Quick Links
Advertisement
Table of Contents

Related Manuals for Sailrite Craftool Pro Stitch Master


Summary of Contents for Sailrite Craftool Pro Stitch Master
- Page 1 Set-Up • Use • Maintenance • Troubleshooting • Schematics...
-
Page 2: Table Of Contents
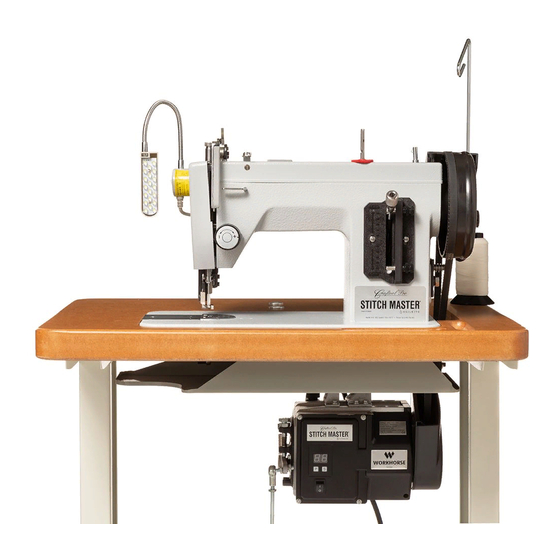
Table of Contents Welcome to Your Stitch Master Legs & Table Top Components Using the Stitch Master Starting to Sew Stitch Master Sewing Machine! ® Regulating Stitch Length Stitch Master Sewing Machine Components Sewing in Reverse Turning Corners You are now the proud owner of one of the toughest, most Stitch Master Safety Thread Tension Adjustment versatile sewing machines around. -
Page 3: Stitch Master Legs & Table Top Components
Stitch Master Legs & Table Top Components ® 37 PCS/PZ Table Top and Legs Hardware Table Top and Legs... -
Page 4: Stitch Master Sewing Machine Components
Stitch Master Sewing Machine Components ® 77 PCS/PZ Servo Motor Box Accessories Box Head Box (10) -
Page 5: Stitch Master Safety
Stitch Master Safety ® Workhorse™ Servo Motor Safety Precautions The Workhorse Servo Motor is designed specifically for sewing machines and is not warranted for other uses. Please follow the guidelines below to prevent Please observe the following when using your Stitch Master sewing machine: injury or damage to the motor/sewing machine. -
Page 6: Assembling The Stitch Master
Stitch Master Guidebook: Safety ® Assembling the Stitch Master Work Environment for Workhorse™ Servo Motor Power Voltage: Do not use any Voltage Avoid operating near combustible or but the one specified on the motor. flammable items. Basic tools required: Electromagnetic Pulse Interference: Keep Avoid water coming into contact with the motor away from high electromagnetic the motor/outlet. -
Page 7: Assembling The Legs
Stitch Master Guidebook: Assembling the Stitch Master ® Flip the legs upside down and lay the Assembling the Legs bottom brace (D) into the desired position across the bottom of the legs. This will Position legs (A) on their side, unfinished determine the distance the treadle will sides facing in, with the feet facing you. - Page 8 Stitch Master Guidebook: Assembling the Stitch Master ® To attach the treadle to the bottom brace, Assemble and flip the treadle upside down with the treadle- Attach Treadle bracket facing the back leg brace. Line up the holes on the sides of the treadle with the pivots and slide the pivots into the treadle.
-
Page 9: Attach Idler Pulley
Stitch Master Guidebook: Assembling the Stitch Master ® Assemble and Attach Idler Pulley Attach Tabletop Partially thread the two remaining hex head lag screws (B), lock washers (C) with two Place the tabletop (A) on the floor with the small washers (E) into the two pilot holes top side down on a soft surface to avoid next to the belt slot of the tabletop (10). -
Page 10: Tabletop Motor Attachment
Stitch Master Guidebook: Assembling the Stitch Master ® Tabletop Motor Attachment Use a mallet or hammer to pound the three carriage bolts (A) into the three through- holes in the tabletop (12). Flip the table over again, legs up. Within the motor box find the plastic belt cover and its mounting bracket. -
Page 11: Linkage Bar Installation
Stitch Master Guidebook: Assembling the Stitch Master ® Linkage Bar Installation Install Oil Tray and Hinges Loosen the center nut on the linkage bar Find the metal oil tray (C) and reference (A) so that it will slide apart (18). Slide into the belt slot of the tabletop (21). -
Page 12: Install Sewing Machine And Belt Bracket
Stitch Master Guidebook: Assembling the Stitch Master ® Install Sewing Machine Attach Power Plus™ Flywheel and Belt Bracket Set the Posi-Pin (E) aside and unscrew ® the reverse-threaded Posi-Pin Nut (F) (27). Remove the sewing machine from its Slide the Power Plus Flywheel (G) onto the styrofoam shell and place the face of the Posi-Pin Wheel Bushing (H) and rethread machine on a soft, flat surface. -
Page 13: Installing Timing Belts
Stitch Master Guidebook: Assembling the Stitch Master ® Check the tension of both timing belts by Installing Timing Belts pressing at the middle of each belt. There should be equal tension between the two Find the long and short timing belts &... -
Page 14: Insert Support Pin And Thread Stand Post
Stitch Master Guidebook: Assembling the Stitch Master ® Changing Motor Rotation Insert Support Pin and Do not run the Workhorse™ in a clockwise Thread Stand Post direction as it will bind the sewing machine and cause other problems. Make sure the motor is always running in a counterclockwise direction. -
Page 15: Install Motor Cover And Belt Cover
Stitch Master Guidebook: Assembling the Stitch Master ® Install Motor Cover Install Light and Wire and Belt Cover To attach the LED light, place the magnetic light in your desired location (39). If it is Find the motor belt cover (A) and the a 110-volt sewing machine, the light will included small screw (B). -
Page 16: Install Spool Pin And Felt
Stitch Master Guidebook: Assembling the Stitch Master ® Stitch Master Set-Up Install Spool Pin and Felt Thread Screw the spool pin (A) into the threaded hole on top of the sewing machine. Slide the red felt disc over the pin (40). Stitch Master sewing machines can handle most polyester, nylon, cotton or monofilament thread from general purpose to heavy-duty V-92 (T-90). -
Page 17: Needles
Stitch Master Guidebook: Stitch Master Set-Up ® Needles Stitch Master sewing machines require system 135x16 leather needles sizes #18 or #20. A size #20 needle is used for most medium to heavy leather sewing. Needle Type Use of the wrong needle type can contribute to unattractive or skipped stitches. -
Page 18: Winding Bobbins
Stitch Master Guidebook: Stitch Master Set-Up ® Disengage the Clutch i.e. Thread the Bobbin Winding Bobbins Posi-Pin Clutch System: on the machine: ® To prepare your machine to wind bobbins, Thread comes off top of cone to thread A partially wound V-92 (T-90) bobbin is already loaded in the machine. -
Page 19: Threading The Machine
Stitch Master Guidebook: Stitch Master Set-Up ® Threading the Machine The black thread in the photos is used for visual purposes only and is not included with the machine. Thread comes off top of cone to thread stand arm hook (A). Pass the thread through one hole in the thread post (most direct route to bobbin tensioner) (B). -
Page 20: Removing & Installing The Bobbin Case
Stitch Master Guidebook: Stitch Master Set-Up ® Removing & Installing Installing Bobbin the Bobbin Case in Bobbin Case The bobbin case (B) is located Insert a threaded bobbin (A) into the bobbin case (B) with thread coming off the on the underside of the machine left side in a clockwise rotation. -
Page 21: Picking Up Bobbin Thread
Stitch Master Guidebook: Stitch Master Set-Up ® Using the Stitch Master Picking Up Bobbin Thread Stitch Master Sewing Machines arrive tuned and optimized for sewing leather. After the machine is threaded and the bobbin case (with bobbin) is installed, pick up the bobbin thread as follows: Starting to Sew Plug the machine into an outlet and switch the Workhorse™... -
Page 22: Regulating Stitch Length
Stitch Master Guidebook: Using the Stitch Master ® Forward Feed Sewing in Reverse Thread Tension Position the needle fully up or fully down and Adjustment push the stitch length lever all the way down. Hold the lever down until the reverse sewing is Tension adjustment refers to the completed. -
Page 23: Adjusting Presser Foot Tension
Stitch Master Guidebook: Using the Stitch Master ® The Stitch Master has a thread Adjusting Presser Foot Tension tensioning knob on the front that the The amount of downward pressure put upper thread runs through (57). on the material by the presser foot is controlled by the Pressure Regulating The upper tension knob can be turned up Thumb Screw (A). -
Page 24: Removing Material From Under The Presser Foot
Stitch Master Guidebook: Using the Stitch Master ® Removing Material from Motor Speed Adjustment Under the Presser Foot Depending on the type of project you are sewing you may want to change the top Stop the machine with the needle at its end speed of the machine. -
Page 25: Stitch Master Maintenance
Stitch Master Maintenance ® Lubrication The machine was thoroughly oiled prior to shipment. Oil all metal to metal working parts frequently! Use only sewing machine oil. After oiling, briefly sew with scrap material to prevent soiling your work. For good maintenance of your machine, you should oil it at least: twice yearly, before it is put in storage, or anytime the machine sounds like it is running roughly. - Page 26 Stitch Master Guidebook: Stitch Master Maintenance ® Underside lubrication points Left end and back side lubrication points...
-
Page 27: Troubleshooting The Stitch Master
Troubleshooting the Stitch Master ® Material Surface is Being Damaged The more we understand our machines, the better they work for us. Stitch Master Surface marring is damage to leather and other delicate material surfaces. The Stitch Master Sewing machines are actually rather simple, and adjustments can be easy if you take sewing machine has special knurled surface feet and feed dogs to reduce marring. -
Page 28: Inconsistent Stitch Tension
Stitch Master Guidebook: Troubleshooting ® Inconsistent Stitch Tension Removing the Hook to Clean the Shuttle Race Guide Shaft and Free Thread Jams If you notice that you are getting inconsistent stitch tension or if your thread looks loose and H). If the sloppy near the tension assembly under operation, check your take up spring Perform these steps with care: wire hook has broken off, you’ll need to replace the take-up spring. -
Page 29: Skipped Stitches
Stitch Master Guidebook: Troubleshooting ® 3. Not Enough Foot Pressure Skipped Stitches Materials like dense, vegetable tanned leather, can make the withdrawal of the needle from the material difficult. If your machine is skipping stitches, straight stitches will have stitch lengths that look If the presser foot is being lifted as the needle comes out of the leather the loop that the exceptionally long at times. -
Page 30: Thread Issues
Stitch Master Guidebook: Troubleshooting ® 4. Burred Gib Hook or Retaining Ring Cap Spring Thread Issues A needle strike to the gib hook or the edge of the retaining ring cap spring’s “triangular” opening may result in a burr which can cause the thread to snag as it pulls through (p. 50, &... - Page 31 Stitch Master Guidebook: Troubleshooting ® There are thread loops on the underside of the material: When stopping to turn a corner, the machine skips a stitch even with the needle buried: A tangle on the bottom side of the material means there is not enough upper tension. More than likely, the thread is not being pulled snugly between the tension disks (p.
-
Page 32: Needle Issues
Stitch Master Guidebook: Troubleshooting ® Needle Issues Bobbin Winding Issues The needle is breaking: The bobbin is not filling evenly, either too much thread on the top or bottom: Ensure the needle is large enough for the thickness and type of leather being sewn. Also make Refer to p. -
Page 33: Belt Issues
Stitch Master Guidebook: Troubleshooting ® Belt Issues Stitch Master Timing The timing of your machine is determined by the relationship of the needle to the gib The belts slip or come off the pulleys: hook. The gib hook picks up the upper thread at the needle and carries it down around If belts stretch after prolonged use, you may need to adjust the belt tension. - Page 34 Stitch Master Guidebook: Troubleshooting ® Check the Needle Bar Height Remove the left end cover of the sewing needle bar up or down to position the machine as shown (72). mark making sure the screw that secures the needle is facing the inside of the Manually lower the needle bar to its sewing machine arm.
-
Page 35: Hook/Driver Gap
Stitch Master Guidebook: Troubleshooting ® Hook/Driver Gap Oscillating hook sewing machines have loose tolerances between the Shuttle Gib Hook and the Shuttle Driver. This play between the parts is intentional and allows the Stitch Master to sew heavier denier threads than many larger rotary hook machines. - Page 36 Stitch Master Guidebook: Troubleshooting ® Check the Rotational Check the Left-Right Positioning Positioning of the Shuttle of the Shuttle Gib Hook Race Guide Shaft If the shuttle assembly and lower shaft have slipped left or right of the factory setting, the gib Before making any adjustments to the left- hook will not be in position to catch the loop.
- Page 37 Stitch Master Guidebook: Troubleshooting ® Adjusting the Left-Right Positioning of the Shuttle Gib Hook Make a mark on the shuttle race guide To move the hook to the right — A) where the halves of the shaft (p. 66, Loosen the two screws in the right collar compressible clamp meet (B).
- Page 38 GROUP 1: Construction External Group PA R T # PA R T # PAR T N AM E PAR T N AM E 121530 Top Plate Thread Take-Up Spring (included in 21) 5332 Top Plate Screw B071 Tension Release Pin W184-2 Bobbin Winder Stopper E066...
- Page 39 GROUP 2: Sewing Transmission Group PA R T # PA R T # PAR T N AM E PAR T N AM E Arm Shaft E053 Inside Presser Foot W012 B007 A035-1 Feed Cam Presser Bar Arm Shaft Bushing B051 Presser Bar Lower Bushing B028 A012...
- Page 40 GROUP 3: Shuttle Transmission Group PA R T # PA R T # PAR T N AM E PAR T N AM E B139 103273 Crank Connecting Rod Retaining Ring Clip Spring Crank Connecting Rod Retaining Ring Clip Screw 103274 Set Screw A027A Retaining Ring...
- Page 41 GROUP 4: Feed Transmission Group PAR T # PAR T # PA R T N A M E PA R T N A M E Feed Regulator Thumb Nut W109 Feed Regulator Wavy Washer A067 Feed Regulator Lever W105 Forked Rod Support Spring B103U Feed Regulator Lever Nut A053B-2...
- Page 42 GROUP 5: Driving & Reversing Mechanism Group PA R T # PA R T # PAR T N AM E PAR T N AM E W042 W036 Presser Foot Lift Lever Presser Bar Feed Rod Presser Foot Lift Lever Hinge Presser Bar Actuator Spacer W024-1 Screw...
- Page 43 GROUP 6: Dynamic Transmission PA R T # PA R T # PAR T N AM E PAR T N AM E 100540 120930 Posi-Pin Knob For Shaft Belt Cover and Bracket ® Posi-Pin Nut - Reverse Thread 100536 Cogged Sewing Machine Posi-Pin Spring 100539 Timing Belt 15.8"...
- Page 44 Not to Scale PA R T # PA R T N A M E 121455 Legs for Stitch Master ® Workhorse™ Servo Motor 121616 (110V) 121617 (220-240V European Union) 121618 (220-240V Australia) Not to Scale 121619 (220-240V United Kingdom) 120864 Oil Tray Table Top for Stitch Master 121454...
-
Page 45: Specifications
Stitch Length Turn the power off and on twice, and try again. If the “E3”: The board cannot read the parameter. problem still occurs, contact Sailrite ® Needle Bar Stroke 34mm H.P. -
Page 46: Warranty
This limited warranty does not apply with respect to products that have been altered or which are missing serial numbers or for products not purchased directly from Sailrite or a dealer authorized by Sailrite. Tandy Leather, Inc. is Sailrite’s authorized Stitch Master dealer. Any product returns/exchanges must be done with the original machine seller in accordance with their policies. - Page 47 Distributed By • Distribuido Por • Distribué Par: Tandy Leather, 1900 SE Loop 820 Fort Worth, TX, USA 76140 TANDYLEATHER.COM ©2019 by Sailrite Enterprises, Inc. All rights reserved. 121449*1 Todos los derechos reservado. Guidebook for Craftool Pro Stitch Master Tous droits réservés.
Need help?
Do you have a question about the Craftool Pro Stitch Master and is the answer not in the manual?
Questions and answers