Advertisement
Quick Links
6. Hang Bottom Frames
Continue to build the tower by hanging bottom frames (C) from the outward facing hooks on the top frames.
Make sure the hang rod slots face forward.
C
7. Connect Bottom Left and Right Frames
Connect the bottom frames with wire braces (D) as completed in Step 4.
8. Install Bottom Plastic Shelves
Snap 2 plastic shelves (I) into each of the bottom frames as completed in Step 5.
9. Connect Two Towers with Hang Rod
Place the inner hang rod (G) inside the outer hang rod (H). Place the hang rods in the desired height location between the tower frames.
Depending on your existing shelf height, adjust height of hang bar to fit your space.
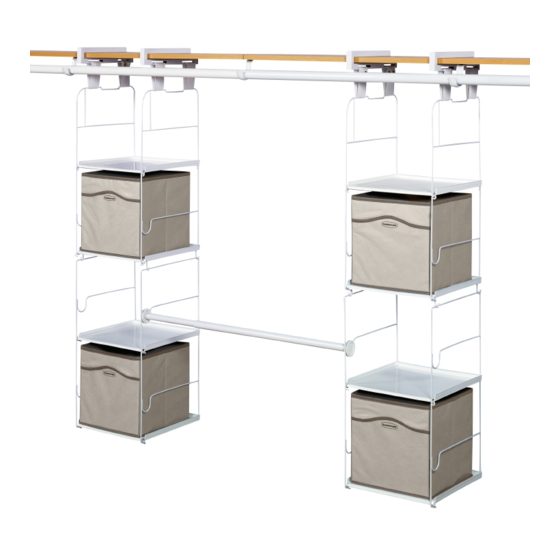
10. Push Unit Against Back Wall
Push the unit into place, against the back wall of your closet. This will provide additional support.
11. Insert Cubbies or Drawers
Insert fabric cubbies as bins or drawers, as desired.
C
C
G
H
Place Hang Rod
MAX Add-On
INSTRUCTIONS & PRODUCT INFORMATION
Component
Optional Hang
Rod locations
™
Closet Organizer
Letter
Quantity
Description
Left
A
2
Top Wire Frame
Right
B
2
Top Wire Frame
C
4
Bottom Frame
D
8
Wire Connectors
E
4
Wood Shelf Attachment Bracket
(for use with your wood shelving)
F
8
Wire Shelf Attachment Bracket
(for use with your wire shelving)
G
1
Inner Hang Rod and End Cap
H
1
Outer Hang Rod and End Cap
I
8
Plastic Shelf
J
8
Support Strap
K
0, 4,
Cubby Insert
or 8
L81806116PO
Advertisement

Related Manuals for Rubbermaid MAX Add-On Closet Organizer


Summary of Contents for Rubbermaid MAX Add-On Closet Organizer
- Page 1 6. Hang Bottom Frames Continue to build the tower by hanging bottom frames (C) from the outward facing hooks on the top frames. Make sure the hang rod slots face forward. MAX Add-On ™ Closet Organizer INSTRUCTIONS & PRODUCT INFORMATION L81806116PO Component Letter...
- Page 2 Brackets for each tower should be Begin by facing the Rubbermaid logo on the plastic shelf (I), towards the front. Next, insert the shelf into the tower and snap the shelf into spaced 12" apart (center to center).
Need help?
Do you have a question about the MAX Add-On Closet Organizer and is the answer not in the manual?
Questions and answers