Table of Contents
Advertisement
Quick Links
Advertisement
Table of Contents

Related Manuals for Theben Timeguard SupplyMaster FST24


Summary of Contents for Theben Timeguard SupplyMaster FST24
- Page 1 Fused Spur Time Switch Model: FST24 – 24 Hour Timer Model: FST77 – 7 Day Timer...
-
Page 2: General Information
1. General Information These instructions should be read carefully and retained for further reference and maintenance. 2. Safety • Before installation or maintenance, ensure the mains supply to the time switch is switched off and the circuit supply fuses are removed or the circuit breaker turned off. -
Page 3: Installation
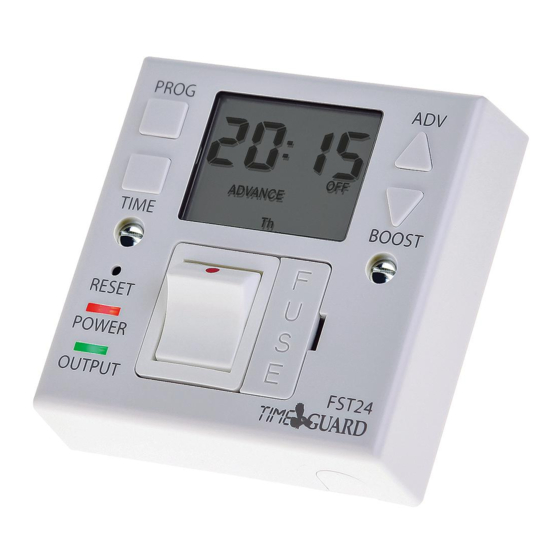
Illuminated screen Override until next programme change and increments Sets displayed value programmes during time and programme setting Sets time and date Boosts for 1 or 2 hours and Reset button decrements displayed value Power LED during time and Output LED programme setting Double pole... -
Page 4: Connection Diagram
5. Connection Diagram The terminals are marked as follows on the rear of the time switch; Supply neutral terminal Supply live terminal Switched neutral terminal (load neutral Switched live connection) terminal (load live connection) Loop terminal for earth continuity Supply L IN Live (Brown or Red) to N IN... -
Page 5: Setting The Clock
6 Battery • The unit has an in built non replaceable, rechargeable battery, which will keep the programmed times during power down situations for up to 4 weeks. • If the screen goes blank, once power is restored, and 4 hours have elapsed (to give a working battery charge), Reset must be pressed, and times/programmes re-entered. - Page 6 • Use the Adv/Ovr to increase (or the Boost buttons to decrease) the value and set to the correct year. • Press the Time button once to save the year, and the screen with show the month; • Use the Adv/Ovr or boost button to set the correct month.
- Page 7 Modifying the date and time of day Normally the only change required will be to the time of day minutes, in which case; • Press and hold the Time button for 3 seconds, the word Hold will show on the screen. •...
- Page 8 • Once the desired day grouping is selected, press Prg button once to set and move onto programming the ON/OFF times. • The display will show Prog 1, with dashes for the hours and minutes; Note: the example shown is for 5 day + 2 day programming.
- Page 9 • At this stage the output ON/OFF indicator (as in the above image) may not reflect the current programme status accurately. • If the time switch should be OFF now, leave as it is. Note: The time switch will automatically turn ON at your desired ON time, and will resume the next programme as normal.
- Page 10 • Either – Accept this by pressing the Prg button once, and review the programmed times for this mode by pressing Prg to move through the times • Or – Press the Adv/Over or Boost button to change the mode, and then press the Prg button to review the times.
-
Page 11: Boost Button
11. Boost button • One press of the boost button will provide 1 hours of boost, after which the output will turn OFF. • Two presses of the boost button will provide 2 hours of boost, after which the output will turn OFF. •... - Page 12 If you experience problems, do not immediately return the unit to the store. Telephone the Timeguard Customer Helpline; HELPLINE 020 8450 0515 or email helpline @ timeguard.com Qualified Customer Support Co-ordinators will be on-line to assist in resolving your query. For a product brochure please contact: Timeguard Limited.
Need help?
Do you have a question about the Timeguard SupplyMaster FST24 and is the answer not in the manual?
Questions and answers