Advertisement
Quick Links
thank you for purchasing a sealey product. manufactured to a high standard, this product will, if used according to these
instructions, and properly maintained, give you years of trouble free performance.
IMPORTANT: please read these instructiOns careFullY. nOte the saFe OperatiOnal reQuirements, WarninGs & cautiOns. use the prOduct
cOrrectlY and With care FOr the purpOse FOr Which it is intended. Failure tO dO sO maY cause damaGe and/Or persOnal inJurY and Will
inValidate the WarrantY. Keep these instructiOns saFe FOr Future use.
Refer to
Wear eye
instruction
protection
manual
1. saFetY
‰
WarninG! ensure Health and Safety, local authority and general workshop practice regulations are adhered to when using tools.
9
observe standard workshop safety procedures.
‰
WarninG! Take extreme caution when using this tool, the drill will require supporting, leaving the user with hands free to sharpen the
bit.
9
Wear approved eye protection and footwear. A range of personal safety equipment is available from your Sealey stockist.
8
dO nOt use this tool for any purpose other than that for which it has been designed.
8
dO nOt use to sharpen masonry drills.
8
dO nOt use adaptor sleeve if damaged.
9
maintain tool in good and clean condition for best and safest
performance.
impOrtant: These instructions are provided as a guide only.
9
When not in use, clean and store complete.
2.
intrOductiOn
t
Fast, simple and effective way to sharpen drill bits. Suitable for use with
HSS, Titanium, Cobalt and Carbon Steel ranging from 3 to 10mm.
Fits with any drill with a 43mm collar (not to be used hammer function).
3. speciFicatiOn
model no: .............................................................SmS2001m
drill bit range: .........................................................................
3, 3.5, 4, 4.2, 4.5, 5, 5.5, 6, 6.5, 7, 7.5, 8, 8.5, 9, 9.5, 10mm
Collar size: ................................................................... 43mm
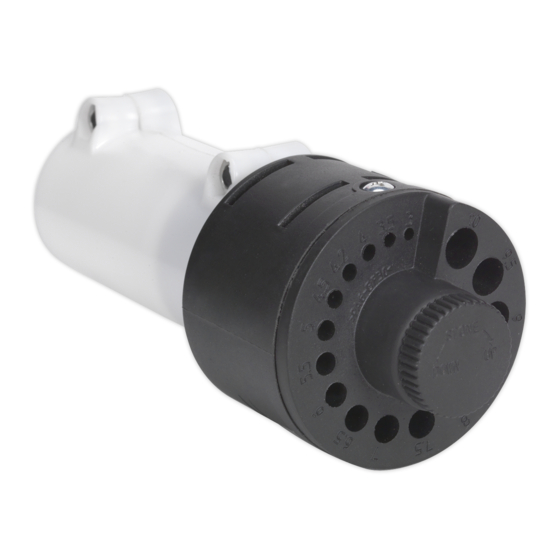
4. OperatiOn
4.1.
setting
4.1.1.
Support the drill with axis vertical.
4.1.2.
Close the jaws of the drill chuck fully to obtain maximum
projection.
4.1.3.
Trial fit the sharpener three pronged internal coupling, see fig.2,
on to the chuck jaws as shown in fig.1
4.1.4.
Adjust the length of the jaws to suit internal coupling.
4.1.5.
Fit the adaptor tube to both the drill shoulder and the sharpener
as shown in fig.1 with equal grip length.
4.1.6.
Apply pressure to the sharpener, forcing the drill jaws to engage
firmly with the internal coupling. Clamp the tube with the two cap
screws (5mm hex).
4.1.7.
Turn the "STONE" (fig.3) knob to the down position.
4.2.
drill sharpening
4.2.1.
Set the drill speed to fastest setting speed and turn on.
4.2.2.
offer the drill bit to be sharpened into the correct aperture.
4.2.3.
Rotate the drill bit slightly whilst lowering on to the flute location
ledges. Resistance will be felt when reached.
4.2.4.
Turn the "STONE" (fig.3) knob toward the up position whilst
rotating the drill slightly until the grinding wheel engages with the
bit.
4.2.5.
observe the bit for ground tip.
4.2.6.
Alternate drill bit 180° cutting face to cutting face for even
sharpening as adjustments to "STone" knob are made. Small
adjustments recommended when grinding. Turn off the drill
between observations.
© Jack Sealey limited
manual drill bit sharpener
sms2001m
model no:
fig.2
fig.3
Original Language Version
Rotation
direction
1
Rotation
direction
SmS2001m | Issue 2 (H,2,3,4,5,6,F) 22/02/18
fig.1
Ø43
2
drill
Advertisement

Related Manuals for Sealey SMS2001M


Summary of Contents for Sealey SMS2001M
- Page 1 IMPORTANT: please read these instructiOns careFullY. nOte the saFe OperatiOnal reQuirements, WarninGs & cautiOns. use the prOduct cOrrectlY and With care FOr the purpOse FOr Which it is intended.
- Page 2 Bit tip requires a large removal of material: Start grinding process on a bench grinder, finish on sharpener. 5.3. Grinder not turning: Check drill jaws to sharpener coupling. 5.4. not grinding on full adjustment: Replace worn grinding wheel (20mm spanner), contact your Sealey dealer for spare. See 6.1 for access to grinding wheel. 6. cleaninG 6.1. Remove screw on each side of top of sharpener. Remove aperture cap, retain loose parts.