
Related Manuals for Tokenworks AgeVisor Touch


Summary of Contents for Tokenworks AgeVisor Touch
- Page 1 AgeVisor Touch ID Scanner ® ™ User’s Guide AGE VERIFICATION MACHINE Contents of this Box AgeVisor Touch ID Scanner 12V Power Supply Users Manual...
-
Page 2: Copyright
TokenWorks, Inc. www.TokenWorks.com (Company Web Site) www.CardVisor.com, www.IDVisor.com, www.IDScanner.com (Product Web site) TokenWorks®, CardVisor®, CardTool®, IDVisor®, IDVisor Pro®, IDVisor Smart®, and AgeVisor® are trademarks of TokenWorks, Inc. www.IDscanner.com www.IDscanner.us www.IDVisor.com Rev 2.3 – May 27, 2020... -
Page 3: Table Of Contents
AgeVisor Touch User’s Guide Page 3 of 26 Table of Contents COPYRIGHT ..............................................2 TABLE OF CONTENTS ..........................................3 1 INTRODUCTION ............................................. 4 1.1 D ..............................4 OCUMENT OVERVIEW 1.2 S ................................. 4 CANNER EATURES 2 HOME SCREEN ............................................5 2.1 M... -
Page 4: Introduction
AgeVisor Touch User’s Guide Page 4 of 26 1 Introduction This document will describe how to use the AgeVisor Touch scanner. 1.1 Document overview This document is designed based on the form hierarchy of the application. Each chapter will begin with the top-level form or screen and the sub paragraphs will be dedicated to the lower level forms that are accessible from the higher form. -
Page 5: Home Screen
AgeVisor Touch User’s Guide Page 5 of 26 2 Home Screen The Top Tabs allow navigation to the 4 main screens for the program. The 4 tabs on the top will take you to the four main screens of the program. The Main screen will show the current scan information. -
Page 6: Main
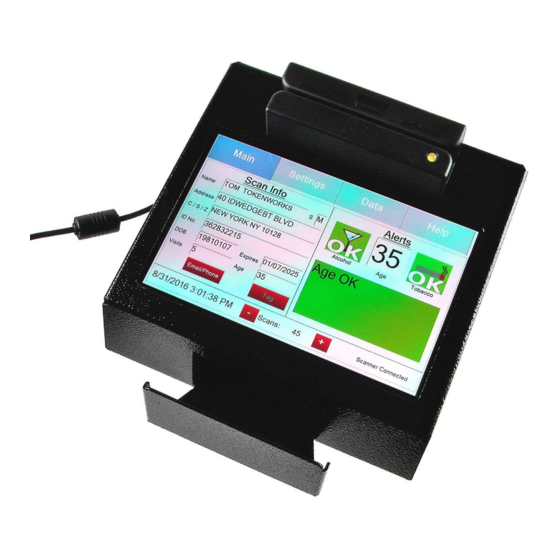
Page 6 of 26 2.1 Main The Main tab is the landing point when the AgeVisor Touch application launches. Below is a picture of the Main form after a scan, which displays a scanned card, and all the elements of the form: www.IDscanner.com... -
Page 7: Settings
AgeVisor Touch User’s Guide Page 7 of 26 2.2 Settings Tapping the Settings tab will display a screen of functions that are typically used by a system administrator. These functions can be protected by pin-codes to keep settings and information secure. The unit comes with a default pin- code of (5678) for the following functions: Connection, Scanning Preferences, Date and Time, Display and Sound, WiFi, and Age Threshold. -
Page 8: Scanned Data
AgeVisor Touch User’s Guide Page 8 of 26 2.3 Scanned Data Tapping the Data screen will display a list of options related to the data stored on the device. The details of each of the buttons in the Data menu are detailed in Chapter 4: Data Screen. -
Page 9: Help
NOTE: WiFi must be enabled to use this feature. Visit https://www.idscanner.us/general-support/how-to-connect-to- wifi-on-agevisor-touch/ to learn how to connect your unit to WiFi. Exit App – Allows you to exit the AgeVisor Touch application. NOTE: Security Pincode is required to exit the application. See section 2.5 for more details. www.IDscanner.com www.IDscanner.us www.IDVisor.com... -
Page 10: Pincode
Page 10 of 26 2.5 Pincode Many features of AgeVisor Touch are protected by a pincode. When you attempt to access these features you will be prompted with a popup window that asks for a password. The default pincode is “5678”. -
Page 11: Settings Screen
The WiFi button brings up options for connect to a local WiFi network. Generally, we recommend not connecting the device to WiFi due to Windows Updates, but a connection is necessary in order to perform updates for AgeVisor Touch software. -
Page 12: Connection
Below is what the Scanner Connection Settings window should look like. If you have a Magnetic Stripe Reader installed on your AgeVisor Touch, the MSR Magstripe enable box should be checked. You may need to change the M260/MSR Port to match the correct port that the MSR is plugged into (commonly COM3 or COM4). -
Page 13: Scanning Preferences
AgeVisor Touch User’s Guide Page 13 of 26 3.2 Scanning Preferences The Scanning Preferences button allows you to adjust important settings at appear when you scan an ID. AntiPassback Time – This will enable an alert to appear if an ID is scanned more than once during the set time. -
Page 14: Advanced Settings- Scanning Preferences
AgeVisor Touch User’s Guide Page 14 of 26 3.2.1 Advanced Settings- Scanning Preferences Limit Data Collection – This function allows you to disable saving of individual License field, like Address, DL number, etc. If you disable certain fields, you will also disable features associated with them, e.g., disabling DL number will also disable the anti-pass back feature. -
Page 15: Date And Time
AgeVisor Touch User’s Guide Page 15 of 26 3.3 Date and Time Set the Date and Time to ensure Age calculation will be correct. If you set the time/date in the past, the application results will become unstable. Additionally, the calculated age of the person will be incorrect. -
Page 16: Display And Sound
AgeVisor Touch User’s Guide Page 16 of 26 3.4 Display and Sound The Display and Sound button displays a window that allows the adjustment of the display and sound. Volume: Allows the adjustment of the system volume. Brightness: Allows adjustment of the screen’s brightness. -
Page 17: Wifi
AgeVisor Touch User’s Guide Page 17 of 26 3.5 WiFi Visit https://www.idscanner.us/general-support/how-to-connect-to-wifi-on-agevisor-touch/ to learn how to connect your unit to WiFi. 3.6 Age Threshold The Age Threshold button allows you to select the minimum age requirement for the product type you select. -
Page 18: Settings Screen
Alternatively you can save the extracted data file to the device and pull the data off at a later time. This will require you to exit the AgeVisor Touch application and use Windows File Explorer to navigate to C:\Tokenworks\ExportedData where the data will be stored. -
Page 19: Reports - Customer Data
Alternatively you can save the extracted data file to the device and pull the data off at a later time. This will require you to exit the AgeVisor Touch application and use Windows File Explorer to navigate to C:\Tokenworks\ExportedData where the data will be stored. - Page 20 AgeVisor Touch User’s Guide Page 20 of 26 You can view additional information about a customer by double clicking the row for the customer. Below is what the additional information window looks like: www.IDscanner.com www.IDscanner.us www.IDVisor.com Rev 2.3 – May 27, 2020...
-
Page 21: Search Data
AgeVisor Touch User’s Guide Page 21 of 26 4.3 Search Data The Search Data button allows you to search for customers who have been previously scanned. You can search for the customer by entering either the First and/or Last name, and/or ID Number. After entering the information click Search and the unit will search the database for the customer information. -
Page 22: Database
AgeVisor Touch User’s Guide Page 22 of 26 4.4 Database The Database button opens the Database Tools window which allow you to manage settings relating to the database Database button functions: Check DB – Displays the number of records currently stored in the database. -
Page 23: View Tagged Customers
The View Tagged Customers button allows you to view and export the customers who have been tagged on the device. The Export button creates a file that is exported to the C:\Tokenworks\ExportedData\Temp folder and saved as a .csv file with the name ‘Banned_VIP’... -
Page 24: View Imported Tag List
AgeVisor Touch User’s Guide Page 24 of 26 4.6 View Imported Tag List The View Imported Tag List button allows you to view and import a new tag list. You can import the list by clicking the Import button. The file must be called ‘Banned_VIP.csv’ and must be located on USB Flash drive that is plugged into one of the USB ports on the side of the Device. - Page 25 ENTIRETY, to be in good working order for a period of one (1) year from the date of purchase. Should this product fail to be in good working order at any time during this warranty period, TokenWorks will, at its op tion, repair or replace this product at no additional charge except as set forth below.
- Page 26 Purchaser is wholly responsible for ensuring full compliance with the laws of the jurisdiction wherein the product is to be used. TokenWorks fully disclaims any liability for any loss, damages or untoward circumstances that may arise from the inappropriate use of the product or of the data retrieved through its use.
Need help?
Do you have a question about the AgeVisor Touch and is the answer not in the manual?
Questions and answers
Hi- we have the age visor 2 and when we scan IDs much of the time it says fail and takes us to a second verification platform. Can you tell me why?
The Tokenworks AgeVisor Touch may fail to scan IDs if the scanner is not properly connected or configured. Possible reasons include:
1. Scanner Connection Issues – The device may not be responding to the scanner. Reconnecting via the "Connection" button can help.
2. Incorrect Port Settings – If a Magnetic Stripe Reader (MSR) is installed, the correct port (commonly COM3 or COM4) must be selected in the settings.
3. Automatic Port Open Not Enabled – If this setting is not selected, connection issues may persist.
4. Scanning Preferences Settings – If specific scanning preferences, such as AntiPassback Time or Clear Screen settings, are misconfigured, it may affect the scanning process.
If the scanner is not functioning properly, the system may redirect to a secondary verification platform for manual age verification.
This answer is automatically generated