
Related Manuals for IDS IDS806


Summary of Contents for IDS IDS806
- Page 1 IDS806 Owner’s Manual South Africa’s leading manufacturer and distributor of electronic security products...
-
Page 2: For Service
For Service Central Station Information: Account #: Telephone Installer Information Account #: Telephone This alarm is to be installed and maintained by an IDS trained installer. Owner’s Manual 700-624-01C... -
Page 3: Table Of Contents
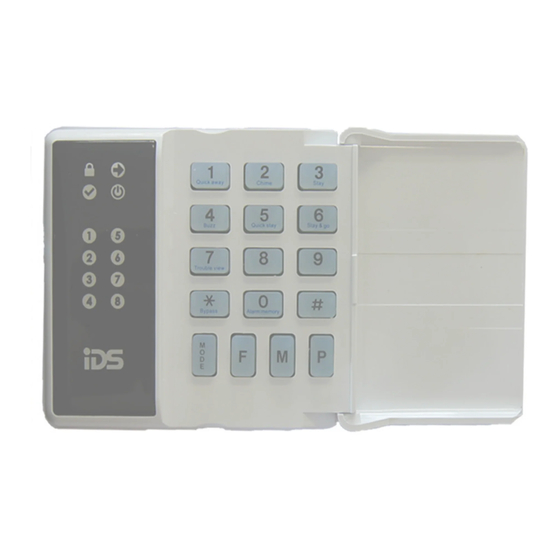
Contents For Service ..........................2 Contents ..........................3 Glossary ..........................5 Introduction to the IDS806 ....................6 System Information ......................9 Arming the System ......................10 Disarming the System ......................14 Emergency Situations......................15 System Memory ......................... 16 System Configuration ......................17 Remote Transmitter ...................... - Page 4 Figure 1: IDS806 Keypad Away Arm icon will be on when armed in away mode Armed icon will be on Power Icon will be on when the system is when there is AC on and armed in stay or away...
-
Page 5: Glossary
Glossary Alarm Memory This is the history of the most recent violations that occurred the last time the system was armed. (See pg. 16) To set the system into the ARMED mode. In this mode, violating a zone will activate an alarm condition. -
Page 6: Introduction To The Ids806
Introduction to the IDS806 The IDS806 Control Panel is manufactured to the highest specification and will provide many years of service if correctly installed and maintained. The unit is designed for simple operation yet provides the maximum protection for you, your family, or business. - Page 7 Understanding the Keypad Indicators Refer to the labelled pictures of the keypads. Table 1: Icon Display Information Icons Description System Disarmed System Away Armed Alarm Condition (Check Alarm Memory zone details BEFORE re-arming) System Stay Armed Stay Alarm Condition Mains Power is Present Trouble Condition System Ready to be armed Zone Bypassed...
- Page 8 Operation of the Keypad To ensure correct operation of your security system it is essential to familiarize yourself with the use of the keypad The keypad has a buzzer, command entry keys, zone and system status LED's. The keypad is used to send commands to the system and to display the current system status.
-
Page 9: System Information
System Information Programmed Functions Check with your installer which of the following functions have been enabled. Quick Away Arm Quick Stay Arm Arm with Entry/Exit or Follower Zones Violated Stay Arm Stay Arm and Go ... -
Page 10: Arming The System
Zone Information Zone Zone Type e.g. Entry/Exit Zone Name e.g. Kitchen Door The Primary Entry Delay is Seconds The Secondary Entry Delay is Seconds The Exit Delay Is Seconds Arming the System There are various options for arming the system Away Arming [#] + [USER CODE] (Leave via Entry/Exit Zone) - Page 11 Stay Arming This allows the user to arm the perimeter zones while disabling the interior zones so that it is possible to remain on the premises. If zones are likely to be violated accidentally, they should be programmed as BUZZ zones (refer to page 19). The panel can be programmed with two different STAY PROFILES to be used as required.
- Page 12 To Stay Arm + [USER CODE] (Do not leave premises) Select the required STAY PROFILE. (To Select a Stay profile page 10.) Ensure that the READY icon is on; if not, check that all protected doors and windows are closed and that motion has ceased in the areas covered by motion detectors.
- Page 13 Arming from a Key-switch or Remote Control There are several option related to this function. Verify with your installer which of the following have been installed: Key-switch or Remote Control installed? Exit Delay with Key-switch or Remote Control? Toot on Arm/Disarm or Arm LED indicator? Arming with a key-switch or remote control: Ensure that the READY icon on the keypad is on before leaving.
-
Page 14: Disarming The System
Zone Bypassing The term BYPASS is used to describe a zone that has been deactivated for the armed cycle; i.e. violation of a bypassed zone will not cause an alarm. Is used when access is needed to a protected area while the system is armed. ... -
Page 15: Emergency Situations
If four incorrect user codes are entered consecutively while either arming or disarming the system, the keypad will be non-responsive for 30 seconds. Your monitoring company will also be notified on a keypad tamper. NOTE: If the ARMED indicator is flashing upon entry, there has been a violation. The intruder may still be inside! Call for assistance. -
Page 16: System Memory
Medical Alarm Hold down the key until the beep If the [M] key is pressed until the keypad beeps (approximately 1 second) a MEDICAL ALARM condition will be activated. The keypad's buzzer will sound rapidly for 5 seconds to indicate that a medical alarm has been initiated. -
Page 17: System Configuration
To view any tampered zones, press the [2] key once flashing zones where tampered. The memory status will be displayed for five seconds. System Configuration User Codes The IDS806 Alarm Panel has 15 programmable user codes Code 1: Master User Code Code 2 – 13: General User Codes Code 14: Maid’s Code... - Page 18 Deleting User Codes Follow steps 1-5 of the previous procedure but in step 6 only press the [*] key. That particular code will be deleted. Maid’s Code The maid’s code (user 14) may be used to limit access to the premises. The maid’s code will only disarm the system if the same code was used for arming.
- Page 19 To Cancel the Stay Zones + [ZONE NUMBER] + If an area programmed as a STAY zone will no longer be entered during STAY arm, then the zone should be removed from the stay profile. This will allow the system to protect that area during a stay arm cycle.
- Page 20 To Cancel Buzz Zones + [ZONE NUMBER] + Hold down the [4] key until the keypad buzzer sounds. The AWAY indicator will flash to show that the panel is armed in the Buzz zone programming mode. Press the [NUMBER] corresponding to the BUZZ zone you wish to cancel. The relevant zone indicator will turn off.
-
Page 21: Remote Transmitter
Remote Transmitter The IDS806 Alarm has the capability to learn remote transmitter to any of the 15 user codes that have been added to the system via an Xwave wireless receiver. The Xwave receiver and Xwave/Keeloq transmitter remotes are purchased separately. - Page 22 Press any button on the remote transmitter and keep pressing until a beep confirms the remote is learnt. Deleting a Remote Transmitter Deleting a remote transmitter from the IDS806 alarm. + [MASTER CODE] + + [SLOT NO.] + Press and hold the [*] for 3 seconds and the keypad will confirm with a beep.
-
Page 23: Date And Time
Allocating Functions to Remote Buttons Button functions can be changed from the factory default discussed before. NOTE: This will change all remotes learnt and any learnt after the change. + [MASTER CODE] + + [23] + + [Button Number] + + [Option] + Press and hold the [*] for 3 seconds and the keypad will confirm with a beep. -
Page 24: Troubleshooting
Troubleshooting Trouble Conditions In the event of a trouble condition the power indicator will flash. Trouble Condition refers to Low Battery power and/or AC Mains Failure. Check that the plug is in place and switched on. If the power indicator is still flashing once these checks have been done, contact your installer who will then check the battery power. -
Page 25: Problems When Arming The System
Problems when Arming the System Keypad beeps 3 times when entering a user code? If you enter the wrong user code, the keypad will beep three times and the system will not arm. Is the READY Indicator on? If this indicator is not on, one or more zones are violated. A flashing zone indicator shows a violation. -
Page 26: Quick Reference User Guide
Quick Reference User Guide Arm/Disarm [USER CODE] Quick Away Arm Hold down for 1 second Quick Stay Arm Hold down for 1 second Quick Stay Arm & Go Hold down for 1 second Panic Hold down for 1 second Fire Hold down for 1 second Medical Emergency... -
Page 27: Index
Fire Alarm............................15 For Service ............................2 Forced Arming ........................... 13 Glossary .............................. 5 Introduction to the IDS806 ......................... 6 Learning a Remote Transmitter to a User Code ................22 Maid’s Code ............................18 Medical Alarm ........................... 16 Notes ..............................6 Panic Alarm ............................ - Page 28 To Enter a Stay Profile ........................11 To Program Buzz Zones ........................19 To Program Stay Zones ........................18 To Program the Chime Zones ......................20 To Stay Arm ............................12 To Un-bypass a Zone ......................... 14 Trouble Conditions ..........................24 Troubleshooting ..........................
- Page 29 Owner’s Manual 700-624-01C...
- Page 30 Owner’s Manual 700-624-01C...
- Page 31 Owner’s Manual 700-624-01C...
- Page 32 For electronic swop out it is not necessary to return the enclosure. The 806 Products are a product of IDS (Inhep Digital Security) and is manufactured by Inhep Electronics Holdings (PTY) LTD Owner’s Manual 700-624-01C...
Need help?
Do you have a question about the IDS806 and is the answer not in the manual?
Questions and answers