
Related Manuals for Chicco Fit2 Cienna


Summary of Contents for Chicco Fit2 Cienna
- Page 1 ® Car Seat User Guide For future use, STORE USER GUIDE in location on bottom of base. ©2020 Artsana USA, Inc. 03/20 www.chiccousa.com IS0144E_08...
-
Page 2: Table Of Contents
TABLE OF CONTENTS If you have any problems with your Chicco Child Restraint, WITHOUT BASE INSTALLATION Registration or any questions regarding installation or use, please call: Install without Base Setup Child Guidelines Install Using LAP-SHOULDER BELT Safe Use Checklist Chicco Customer Service... -
Page 3: Registration
REGISTRATION REGISTRATION Please complete the Registration Card that came with your Child Restraint and mail it promptly. Child Restraints could be recalled for safety reasons. You must register this restraint to be reached in a recall. Send your name, address, e-mail address if available, and the restraint’s model number and manufacturing date to: Artsana USA, Inc. -
Page 4: Child Guidelines
CHILD GUIDELINES CHILD GUIDELINES WARNING! Use of this Child Restraint is ONLY for children who meet ALL ONLY use this Child Restraint if the child meets BOTH of the following of the requirements shown here. If the child is not within these requirements, Weight and Height requirements: select a different car seat (such as a convertible car seat). -
Page 5: Safe Use Checklist
SAFE USE CHECKLIST SAFE USE CHECKLIST Ensure that the Child Restraint is properly leveled when installed: YOUR CHILD’S SAFETY DEPENDS ON YOU! You MUST follow the detailed instructions in this User Guide to ensure the steps below are performed correctly! Check Child Restraint for a snug fit in your car: While holding Child Restraint near belt path used, pull side to side and forward. -
Page 6: Important Warnings
IMPORTANT WARNINGS IMPORTANT WARNINGS WARNING WARNING DEATH or SERIOUS INJURY CAN OCCUR DEATH or SERIOUS INJURY CAN OCCUR Secure Child Properly FAILURE TO FOLLOW THESE INSTRUCTIONS AND THE PRODUCT LABELS CAN RESULT IN SERIOUS INJURY OR DEATH TO YOUR CHILD. •... - Page 7 • ALWAYS install rear-facing when using this Child Restraint in a vehicle. Your child could be killed or seriously • DO NOT use Chicco KeyFit/KeyFit 30/KeyFit 35 infant carriers with the Chicco Fit 2 base. injured if you install this restraint forward-facing.
- Page 8 • Fall Hazard: The carrier can fall from the shopping cart. Do not use on shopping cart. • For proper removal and installation of the harness straps contact Chicco USA for additional instructions. • Do not use the infant carrier if it is damaged or broken.
-
Page 9: Best Practices
• Do not leave loose objects, such as books, bags, etc., in the back of the vehicle. In the event of a sharp turn, sudden stop, or crash, loose objects can be thrown around and • Contact Chicco USA by visiting our website at www.chiccousa.com or possibly cause serious injury to vehicle occupants. -
Page 10: Vehicle Seating Positions
VEHICLE SEATING POSITIONS VEHICLE SEATING POSITIONS Some vehicles have no seating positions which are compatible with this Child Restraint. If in doubt, contact the vehicle manufacturer for assistance. Only forward-facing vehicle seats can be used with this Child Restraint. Make sure no more than 4 inches (10 cm) Do not use on a folded down of the Child Restraint base is past the edge vehicle seat back. - Page 11 VEHICLE SEAT BELTS VEHICLE SEAT BELTS The following types of vehicle belts MUST NOT be used to install this Child Restraint. The information in this section only applies to installation with vehicle seat belts. If any of the belt types listed below are in the chosen seating position, choose another vehicle seating position or use LATCH if available.
-
Page 12: What Is Latch
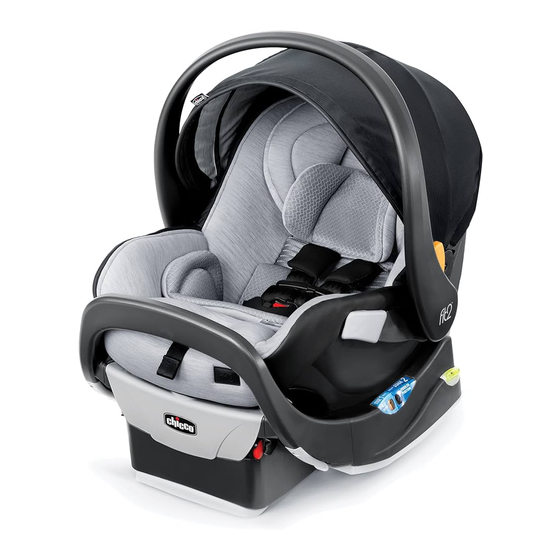
WHAT IS LATCH WHAT IS LATCH WARNING: This Child Restraint is designed to be used with lower LATCH anchors at the standard spacing (11 inches (28 cm)) ONLY! Refer to vehicle owner’s manual for information about LATCH and Child Restraint installation positions. LATCH Vehicle ower... - Page 13 CARRIER COMPONENTS CARRIER COMPONENTS Shoulder Head Rest Base Release Head Rest Belt Guide Adjustment Tab Handle Insert (when installing carrier without the base) Head Rest Canopy Head Rest Carry Cross Bar Harness Handle Canopy Straps Harness Mount Strap Handle Shoulder Release Harness Pads...
- Page 14 BASE AND LATCH COMPONENTS BASE AND LATCH COMPONENTS LATCH Base Stage Leveling Foot Pull Strap Lever Adjuster LATCH Release Lever User Guide Storage Carrier (Inside Base) PAGE INTENTIONALLY LEFT BLANK Attachment Hook Bubble Level Shoulder Belt Indicator Lock-Off LATCH Base Stage Recline Connector Indicator...
-
Page 15: Base Installation
BASE STAGE 1 BASE STAGE 1 Choose the Stage that best fits your child: Stage 1 allows for a more reclined install To install this Child Restraint in Stage 1, rotate the Base Stage Lever and riding position for a child that meets the weight and height requirement for this over into Stage 1 on the Base. - Page 16 BASE STAGE 2 BASE STAGE 2 Choose the Stage that best fits your child: Stage 2 is an upright install for a child that Infants may have difficulties breathing in a more upright seating position. ONLY meets the developmental requirement for this restraint. This allows for more leg room use base Stage 2 with children that can crawl or walk.
- Page 17 INSTALL WITH BASE SETUP INSTALL WITH BASE SETUP Infants may have difficulty breathing when in a sitting position. Make sure the seat is reclined properly so that your child’s head does not fall forward. Failure to properly recline the Child Restraint could increase the child’s risk of serious injury or death.
- Page 18 INSTALL USING LATCH INSTALL USING LATCH Store LATCH Connectors properly in the compartments when not using for installation - See page 77. When installing with LATCH in vehicle equipped with inflatable seat belts, the unused seat belt should not be buckled behind the Child Restraint System as this will engage the inflatable portion of the belt.
- Page 19 INSTALL USING LATCH INSTALL USING LATCH Locate the LATCH anchor bars in your vehicle. Attach both LATCH Connectors to the vehicle LATCH anchor bars. Tighten LATCH straps by pulling up on LATCH Pull Strap while pressing Base firmly into vehicle seat.
-
Page 20: Install Using Latch
INSTALL USING LATCH INSTALL USING LATCH Roll LATCH Release Strap and store in Release Strap Storage Compartment. CHECK YOUR WORK Hold Base at each side and pull side to side and forward. Base should not move more than 1” (25 mm) from vehicle seat back or side-to-side. ... - Page 21 INSTALL USING LAP-SHOULDER BELT INSTALL USING LAP-SHOULDER BELT Thread vehicle seat belt up through the belt path on the side of the Base. Pull vehicle seat belt down through the vehicle seat belt path on opposite side of the Base. Buckle the vehicle seat belt. CLICK! Belt Path...
- Page 22 INSTALL USING LAP-SHOULDER BELT INSTALL USING LAP-SHOULDER BELT While pushing down on the Base, pull up on the vehicle shoulder belt to remove all slack from the vehicle lap belt.
- Page 23 INSTALL USING LAP-SHOULDER BELT INSTALL USING LAP-SHOULDER BELT While holding the shoulder belt tight, slide the shoulder belt strap firmly into Shoulder Belt Lock-Off. Always use the Lock-Off on the opposite side of where the vehicle seat belt is buckled. Do NOT pull on shoulder belt after it is positioned in Lock-Off.
-
Page 24: Install Using Lap Belt Only
INSTALL USING LAP BELT ONLY INSTALL USING LAP BELT ONLY Thread vehicle seat belt up through the belt path on the side of the Base. Pull vehicle seat belt down through the vehicle seat belt path on opposite side of the Base. Buckle the vehicle seat belt. CLICK! Belt Path... - Page 25 INSTALL USING LAP BELT ONLY INSTALL USING LAP BELT ONLY While pushing down on the Base, pull up on the loose end of the vehicle lap belt to remove all slack. CHECK YOUR WORK Hold Base at each side and pull side to side and forward. Base should not ...
-
Page 26: Install Carrier To Base
INSTALL CARRIER TO BASE INSTALL CARRIER TO BASE IMPORTANT: Before installing Child Restraint refer to page 26-29 to determine the best Base Stage for your child. Insert the Carrier into the Base. Push down on the Carrier to make sure it locks onto the Carrier Attachment Hooks on the Base. - Page 27 INSTALL CARRIER TO BASE INSTALL CARRIER TO BASE Check to make sure the Carrier is securely attached to the Base. ALWAYS lift up on Carrier to verify it is properly attached to the Base. CHECK YOUR WORK Hold Base at each side and pull side to side and forward. Child Restraint ...
-
Page 28: Install Without Base Setup
INSTALL WITHOUT BASE SETUP INSTALL WITHOUT BASE SETUP Infants may have difficulty breathing when in a sitting position. Make sure the seat is reclined properly so that your child’s head does not fall forward. Failure to properly recline the Child Restraint could increase the child’s risk of serious injury or death. NEVER install Child Restraint without Base using a non-locking vehicle belt. -
Page 29: Install Using Lap-Shoulder Belt
INSTALL USING LAP-SHOULDER BELT INSTALL USING LAP-SHOULDER BELT Thread vehicle seat belt up and slide into the Seat Belt Guide on the side of the Child Restraint. Pull vehicle seat belt down and slide into the Seat Belt Guide on opposite side of the Child Restraint. - Page 30 INSTALL USING LAP-SHOULDER BELT INSTALL USING LAP-SHOULDER BELT Put the vehicle seat belt in the locked mode, see vehicle owner's manual for more information. A tightly rolled towel may be used under the front edge of the Carrier if needed to adjust the angle of the Carrier. Angle is correct when level line on Carrier is level with ground.
-
Page 31: Install Using Shoulder Belt Guide
INSTALL USING SHOULDER BELT GUIDE INSTALL USING SHOULDER BELT GUIDE An optional Shoulder Belt Guide is on the back of the Child Restraint. The Guide offers additional stability when installing your Child Restraint without the Base using the Lap/Shoulder Belt. Make sure your vehicle seat belts have enough length to allow you to properly install the Child Restraint using the Shoulder Belt Guide. - Page 32 INSTALL USING SHOULDER BELT GUIDE INSTALL USING SHOULDER BELT GUIDE While pushing down on the Child Restraint, pull up on the vehicle shoulder belt to remove all slack from the vehicle lap and shoulder belt. CHECK YOUR WORK Hold Child Restraint at each side and pull side to side and forward. ...
-
Page 33: Install Using Lap Belt Only
INSTALL USING LAP BELT ONLY INSTALL USING LAP BELT ONLY Thread vehicle seat belt up and slide into the Seat Belt Guide on the side of the Child Restraint. Pull vehicle seat belt down and slide into the Seat Belt Guide on opposite side of the Child Restraint. - Page 34 INSTALL USING LAP BELT ONLY INSTALL USING LAP BELT ONLY Put the vehicle seat belt in the locked mode, see vehicle owner's manual for more information. A tightly rolled towel may be used under the front edge of the Carrier if needed to adjust the angle of the Carrier. Angle is correct when level line on Carrier is level with ground.
-
Page 35: Securing Child With Harness
SECURING CHILD WITH HARNESS SECURING CHILD WITH HARNESS For a better fit in the Carrier with smaller infants, the provided Newborn Positioner may be needed. See page 78 for more details. Loosen harness by pressing the Adjuster Button and pulling out on both Harness Straps. - Page 36 SECURING CHILD WITH HARNESS SECURING CHILD WITH HARNESS Pull up on the Head Rest Adjustment Tab and adjust the Head Rest up or down until the harness slots are AT or JUST BELOW top of child's shoulders. Pull up and push down on the Head Rest to make sure the Head Rest locks into position before tightening Harness.
- Page 37 SECURING CHILD WITH HARNESS SECURING CHILD WITH HARNESS Insert each Buckle Tongue into Harness Buckle; listen for a click (6a). Pull up firmly on both Buckle Tongues to make sure that they are securely latched (6b). Fasten Chest Clip by snapping both sides together. CLICK! Harness Straps must be laying flat, free of twists and on top of child's shoulders.
- Page 38 SECURING CHILD WITH HARNESS SECURING CHILD WITH HARNESS Pull excess strap up through buckle tongues so that harness is snug around child's thighs. Tighten the harness by pulling slowly on Harness Adjuster Strap while pulling up on both shoulder straps to remove all slack from below (8a). Make sure the Harness Straps are snug on child.
- Page 39 SECURING CHILD CHECKLIST SECURING CHILD CHECKLIST Check the position of Chest Clip: Chest Clip should be centered on the child’s chest, level Harness Straps must be snug. If you can pinch a fold in the strap at the shoulders, the with the armpits.
-
Page 40: Base Release Handle
BASE RELEASE HANDLE LATCH STORAGE RELEASE CARRIER FROM BASE: Store LATCH Connectors properly in the compartments when not using for installation. To unhook the Carrier from the Base, squeeze the Base Release Handle on the back of the Carrier then lift up on the Carry Handle. Store both LATCH Connector in compartments on either side of the Base when not in use. -
Page 41: Newborn Positioner
To ensure a better fit for smaller infants, the Newborn Positioner may be needed. Do NOT use any other newborn positioner or pillows. Only use the one provided by Chicco for this Child Restraint. Place the Newborn Positioner in the Carrier seat. Then pull the Buckle through slot in the bottom of Newborn Positioner. -
Page 42: Head Rest Insert
HEAD REST INSERT HANDLE POSITIONS To provide head support for smaller infants, the Head Rest Insert may be used. To Adjust Handle, press the Handle Release Button on one side and rotate the handle. The Head Rest Insert can be used with or without the Newborn Positioner. There are 3 positions: To Install Head Rest Insert, hold the Insert in place. -
Page 43: Adjusting Crotch Strap
Restraint. Pull on Crotch Strap to make sure it is secure. Position 1 Position 2 DO NOT USE Child Restraint if any part of the harness is damaged. For proper removal and installation of the harness straps visit the Chicco website at www.chiccousa.com or call 1-877-424-4226. -
Page 44: Canopy
INSTALLATION ON AN AIRCRAFT ADJUSTING CANOPY: When traveling by airplane with your child, Chicco recommends taking the Carrier The Canopy can be adjusted by rotating the canopy forwards or backwards. on the airplane with you so that you can use it with your child. Not only will it protect your child during take-off, landing, and turbulence, but also allow your child to be more comfortable. -
Page 45: Cleaning And Maintenance
DO NOT USE Child Restraint if any part of the harness is damaged. For LATCH hardware. It may cause them to malfunction. proper removal and installation of the harness straps visit the Chicco website at www.chiccousa.com or call 1-877-424-4226. • Fabrics may be spot-cleaned, hand or machine washed: Hand wash using mild soap and water, or machine washed in cold •... - Page 46 PMS 2747 and PMS 186...
Need help?
Do you have a question about the Fit2 Cienna and is the answer not in the manual?
Questions and answers