Samsung CLX-2160 User Manual
Clx-216x series color laser mfp
Hide thumbs
Also See for CLX-2160:
- Manual del usuario (118 pages) ,
- Brochure & specs (8 pages) ,
- Service manual (7 pages)
Table of Contents
Advertisement
Quick Links
Download this manual
See also:
Service Manual
Advertisement
Chapters
Table of Contents
Troubleshooting

Related Manuals for Samsung CLX-2160


Summary of Contents for Samsung CLX-2160
- Page 2 © 2007 Samsung Electronics Co., Ltd. All rights reserved. This user’s guide is provided for information purposes only. All information included herein is subject to change without notice. Samsung Electronics is not responsible for any direct or indirect damages, arising from or related to use of this user’s guide.
-
Page 3: Contact Samsung Worldwide
SAMSUNG worldwide If you have any comments or questions regarding Samsung products, contact the Samsung customer care center. COUNTRY CUSTOMER CARE CENTER ARGENTINE 0800-333-3733 AUSTRALIA 1300 362 603 AUSTRIA 0800-SAMSUNG (726-7864) BELGIUM 0032 (0)2 201 24 18 BRAZIL 0800-124-421... - Page 4 8-10-800-500-55-500 TAIWAN 0800-329-999 THAILAND 1800-29-3232 02-689-3232 TRINIDAD & 1-800-SAMSUNG (726-7864) TOBAGO TURKEY 444 77 11 U.A.E 800-SAMSUNG (726-7864) 8000-4726 0845 SAMSUNG (726-7864) U.S.A. 1-800-SAMSUNG (726-7864) UKRAINE 8-800-502-0000 UZBEKISTAN 8-10-800-500-55-500 VENEZUELA 0-800-100-5303 VIETNAM 1 800 588 889 WEB SITE www.samsung.com/ch www.samsung.com www.samsung.com/th...
-
Page 5: Table Of Contents
ONTENTS 1. Introduction Special features ... 1.1 Machine overview ... 1.2 Front view ... 1.2 Rear view ... 1.2 Control panel overview ... 1.3 Understanding the Status LED ... 1.4 Status LED ... 1.4 Status LED with the toner cartridge messages ... 1.4 Finding more information ... - Page 6 5. Selecting and loading print media Loading originals ... 5.1 Selecting print media ... 5.1 Supported print media types and sizes ... 5.2 Media sizes supported in each mode ... 5.3 Guidelines for selecting and storing print media ... 5.3 Guidelines for special print media ...
- Page 7 10. Maintenance Printing reports ... 10.1 Printing a report ... 10.1 Clearing memory ... 10.1 Cleaning your machine ... 10.2 Cleaning the outside ... 10.2 Cleaning the inside ... 10.2 Cleaning the scan unit ... 10.3 Maintaining the toner cartridge ... 10.4 Toner cartridge storage ...
- Page 8 Safety and Regulatory Information Important Precautions and Safety Information When using this machine, these basic safety precautions should always be followed to reduce risk of fire, electric shock, and injury to people: Read and understand all instructions. Use common sense whenever operating electrical appliances. Follow all warnings and instructions marked on the machine and in the literature accompanying the machine.
-
Page 9: Ozone Safety
March 9, 1999: Council Directive 1999/5/EC on radio equipment and telecommunications terminal equipment and the mutual recognition of their conformity. A full declaration, defining the relevant Directives and referenced standards can be obtained from your Samsung Electronics Co., Ltd. representative. -
Page 10: Replacing The Fitted Plug (For Uk Only)
Replacing the Fitted Plug (for UK Only) Important The mains lead for this machine is fitted with a standard (BS 1363) 13 amp plug and has a 13 amp fuse. When you change or examine the fuse, you must re-fit the correct 13 amp fuse. You then need to replace the fuse cover. If you have lost the fuse cover, do not use the plug until you have another fuse cover. -
Page 12: Introduction
Introduction Thank you for purchasing this Samsung multifunctional product. Your machine provides printing, copying, scanning functions. This chapter includes: • Special features • Machine overview • Finding more information • Selecting a location • Printing a demo page • Altitude adjustment Special features Your new machine is equipped with special features. -
Page 13: Machine Overview
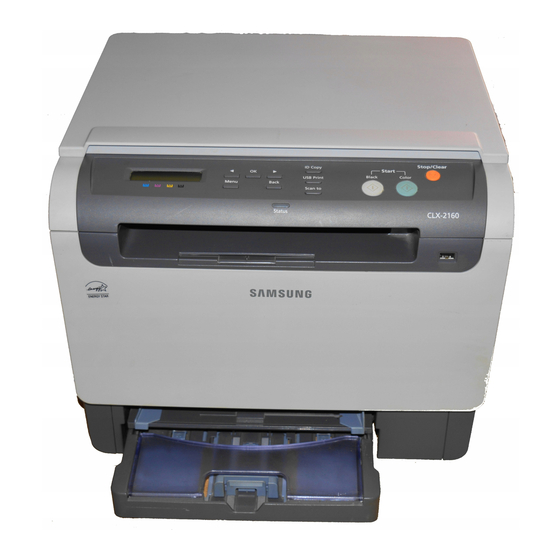
Machine overview These are the main components of your machine: Front view * The figure above shows an CLX-2160N with all available accessories. scanner lid scanner glass USB memory port front cover handle control panel output support Note The surface of the output tray may become hot if you print a large number of pages at once. -
Page 14: Control Panel Overview
Display: Shows the current status and prompts during an operation. Toner colors: The toner colors shown below the LCD display co- works with display messages. See Status LED with the toner cartridge messages on page 1.4. Status: Shows the status of your machine. See page 1.4. Menu: Enters Menu mode and scrolls through the available menus. -
Page 15: Understanding The Status Led
Understanding the Status LED The Status LED on the control panel shows the status of your machine. See the table below to know your machine’s status. Status LED Status Description • The machine is off-line. • The machine is in Power Save mode. When data is received, or Black Start or Color Start button was pressed, it switches to on-line automatically. -
Page 16: Finding More Information
If you have Internet access, you can get help, Website support, printer drivers, manuals, and order information from the Samsung website, www.samsungprinter.com. Selecting a location Select a level, stable place with adequate space for air circulation. Allow extra space for opening covers and trays. -
Page 17: Printing A Demo Page
Printing a demo page Print a demo page to make sure that the machine is operating correctly. To print a demo page: In ready mode, press and hold the OK button for about 2 seconds. Altitude adjustment The print quality is affected by atmospheric pressure, which is determined by the height of the machine above sea level. -
Page 18: System Setup
System setup This chapter gives you an overview of menus available on your machine and step-by-step instructions for setting up the machine’s systems. This chapter includes: • Menu overview • Changing the display language • Using the power save mode •... -
Page 19: Changing The Display Language
Changing the display language To change the language that appears on the control panel, follow these steps: Press Menu until Copy Menu appears on the bottom line of the display and press OK. Press the Scroll buttons until System Setup appears and press OK. Press the Scroll buttons until Machine Setup appears and press OK. -
Page 20: Software Overview
Software overview This chapter gives you an overview of the software that comes with your machine. Further details about installing and using the software are explained in the Software Section. This chapter includes: • Supplied software • Printer driver features •... -
Page 21: System Requirements
System requirements Before you begin, ensure that your system meets the following requirements: Windows Item Requirements Operating Windows 98/Me/2000/XP/2003/Vista system Pentium II Windows 98/Me/2000 400 MHz or higher Windows XP/2003/ Pentium III Vista 933 MHz or higher Windows 98/Me/2000 64 MB or more Windows XP/2003 128 MB or more Windows Vista... -
Page 22: Network Setup (Clx-2160N Only)
Network setup (CLX-2160N only) This chapter gives you step-by-step instructions for setting up your machine for network connections. This chapter includes: • Introduction • Supported operating systems • Configuring TCP/IP • Setting ethernet speed • Restoring the network configuration • Printing a network configuration page Introduction Once you have connected your machine to a network with an RJ-45... -
Page 23: Dynamic Addressing (Bootp/Dhcp)
Set the first byte between 0 and 255 using the Scroll buttons and press OK to move to the next byte. Repeat this to complete the address from the 1st byte to the 4th byte. When you have finished, press OK. Repeat steps 5 and 6 to configure the other TCP/IP parameters: subnet mask and gateway address. -
Page 24: Selecting And Loading Print Media
• Some print media may meet all of the guidelines in this section and still not produce satisfactory results. This may be the result of improper handling, unacceptable temperature and humidity levels, or other variables over which Samsung has no control. • Before purchasing large quantities of print media, ensure that it meets the requirements specified in this user’s guide. -
Page 25: Supported Print Media Types And Sizes
Supported print media types and sizes Type Size Letter Legal Folio Oficio Plain paper JIS B5 Executive ISO B5 ISO/Envelope B5 Envelope Monarch Envelope COM-10 Envelope No.9 Envelope Envelope DL Envelope C5 Envelope C6 Envelope size 6 3/4 Transparency Letter, A4 Letter, Legal, Folio, Labels Oficio, A4, JIS B5,... -
Page 26: Media Sizes Supported In Each Mode
Media sizes supported in each mode Mode Size Letter, A4, Legal, Oficio, Folio, Copy mode Executive, JIS B5, A5, A6 All sizes supported by the Print mode machine Guidelines for selecting and storing print media When selecting or loading paper, envelopes, or other print materials, keep these guidelines in mind: •... - Page 27 Media type Guidelines • To avoid damaging the machine, use only transparencies designed for use in laser printers. • Transparencies used in the printer must be able to withstand the machine’s fusing temperature. Check your machine’s specification to view the fusing temperature, see page 13.1.
-
Page 28: Loading Paper
Loading paper In the tray Load the print media you use for the majority of your print jobs in the tray. The tray can hold a maximum of 150 sheets of 75 g/m plain paper. Loading paper in the tray Pull the tray out of the machine. - Page 29 Close the paper cover. Slide the tray back into the machine. You can load letterhead with the design side face up. The top edge of the sheet with the logo should be go into the machine first. After loading paper, set the paper type and size for the tray. See page 5.8 for copying and faxing or the Software Section for PC- printing.
-
Page 30: In The Manual Feeder
For paper smaller than Letter-sized, return the paper guides to their original positions and adjust the paper length guide and paper width guide. Note • Do not push the paper width guides far enough to cause the material to warp. •... -
Page 31: Setting The Paper Size And Type
Squeeze the manual feeder paper width guides and adjust them to the width of the paper. Do not force too much, or the paper will be bent, which will result in a paper jam or skew. After loading paper, set the paper type and size for the manual feeder. See page 5.8 for copying the Software Section for PC-printing. -
Page 32: Copying
Copying This chapter gives you step-by-step instructions for copying documents. This chapter includes: • Selecting the paper tray • Copying • Changing the settings for each copy • Changing the default copy settings • Using special copy features Selecting the paper tray After loading the print media for copy output, you must select the paper tray you will use for copy jobs. -
Page 33: Original Type
•Normal: works well with standard typed or printed documents. •Dark: works well with light print or faint pencil markings. Press OK to save the selection. Original type The original type setting is used to improve the copy quality by selecting the document type for the current copy job. -
Page 34: Id Card Copying
ID card copying Your machine can print 2-sided originals on one sheet of A4-, Letter-, Legal-, Folio-, Oficio-, Executive-, B5-, A5-, or A6-sized paper. When you copy using this feature, the machine prints one side of the original on the upper half of the paper and the other side on the lower half without reducing the size of the original. -
Page 35: Poster Copying
Poster copying Your machine can print an image onto 9 sheets of paper (3x3). You can paste the printed pages together to make one poster-sized document. This copy feature is available only when you place originals on the scanner glass. Place the document to be copied on the scanner glass, and close the scanner lid. -
Page 36: Erasing Background Images
Erasing background images You can set the machine to print an image without its background. This copy feature removes the background color and can be helpful when copying an original containing color in the background, such as a newspaper or a catalog. This copy feature is only for mono copying. Place the document to be copied on the scanner glass, and close the scanner lid. -
Page 37: Basic Printing
For Windows XP/2003, select Printers and Faxes. For Windows Vista, select Control Panel > Hardware and Sound > Printers. Double-click the Samsung CLX-216x Series icon. From the Document menu, select Cancel Printing (Windows 98/ Me) or Cancel (Windows 2000/XP/2003/Vista). Note You can also access this window by simply double-clicking the printer icon at the bottom right corner of the Windows desktop. -
Page 38: Scanning
Scanning Scanning with your machine lets you turn pictures and text into digital files that can be stored on your computer. Then you can email the files, upload them to your website, or use them to create projects that you can print. -
Page 39: Scanning Using A Network Connection (Clx-2160N Only)
Press the Scroll buttons until Network Scan appears on the bottom line of the display and press OK. Select the Scroll buttons until the ID you have set in the Samsung Network Scan Manager window and press OK. Samsung Network Enter the PIN you have set in the Samsung Network Scan Manager window and press OK. -
Page 40: Setting Network Scan Timeout
Setting network scan timeout If the Network Scan program on your computer does not send a refresh request and does not scan a job within a specified timeout period, your machine cancels the scan job. You can change this timeout setting as needed. -
Page 41: Using Usb Flash Memory
Using USB flash memory This chapter explains how to use a USB memory device with your machine. This chapter includes: • About USB memory • Plugging in a USB memory device • Scanning to a USB memory device • Printing from a USB memory device •... -
Page 42: Scanning To A Usb Memory Device
Scanning to a USB memory device You can scan a document and save the scanned image onto a USB memory device. There are two ways of doing this: you can scan to the device using the default settings, or you can customize your own scan settings. -
Page 43: Printing From A Usb Memory Device
Printing from a USB memory device You can directly print files stored on a USB memory device. You can print TIFF, BMP, JPEG. Direct Print option supported file types: • BMP: BMP Uncompressed • TIFF: TIFF 6.0 Baseline • JPEG: JPEG Baseline To print a document from a USB memory device: Insert a USB memory device into the USB memory port on your machine. -
Page 44: Viewing The Usb Memory Status
Viewing the USB memory status You can check the amount of memory space available for scanning and saving documents. Insert the USB memory device into the USB memory port on your machine. Press Scan to. Press OK when Scan to USB appears on the bottom line of the display. -
Page 45: Maintenance
Maintenance This chapter provides information for maintaining your machine and the toner cartridge. This chapter includes: • Printing reports • Clearing memory • Cleaning your machine • Maintaining the toner cartridge • Redistributing toner • Replacing the toner cartridge • Replacing the imaging unit •... -
Page 46: Cleaning Your Machine
Cleaning your machine To maintain print and scan quality, follow the cleaning procedures below each time the toner cartridge is replaced or if print and scan quality problems occur. Caution • Cleaning the cabinet of the machine with cleaning materials containing large amounts of alcohol, solvent, or other strong substances can discolor or distort the cabinet. -
Page 47: Cleaning The Scan Unit
Pull the imaging unit about half and push it until it sounds ‘click’. Repeat this action two or three times. Push the imaging unit until it sounds ‘click’ in to the machine. Close the front cover firmly. Caution If the front cover is not completely closed, the machine will not operate. -
Page 48: Maintaining The Toner Cartridge
Maintaining the toner cartridge Toner cartridge storage To get the most from the toner cartridge, keep the following guidelines in mind: • Do not remove the toner cartridge from its package until ready for use. • Do not refill the toner cartridge. The machine warranty does not cover damage caused by using a refilled cartridge. -
Page 49: Replacing The Toner Cartridge
Replacing the toner cartridge The machine uses four colors and has a different toner cartridge for each one: yellow (Y), magenta (M), cyan (C), and black (K). When the toner cartridge is completely empty: • The Status LED and the toner-related message on the display indicate when each individual toner cartridge should be replaced. -
Page 50: Replacing The Imaging Unit
Replacing the imaging unit The life of the imaging unit is approximately 20,000 pages for black or 50,000 image printing whichever comes first. When the life span of the imaging unit has expired, Replace Imaging Unit appears on the display of the control panel, indicating the imaging unit needs to be replaced. - Page 51 Holding the handles on the new imaging unit, push the imaging unit until it sounds ‘click’ into the machine. Remove four dummy caps which are on the toner cartridge entrances of the imaging unit. When you remove the dummy cap from the cartridge, lift the handle up and pull it out.
-
Page 52: Replacing The Waste Toner Container
Replacing the waste toner container The life of the waste toner container unit is approximately 1,250 pages for full color 5% image printing or 5,000 images for black printing. When the life span of the waste toner container has expired, Replace/Install Waste Toner Tank appears on the display of the control panel, indicating the waste toner container needs to be replaced. -
Page 53: Maintenance Parts
Enter key or click Go. Your machine’s embedded website opens. When you call for service or register as a user on the Samsung website, the machine’s serial number may be required. You can check the serial number by taking the following steps: Press Menu until Copy Menu appears on the bottom line of the display and press OK. -
Page 54: Troubleshooting
Troubleshooting This chapter gives helpful information for what to do if you encounter an error. This chapter includes: • Tips for avoiding paper jams • Clearing paper jams • Understanding display messages • Solving other problems Tips for avoiding paper jams By selecting the correct media types, most paper jams can be avoided. -
Page 55: In The Manual Feeder
In the manual feeder Pull the tray out. Push the manual feeder tab down. Pull the jammed paper out of the manual feeder. Insert the tray into the machine until it snaps into place. Open and close the front cover. Printing automatically resumes. In the paper exit area Open and close the front cover. -
Page 56: Understanding Display Messages
Lowering down the scan unit gently and slowly until it is completely closed. The inner cover will be closed automatically by the scan unit closed. Be careful not to pinch your fingers! If there is any resistance and the paper does not move when you pull or if you cannot see the paper under the scan unit, continue to the next step. - Page 57 Open Heat Error cartridge. Cycle Power Install Imaging Unit Out-Bin Full into your machine. Over Heat Error Install the a Cycle Power Samsung-genuine color toner cartridge designed for your machine. Paper Jam 0 Open/Close Door Install the a Scan Unit Open Samsung-genuine...
-
Page 58: Solving Other Problems
Message Meaning Replace The life of the part [zzz] expires totally. * zzz indicates the part of the machine. Replace The life of the part [zzz] Soon expires soon. * xxx indicates the part of the machine. Replace/Install The life span of the Waste Toner Tank waste toner tank has expired and the... -
Page 59: Printing Problems
Check the does not power switch and the power print. source. The machine is not Select Samsung CLX-216x selected as the Series as your default default printer. printer in your Windows. Check the machine for the following: • The front cover is not closed. Close the cover. -
Page 60: Printing Quality Problems
Condition Possible cause Suggested solutions The printer cable is Disconnect the printer cable machine loose or defective. and reconnect. Try a print job prints, but that you have already printed the text is successfully. If possible, wrong, attach the cable and the garbled, or machine to another incomplete. - Page 61 Condition Suggested solutions White Spots White spots appears on the page: • The paper is too rough and a lot of dirt from a paper falls to the inner devices within the machine, so the transfer roller may be dirty. Clean the inside of your machine.
- Page 62 Condition Suggested solutions Curl or wave • Ensure that the paper is loaded properly. • Check the paper type and quality. Both high temperature and humidity can cause paper curl. See page 5.1. • Turn over the stack of paper in the tray. Also try rotating the paper 180°...
-
Page 63: Copying Problems
Copying problems Condition Suggested solutions Copies are too light Use Darkness to darken or lighten the or too dark. background of the copies. Smears, lines, • If defects are on the original, use Darkness marks, or spots to lighten the background of your copies. appears on copies. -
Page 64: Network Scan Problems (Clx-2160N Only)
To view the Help file, you need to have Internet the Help file. Explorer 4 service pack 2 or above. I cannot use the Check your operating system. Supporting Samsung operating systems are Windows 98/Me/2000/XP/ Network Scan 2003/vista. Manager. Common Windows problems... -
Page 65: Common Linux Problems
Common Linux problems Problem Possible cause and solutions The machine does • Check if the printer driver is installed in not print. your system. Open Unified Driver configurator and switch to the Printers tab in Printers configuration window to look at the list of available printers. Make sure that your machine is displayed on the list. - Page 66 Problem Possible cause and solutions The machine does • Check if your machine is attached to your not appear on the computer. Make sure that it is connected scanners list. properly via the USB port and is turned • Check if the scanner driver for your machine is installed in your system.
- Page 67 Problem Possible cause and solutions Please avoid changing the print job I encounter error parameters (via LPR GUI, for example) “Cannot open port while a print job is in progress. Known device file” when versions of CUPS server break the print job printing a document.
-
Page 68: Ordering Supplies
Otherwise, the print cartridge or supplies will be incompatible with your machine since the configuration of the print cartridge or supplies vary depending on the contries. To order Samsung-authorized supplies, contact your local Samsung dealer or the retailer where you purchased your machine, or visit www.samsungprinter.com on calling for technical support. -
Page 69: Specifications
From ready: Less than 26 seconds Color From coldboot: Less than 57 seconds Up to 2,400 x 600 dpi effective output SPL-C (Samsung Printer Language Color) Windows 98/Me/2000/XP/2003/Vista Various Linux OS (USB only) Macintosh 10.3 ~ 10.5 High Speed USB 2.0... -
Page 70: Scanner And Copier Specifications
Scanner and copier specifications Item Description Compatibility TWAIN standard / WIA standard Scanning method Color CIS Optical: Up to 600 x 1200 dpi (mono and color) Resolution Enhanced: 4,800 x 4,800 dpi Effective Max. 289 mm (11.4 inches) scanning length Effective Max. -
Page 71: Index
NDEX Numerics 2/4-up, special copy 6.3 Back 1.3 background image, erase 6.5 Black Start 1.3 cleaning inside 10.2 outside 10.2 scan unit 10.3 clone, special copy 6.4 contrast, copy 6.1 copying 2/4-up 6.3 darkness 6.1 default setting, change 6.2 erasing background 6.5 ID card copy 6.3 original type 6.2 poster 6.4... - Page 72 scanning default setting, change 8.3 scan settings 8.3 to application 8.1 to network computer 8.2 USB flash memory 9.2 special copy features 6.3 special print media, guidelines 5.3 specifications general 13.1 printer 13.1 scanner and copier 13.2 Status 1.3 Status LED 1.4 Stop/Clear 1.3 supplies checking life 10.9...
-
Page 73: Software Section
Samsung Printer Software section... - Page 74 OFTWARE SECTION ONTENTS NSTALLING Chapter 1: Installing Printer Software ... 4 Installing Software for Local Printing ... 4 Installing Software for Network Printing ... 7 Reinstalling Printer Software ... 10 Removing Printer Software ... 11 ASIC Chapter 2: Printing a Document ... 12 Printing to a file (PRN) ...
- Page 75 Using Onscreen Help File ... 25 Changing the Smart Panel Program Settings ... 25 CANNING Chapter 6: Scanning Using Samsung SmarThru ... 26 Uninstalling Samsung SmarThru ... 26 Using Samsung SmarThru ... 27 Using Onscreen Help File ... 28 Scanning Process with TWAIN-enabled Software ... 28 Scanning Using the WIA Driver ...
- Page 76 SING RINTER IN Chapter 7: Getting Started ... 30 Installing the Unified Linux Driver ... 30 Installing the Unified Linux Driver ... 30 Uninstalling the Unified Linux Driver ... 31 Using the Unified Driver Configurator ... 32 Opening the Unified Driver Configurator ... 32 Printers Configuration ...
-
Page 77: Installing Printer Software In Windows
Installing Printer Software in Windows This chapter includes: • Installing Printer Software • Reinstalling Printer Software • Removing Printer Software Installing Printer Software You can install the printer software for local printing or network printing. To install the printer software on the computer, perform the appropriate installation procedure depending on the printer in use. -
Page 78: Custom Installation
If the test page prints out correctly, click Yes. If not, click No to reprint it. To register yourself as a user of Samsung Printers in order to receive information from Samsung, select the checkbox and click Finish. You are now sent to the Samsung web site. - Page 79 Click Next. • If necessary, select a language from the drop-down list. • View User’s Guide: Allows you to view the User’s Guide. If your computer doesn’t have Adobe Acrobat, click on this option and it will automatically install Adobe Acrobat Reader for you.
-
Page 80: Typical Installation
To register yourself as a user of Samsung Printers in order to receive information from Samsung, select the checkbox and click Finish. You are now sent to the Samsung web site. Otherwise, just click Finish. Installing Software for Network Printing When you connect your printer to a network, you must first configure the TCP/IP settings for the printer. - Page 81 After the installation is finished, a window appears asking you to print a test page and to register yourself as a user of Samsung Printers in order to receive information from Samsung. If you so desire, select the corresponding checkbox(es) and click Finish.
- Page 82 After the installation is finished, a window appears asking you to print a test page and to register yourself as a user of Samsung Printers in order to receive information from Samsung. If you so desire, select the corresponding checkbox(es) and click Finish.
-
Page 83: Reinstalling Printer Software
Otherwise, just click Finish. : After setup is complete, if your printer driver doesn’t work properly, reinstall the printer driver. See “Reinstalling Printer Software” on page 10. Reinstalling Printer Software You can reinstall the software if installation fails. Start Windows. From the Start menu select Programs or All Programs →... -
Page 84: Removing Printer Software
Removing Printer Software Start Windows. From the Start menu select Programs or All Programs → your printer driver name → Maintenance. Select Remove and click Next. You will see a component list so that you can remove any item individually. Select the components you want to remove and then click Next. -
Page 85: Basic Printing
Basic Printing This chapter explains the printing options and common printing tasks in Windows. This chapter includes: • Printing a Document • Printing to a file (PRN) • Printer Settings - Layout Tab - Paper Tab - Graphics Tab - Extras Tab - About Tab - Printer Tab - Using a Favorite Setting... -
Page 86: Printer Settings
Printer Settings You can use the printer properties window, which allows you to access all of the printer options you need when using your printer. When the printer properties are displayed, you can review and change the settings needed for your print job. Your printer properties window may differ, depending on your operating system. -
Page 87: Paper Tab
Paper Tab Use the following options to set the basic paper handling specifications when you access the printer properties. See “Printing a Document” on page 12 for more information on accessing printer properties. Click the Paper tab to access various paper properties. Copies Copies allows you to choose the number of copies to be printed. -
Page 88: Graphics Tab
Graphics Tab Use the following Graphic options to adjust the print quality for your specific printing needs. See “Printing a Document” on page 12 for more information on accessing printer properties. Click the Graphic tab to display the properties shown below.. Quality The Resolution options you can select may vary depending on your printer model. -
Page 89: Extras Tab
Extras Tab You can select output options for your document. See “Printing a Document” on page 12 for more information about accessing the printer properties. Click the Extras tab to access the following feature: Watermark You can create a background text image to be printed on each page of your document. -
Page 90: Using A Favorite Setting
Using a Favorite Setting The Favorites option, which is visible on each properties tab, allows you to save the current properties settings for future use. To save a Favorites item: Change the settings as needed on each tab. Enter a name for the item in the Favorites input box. Click Save. -
Page 91: Advanced Printing
Advanced Printing This chapter explains printing options and advanced printing tasks. • Your printer driver Properties window that appears in this User’s Guide may differ depending on the printer in use. However the composition of the printer properties window is similar. -
Page 92: Printing Posters
Printing Posters This feature allows you to print a single-page document onto 4, 9, or 16 sheets of paper, for the purpose of pasting the sheets together to form one poster-size document. To change the print settings from your software application, access printer properties. -
Page 93: Printing On Both Sides Of Paper
Printing on Both Sides of Paper You can print on both sides of a sheet of paper. Before printing, decide how you want your document oriented. The options are: • None • , which is the conventional layout used in Long Edge book binding. -
Page 94: Using Watermarks
Using Watermarks The Watermark option allows you to print text over an existing document. For example, you may want to have large gray letters reading “DRAFT” or “CONFIDENTIAL” printed diagonally across the first page or all pages of a document. There are several predefined watermarks that come with the printer, and they can be modified, or you can add new ones to the list. -
Page 95: Using Overlays
Using Overlays What is an Overlay? An overlay is text and/or images stored in the computer hard disk drive (HDD) as a special file format that can be printed on Dear ABC any document. Overlays are often used to take the place of preprinted forms and letterhead paper. -
Page 96: Sharing The Printer Locally
Sharing the Printer Locally You can connect the printer directly to a selected computer, which is called “host computer,” on the network. The following procedure is for Windows XP. For other Windows OS, refer to the corresponding Windows User's Guide or online help. -
Page 97: Using Smart Panel
Programs or All Programs → your printer driver name → Smart Panel. OTES • If you have already installed more than one Samsung printer, first select the printer model you want in order to use the corresponding Smart Panel. Right-click (in Windows or Linux) or click (in Mac OS X) the Smart Panel icon and select your printer name. -
Page 98: Opening The Troubleshooting Guide
Opening the Troubleshooting Guide Using the troubleshooting guide, you can view solutions for error status problems. Right-click (in Windows or Linux) or click (in Mac OS X) the Smart Panel icon and select Troubleshooting Guide. Using Printer Settings Utility Using the Printer Settings Utility, you can configure and check print settings. -
Page 99: Scanning
Then you can fax or e-mail the files, display them on your web site or use them to create projects that you can print using Samsung SmarThru software or the WIA driver. This chapter includes: •... -
Page 100: Using Samsung Smarthru
Place your photograph or page on the document glass or ADF. Once you have installed Samsung SmarThru, you will see the SmarThru 4 icon on your desktop. Double-click the SmarThru 4 icon. Double-click this icon. -
Page 101: Using Onscreen Help File
Click the service icon according to your job. SmarThru 4 opens for the selected service. Adjust the scan settings. To start scanning, click Scan. : If you want to cancel the scan job, click Cancel. Using Onscreen Help File For more information about SmarThru, click corner of the window. -
Page 102: Windows Vista
Windows Vista Load the document(s) face up into the DADF (or ADF). Place a single document face down on the document glass. Click Start → Control Panel → Hardware and Sound → Scanners and Cameras. Click on Scan a document or picture. Then Windows Fax and Scan application is opened automatically. -
Page 103: Using Your Printer In Linux
• Configuring Printer Properties • Printing a Document • Scanning a Document Getting Started The supplied CD-ROM provides you with Samsung’s Unified Linux Driver package for using your machine with a Linux computer. Samsung’s Unified Linux Driver package contains printer and scanner drivers, providing the ability to print documents and scan images. -
Page 104: Uninstalling The Unified Linux Driver
When the installation is complete, click Finish. The installation program has added the Unified Driver Configurator desktop icon and Samsung Unified Driver group to the system menu for your convenience. If you have any difficulties, consult the onscreen help that is... -
Page 105: Using The Unified Driver Configurator
Double-click Unified Driver Configurator on the desktop. You can also click the Startup Menu icon and select Samsung Unified Driver and then Samsung Unified Driver Configurator. Press each button on the Modules pane to switch to the corresponding configuration window. -
Page 106: Scanners Configuration
• Add Class... : Allows you to add a new printer class. • Remove Class : Removes the selected printer class. Scanners Configuration In this window, you can monitor the activity of scanner devices, view a list of installed Samsung MFP devices, change device properties, and scan images. Switches to Scanners configuration. -
Page 107: Configuring Printer Properties
Configuring Printer Properties Using the properties window provided by the Printers configuration, you can change the various properties for your machine as a printer. Open the Unified Driver Configurator. If necessary, switch to Printers configuration. Select your machine on the available printers list and click Properties. -
Page 108: Printing Files
To abort the current job, click Cancel. Printing Files You can print many different types of files on the Samsung machine device using the standard CUPS way - directly from the command line interface. The CUPS lpr utility allows you do that. -
Page 109: Adding Job Type Settings
The document is scanned and the image preview appears in the Preview Pane. Drag the pointer to set the image area to be scanned. Change the scan options in the Image Quality and Scan Area sections. •Image Quality: allows you to select the color composition and the scan resolution for the image. - Page 110 You can use the following tools to edit the image: Tools Function Saves the image. Cancels your last action. Restores the action you canceled. Allows you to scroll through the image. Crops the selected image area. Zooms the image out. Zooms the image in.
-
Page 111: Using Your Printer With A Macintosh
Double-click the MAC_Printer folder. Double-click the Samsung SPLC Installer icon. Enter the password and click OK. The Samsung SPL Installer window opens. Click Continue and then click Continue. Select Easy Install and click Install. After the installation is finished, click Quit. -
Page 112: Install The Scan Driver
Enter the queue name in the Queue Name field. If you cannot determine the queue name for your printer server, try using the default queue first. Select Samsung in Printer Model and your printer in Model Name. Click Add. Your printer’s IP address appears on the Printer List, and is set as the default printer. -
Page 113: Printing
Printing OTES • The Macintosh printer’s properties window that appears in this User’s Guide may differ depending on the printer in use. However the composition of the printer properties window is similar. • You can check your printer name in the supplied CD- ROM. -
Page 114: Printing Multiple Pages On One Sheet Of Paper
Printer Features Setting The Printer Features tab provides options for selecting the paper type and adjusting print quality. Select Printer Features from the Presets drop-down list to access the following features: ▲ Mac OS 10.3 Paper Type Set Type to correspond to the paper loaded in the tray from which you want to print. -
Page 115: Scanning
Scanning If you want to scan documents using other software, you will need to use TWAIN-compliant software, such as Adobe PhotoDeluxe or Adobe Photoshop. The first time you scan with your machine, select it as your TWAIN source in the application you use. - Page 116 OFTWARE SECTION NDEX advanced printing, use 18 booklet printing 19 canceling scan 28 Color 15 document, print Macintosh 40 Windows 12 double-sided printing 20 Extras properties, set 16 favorites settings, use 17 Graphics 15 Graphics properties, set 15 help, use 17 install printer driver Macintosh 38...
- Page 117 resolution printing 35 scanning Linux 35 SmarThru 26 TWAIN 28 WIA driver 28 scanning from Macintosh 42 setting darkness 15 favorites 17 image mode 15 resolution Macintosh 41 Windows 15 true-type option 15 software install Macintosh 38 Windows 4 reinstall Windows 10 system requirements Macintosh 38...
- Page 118 Rev.3.00...
Need help?
Do you have a question about the CLX-2160 and is the answer not in the manual?
Questions and answers