Table of Contents
Advertisement
Item #1001 509 794
Model DIY-300PS
HAMPTON BAY
®
USE AND CARE GUIDE
TRANSFORMER
Questions, problems, missing parts? Before returning to the store,
call HamptonBay Customer Service
8 a.m. - 7 p.m., EST, Monday Friday, 9 a.m. - 6 p.m., EST, Saturday
1-855-HD-HAMPTON
HAMPTONBAY.COM
THANK YOU
We appreciate the trust and confidence you have placed in Hampton Bay through the purchase of this transformer. We strive to continually create
quality products designed to enhance your home. Visit us online to see our full line of products available for your home improvement needs. Thank
you for choosing Hampton Bay!
Advertisement
Table of Contents

Related Manuals for HAMPTON BAY DIY-300PS


Summary of Contents for HAMPTON BAY DIY-300PS
- Page 1 THANK YOU We appreciate the trust and confidence you have placed in Hampton Bay through the purchase of this transformer. We strive to continually create quality products designed to enhance your home. Visit us online to see our full line of products available for your home improvement needs. Thank...
-
Page 2: Table Of Contents
Table of Contents Table of Contents ..............2 Hardware Included ..............4 Safety Information ............... 2 Package Contents ..............4 Warranty ..............3 Installation ................5 What is Covered ..............3 Operation ................8 What is Not Covered ...............3 Troubleshooting ..............10 Pre-installation .............. -
Page 3: Warranty
Warranty WHAT IS COVERED The manufacturer warrants this transformer to be free from defects in materials and workmanship for a period of two (2) years from date of purchase. This warranty applies only to the original consumer and only to products used in normal use and service. If this product is found to be defective, the manufacturer’s only obligation, and your exclusive remedy, is the repair or replacement of the product at the manufacturer’s discretion, provided that the product has not been damaged through misuse, abuse, accident, modifications, alterations, neglect or mishandling. -
Page 4: Pre-Installation
Pre-installation Use only CSA or UL approved low-voltage WARNING: cable. Failure to use at least 16 gauge minimum cable or install it as directed in these instructions may result in Risk of Fire or Electric Shock. Using large cable will ensure maximum light output. -
Page 5: Installation
Installation Connecting the Cable to the Preparing the Cable Transformer Being careful when splitting NOT to expose the copper wire, remove Lay the transformer on a flat, stable surface and insert the stripped the landscape wire insulation 1/2 in. from both wires and twist ends. end of one wire under the terminal clamping plate “COM”. - Page 6 Installation (continued) Placing Your Fixtures and Attaching Your Fixtures Routing the Cable Lay your fixtures (not included) out where you want to locate them. Turn the transformer on. Attach your fixtures to the cable to using Be sure do not exceed 300 watt rating of the transformer. cable connectors as shown.
- Page 7 Installation (continued) Mounting the Transformer Mounting the Photocell To mount directly to a wall surface use the included screws (AA) as Mount the photocell (B) bracket on a wall or other solid surface with shown, suitable for mounting within 12 in. to 48 in. (0.3 m to 1.2 m) the screws (BB) provided.
-
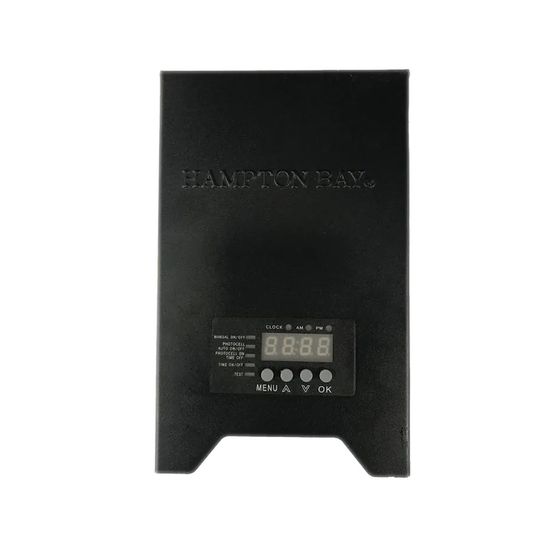
Page 8: Operation
Operation Setting the Clock Operating in Manual Mode This setting allows you to set the clock to local time. This setting allows you to immediately turn the lights on and turn them a) Press MENU until CLOCK LED indicator is lit and the digit indicator off when you no longer need them. - Page 9 Operation (continued) Setting the TIME ON/OFF Using the TEST function This setting allows you to control the time the lights turn on and This setting allows you to test your landscape lighting after when they will go off. installation. a) Press MENU until the TIME ON/OFF LED indicator is lit and press Press MENU until the TEST LED indicator is lit and press OK.
-
Page 10: Troubleshooting
Troubleshooting Problem Probable Cause Check that the transformer power is on. Check if there is a loose connection at the transformer screw terminal All of the lights fail to work with the cable. Check that the power switch is not in an OFF setting. ... - Page 12 HAMPTON BAY ® Questions, problems, missing parts? Before returning to the store, call HamptonBay Customer Service 8 a.m. - 7 p.m., EST, Monday Friday, 9 a.m. - 6 p.m., EST, Saturday 1-855-HD-HAMPTON HAMPTONBAY.COM Retain this manual for future use. HAMPTONBAY.COM...
Need help?
Do you have a question about the DIY-300PS and is the answer not in the manual?
Questions and answers
Set the timer of operation on my Hampton Bay transformer
To set the timer on your Hampton Bay DIY-300PS transformer:
1. Press OK – the minute position will flash.
2. Use the Up/Down button to select 30, then press OK.
3. "OFF" will be displayed – press OK.
4. The AM/PM lights will flash – use the Up/Down button to select AM, then press OK.
5. The hour position will flash – use the Up/Down button to select 1, then press OK.
6. The minute position will flash – use the Up/Down button to select 20, then press OK.
7. The current time will be displayed, and the time on/off mode is now set.
If you make a mistake, cycle back through the settings or press the Menu button to reset.
This answer is automatically generated
Need to set operation
To set the operation for the HAMPTON BAY DIY-300PS transformer, follow these steps:
1. Setting the Clock
- Press the MENU button until the CLOCK LED indicator is lit and the digit flashes.
- Press OK to confirm.
- Use the UP or DOWN arrow buttons to select AM/PM, then press OK.
- Adjust the hour with the UP/DOWN buttons and press OK.
- Adjust the minutes with the UP/DOWN buttons and press OK to complete the clock setup.
2. Manual On/Off Mode
- Press MENU until the MANUAL ON/OFF LED indicator is lit, then press OK.
- Press the UP arrow button to turn the lights ON.
- Press the DOWN arrow button to turn the lights OFF.
3. Photocell Auto On/Off Mode
- Press MENU until the PHOTOCELL AUTO ON/OFF LED indicator is lit.
- Press OK to confirm.
- The lights will automatically turn ON at dusk and OFF at dawn.
4. Photocell On/Time Off Mode
- Press MENU until the PHOTOCELL ON/TIME OFF LED indicator is lit.
- The lights will turn ON at dusk and turn OFF at a set time.
5. Time On/Off Mode
- Press MENU until the TIME ON/OFF LED indicator is lit.
- Set the desired ON and OFF times using the UP/DOWN buttons and press OK to confirm.
This allows you to customize the transformer’s operation based on your lighting needs.
This answer is automatically generated
The lights stay on all the time regardless of where I install the wired sender. I need a replacement part # and a place to order.
There is no Manual On Off button on the 300 watt transformer that I have !
Yes, the HAMPTON BAY DIY-300PS transformer has a manual on/off mode. You can activate it by pressing the MENU button until the MANUAL ON/OFF LED indicator is lit, then pressing OK. Use the UP arrow to turn the lights on and the DOWN arrow to turn them off.
This answer is automatically generated
How to turn the lights off and on manually
Lights do not turn off
To manually turn the lights on and off for the HAMPTON BAY DIY-300PS:
1. Press the MENU button until the MANUAL ON/OFF LED indicator is lit.
2. Press OK.
3. Press the UP arrow button to turn the lights ON.
4. Press the DOWN arrow button to turn the lights OFF.
This answer is automatically generated
WHere is the hotocell