Table of Contents
Advertisement
Owner's Manual – Tipper and Tiltbed Trailers
Tiltbed Trailers – CT166, CT167, CT177, TB4021, TB4621, TB5021, TB5521
Please enter the following information for your own records:
Trailer Model: (from Manufacturers plate)
VIN Number: (from Manufacturers Plate)
Date of purchase:
Purchased from:
Maximum Gross Weight (MGW):
Unladen Weight: (from CoC)
Payload: (MGW minus Unladen Weight)
Drawbar Security Code: (from RH drawbar)
Having recorded this information, please take a further moment to fill in and return the Guarantee
Registration Card. This is a big step towards protecting your trailer against theft.
It is suggested this page is removed from the manual (so that the manual can be kept with the trailer
without risk of losing both trailer and this important information) and kept in a place of safety with
the purchase receipt and the Certificate of Conformity*.
Manufacturer's Plate
The trailer is fitted with a Manufacturer's Plate to the right hand side drawbar which will show the
following information:
•
The manufacturers name and address details
•
The trailer model
•
The trailer serial number
•
Maximum gross weight for the trailer
Drawbar Security Code:
This is a code – numbers and letters – cut into the right-hand drawbar but only on TT, CT166 and
CT167 models. It is not on CT177, TT2012 and TB drawbars.
INTENDED USE
The following are permitted:
• (Tipper) Transport of loose aggregates,
wood chips
Page | 1
Tipping Trailers – TT2012, TT2515, TT3017, TT3621
SCK
• (Tilt bed) Transport of wheeled or tracked
vehicles
Advertisement
Table of Contents

Related Manuals for Ifor Williams Trailers TT2012


Summary of Contents for Ifor Williams Trailers TT2012
- Page 1 Drawbar Security Code: This is a code – numbers and letters – cut into the right-hand drawbar but only on TT, CT166 and CT167 models. It is not on CT177, TT2012 and TB drawbars. INTENDED USE • (Tilt bed) Transport of wheeled or tracked...
-
Page 2: Table Of Contents
3.4.2.2 – Lowering the trailer bed/body..................17 3.4.3 – Tipping – Manual Tip ......................18 3.4.3.1 – Raising the Trailer Body TT2012 ..................19 3.4.3.2 Raising the Trailer Body TT2515 (Manual pump) ............. 20 3.4.3.3 – Lowering the Trailer Body....................20 3.4.4 –... - Page 3 4 – Operation – Tiltbed Trailers ......................25 4.1 – Safe Operation of Tiltbed Trailers .................... 25 4.2 – Loading Tiltbed Trailers with Vehicles or other Rolling Loads ..........26 4.2.1 – General Notes on Loading – Manual Tilt ................26 4.2.2 –...
-
Page 4: General - All Types Covered By This Manual
5.10 – Suspension ..........................49 5.10.1 – Suspension Inspection..................... 49 5.12 Washing ............................ 49 7 – End of Life Disposal ......................... 52 8 – Technical Data ..........................52 8.1 All Versions ..........................52 8.3 Tiltbed – CT ..........................53 8.4 Tiltbed – TB ..........................54 EC DECLARATION OF CONFORMITY .................... - Page 5 Tipper – TT Series Page | 5...
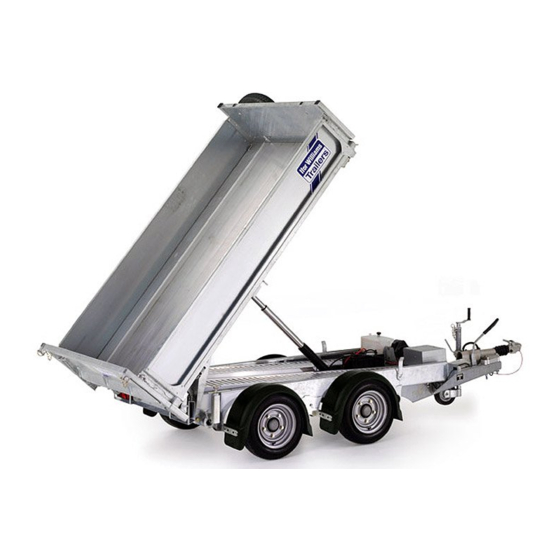
- Page 6 1. Trailer bed 2. Chassis 3. Drawbar 4. Coupling Device 5. Jockey Wheel 6. Pump 7. Hydraulic Ram 8. Safety Prop Tiltbed – CT166 and CT167 TT2012 Page | 6...
- Page 7 Tiltbed – TB Series Tiltbed – CT177 Page | 7...
-
Page 8: Load Security
2 – Load Security • Except in the case of tipping trailers carrying aggregate loads – sand and gravel for instance - always ensure the load is secured against movement. • Be aware that the highest loads occur during braking and restraint against forward movement is particularly important. -
Page 9: Operation - Tipping Trailers
• In the special case of transporting cars and vans (wheeled vehicles with pneumatic tyres), special ratchet tensioning wheel securing straps, Ifor Williams part P1042, should be used at every wheel. Lashing any other part of the vehicle to the trailer is likely to result in the lashing “tugging” as the transported vehicle suspension moves and this may break or loosen the lashings or at least overload the lashing points. - Page 10 • It is recommended that Personal Protection Equipment such as safety boots and gloves be worn when operating the trailer. • It is recommended that new users practice operating the tipping mechanism with the trailer empty to ensure familiarity with the controls. •...
-
Page 11: Use Of The Safety Prop
• If any part of the load is stuck in the front of the trailer and will not discharge when the maximum tip angle is reached, the only safe solution is to fully lower the body and shovel the remaining load until loose. Then tip again. Using the towing vehicle to try and jerk the stuck load free is VERY UNSAFE. -
Page 12: Loading
Figure 1 Figure 3 Figure 2 Safety prop specific to TT2012 shown below Figure 3 Figure 2 Figure 3.3 Loading • All Ifor Williams Tipping Trailers should achieve correct weight distribution if loaded evenly over the entire length of the body or the centre of the load mass is just forward of the centre of the trailer wheel set. -
Page 13: Unloading
• Tipping Trailers can be used as flatbed trailers when bodywork is removed. However, it is inadvisable to do so with the headboard removed – this being the last line of defence against the load sliding forwards under emergency braking. •... -
Page 14: Bottom Hinged Unloading (If Applicable)
• If the nature of the load is such that it is likely to both jam against the top edge of the tailboard and yet is not sufficiently free-flowing to come out at the limited tip angle dictated by bottom hinging, then the tailboard may be removed altogether. First release the bottom, then release both top pivots at the same time (therefore requires two people). -
Page 15: Tt2012 Tailboard Removal
VEHICLE ON THE ROAD. (Any such device used must be in accordance with national requirements for use on the road.) 3.4.1.3 TT2012 Tailboard removal • Un-clip and remove both retaining pins • Remove tailboard from body and place safely to one side... -
Page 16: Tipping - Electric Tip
3.4.2 – Tipping – Electric Tip This system uses an electro-hydraulic pump powered by an on-board 12V battery and controlled by a cabled handset. A main isolator switch operated by a removable key deters unauthorised use. An override system allows the pump to be operated manually if required. Follow the Manual Pump instructions to operate. -
Page 17: Tipping The Trailer Body
3.4.2.1 – Tipping the Trailer Body. • Connect remote control to socket • Insert key into isolator switch and turn clockwise 90° to switch on the system. • Ensure pressure release valve is closed (turned fully clockwise). • Using the remote control, press the ‘up button’ to raise the trailer body, release to stop. It is important to release the raise (up) button on the handset as soon as the ram reaches full stroke. -
Page 18: Tipping - Manual Tip
• Lower the trailer bed/body by pressing the ‘down button’ or opening the pressure release valve. • Once lowered switch off the isolator, remove the key and store safely. • Disconnect the remote control from the socket. Note. The remote-control unit supplied is generally splash-proof but is not fully waterproof. -
Page 19: Raising The Trailer Body Tt2012
3.4.3.1 – Raising the Trailer Body TT2012 • Close pressure release valve by turning the release valve clockwise • Pull safety catch lever to release locking mechanism • Whilst holding the safety catch operate the pump handle until the catch is no longer engaged. -
Page 20: Raising The Trailer Body Tt2515 (Manual Pump)
Ifor Williams Tipping Trailers do not side-tip but it may often be convenient to open the sideboards on one side to shovel off aggregate loads or, if the side centre pillar is removed, to roll or drag other cargo off the side. N/A for TT2012 3.5 - Loading Skids Where loading skids are fitted the procedure for using them is as follows. -
Page 21: 1- Removing Skids
3.5.1- Removing skids Figure 11 (Above) / Figure 13 (Below) Figure 12 (Above) / Figure 14 (Below) • The skids are stowed under the trailer body and are removed from the rear of the trailer. It is strongly recommended that any lifting or positioning of the skids is carried out by two persons. -
Page 22: Use Of Loading Skids
11. 3.6 – Electric Winch (Not available on TT2012) The electric winch option is substantially the same as for the Tiltbed – covered in section 4.2.2 except that the winch is fixed in the central position and does not slide from side to side. -
Page 23: Removing Sideboards
3.7.1 – Removing Sideboards • This is best done with an assistant – one each end of each sideboard. • Open the sideboard fully • Slide the sideboard forwards and off its hinges 3.7.2 – Removing Centre Side-Post (where fitted) The centre sidepost sits in a socket on the side of the trailer and is secured with and anti-rattle bolt. -
Page 24: Re-Fitting Headboard, Tailboard And Sideboards
• Tape the winch power cable terminals so that they cannot accidentally reconnect with the battery terminals when the body is lowered. Also place the disconnected winch power cables so that they are not trapped and damaged as the body is lowered or in subsequent road trips. •... -
Page 25: Operation - Tiltbed Trailers
4 – Operation – Tiltbed Trailers Note that the Tiltbed trailers covered by this manual are suitable for any vehicle or other type of rolling load with pneumatic tyres. They are not suitable for trailers with solid tyres – notably Access Platforms and Rollers. -
Page 26: Loading Tiltbed Trailers With Vehicles Or Other Rolling Loads
• Most modern vehicles have a removable towing eye – typically stored close to the vehicle spare wheel – that screws into the vehicle structure via an access point in the front bumper. In any event consult the vehicle handbook for recommended towing points. •... - Page 27 • All other Tiltbeds will have ramps or attached skids. All should be left closed until tilting is complete. • CT177 trailers have pull out but retained mini-skids. These should be pulled out before tilting. They are retained by pins on the bottom of the light pods and released by removing the lynch pins just in front of the light pods, thereby allowing the light pods to swing outwards and releasing the mini-skids.
- Page 28 • In the case of the CT166, 167 and TB trailers fitted with sideboards (an option), ensure the rear sideboards are closed – otherwise they will dig in the ground when the load-bed is tilted and suffer significant damage. • Release the clamps holding the front of the trailer to the drawbar: o In the case of the TB a single over-centre latch sitting on top of the ram.
- Page 29 • Open the pump valve by turning the black pressure release valve knob anti-clockwise – refer to image in 3.4.3 • Operate the pump handle to raise the body until the rear of the trailer just touches the ground. Note that, to allow for uneven ground, all the hydraulic rams have excess travel. It will be quite possible to continue to tilt the trailer well beyond the point where the rear of the trailer first touches the ground –...
- Page 30 Note: when TB ramp or sliding skids are open, or when the mini-skids are attached prior to loading, the trailer rear lights are obscured. It is essential put a warning device (approved warning triangle) at the rear of the working area (upstream of traffic). •...
-
Page 31: Loading Vehicles Or Rolling Loads With An Electric Winch
• When lowering Tiltbeds open the pressure release valve (refer to image in 4.4.3) very slowly. If the release valve is opened too quickly too soon the flow of high pressure hydraulic fluid out of the ram may be such that it simulates a burst hose and the burst valve screwed into the base of the ram then closes, locking the trailer in a partly tilted condition. - Page 32 Plug one end of the Power Leads into the mating plug on the winch installation and the other end into the towing vehicle supply point. • Either lift the small lever on the centre of the winch and pull out the cable by hand – “free spooling”.
-
Page 33: Loading Vehicles Or Other Rolling Loads With A Manual Winch
• Ensure the vehicle on the trailer has its handbrake “on”. • Close any open windows on the vehicle and lock it if appropriate. • Pull a small amount of slack (about 5 cm (2”) of “sag”) in the winch cable so that the winch is not restraining the vehicle. -
Page 34: Loading Vehicles And Other Plant Under Own Power
• Turn the winch handle so as to remove all slack and apply minimum tension to the cable. Ensure there are at least three turns of cable on the drum. • Having got the load into position the loading procedure is completed as detailed in section 5.2.2 for electric winch loading. -
Page 35: Unloading Tiltbed Trailers Carrying Vehicles Or Other Rolling Loads
4.2.5.3 – Notes Specific to Loading CT177 Trailers • CT177 trailers have a very low bed and clearance problems are rare. • However the low bed is achieved at the expense of having “wheelboxes” which project above the bed. • When loading it is necessary to establish whether the vehicle wheels will go between the wheelboxes or whether one or both vehicle wheels must go over the wheelboxes. - Page 36 • During unloading it is particularly important to establish a safe working area extending at least 6m behind the trailer. This rear MUST remain clear of people and property. Children and animals should be firmly under control so that they cannot wander into the working area. •...
-
Page 37: Using Tiltbed Trailers As Flat Trailers (Tiltbed Function Not Used)
• With a manual winch operating correctly, winching the vehicle off the trailer should require a slight positive (unwinding) force on the handle. • IF THE HANDLE IS RELEASED AND SPINS WILDLY because the automatic brake has not engaged DO NOT ATTEMPT TO GRAB THE SPINNING HANDLE. The least worst option is to let the vehicle roll off. -
Page 38: Fitting And Using Ct177 Ski-Jump Kit
• The Wheel Chock sideplates have multiple 10.5 mm diameter mounting holes. Only two holes in each plate will align with two holes in a particular chassis. The other holes line up on other TB models. Only 2 x M10 bolts are needed to secure teach plate. 4.6 –... -
Page 39: Maintenance
5 Maintenance 5.2 – Hydraulic System 5.2.1 – Hydraulic System Maintenance • Wipe all external surfaces of the pump and reservoir tank to remove dirt, dust and oil residue. • Inspect unit for leaks and rectify as necessary. • Clean reservoir filler cap, remove and renew if cap and / or seal is damaged. Check oil level and replenish with clean hydraulic oil. - Page 40 • Connect the hose to the ram but do not tighten. • Fill the tank to the level mark. • Bleed the system by operating the motor briefly (or operate the manual pump) whilst observing the release of air from the hose connection on the ram. As soon as there is no sign of air escaping, tighten the connector.
-
Page 41: Battery
5.3 – Battery Batteries, where fitted, are 12V 105Ah, maintenance free (apart from charging) type. When working on the battery observe the appropriate safety precautions: Page | 41... -
Page 42: Battery Maintenance
5.3.1 – Battery Maintenance • In the case of TB trailers the battery is carried underneath the body inside the vee of the drawbar and access requires that the body be tilted. Do not attempt to inspect or charge the battery unless the tilted body is safely supported –... -
Page 43: Parts
5.4.1 Replacement parts A comprehensive list of all approved replacement parts specific to Tiltbeds and Tippers can be found in the Ifor Williams Trailers Parts catalogue. The latest version can be found at www.iwt.co.uk, or copies are available from your local distributor. -
Page 44: Tyre Repairs
Tyre Size Correct Load/Speed Index Pressure (cold) 195/55R10 6.2 bar / 90 psi 165R13C 8PR 94/92N 4.5 bar / 65 psi 155/70R12 104/102N 6.2 bar / 90 psi 195/60R12 104/102N 6.5 bar / 95 psi 185/70R13C 106/104N 6.0 bar / 87 psi 5.5.2 Tyre Repairs Punctures should be inspected and repaired by a specialist tyre Distributor. - Page 45 • DO NOT jack under the spring, near the centre of the axle beam or near the centre of any cross-member. • Unless the trailer is unladen it should always be coupled to an appropriately rated towing vehicle when changing a wheel. Laden trailers should not be jacked up with the jockey wheel supporting the front of the trailer.
-
Page 46: Wheel Bearings
• The only acceptable method of applying the correct wheel bolt torque is a calibrated manual torque wrench. • Lower the trailer and remove the jack. • DO NOT DRIVE ON AN UNDER INFLATED TYRE. • After any wheel refitting wheel bolt torques should be checked after approximately 25 miles. Wheel bolt torques are 110 Nm (81 lbf. -
Page 47: Coupling Maintenance
• Any signs of rust or fraying on the inner cable or rusting of the threaded end such that the adjuster nuts cannot be turned is cause for immediate replacement. 5.8 Coupling Maintenance 5.8.1 – Bellows 5.8.1.1 – Checking Bellows •... -
Page 48: Breakaway Cable
into the grease nipple on top of the damper body. Rock the damper head from side to side, but not so much as to damage the bellows, so as to encourge the grease to spread. • If a siezed Drawtube us suspected then proceed to remove the damper as described in the next section and, with the Damper removed, establish whether the Drawtube can be made to slide easily. -
Page 49: Suspension
5.10 – Suspension 5.10.1 – Suspension Inspection • The great majority of springs last the life of the trailer and no maintenance of the spring itself is required. In particular DO NOT GREASE OR OIL THE SLIPPER SURFACE AT THE REAR OF THE SPRING – it increases the spring stress and greatly increases the risk of premature failure. - Page 50 6 – Troubleshooting All Tippers Body/Bed will Pressure release valve Pump body back up a few not come down opened too quickly and burst strokes, close pressure relief Tiltbeds valve has closed valve and then open it more with slowly manual pumps All except...
- Page 51 TB and Trailer tilts Latch has become stretched Replace latch(es) CT177 while travelling and lost its overcentre Tiltbeds geometry. Trigger still works but cannot keep handle closed when subject to dynamic loads. CT177 Wheel can’t be Trailer jacked up under axle Jack trailer under outer ends of removed after or wrong technique...
-
Page 52: End Of Life Disposal
trailer during normal braking. Trailer locks and Coupling Damper may be Carry out Coupling Damper releases wheels worn out. check as described in section under normal or 6.8.3.1. Replace if necessary. hard breaking. Rattle from Either the tow-ball is worn, Check tow-bar and coupling for Coupling when or the coupling head is... -
Page 53: Tiltbed - Ct
-20°C to + 45°C Temperature Ambient Storage -40°C to +60°C (below -20°C the battery must be kept charged above 12.2V) temperature Humidity 0 to 100% 8.2 – Tipper Type TT2012 TT2515 TT3017 TT3621 Unladen Weight 400 kg 730 kg 870 kg 1085 kg... -
Page 54: Tiltbed - Tb
Electric Tip 40 kg Electric Winch 55 kg Headboard only 28 kg 31 kg Ladder Rack 20 kg 24 kg Full Drop side Kit incl. headboard 121 kg 124 kg Mesh Side Extensions 125 kg 130 kg High Ramp +33 kg +40 kg Floor lashing rings (per pair) 1 kg... -
Page 55: Ec Declaration Of Conformity
Electric Winch with 52 kg Bracket and Battery Kit Electric Winch with 28.5 kg Bracket and Power Leads 3000 kg Cable Winch 25 kg (Manual) 1500 kg Mechanical 6.5 kg Cable Winch Raised Rave Kit 6 kg Drop-in tailboard kit 16 kg Mesh extension kit 95 kg...
Need help?
Do you have a question about the TT2012 and is the answer not in the manual?
Questions and answers