FAZUA Evation Owner's Manual
Ebike system 25 km/h australia / new zealand
Hide thumbs
Also See for Evation:
- Quick start manual ,
- Original instructions manual (84 pages) ,
- Quick manual (76 pages)

Related Manuals for FAZUA Evation


Summary of Contents for FAZUA Evation
- Page 1 OWNER’S MANUAL ELECTRIC BICYCLE eBike system 25 km/h Australia / New Zealand IT IS IMPORTANT TO READ THE WARNINGS AND INSTRUCTIONS IN THIS MANUAL BEFORE RIDING YOUR NEW BICYCLE.
-
Page 3: Welcome
Welcome Welcome to our bicycle family Thank you for purchasing your new bicycle. We believe in bicycles. We make high quality bicycles that are built to last. That is why each bicycle we make comes with a limited lifetime warranty. We wish you many carefree and enjoyable cycling kilometers with your new bicycle! However, if you experience any problems with your bicycle, do not hesitate to contact your local retailer. -
Page 4: Table Of Contents
Content Welcome ....................................................Important to read ................................................. Fazua Evation E-bike Drive System ...................................... • Basics ................................................• Drivepack ..............................................• Bottom bracket ..........................................• Remote ................................................• Battery ................................................• Charger ................................................. Contact ....................................................... - 2 -... -
Page 5: Important To Read
Failure to follow these instructions may result in damage to your battery pack and may require battery pack replacement: • Only charge the battery pack with the included Fazua charger. • When not using the battery pack for a longer period, charge it to approx. 60% (3 to 4 LEDs lit on the charge- control indicator). - Page 6 • The battery pack can be stored at temperatures between -20°C and +60°C. For a long battery pack life, however, storing the battery pack at room temperature of approx. +5 °C to +20°C is of advantage. • Take care that the maximal storage temperature is not exceeded. As an example, do not leave the battery pack in a vehicle in summer and store it out of direct sunlight.
-
Page 7: Fazua Evation E-Bike Drive System
- b i k e d r i v e s y s t e m Translation of the original © 2019 Fazua GmbH German operating instructions All Rights Reserved EU Edition 2019 | EN - 5 -... - Page 8 - 6 -...
-
Page 9: Basics
7 Cleaning and maintenance ..............32 8 Troubleshooting ..................34 9 Disposal instructions .................36 Disposing of your e-bike ............36 Disposing of the battery ............36 10 Manufacturer's warranty, EU .............37 11 Service ....................38 12 EU Conformity ..................39 EN-3 | evation - 7 -... - Page 10 24 Detailed view & part designations: Remote fX and Remote bX ..58 25 Technical data for Remote fX and Remote bX .........59 26 Displays on Remote fX and Remote bX ..........59 26.1 Status display ................60 26.2 Display of charge level/support level ........60 EN-4 evation | - 8 -...
- Page 11 33 Detailed view & part designations: Charger ........75 34 Technical data ..................76 35 Using the charger................77 35.1 Preparing the charger ...............77 35.2 Connector charger to the battery ..........78 35.3 Unplugging the charger from the battery .......79 EN-5 | evation - 9 -...
-
Page 12: Overview: Drive System
(Details from page EN-46) Remote Battery (Details from page EN-50) (Details from page EN-66) Remote b Battery 250 Remote fX Remote bX Battery 250 X Charger (Details from page EN-75) Charger A Charger S (EU/US) EN-6 evation | - 10 -... - Page 13 EN-7 | evation - 11 -...
-
Page 14: About These Instructions
ABOUT THESE INSTRUCTIONS 2.1 Terms and structure These original operating instructions form part of the Fazua drive system, evation. To improve readability, the term "Instructions" will be used below instead of the term "Original operating instructions". The decision to use the mascu- line form (e.g. -
Page 15: Reading And Retaining The Instructions
"Caution". NOTICE Risks relating to damage to the product itself or to property damage to other objects, are identified with the "Notice" signal word. Useful additional information is identified with this informa- tion symbol. EN-9 | evation - 13 -... -
Page 16: Safety
SAFETY 3.1 Functional principle & proper use evation is designed as an electric drive system for e-bikes used as a means of transport for one person. From a speed of 25 km/h, the electric pedal support switches off so that at speeds over 25 km/h without motor support, you pedal solely with your own muscle power. -
Page 17: Symbols & Pictograms Of The Drive System
For specific information, see the "Disposal" chapter. This symbol indicates products that meet all requirements for obtaining the European CE marking. Specific information can be found in the "EU Conformity" chapter. EN-11 | evation - 15 -... -
Page 18: General Safety Instructions
► Read and follow the manufacturer's instructions for your e-bike. ► Obtain information on any relevant national standards relating to e-bikes and comply with these. EN-12 evation | - 16 -... - Page 19 ► Only use the "Pushing support" function when pushing the e-bike. While pushing support is activated, you must hold the e-bike securely with both hands and the wheels must be in contact with the ground, otherwise there is a risk of injury. EN-13 | evation - 17 -...
- Page 20 The battery may explode if you use inappropriate batteries or do not handle the rechargeable battery correctly. ► Only use the genuine battery from Fazua approved by the e-bike manufacturer. ► Under no circumstances use a damaged battery and never attempt to charge a damaged battery! ►...
- Page 21 ► If you come into contact with battery acid, rinse the affected body part thoroughly under running water straight away. ► After rinsing, seek advice from a doctor immediately, in particular on eye contact and/or if the mucous membranes are affected (e.g. nasal mucous membranes). EN-15 | evation - 19 -...
- Page 22 The magnetic connections of the battery (= rechargeable battery) and charger can impair the function of pacemakers. ► Keep the battery and the charger away from pacemakers or persons with pacemakers and make people with pace- makers aware of the danger. EN-16 evation | - 20 -...
- Page 23 ► Never use a damaged charger. Otherwise, there is a high risk of electric shock! ► Keep the charger in a clean condition. There is an increased risk of electric shock if the charger is dirty or soiled. EN-17 | evation - 21 -...
- Page 24 The radiator in the drivepack can become very hot during oper- ation, meaning you may burn yourself. ► Proceed with caution when handling the drivepack. ► Allow the drivepack to cool down completely before touching the drivepack. EN-18 evation | - 22 -...
- Page 25 ► When charging the battery, make sure that the charger's mains cable and charging cable do not present a trip hazard to avoid damaging components as a result of a fall, for example. EN-19 | evation - 23 -...
-
Page 26: Instructions For Safe Riding In Road Traffic
► Ride carefully and show consideration for other road users. ► Ride in such a way that no-one is injured, endangered, hindered or harassed. ► Ride on prescribed lanes for bicycles, where available. EN-20 evation | - 24 -... -
Page 27: Use
► It is essential that you also read the detailed descriptions in the section relating to the component in question: • before you use your e-bike equipped with the evation drive system for the first time, • if you are unsure how to use it, •... - Page 28 3. Check that the drivepack is securely fitted. If the drivepack does not lock, repeat the procedure. Do not use the drive system if the drivepack cannot be locked to the e-bike. EN-22 evation | - 26 -...
- Page 29 2. Press the push button as far as it will go to release the battery from the lock. 3. Press and hold the push button and gently pull the battery out of the battery holder. EN-23 | evation - 27 -...
-
Page 30: Switching The Drive System On And Off
27.1 “Switching the drive system on and off”. ► Switch on the drive system using Remote b by pressing one of the three buttons. ► Switch on the drive system using Remote fX or Remote bX by pressing the centre button. EN-24 evation | - 28 -... -
Page 31: Instructions For Driving With The Drive System
More detailed information can be found off the battery” 4.3 Instructions for driving with the drive system Follow these instructions for riding your e-bike equipped with the evation drive system. Changing gear: The gears of your e-bike are to be operated in the same way as those of a conventional bicycle. -
Page 32: Switching On The Drive System Following A Standstill
The drive system can be switched on again using the remote by briefly pressing the centre button. • After 8 hours of standstill (provided no button/touch sensor is pressed during this time), the battery switches off. EN-26 evation | - 30 -... -
Page 33: Setting The Support Level
400 W* 400 W* Rocket pink * The values given here are the "theoretical" maximum motor power. The "actual" maximum motor power is configured by the manufacturer of your e-bike, depending on the model. EN-27 | evation - 31 -... -
Page 34: Using "Pushing Support" Mode
► Make sure you do not injure yourself on the rotating pedals when using the "Pushing support" function. 1. Change to the support level "none" where appropriate. 2. Press and hold down the bottom button on remote b to activate "Pushing support" mode. EN-28 evation | - 32 -... -
Page 35: Charging The Battery
4. Plug the power plug into a suitable wall outlet to establish the power connection. The charging process starts automatically after connection to the mains. in chapter 31.6 “Charging process” and in → More detailed information can be found chapter 31.7 “Battery charge level indicator”. EN-29 | evation - 33 -... -
Page 36: Storage And Transport
The battery should have a charge level of at least 60% if you plan not to use it for an extended period of time. EN-30 evation | - 34 -... -
Page 37: Optional Accessories
• < 1 month storage time: -15 to 60 °C • 3 month storage time: -15 to 45 °C • 1 year storage time: -15 to 25 °C ► If you have any questions, please contact a Fazua Servicepartner or visit the official Fazua service platform (www.fazua.com/help). OPTIONAL ACCESSORIES... -
Page 38: Cleaning And Maintenance
Depending on the model, your remote is equipped with Bluetooth® func- tionality. This allows you to connect a mobile device (e.g. your smartphone) to the remote and use the Fazua Rider app to display and evaluate certain trip data etc. - Page 39 2 – 3 months or at the latest as soon as it can no longer be easily operated. ► If you have any questions about cleaning and maintenance of your drive system, please contact a Fazua Servicepartner or visit the official Fazua service platform (www.fazua.com/help). EN-33...
-
Page 40: Troubleshooting
1. If your e-bike or the drive system does not function as desired, first check whether the fault can be rectified using the "Troubleshooting" overview table given below. 2. Where appropriate, please contact a Fazua Servicepartner or visit the official Fazua service platform (www.fazua.com/help) in the following cases: •... - Page 41 ► Check the position of the spoke magnet. If you do not find a fault, contact a Fazua Servicepartner. The white LEDs on Software update the remote flash. ► After a new firmware update, the remote will update itself automatically.
-
Page 42: Disposal Instructions
► Dispose of the battery of the drive system as well as any other batteries and accumulators installed on the e-bike at a recycling centre or at a collection point in your town or municipality. EN-36 evation | - 40 -... -
Page 43: Manufacturer's Warranty, Eu
10 MANUFACTURER'S WARRANTY, EU FAZUA GmbH, Marie-Curie-Straße 6, 85521 Ottobrunn, Germany (here- inafter referred to as "Manufacturer") guarantees to the end customer (hereinafter referred to as "Customer") in accordance with the following provisions that the drive system and its components installed in the bicycle (hereinafter referred to as "Product") purchased by the customer within... -
Page 44: Service
Fazua service team. ► Where applicable, also visit the Fazua service platform: www.fazua.com/help. Here you will find comprehensive contents relating to the topic of "Service" as well as a search function for Fazua Servicepartners in your area. EN-38 evation |... -
Page 45: Eu Conformity
Special information on the remote with Bluetooth® function FAZUA GmbH hereby declares that this product conforms to the basic requirements and other relevant regulations of the Radio Equipment Direc- tive 2014/53/EU, R&TTE Directive 1999/5/EC, EMC Directive 2014/30/ EU, ErP Directive 2009/125/EC, Low Voltage Directive 2014/35/EC and ROHS Directive 2011/65/EC. -
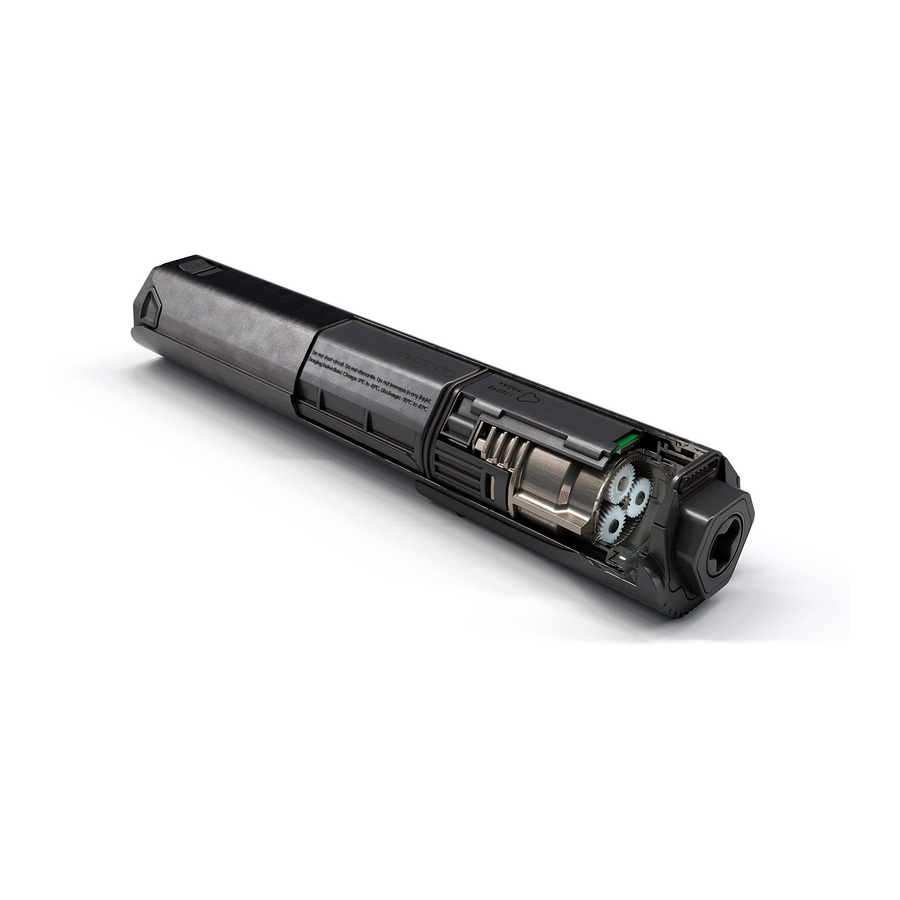
Page 46: Drivepack
DRIVEPACK 13 DETAILED VIEW & PART DESIGNATIONS: DRIVEPACK EN-40 evation | - 44 -... - Page 47 The numbering 1–7 within this section refers to the individual parts of the component (drivepack). Individual parts of other components illustrated within this section are additionally marked with the corresponding component letter. EN-41 | evation - 45 -...
-
Page 48: Technical Data
→ Storage temperature (> 1 month) -15 °C to +25 °C 15 USING THE DRIVEPACK 15.1 Inserting the drivepack into the e-bike 1. Place the drivepack onto the corresponding interface on the bottom bracket. EN-42 evation | - 46 -... - Page 49 If the drivepack does not lock, pull it out again if necessary and then try to insert it again. Do not use the drive system if the drivepack cannot be locked to the e-bike. EN-43 | evation - 47 -...
-
Page 50: Removing The Drivepack From The E-Bike
3. Press and hold down the push button and carefully lower the drivepack out of its holder in the down tube. The locking lever automatically remains in the open position. 4. Remove the drivepack from the front of the interface on the bottom bracket. EN-44 evation | - 48 -... -
Page 51: Securing/Locking The Drivepack On The E-Bike
4. Remove the key from the cylinder lock. If you want to unlock the drivepack again: 1. Insert the key into the cylinder lock. 2. Turn the key 90° clockwise to unlock the drivepack on the e-bike. EN-45 | evation - 49 -... -
Page 52: Bottom Bracket
BOTTOM BRACKET 16 DETAILED VIEW & PART DESIGNATIONS: BOTTOM BRACKET EN-46 evation | - 50 -... -
Page 53: Technical Data
It may be necessary to align only the speed sensor connected to the bottom bracket as well as the corresponding spoke magnet in some circumstances. EN-47 | evation - 51 -... -
Page 54: Correct Position/Alignment
2. To set the correct distance between the mark on the speed sensor and the spoke magnet: • Move the spoke magnet vertically on its spoke (up/down) if neces- sary. • Turn the spoke magnet around its own axis if necessary. EN-48 evation | - 52 -... - Page 55 3. If the problem cannot be solved, do not use the e-bike and contact an authorised specialist to have the fault rectified. EN-49 | evation - 53 -...
-
Page 56: Remote
► Observe chapters 20 – 2 3 within this section if your e-bike is equipped with Remote b. ► Observe chapters 24 – 2 7 within this section if your e-bike is equipped with Remote fX or Remote bX. 20 DETAILED VIEW & PART DESIGNATIONS: REMOTE b EN-50 evation | - 54 -... - Page 57 The numbering 1 – 7 within this section refers to the indi- vidual parts of the component (Remote b). Individual parts of other components illustrated within this section are additionally marked with the corresponding component letter. EN-51 | evation - 55 -...
-
Page 58: Technical Data On Remote B
If you have paired a mobile device (e.g. your smartphone) via Bluetooth® function to Remote b, the status display is linked green continuously for the duration of the Bluetooth® connection between the two devices. EN-52 evation | - 56 -... -
Page 59: Display Of Charge Level/Support Level
If a "Soft Fault" occurs, you will be able to continue riding your e-bike, but Fazua strongly recommends not doing so to avoid further faults or damage to the drive system or to the e-bike. -
Page 60: Using Remote B
► Switch on the drive system using Remote b by pressing one of the three buttons. ► Switch off the drive system using Remote b by holding down the centre button for 2 seconds. EN-54 evation | - 58 -... -
Page 61: Setting The Pedal Support
• You are riding with reliable support for most applications. "Rocket" support level • The display LEDs on Remote b are lit in pink. • You are riding with maximum support for challenging rides. EN-55 | evation - 59 -... -
Page 62: Pushing Support" Mode
If you are pushing the e-bike with pushing support activated, the pedals will also turn slowly and you could be injured on them. ► Make sure you do not injure yourself on the rotating pedals when using the "Pushing support" function. EN-56 evation | - 60 -... - Page 63 4. Switch off the pushing support by releasing the bottom button. EN-57 | evation - 61 -...
-
Page 64: Detailed View & Part Designations: Remote Fx And Remote Bx
Remote fX and Remote bX are different in terms of where they are attached: → Remote fX is located on the frame (top or bottom tube), → Remote bX is located on the handlebars. Remote bX Remote fX Remote fX Remote bX EN-58 evation | - 62 -... -
Page 65: Technical Data For Remote Fx And Remote Bx
• All five LEDs together serve as a display for the charge level and the pedal support level set. • The upper of the five LEDs also serves as a status indicator, informing you about the status of your e-bike. EN-59 | evation - 63 -... -
Page 66: Status Display
If a "Soft Fault" occurs, you will be able to continue riding your e-bike, but Fazua strongly recommends not doing so to avoid further faults or damage to the drive system or to the e-bike. • Flashing red = "Hard Fault"... -
Page 67: Using The Remote Fx And Remote Bx
► Switch on the drive system using Remote fX/Remote bX by pressing the centre button. ► Switch off the drive system using Remote fX/Remote bX by holding down the centre button for 1 second. Remote fX Remote bX EN-61 | evation - 65 -... -
Page 68: Setting The Pedal Support Level
Remote fX Remote bX If you are riding in rain mode, set the desired support level using the centre button. More detailed information can be found in chapter 27.5 "Rain mode". → EN-62 evation | - 66 -... -
Page 69: Support Levels
"SUPPORT LEVELS" OVERVIEW TABLE Support level Colour max. motor power: none white Breeze green 400 W* 400 W* River blue 400 W* Rocket pink * The values given here are the "theoretical" maximum motor power. EN-63 | evation - 67 -... -
Page 70: Re-Starting The Drive System
→ → → → No support "Breeze" "River" "Rocket" No support etc. 3. To return from the rain mode to the regular operating mode, hold down the centre button again for 2 seconds. EN-64 evation | - 68 -... -
Page 71: Switching The Bicycle Lighting On And Off
3. Press the centre button again once briefly to turn off the bicycle lights. 27 .7 Bluetooth® connection You can connect your mobile phone to your drive system via the Fazua Rider app. If the connection has been established successfully, the LEDs on the Remote fX/Remote bX flash blue three times. -
Page 72: Battery
The SOH is displayed in 20% increments (similar to the battery charge indicator): If all five LED's are flashing, the battery has a SOH of 100%, if four LED's are flashing 80%, etc. EN-66 evation | - 70 -... -
Page 73: Detailed View & Part Designations: Battery
LEDs are lit, but not, for example, when the battery is switched off. The numbering 1 – 5 within this section refers to the indi- vidual parts of the component (battery). Individual parts of other components illustrated within this section are additionally marked with the corresponding component letter. EN-67 | evation - 71 -... -
Page 74: Technical Data
The number of illuminated LEDs indicate the charge level. Thus each illuminated LED corresponds to 20 % of the total charging capacity. When the battery is fully charged, all 5 LEDs light up. EN-68 evation | - 72 -... -
Page 75: Inserting The Battery Into The Drivepack
2. Position the battery with the interface forwards in front of the empty battery receptacle and align it so that the battery lock push button is on the same side as the corresponding opening on the drivepack. EN-69 | evation - 73 -... - Page 76 Do not use the drive system if the battery cannot be locked. In this case, contact an authorised specialist to have the fault rectified. EN-70 evation | - 74 -...
-
Page 77: Removing The Battery From The Drivepack
The two handles are located at the side of the upper battery end (see arrows). 31.4 Switching off the battery ► Turn off the battery by pressing and holding the on/off button. EN-71 | evation - 75 -... -
Page 78: Charging The Battery
If you handle the battery improperly or try to charge it with an incompatible charger, you could cause a fire. ► To charge the battery, use only original and compatible evation chargers from Fazua. ► The charger and battery heat up during charging, so keep away from combustible materials. -
Page 79: Charging Process
Charging begins as soon as you have connected the charger's charger plug to the charger socket on the battery and the charger to the power supply. The flashing LEDs on the battery charge indicator indicate that the battery is being charged. EN-73 | evation - 77 -... -
Page 80: Battery Charge Level Indicator
As soon as the battery is fully charged, the LEDs of the charge level indi- cator go out. ► When the battery is switched on, press the on/off button on the battery to check the charge status, e.g. before or during a (longer) trip. EN-74 evation | - 78 -... -
Page 81: Charger
If none of the model variants is explicitly mentioned, the descriptions refer to all model elements. 33 DETAILED VIEW & PART DESIGNATIONS: CHARGER Charger A Charger S (EU/US) EN-75 | evation - 79 -... -
Page 82: Technical Data
Protection class → Protection type IP54 0.6 kg (Charger A) → Weight, approx. 0.39 kg (Charger S (EU/US)) → 0 °C to +45 °C Operating temperature → 0 °C to +45 °C Storage temperature EN-76 evation | - 80 -... -
Page 83: Using The Charger
► During charging place the charger and battery on a well ventilated surface. ► Only use the charger to charge the original and compatible evation battery from Fazua. ► Never attempt to charge non-rechargeable batteries! 35.1 Preparing the charger 1. Take the mains adapter and the mains cable. -
Page 84: Connector Charger To The Battery
During the charging process, the LED indicator on the mains adapter lights up red and signals that the battery is being charged. When the colour of the LED indicator changes to green, this signals that the battery is fully charged. EN-78 evation | - 82 -... -
Page 85: Unplugging The Charger From The Battery
2. Then disconnect the charger from the battery by removing the charging plug from the socket. 3. Then disconnect the mains cable from the mains adapter and keep the two parts of the charger separate from each other. EN-79 | evation - 83 -... - Page 86 Fazua GmbH Marie-Curie-Straße 6 85521 Ottobrunn, Germany www.fazua.com - 84 -...
-
Page 87: Contact
Contact Trek Australia & New Zealand Customer Service PO Box 1747 Fyshwick, ACT 2609 Australia Telephone Australia: +61 2 6173 2400 New Zealand: 0800-873-569 E-mail Australia: customerservice_australia@trekbikes.com New Zealand: customerservice_newzealand@trekbikes.com Internet: www.trekbikes.com Limited warranty Your bicycle is covered by a Lifetime Limited Warranty. Please visit our web site for details.
Need help?
Do you have a question about the Evation and is the answer not in the manual?
Questions and answers