FAZUA Evation Original Instructions Manual
Hide thumbs
Also See for Evation:
- Quick start manual ,
- Owner's manual (88 pages) ,
- Quick manual (76 pages)
Table of Contents
Advertisement
Advertisement
Table of Contents

Related Manuals for FAZUA Evation


Summary of Contents for FAZUA Evation
- Page 1 Original instructions...
- Page 3 p e d e l e c d r i v e s y s t e m Original instructions English...
-
Page 5: Table Of Contents
FUNDAMENTALS Drive system: 1 Overview: Drive system ................ 6 2 About this manual ................8 Terminology and structure ............8 Read and keep manual ............... 8 Explanation of characters and symbols used ......9 3 Safety ..................... 9 Functionality & intended use ............. 9 Symbols &... - Page 6 14 Technical data ..................40 15 Using drivepack ..................40 15.1 Mounting the drivepack on the e-bike ........40 15.2 Remove drivepack from e-bike ..........42 15.3 Secure/lock drivepack from e-bike .........43 BOTTOM BRACKET Components: 16 Detailed view & part designations: bottom bracket ......44 17 Technical data ..................45 18 Using bottom bracket .................45 18.1 Correct position/alignment .............46...
- Page 7 27.1 Switching the drive system on and off ........59 27.2 Setting the pedal support ............60 27.3 Levels of support ..............61 27.4 Restart drive system ..............61 27.5 Rain mode .................62 27.6 Switching bicycle lighting on and off ........63 27.7 Bluetooth connectivity .............63 BATTERY Components: 28 Model variants of the battery .............64...
-
Page 8: Overview: Drive System
OVERVIEW: DRIVE SYSTEM Drivepack Bottom bracket (Details from page 38) (Details from page 44) Art. no. 5002000101 Art. no. 5002000201 Remote Battery (Details from page 48) (Details from page 64) Art. no. 01-2019-003-01/02 01-2019-010-01/02 Art. no. 5002000401 Art. no. 5002000301 5002000302 Charger (Details from page page 73) - Page 9 Chapter "Overview: Drive system"...
-
Page 10: About This Manual
ABOUT THIS MANUAL 2.1 Terminology and structure These original instructions are part of the Fazua evation drive system. In order to improve readability, the term "manual" will be used instead of the term "original instructions". To facilitate orientation within the manual, it is divided into sections: The first section "Fundamentals"... -
Page 11: Explanation Of Characters And Symbols Used
SAFETY 3.1 Functionality & intended use evation is designed as an electric drive system for eBikes that are used as a means of transport by one person. From a speed of 20 mph (32 km/h), the electric pedal support switches off, so that at speeds above 20 mph (32 km/h) without motor support, you pedal exclusively with your own muscle power. -
Page 12: Symbols & Pictograms Of The Drive System
Fazua accepts no liability for damage caused by incorrect or improper installation or use other than that intended. Only use the drive system as described in this manual. - Page 13 This symbol indicates that the marked component must be disposed of separately as electrical or electronic equipment at the end of its service life and must not be disposed of with household waste. The symbol must be affixed in the European Union in accordance with the laws and directives in force there.
-
Page 14: Important Safety Instructions
3.3 Important safety instructions RE AD AND K E E P ALL IMPORTANT SAFETY INSTRUCTIONS! The following important safety instructions must always be observed when using and handling the drive system. WARNING Dangers for users of eBikes! Basically there are specific dangers for the users of eBikes. Depending on the eBike model in which the drive system is installed, additional dangers may arise which are not mentioned here. - Page 15 If you use inappropriate batteries or do not handle the battery properly, the battery may explode. ► Only use original Fazua evation batteries approved by the eBike manufacturer. ► Never use a damaged battery and never try to charge a damaged battery! ►...
- Page 16 ► Only use the battery in eBikes equipped with an original Fazua evation drive system. Never use the battery for other purposes or in other drive systems. WARNING Fire hazard due to incorrect handling! If you handle the battery and/or charger improperly or use incompatible batteries and chargers together, they may cause a fire.
- Page 17 WARNING Risk of caustic burns due to battery acid! The battery contains battery acid. If you come into contact with this fluid, the affected skin area and/or mucous membrane may be burnt. Eye contact can cause loss of vision. ► Do not touch any liquid leaking from the battery. ►...
- Page 18 WARNING Risk of electric shock! Improper handling of the charger or incorrect mains connection may expose you and others to the risk of electric shock. ► Only connect the charger to an easily accessible and properly installed power outlet. ► Make sure that the mains voltage at the mains connection corresponds to the information on the charger.
- Page 19 WARNING Dangers during unattended use! If, for example, children or people with physical or mental impairments handle the battery or charger, there is an increased risk potential as these user groups may not be able to correctly assess certain risks, for example. ►...
-
Page 20: Notes On Safe Riding In Road Traffic
NOTICE Risk of damage! Improper handling can damage the drive system or individual components. ► Have individual components of the drive system and the eBike replaced exclusively by identical components or other components expressly approved by the eBike manufacturer. This will protect the other components or your eBike from possible damage. -
Page 21: Usage
► You must also read the detailed descriptions in the section for the relevant component: • before you use your eBike equipped with the evation drive system for the first time, • if you are unsure how to use it, •... -
Page 22: Attaching And Removing Components
4.1 Attaching and removing components 4.1.1 Inserting the battery into the drivepack in chapter 31.1 "Checking and switching on → More detailed information can be found battery" and in chapter 31.2 "Inserting the battery into the drivepack". On delivery, the battery may only be precharged. ►... - Page 23 3. Check the drivepack makes a tight fit. If the drivepack does not lock, repeat the procedure. Do not use the drive system if the drivepack cannot be locked to the eBike. 4.1.3 Remove drivepack from eBike in chapter 15.2 "Remove drivepack from →...
-
Page 24: Switching The Drive System On And Off
4.1.5 Removing the battery from the drivepack More detailed information can be found in chapter 31.3 "Removing the battery from → the drivepack". 1. Secure the battery with one hand. 2. Press the push button as far as it will go to release the battery from the lock. -
Page 25: Instructions For Riding With The Drive System
► Remove the drivepack from your eBike. ► Turn off the battery by pressing the On/Off button. In addition to the drive system, Fazua also recommends switching off the battery if you park your eBike for a longer period of time (e.g. if you take a break during a trip). -
Page 26: Switching On The Drive System After Standstill
Range/trip planning: How long or how far you can ride your eBike before you need to recharge the battery depends on several factors. These factors include, but are not limited to: • the set support level; • the (riding) speed with which you move; •... -
Page 27: Set Support Level
► Switch on the battery by pressing the on/off button to be able to use the drive system again after the battery has automatically switched off due to a standstill. 4.5 Set support level in chapter 23.2 "Setting the pedal support" →... -
Page 28: Using "Pushing Support" Mode
4.6 Using "Pushing support" mode If your eBike is equipped with a model "b" control, it has the "Pushing support" mode, which you can use when pushing the eBike. in chapter 23.4 ""Pushing → More detailed information can be found support"... -
Page 29: Charging The Battery
4. Switch off the pushing support by releasing the lower button. 4.7 Charging the battery You can either leave the battery in the drivepack during charging or remove it from the drivepack and charge it separately. 1. Before charging the battery, prepare the charger by connecting the power cord to the power supply. -
Page 30: Storage And Transport
• 3 months storage time: 5 to 113 °F (-15 to 45 °C) • 1 year storage time: 5 to 77 °F (-15 to 25 °C) ► If you have further questions, please contact a Fazua servicepartner or visit the official Fazua service platform (www.fazua.com/service). -
Page 31: Optional Accessories
You can easily use your eBike as a conventional bicycle without an electric drive system by removing the drivepack. You can use the optional Fazua downtube cover to cover the free opening in the down tube after removing the drivepack. You can use the remaining internal space as storage space, e.g. -
Page 32: Cleaning And Maintenance
CLEANING AND MAINTENANCE CAUTION Risk of injury! If the drive system is set in motion while you are handling it, you may jam your fingers or otherwise injure yourself. ► Remove the drivepack from the eBike when cleaning the eBike or the drive system components. NOTICE Risk of damage! Improper cleaning may damage the drive system or individual... - Page 33 2-3 months or at the latest as soon as it is no longer convenient to operate. ► For more information on cleaning and maintaining your drive system, contact a Fazua servicepartner or visit the Fazua service platform (www.fazua.com/service). Chapter "Cleaning and maintenance"...
-
Page 34: Troubleshooting
1. If your eBike or drive system does not function as desired, first check whether the fault can be rectified using the following overview table "Troubleshooting". 2. If necessary, contact a Fazua servicepartner or visit the Fazua service platform (www.fazua.com/service), if: • the error is not listed in the overview table, •... - Page 35 There may be a bad connection between the speed the remote lights up/ sensor and the bottom bracket. flashes yellow. ► Check the position of the spoke magnet. If you cannot find a fault, contact a Fazua servicepartner. The white LEDs on the Software update remote flash.
-
Page 36: Disposal Instructions
DISPOSAL INSTRUCTIONS According to the EU Directives for waste electrical and electronic equipment (Directive 2012/19/EU) and spent batteries (Directive 2006/66/EC), the relevant components must be collected separately and disposed of in an environmentally sound manner. ► Before disposing of your eBike, remove all batteries and all components and controls that contain batteries. -
Page 37: Consumer Warranty
(warranty period). However, in the event that a defect should occur, or if the drive system does not remain fully functional, the Fazua GmbH shall, at its own discretion, remedy the defect(s) at its own expense by either performing repairs or providing new or refurbished parts. - Page 38 • the Product is delivered or returned to Fazua GmbH. • the original invoice containing the date of purchase is presented. • the shipping is carried out by a carrier designated by Fazua GmbH. The Customer may use a different carrier at his own expense.
-
Page 39: Service
If possible, prepare the error image and all information on the relevant component before contacting a Fazua servicepartner or the Fazua service team. ► If service is required, contact a Fazua servicepartner or the Fazua service team. ► Visit the Fazua service platform if necessary: www.fazua.com/service. -
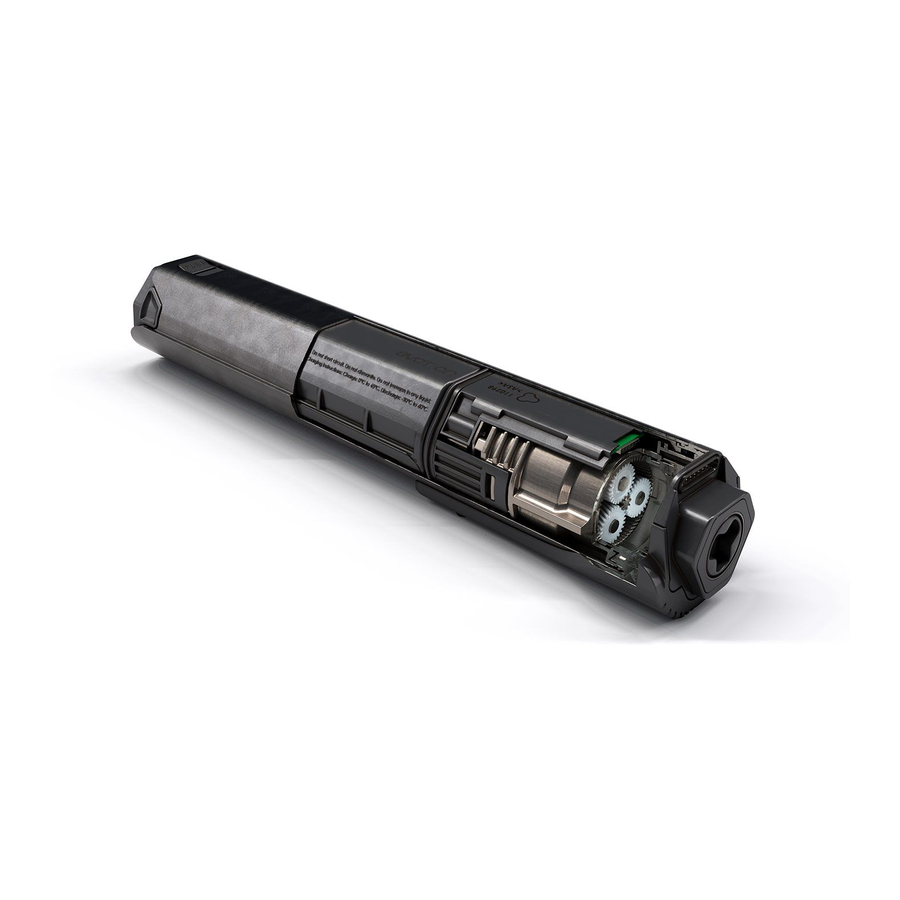
Page 40: Drivepack
DRIVEPACK 13 DETAILED VIEW & PART DESIGNATIONS: MOTOR UNIT Chapter "Detailed view & part designations: Motor unit"... - Page 41 Part designations Interface (bottom bracket) Cover (USB port) USB port Battery holder Pushbutton (5.1)*/locking lever (5.2)* Cylinder lock** Key** * The locker or mechanism for removing the drivepack is operated differently depending on the model: With a push button located on the top of the down tube or with a locking lever located on the bottom of the down tube.
-
Page 42: Technical Data
14 TECHNICAL DATA TECHNICAL DATA ON THE DRIVEPACK 5002000101 Article number 250 W Continuous rated power 400 W Power, max. Torque at the chain, max. 60 Nm 36 V Nominal voltage Protection type IP54 4.2 lbs (1.94 kg) Weight, approx. Operating temperature 14 °F to 140 °F (-10 °C to +60 °C) -4 °F to 140 °F (-20 °C to +60 °C) - Page 43 2. Swing the upper end of the drivepack into the down tube of the e-bike. When you have inserted the drivepack correctly and completely into the down tube, the locking mechanism built into the down tube automatically engages in the motor mount and locks the drivepack in the correct position.
-
Page 44: Remove Drivepack From E-Bike
15.2 Remove drivepack from e-bike CAUTION Risk of burns! The radiator in the drivepack can become very hot during operation so that you can burn yourself on it. ► Let the drivepack to cool down completely before touching the drivepack. If you press the drivepack firmly against the frame before pressing the push button or releasing the locking lever, it will be easier to release the drivepack from the locking device on... -
Page 45: Secure/Lock Drivepack From E-Bike
15.3 Secure/lock drivepack from e-bike Depending on the model, a cylinder lock is integrated into the frame of your e-bike, which you can use to lock the drivepack mounted on the e-bike and thus secure it against theft etc. 1. If necessary, make sure that the drivepack is correctly attached to the e-bike. -
Page 46: Components: Bottom Bracket
BOTTOM BRACKET 16 DETAILED VIEW & PART DESIGNATIONS: BOTTOM BRACKET Chapter "Detailed view & part designations: bottom bracket"... -
Page 47: Technical Data
Part designations Interface (drivepack) Speed sensor Marking (alignment spoke magnet/speed sensor) Spoke magnet Fixing screw (spoke magnet) The numbering 1–5 within this section refers to the individual parts of the components (bottom bracket). 17 TECHNICAL DATA TECHNICAL DATA ON THE BOTTOM BRACKET 5002000201 Article number 60 Nm... -
Page 48: Correct Position/Alignment
18.1 Correct position/alignment For the drive system to function correctly, the speed sensor and spoke magnet must be correctly mounted and aligned on the rear wheel. • The spoke magnet must be positioned on the spoke so that it can move freely past the speed sensor at the marking level. - Page 49 3. If the problem cannot be solved, do not use the e-bike but contact an authorized specialist. Chapter "Using bottom bracket"...
-
Page 50: Remote
REMOTE 19 MODEL VARIANTS OF THE REMOTE Depending on the model, you operate your drive system using the model "b" remote or the model "fX" remote. Since the model variants differ both visually and in their handling, the models within this section are described separately in Chapters 20–23 (Model "b") and 24–27 (Model "fX"). - Page 51 Part designations Upper button Center button Bottom button LED display Status display Display of charging level/support level Fixing screw The numbering 1–7 within this section refers to the individual parts of the components (remote). Individual parts of other components illustrated within this section are additionally marked with the corresponding component letter.
-
Page 52: Technical Data Model "B
21 TECHNICAL DATA MODEL "b" TECHNICAL DATA ON THE REMOTE 01-2019-003-01/02 Article numbers 01-2019-010-01/02 Protection type IP54 0.165 lbs (0.075 kg) Weight, approx. 14 °F to 140 °F (-10 °C to +60 °C) Operating temperature -4 °F to 140 °F (-20 °C to +60 °C) Storage temperature 22 DISPLAYS ON MODEL "b"... -
Page 53: Display Of Charging Level/Support Level
If a "soft fault" occurs, you can continue riding your e-bike, but Fazua strongly advises against doing so in order to avoid further damage to the drive system or e-bike. -
Page 54: Using Remote Model "B
23 USING REMOTE MODEL "b" WARNING Danger due to distraction during operation! If you are distracted by the use of the remote while riding, accidents and serious injury may result. ► Before using your e-bike for the first time, familiarize yourself with the functions and handling of your remote away from road traffic. -
Page 55: Setting The Pedal Support
23.2 Setting the pedal support With the help of the remote you can set the desired support level at any time - even while riding. ► Press the upper button on the remote to switch to the next higher support level. ►... -
Page 56: Pushing Support" Mode
The maximum motor power for the "Breeze" and "River" modes can be individually configured by the manufacturer of your e-bike. ► Also note the manufacturer's specifications for your e-bike to determine how high the maximum motor power is for your e-bike in "Breeze" and "River" modes. OVERVIEW TABLE "SUPPORT LEVELS"... - Page 57 23.4.1 General information about the mode The pushing support facilitates the pushing of the e-bike. In the "Pushing support" mode your e-bike can reach a speed of up to 3.73 mph (6 km/h) depending on the gear selected. You can slow down the speed of the e-bike to your walking speed by holding or restraining the e-bike.
-
Page 58: Detailed View & Part Designations: Remotes Model "Fx
24 DETAILED VIEW & PART DESIGNATIONS: REMOTES MODEL "fX" Model "fX" Chapter "Detailed view & part designations: Control elements model "fX""... -
Page 59: Technical Data Model "Fx
Part designations Upper touch sensor Center button Lower touch sensor LED display Brightness sensor Display of charging level/support level Status display The numbering 1–7 within this section refers to the individual parts of the components (remote). Individual parts of other components illustrated within this section are additionally marked with the corresponding component letter. -
Page 60: Status Display
If a "soft fault" occurs, you can continue riding your e-bike, but Fazua strongly advises against doing so in order to avoid further damage to the drive system or e-bike. -
Page 61: Using Remote Model "Fx
• The selected support level of the pedal support: Each support level is assigned a color, i.e. the color of the LEDs on the display indicates the currently set support level. in chapter 27.3 "Levels of support".' → More detailed information can be found 27 USING REMOTE MODEL "fX"... -
Page 62: Setting The Pedal Support
27 .2 Setting the pedal support With the help of the remote you can set the desired support level at any time - even while riding. ► Tap the upper touch sensor on the remote to switch to the next higher support level. -
Page 63: Levels Of Support
27 .3 Levels of support No support (white) • The LEDs of the display on the remote light up white. • You ride without electric pedal assistance (as with a conventional bicycle). Support level "Breeze" • The LED of the display on the remote lights up green. •... -
Page 64: Rain Mode
27 .5 Rain mode The rain mode prevents rain drops from unintentionally adjusting the support level of your e-bike. If you have activated the rain mode, use the center button to set the desired support level: 1. Activate the rain mode by holding down the center button for 2 seconds. A short blue LED animation appears. -
Page 65: Switching Bicycle Lighting On And Off
3. Press the center button again once briefly to turn off the bicycle lights. 27 .7 Bluetooth connectivity You can connect your cell phone to your drive system via the Fazua app. If the connection has been established successfully, the LEDs on the remote flash 3×... -
Page 66: Battery
BATTERY 28 MODEL VARIANTS OF THE BATTERY Depending on the model, your drive system is powered by the "250" battery model or the "250 X" battery model. Since the two model variants differ in appearance, you may find different model-dependent illustrations next to each other in this section. Different handling of the model variants after automatic switch-off of the battery: The battery model "250"... -
Page 67: Detailed View & Part Designations: Battery
29 DETAILED VIEW & PART DESIGNATIONS: BATTERY Model "250" Part designations Pushbutton (battery lock) Interface (drivepack) Charging socket Charge level indicator On/off button The numbering 1–5 within this section refers to the individual parts of the components (battery). Individual parts of other components illustrated within this section are additionally marked with the corresponding component letter. -
Page 68: Technical Data
30 TECHNICAL DATA TECHNICAL DATA ON THE BATTERY Article number 5002000401 (model "250") 36 V Nominal voltage 7 Ah Nominal capacity 252 Wh Power Protection type IP54 3.1 lbs (1.4 kg) Weight, approx. 14 °F to 140 °F (-10 °C to +60 °C) Operating &... -
Page 69: Inserting The Battery Into The Drivepack
1. Check the battery for visible damage (visual check). 2. Press the on/off button on the battery once to turn on the battery: The LEDs of the charge level indicator next to the on/off button light up and indicate the current charge level of the battery. Model "250"... - Page 70 So if you have problems inserting the battery into the battery holder, it may be because you have not aligned the battery correctly. Therefore, in this case, first check the correct alignment of the battery and try inserting it again. If the battery cannot be inserted into the battery receptacle despite correct alignment, this may indicate that one of the components is damaged.
-
Page 71: Removing The Battery From The Drivepack
31.3 Removing the battery from the drivepack CAUTION Pinch risk! You can pinch your fingers when removing the battery from the drivepack. ► When pressing the push button or removing the battery, be careful not to pinch your fingers. 1. Hold the drivepack with one hand and secure the battery with the other. 2. -
Page 72: Charging The Battery
If you handle the battery improperly or try to charge it with an incompatible charger you could cause a fire. ► To charge the battery, use only original and compatible evation chargers from Fazua. ► The charger and battery heat up during charging, so keep away from combustible materials. -
Page 73: Charging Process
31.5.1 Connect battery to the charger 1. Insert the charging plug into the charging socket on the battery. Since the charging plug is magnetically coded, it can only be plugged in in the intended position. 2. Plug the power plug into a suitable wall outlet to establish the power connection. -
Page 74: Battery Charge Level Indicator
31.7 Battery charge level indicator As soon as you have switched on the battery, the charge status display automatically shows a start animation. Immediately afterwards, the LEDs briefly indicate the current charge level of the battery. Depending on the charge level, the number of LEDs varies, with each LED representing 20% of the capacity. -
Page 75: Charger
CHARGER 32 DETAILED VIEW & PART DESIGNATIONS: CHARGER Model "DZL" Part designations Mains adapter Charging cable Charging plug Mains cable Mains plug (power supply)* Plug Mains socket LED display * Different from country to country, therefore without illustration. The numbering 1–8 within this section refers to the individual parts of the components (charger). -
Page 76: Technical Data
33 TECHNICAL DATA TECHNICAL DATA ON THE CHARGER 5002000501 (model "DZL"), Article number 100–240 V AC Nominal input voltage 50/60 Hz Frequency Charging current 3.5 h Charging time, approx. Protection class 2 [symbol: Protection type IP54 Weight, approx. 1.3 lbs (0.6 kg) 32 °F to 113 (0°C to +45 °C) Operating temperature Storage temperature... -
Page 77: Using Charger
► During charging place the charger and battery on a well ventilated surface. ► Only use the charger to charge the original and compatible evation battery from Fazua. Never attempt to charge non-rechargeable batteries! 34.1 Prepare charger 1. Take the power supply unit and the power cord with you. -
Page 78: Connector Charger To The Battery
34.2 Connector charger to the battery WARNING Risk of electric shock! If the mains connection is incorrect, you and others may be exposed to the risk of electric shock. ► First connect the charger to the battery before you connect the charger to the power supply. -
Page 79: Unplug Charger From Battery
34.3 Unplug charger from battery WARNING Risk of electric shock! If the mains connection is incorrect, you and others may be exposed to the risk of electric shock. ► First disconnect the charger from the power supply before you disconnect the charger from the battery. 1. - Page 84 Fazua GmbH Marie-Curie-Straße 6 85521 Ottobrunn, Germany www.fazua.com version 2 (09|2019)
Need help?
Do you have a question about the Evation and is the answer not in the manual?
Questions and answers