Advertisement
Quick Links
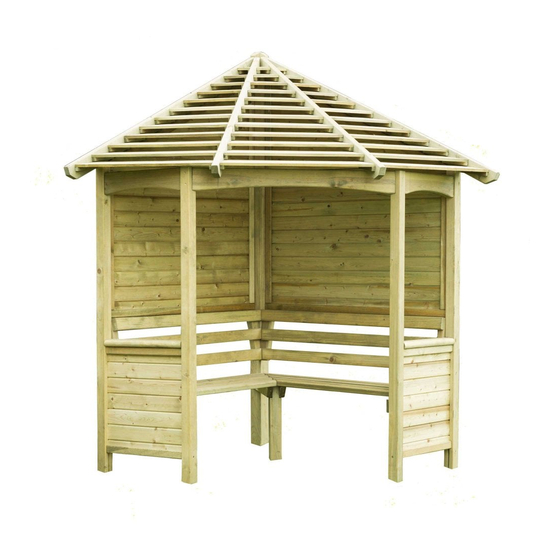
Venetian Corner Arbour
IMPORTANT, RETAIN FOR FUTURE REFERENCE;
READ CAREFULLY
- Always pre-drill the timber to avoid splitting.
- The timber in this product is pressure treated to
ensure longevity and protection against rot. This may
leave colour variations, but these will even out as the
moisture content stabilises
- Timber is a natural material and will shrink and swell
as a result of varying moisture content.
- Please keep all plastic bags and small parts away
from children
- Warning. Only for domestic use
- This product must be built on a solid level base.
Technical Help line: 0333 7777 089 8.30 am and 5.00
pm Monday to Friday.
In line with your statutory rights, please check all parts
prior to assembly, as assembly of damaged parts may
be deemed to be acceptance and this may affect the
remedies you are entitled to. If the product is not
constructed in accordance with the instructions, or is
altered in anyway (e.g. painted), the manufacturer
cannot be held liable for any resulting damage.
Fixing Pack (ACARBFP)
Not to Scale
M8 x 70mm COACH BOLT Qty 2
M8 x 70mm NUT Qty 2
M8 Washer Qty 2
60mm SCREW Qty 8
25mm SCREW Qty 138
70mm SCREW Qty 36
90mm SCREW Qty 4
100mm SCREW Qty 4
120mm SCREW Qty 4
DRILL
SPIRIT LEVEL
TAPE MEASURE
POZI DRIVE SCREWDRIVER
HAMMER
Important :
Assembly of this
arbour requires a
minimum of two
MUST PRE DRILL
adults.
CARB PARTS LIST
A
B
ACARBLHPA
ACARBRHPA
LEFT HAND PANEL
RIGHT HAND PANEL
H
ACARBCPBS
LARGE CORNER POST
M
L
ACARBRHBB
RIGHT HAND BENCH BACK
ROOF PACK
R1
ACARBRB12 Qty 3
R2
ACARBRB11 Qty 3
R3
ACARBRB10 Qty 3
1
H
H
Slot the two posts together and fix using the two coach bolts.
C
D
ACARBBI
ACARBTINS
BACK INSERT Qty 2
TOP INSERT Qty 2
I
J
ACARBCPTS
LARGE CORNER POST TOP
N
ACARBLHBB
LEFT HAND BENCH BACK
LEFT HAND BENCH
R4
ACARBRB9 Qty 3
R5
ACARBRB8 Qty 3
R6
ACARBRB7 Qty 3
2
I
Panel flush with
the top of the
angled post
Fix the back insert to the left hand panel using 2 x 70mm screws, screwing through the back insert's
framework into the post. (Make sure the insert is inline with the back and top of the left hand panel.)
Place the assembled post against the back insert and fix the insert to the post using 2 x 70mm
(USE A TAPE MEASURE TO MAKE SURE THE POST IS IN LINE WITH THE BOTTOM OF THE SIDE PANEL.)
E
ACARBLHORA
LEFT HAND RAFTER
F
ACARBRHORA
RIGHT HAND RAFTER
G
ACARBIRA
INNER RAFTER Qty 2
K
ACARBRS
ROOF SUPPORT
O
ACARBLHB
R10
R7
ACARBRB6 Qty 3
R8
R11
ACARBRB5 Qty 3
R9
R12
ACARBRB4 Qty 3
C
A
screws.
Issue 0214
Profile
Profile
Profile
Profile
ACARBSL
BENCH LEG
ACARBRHB
RIGHT HAND BENCH
ACARBRB3 Qty 3
ACARBRB2 Qty 3
ACARBRB1 Qty 3
A
C
Advertisement

Related Manuals for Forest garden Venetian Corner Arbour


Summary of Contents for Forest garden Venetian Corner Arbour
- Page 1 Issue 0214 Venetian Corner Arbour CARB PARTS LIST Profile IMPORTANT, RETAIN FOR FUTURE REFERENCE; ACARBLHORA READ CAREFULLY LEFT HAND RAFTER Profile - Always pre-drill the timber to avoid splitting. - The timber in this product is pressure treated to ACARBRHORA RIGHT HAND RAFTER ensure longevity and protection against rot.
- Page 2 2 x 25mm SCREWS ONLY Panel flush to the outside Note: Please take care when working at Height. The roof is not load bearing. Hint: You may wish to add a small bead of silicon to seal the ends of each board.
Need help?
Do you have a question about the Venetian Corner Arbour and is the answer not in the manual?
Questions and answers