Table of Contents
Advertisement
Mira ERD Thermostatic Bar Valve
Installation and User Guide
These instructions must be left with the user
Model Name:
Product Code:
Date of Manufacture:
(Please keep these details safe as you will need them when registering your
product guarantee. Your guarantee information is included in this guide.)
Affix Sticker Here
1
For SPARES,
ADVICE or REPAIRS
please call us free
on 0800 001 4040
(UK only)
1393516-W2-A
Advertisement
Table of Contents

Related Manuals for Kohler Mira ERD


Summary of Contents for Kohler Mira ERD
- Page 1 Mira ERD Thermostatic Bar Valve Installation and User Guide For SPARES, ADVICE or REPAIRS please call us free on 0800 001 4040 (UK only) These instructions must be left with the user Model Name: Affix Sticker Here Product Code: Date of Manufacture: (Please keep these details safe as you will need them when registering your product guarantee.
- Page 2 Products manufactured by Kohler Mira Ltd are designed to be safe, provided that they are installed, used and maintained in good working order, in accordance with our instructions and recommendations.
-
Page 3: Pack Contents
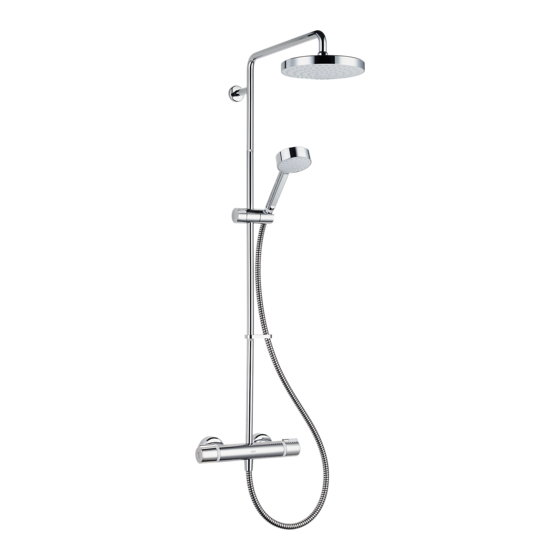
Pack Contents Note: Only 1 pair of handles and 1 pair of concealing plates are provided and differ depending on product purchased. Assist and React Only 2 x 6 l/min Flow Regulator 1 x Bar Valve 1 x Pair of Handles ... - Page 4 1 x Mounting Bracket 1 x Concealing Cover 2 x Fixing Screws 1 x Grubscrew 1 x Overhead 1 x Riser Arm 1 x Middle Pipe 1 x Handset 2 x Hose Washer (Included with Hose) ...
- Page 5 Dimensions 1065 mm 85 mm 150 mm 105 mm 305 mm 1393516-W2-A...
-
Page 6: Recommended Usage
Ensure that any pipework that could become frozen is properly insulated. DO NOT perform any unspecified modifications to the shower or its accessories. When servicing only use genuine Kohler Mira replacement parts. If the shower is dismantled during installation or servicing then, upon completion, an inspection must be made to ensure all connections are tight and that there are no leaks. - Page 7 Using the Shower The shower must be operated and maintained in accordance with the requirements of this guide. Make sure you fully understand how to operate the shower before use, read all instructions and retain this guide for future reference. DO NOT switch the shower on if there is a possibility that the water in the shower unit or fittings is frozen.
-
Page 8: Specifications
Specifications Pressures Maximum Static Pressure 1000 kPa (10 bar) Maximum Maintained Pressure 500 kPa (5 bar) Minimum Maintained Pressure 100 kPa (1 bar) (Gas Water Heater) (for optimum performance supplies should be nominally equal) Minimum Maintained Pressure 10 kPa (0.1 bar) (Gravity System) (0.1 bar = 1 Metre head from cold tank base to shower handset outlet) -
Page 9: Installation
Suitable Plumbing Installations The Thermostatic Mixer can be installed with all systems with balanced pressures. Mixed gravity and mains supplies are not recommended. Installation Warning! This product does not allow for reversed inlets and will deliver unstable temperatures if fitted incorrectly. General Installation of the shower must be carried out in accordance with these instructions by qualified, competent personnel. - Page 10 11. The water supplies to this product should be isolated if the product is not to be used for a long period of time. If the product or pipework is at risk of freezing during this period they should also be drained of water. 12.
- Page 11 Installation of the Bar Valve Note: Ensure the bar valve is installed at a height suitable to be able to fit the overhead shower fittings. A shorter 135 mm length pipe is available from Mira Customer Services if required. 25 mm 25 mm COLD Plastic Pipe...
- Page 12 Install the olives and the connectors. Turn on the water supply and flush the Tighten finger tight and then another pipework. 1/4 to 1/2 turn. Attach the bar valve to the wall fixings. Note: Make sure that the sealing washer/filter is installed in each inlet.
- Page 13 Installation of the Shower Fittings Riser Arm Fixed Showerhead Mounting Boss Wall Fixing Bracket Riser Middle Bar Concealing Showerhead Cover Clamp Bracket Red Protective Cover or White label. Remove before Fitting. Hose Hose Retaining Ring Lower Bar 1393516-W2-A...
- Page 14 Slide the clamp bracket and hose retaining ring onto the middle bar, and then screw the middle and lower bar sections together. Screw the riser arm to the middle and lower bar section. Push the riser bar into the top of the bar DO NOT install the grub screw until valve.
- Page 15 Refit the riser bar into the bar valve and then put the concealing cover onto the riser arm mounting boss. Push the riser arm mounting boss onto the wall fixing bracket. Fit and tighten the grubscrew (2.5 mm hexagonal key) into the hole on top of the mounting boss then push the concealing cover over the wall fixing bracket.
- Page 16 Commissioning Maximum Temperature Setting Before using the shower, the maximum temperature must be checked to make sure that it is at a safe level. It has been preset to a safe showering temperature under ideal conditions at the factory, appropriate for most systems. However, site conditions and personal preference may make it necessary to reset this temperature.
-
Page 17: Operation
Cleaning Cleaning Many household and commercial cleaners, including hand and surface cleaning wipes contain abrasives and chemical substances that can damage plastics, plating and printing and should not be used. These finishes should be cleaned with a mild washing up detergent or soap solution, and then wiped dry using a soft cloth. Important! The showerhead must be de scaled regularly, keeping the showerhead clean and free from lime scale will ensure that your shower and showerhead continue to perform to their maximum. -
Page 18: Fault Diagnosis
Fault Diagnosis If you require a Mira trained service engineer or agent, refer to ‘Customer Service’. Symptom Cause / R ectification Water too hot or too cold Inlets reversed (hot supply to cold supply).Rework inlet pipework. Check filters for any blockage. Check the maximum temperature setting (If you have a combination type boiler it may not be producing sufficient hot water at the desired flow rate). - Page 19 We’ll use your information: (i) As necessary to fulfil our contract with you (including to recover We, along with other members of our Group and Kohler Mira any amounts owing); (ii) for our legitimate interests in: undertaking Limited may use your information to tell you about any offers, marketing (about our products and services and those of our third products or services which may be of interest to you.
-
Page 20: Customer Service
TMV2 or E-mail: TMV3 healthcare schemes. CustomerServiceEire@mirashowers.com ● Accidental or wilful damage. Mira is a registered trade mark of Kohler Mira Limited. The company reserves the right to alter product specifications without notice. 14648 1393516-W2-A © Kohler Mira Limited, November 2019... - Page 21 Check out our full range of Showers Electric Showers Digital Showers Mixer Showers Power Showers Smart Showers Shower Towers From Top Shower Brands Mira Showers Aqualisa Showers Triton Showers Gainsborough Showers Shower Pumps can upgrade your showering experience even more Stuart Turner Shower Pumps Salamander Shower Pumps Grundfos Shower Pumps...
Need help?
Do you have a question about the Mira ERD and is the answer not in the manual?
Questions and answers